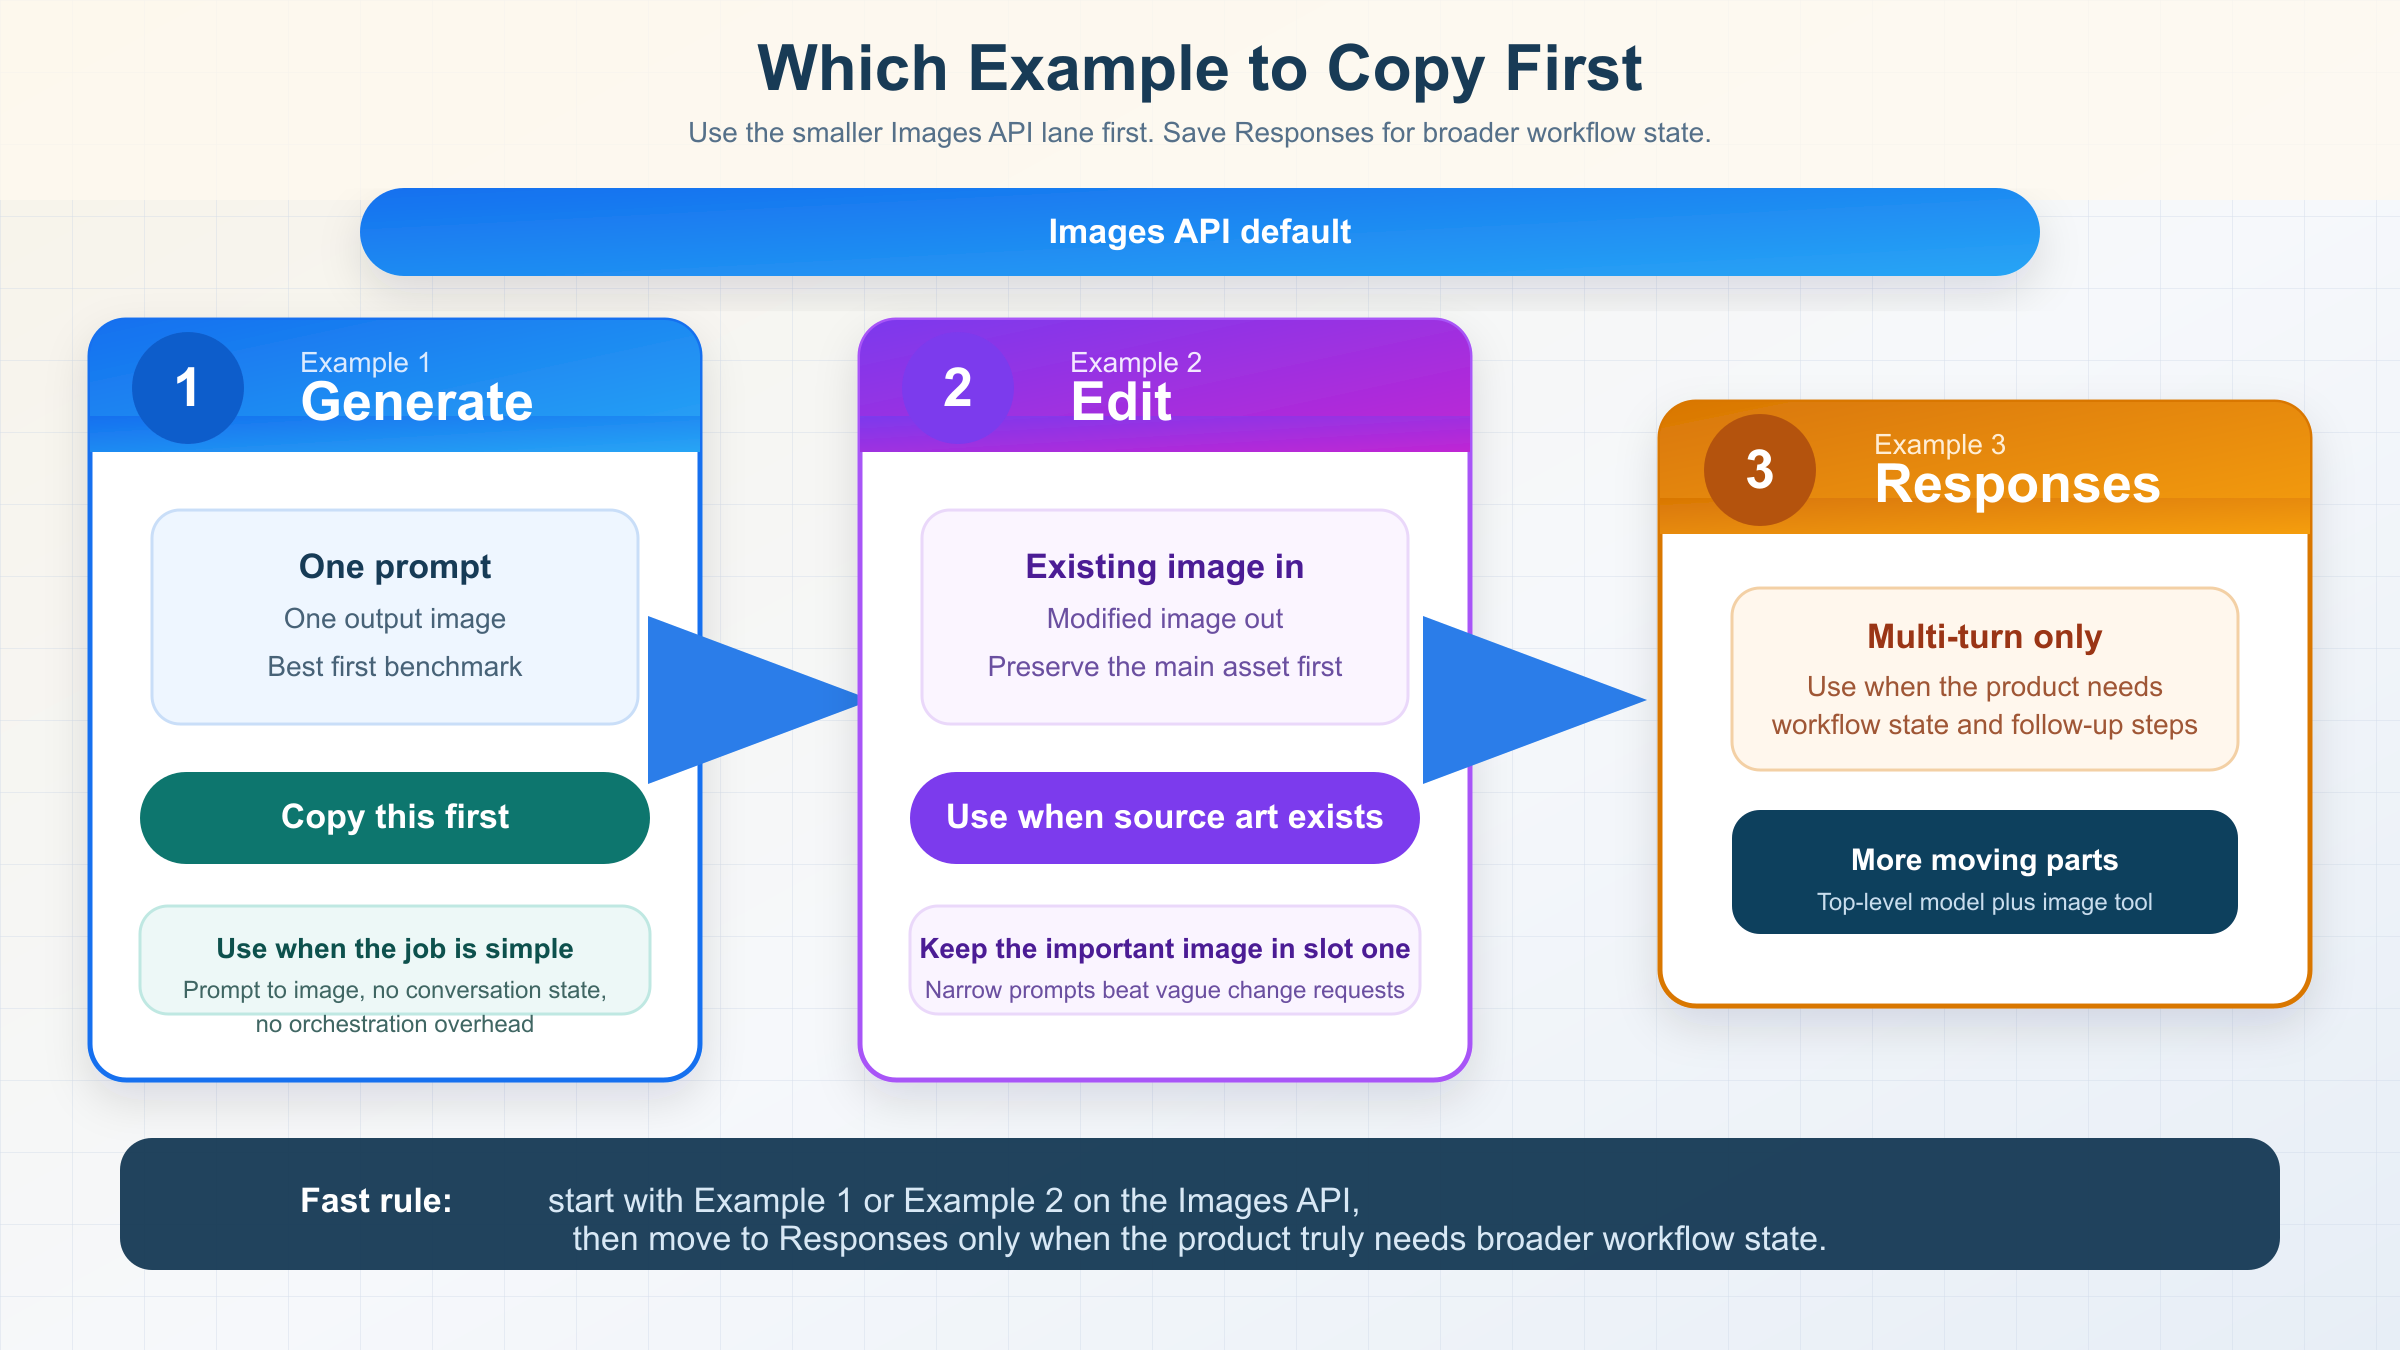
If you want gpt-image-1-mini examples that still work on March 29, 2026, start with the Images API for one-shot generation or direct edits, and use Responses only when you actually need multi-turn image workflows. That is the simplest current rule the exact-query SERP still fails to state clearly.
That ordering comes straight from OpenAI's current docs. The official image generation guide still says the Image API is the best choice when you only need to generate or edit a single image from one prompt, while Responses is for conversational or multi-step image flows. The current gpt-image-1-mini model page confirms that mini is OpenAI's cost-efficient GPT Image lane, not the best-experience default for every image job.
That is why the three examples below are the ones worth copying first. If you only need prompt-to-image output, copy Example 1. If you already have an image and want a direct edit, copy Example 2. If your product really needs follow-up refinement across turns, jump to Example 3. Everything else is optimization.
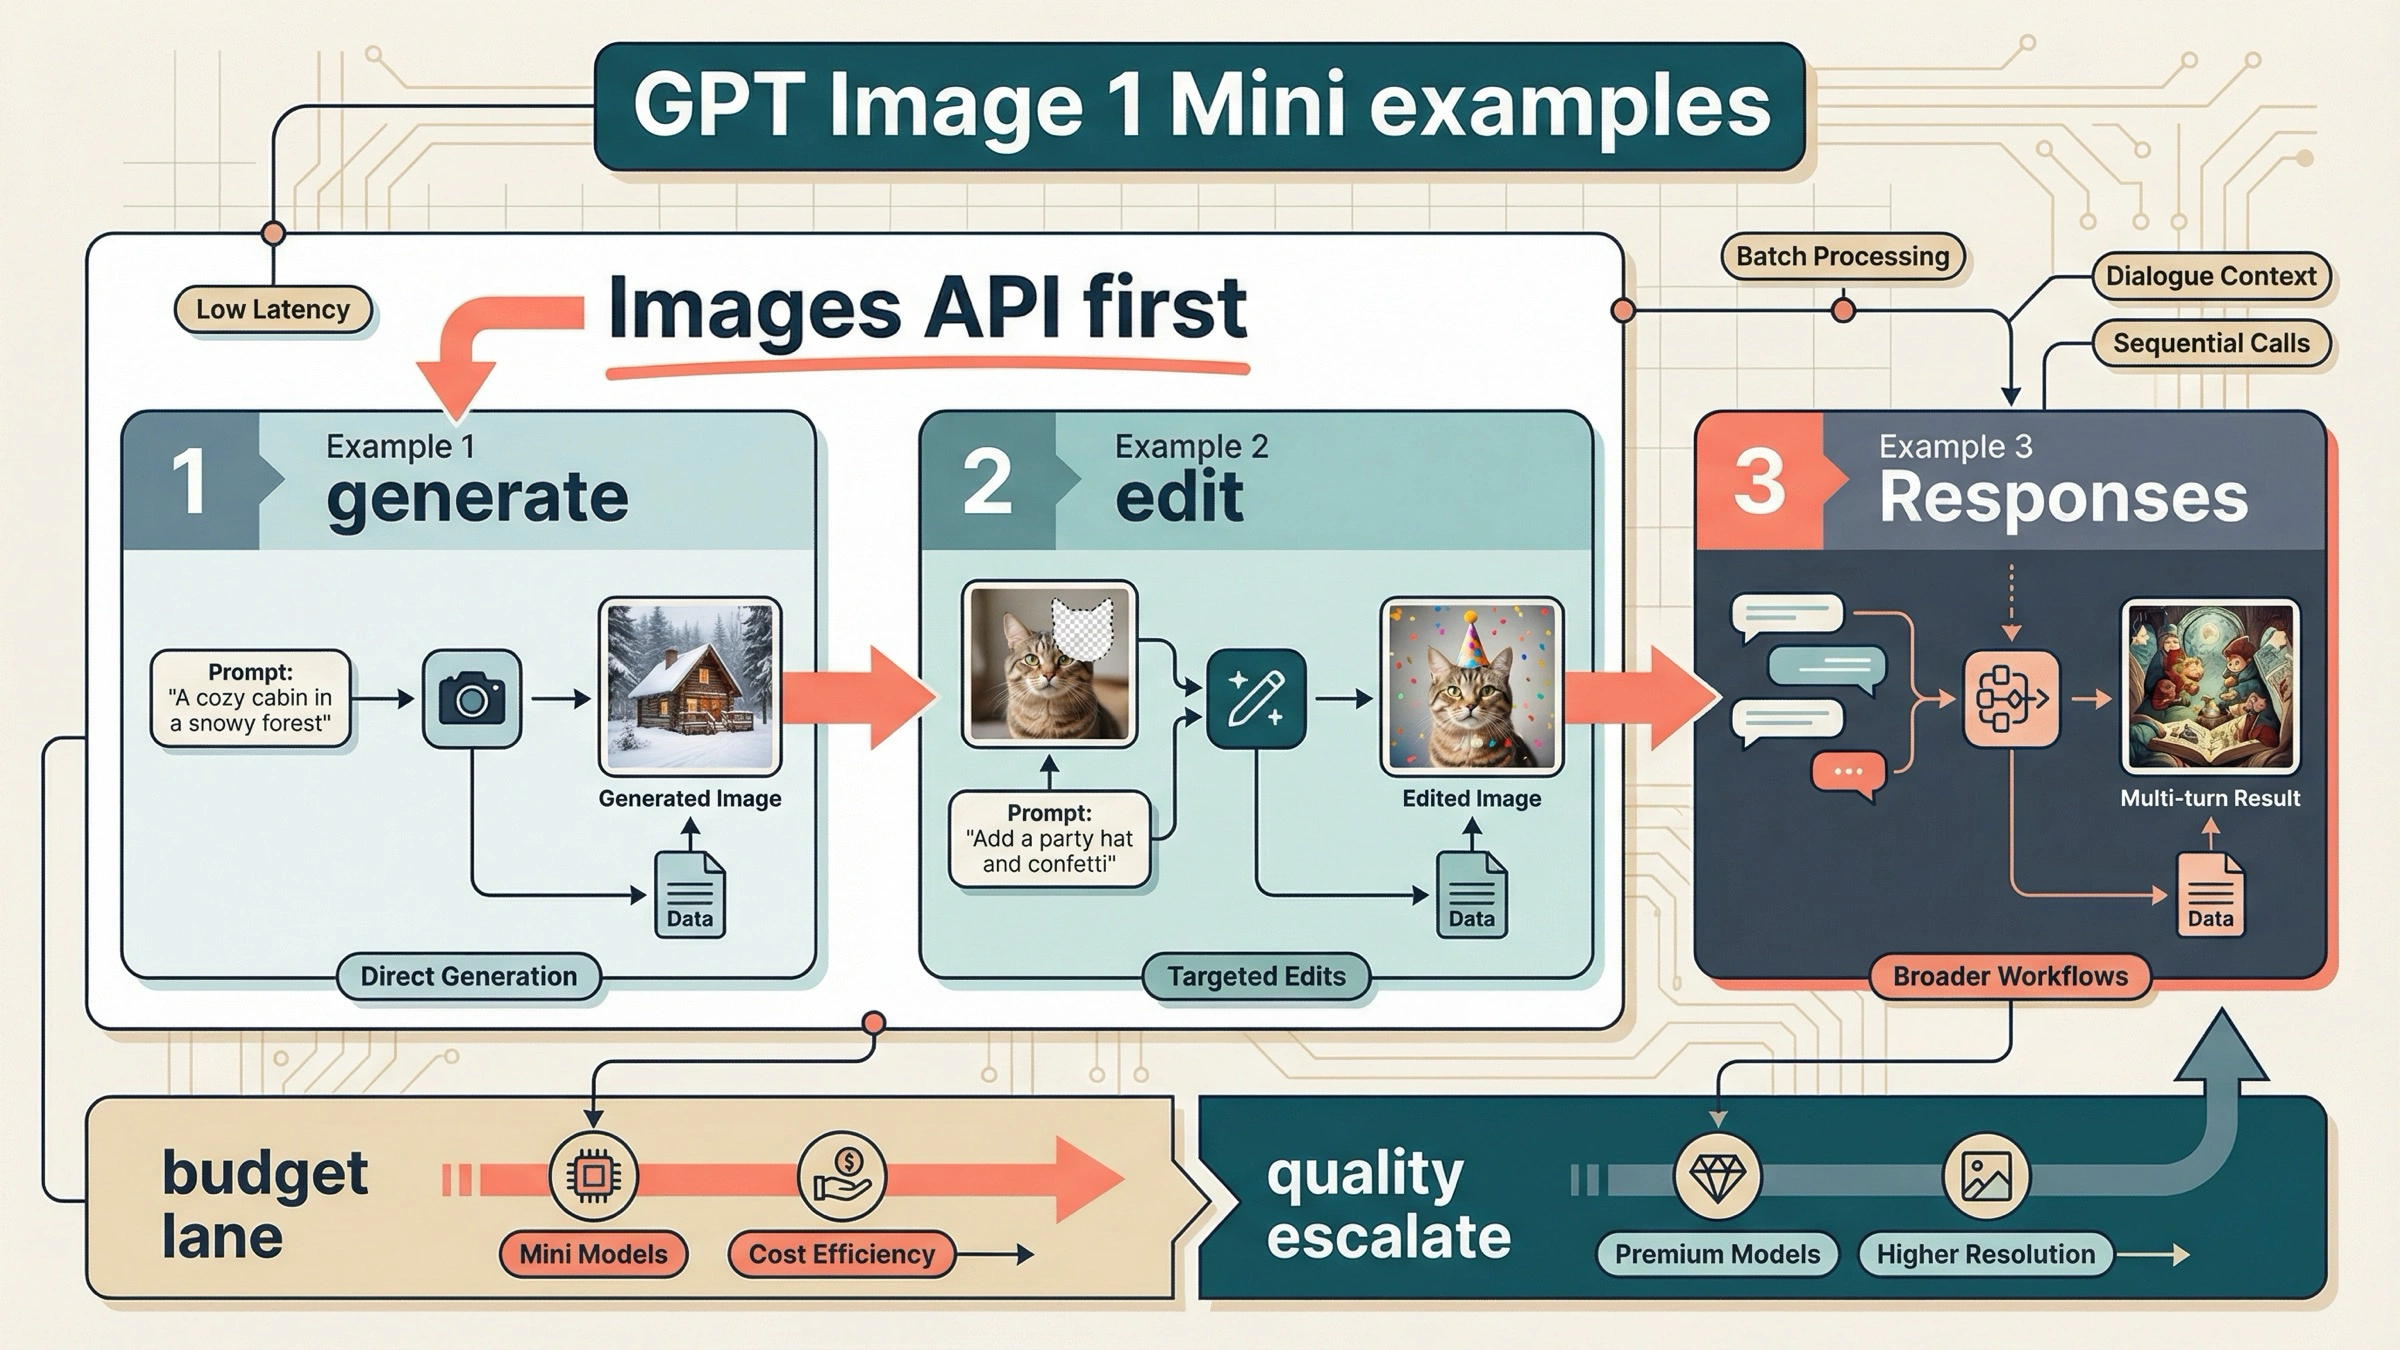
The 3 gpt-image-1-mini examples worth copying first
The exact examples query is crowded with model directories, example galleries, and gateway playgrounds. Most of them are useful for discovery, but they do not tell you what to do first. This table is the shortest honest answer.
| If you need... | Copy this example | API surface | Start here because |
|---|---|---|---|
| One prompt, one output image | Example 1 | Images API | It is the smallest official route and the easiest first success target |
| A direct edit to an existing image | Example 2 | Images API | OpenAI still recommends the direct image route for one-shot edits, and mini-specific fidelity details matter here |
| Iterative image refinement across turns | Example 3 | Responses API | This is the point where conversation state and hosted image-generation tooling actually justify the bigger abstraction |
There is one more shortcut worth remembering before the code starts. The current tool guide says image prompts work best when you use direct verbs like draw or edit. That is a small detail, but it makes weak example pages easier to spot. Pages that only dump one-line code without explaining how to prompt the model are usually not trying to get you to a reliable first result.
If you want a broader OpenAI image example page centered on the flagship lane instead of mini, read OpenAI image generation API example after this. This article is narrower on purpose: it is only about which mini patterns are still worth copying.
Example 1: one-shot image generation on the Images API
This is the safest first mini example because it keeps the whole failure surface small. You send one prompt, you get back base64 image bytes, and you save them to disk. No conversation state. No hosted tool routing. No ambiguity about whether you chose the wrong surface.
jsimport fs from "fs";
import OpenAI from "openai";

const client = new OpenAI({
  apiKey: process.env.OPENAI_API_KEY,
});

const result = await client.images.generate({
  model: "gpt-image-1-mini",
  prompt:
    "Draw a clean editorial illustration of a robot street photographer in bright morning light.",
  size: "1024x1024",
  quality: "medium",
  output_format: "jpeg",
  output_compression: 80,
});

const imageBase64 = result.data[0].b64_json;
fs.writeFileSync(
  "gpt-image-1-mini-generate.jpg",
  Buffer.from(imageBase64, "base64")
);
The matching Python version is just as direct:
pythonfrom openai import OpenAI
import base64

client = OpenAI()

result = client.images.generate(
    model="gpt-image-1-mini",
    prompt="Draw a clean editorial illustration of a robot street photographer in bright morning light.",
    size="1024x1024",
    quality="medium",
    output_format="jpeg",
    output_compression=80,
)

image_base64 = result.data[0].b64_json

with open("gpt-image-1-mini-generate.jpg", "wb") as f:
    f.write(base64.b64decode(image_base64))
And here is the raw cURL shape:
bashcurl https://api.openai.com/v1/images/generations \
  -H "Authorization: Bearer $OPENAI_API_KEY" \
  -H "Content-Type: application/json" \
  -d '{
    "model": "gpt-image-1-mini",
    "prompt": "Draw a clean editorial illustration of a robot street photographer in bright morning light.",
    "size": "1024x1024",
    "quality": "medium",
    "output_format": "jpeg",
    "output_compression": 80
  }' \
  | jq -r '.data[0].b64_json' \
  | base64 --decode > gpt-image-1-mini-generate.jpg
This example is the right default for two reasons.
First, it matches OpenAI's current route rule. The image generation guide still says the Image API is the best choice when you only need one image job from one prompt. That means the example is not only simple. It is aligned with the official product surface.
Second, it is the best way to test whether mini is even the right lane for your workload. OpenAI's current guide recommends GPT Image 1.5 for the best experience, but if your real goal is lower-cost generation, this example gives you the cheapest official OpenAI path to benchmark first. If the result is already good enough, you keep mini. If it is not, then you have learned something real before you scale the wrong lane.
Keep the first request boring on purpose. Use a square image, medium quality, and a prompt that clearly says draw. Save the file. Confirm that the bytes decode correctly. After that, you can add transparency, streaming, or more specific art direction. Before that, complexity is usually wasted motion.
The practical reason to start this way is that quality is your first cost and latency knob. On the official mini model page, the jump from 1024x1024 low at $0.005 to medium at $0.011 and high at $0.036 is large enough that you should not default to high just because it sounds safer. If your app is generating drafts, concept frames, or low-stakes marketing variants, medium is the better first benchmark. Move upward only after you see a real quality gap.
This example is also where prompt shape matters more than most gallery pages admit. Mini responds better when the prompt tells it what to make, what visual style to use, and what details must not be omitted. A vague prompt like "make a cool robot photo" is not a fair model test. A narrower prompt like "Draw a clean editorial illustration of a robot street photographer in bright morning light, with a visible camera strap and soft city reflections in the shop window" gives you a cleaner read on whether mini is good enough for your product.
| Parameter | Safe first value | Change it when |
|---|---|---|
size | 1024x1024 | You have a real product need for a different aspect ratio or downstream crop |
quality | medium | You have measured that low is too weak or that high pays for itself |
output_format | jpeg | Your downstream workflow needs a different file type or stronger editing tolerance |
output_compression | 80 | File size or visible compression artifacts matter more than a simple first success |
That table looks basic, but it is exactly the layer missing from thin example pages. A strong first example is not the one with the most optional flags. It is the one that gives you a stable baseline before you start making quality, format, and cost tradeoffs.
Example 2: direct image edits with input_fidelity
If you already have a source image and want to modify it, stay on the Images API. The current docs still treat direct edits as part of the same simpler route. You do not need to jump to Responses just because the job is no longer pure text-to-image.
jsimport fs from "fs";
import OpenAI from "openai";

const client = new OpenAI({
  apiKey: process.env.OPENAI_API_KEY,
});

const result = await client.images.edit({
  model: "gpt-image-1-mini",
  image: [
    fs.createReadStream("product-photo.jpg"),
    fs.createReadStream("brand-logo.png"),
  ],
  prompt:
    "Edit the first image by placing the logo from the second image onto the coffee cup label. Preserve the cup shape, lighting, camera angle, and table texture.",
  input_fidelity: "high",
  size: "1024x1024",
  quality: "medium",
});

const imageBase64 = result.data[0].b64_json;
fs.writeFileSync(
  "product-photo-edited.png",
  Buffer.from(imageBase64, "base64")
);
This is the example where mini-specific detail actually matters.
OpenAI's current input fidelity documentation says that when you use gpt-image-1 or gpt-image-1-mini with input_fidelity: "high", the first input image is preserved with richer textures and finer details than later ones. So if one face, product, or logo is more important than everything else, put that asset in slot one.
That is the detail most page-one wrappers skip. They show that edits exist, but they do not tell you what actually changes the result quality.
There are three practical rules to keep in your head for mini edits:
- Put the most important source asset first.
- Use
input_fidelity: "high"only when preserving details matters enough to justify higher image-input token usage. - Keep your edit instruction narrow. Tell the model what to change, but also tell it what must stay unchanged.
If you add a mask later, remember that GPT Image edits are still prompt-driven rather than pixel-perfect local patching. The image guide says the image and mask should match in size and format, and the mask needs an alpha channel. That is useful for steering, but it is not Photoshop-style deterministic surgery.
There is also an integration detail that trips up teams moving from SDK examples to raw HTTP. The SDK hides the multipart form-data mechanics for you. If you reimplement the same edit call over raw HTTP, you need to send the image files as actual file parts rather than JSON-encoding the binary content. That sounds obvious, but it is one of the main reasons a wrapper example can look "simpler" than an official example while silently omitting the part you need in production.
The safest mental model for multi-image edits is this: the first image is the canvas you most care about preserving, and the later images are reference assets you want the model to borrow from. That mental model is not a full guarantee of deterministic compositing, but it does align with the official high-fidelity rule and usually produces better prompts. In other words, do not bury the important source image in slot two or three and then wonder why the output drifted.
If you need to preserve a product shot, use a prompt that names the preserved details explicitly: lighting, angle, texture, framing, and anything else that would make a human reviewer reject the edit. The model is still doing generative editing, so "add the logo" by itself is weaker than "add the logo while preserving the existing ceramic cup texture, front-facing label position, overhead café lighting, and shallow depth of field."
If your whole project is really about direct mini edits rather than examples more broadly, the deeper follow-up is GPT Image 1 Mini edit. This page stays at the example-selection layer.
Example 3: multi-turn image workflows on Responses
This is the example to use only when the product genuinely needs conversation state or iterative follow-up edits. It is not the first example to copy for a one-request job.
The reason is subtle but important. In the Responses API, the top-level model is a text-capable mainline model such as gpt-5 or gpt-4.1. The hosted image_generation tool uses GPT Image models underneath, but gpt-image-1-mini is not the value you put in the top-level model field. That is one of the easiest mistakes thin wrapper examples still encourage.
jsimport fs from "fs";
import OpenAI from "openai";

const client = new OpenAI({
  apiKey: process.env.OPENAI_API_KEY,
});

const response = await client.responses.create({
  model: "gpt-5",
  input:
    "Generate an image of a gray tabby cat reading a newspaper at a cafe table.",
  tools: [{ type: "image_generation" }],
});

const firstImage = response.output
  .filter((item) => item.type === "image_generation_call")
  .map((item) => item.result)[0];

fs.writeFileSync("cat-cafe.png", Buffer.from(firstImage, "base64"));

const followUp = await client.responses.create({
  model: "gpt-5",
  previous_response_id: response.id,
  input: "Now make it look like a realistic magazine photo.",
  tools: [{ type: "image_generation" }],
});

const secondImage = followUp.output
  .filter((item) => item.type === "image_generation_call")
  .map((item) => item.result)[0];

fs.writeFileSync("cat-cafe-realistic.png", Buffer.from(secondImage, "base64"));
This is the right route when the image job is not really a one-shot image job anymore. It is the right route when your product needs image memory across turns, or when image generation is only one tool inside a bigger agent workflow.
It is the wrong route when your product need is still simple.
That is the part the exact-query SERP keeps muddying. Gateway and playground pages make Responses look like the more modern answer. OpenAI's own docs are more precise than that. The more modern answer is the one that matches the job. For simple generation or simple edits, the smaller Images API route is still the cleaner official default.
There is one more reason to keep this example in third place: Responses adds two decision layers at once. You now have to choose the top-level reasoning model, and you also have to reason about when to call image generation inside a larger workflow. That can be the correct architecture for an assistant, but it is a worse debugging surface for a first mini benchmark. If you have not already proven that mini gives you acceptable image quality on the direct Images API, Responses usually makes the experiment harder to interpret, not easier.
That is also why I would not treat the Responses example as proof that mini has a dedicated mini-only tool switch. The current OpenAI tool guide documents the broader image_generation workflow, but it does not frame gpt-image-1-mini as the top-level Responses model value. So the right lesson to copy is the architecture pattern, not a made-up shortcut parameter that a third-party playground invented.
Setup checks before you blame the examples
Mini is the cheap image lane, but it is not a free lane.
As checked on March 29, 2026, the official mini model page lists 1024x1024 output prices of $0.005 low, $0.011 medium, and $0.036 high. The same page also says Free is not supported, and it lists Tier 1 starting at 100,000 TPM and 5 IPM.
That matters because a good example can still fail if your account is not ready for the model.
OpenAI's current model availability article says gpt-image-1 and gpt-image-1-mini are available to API users on tiers 1 through 5, with some access subject to organization verification. The current organization verification article adds the operational branch that example galleries usually skip: verification can unlock image-generation capabilities, the status can take up to 30 minutes to propagate, and generating a new API key often resolves lingering not verified errors.
That gives you a clean debugging order:
- Confirm the API key belongs to the correct project and organization.
- Confirm the account is on a tier that supports mini image access.
- If access still looks blocked, confirm the organization verification state.
- Wait the full 30 minutes if verification just completed.
- Generate a new API key before you rewrite a working example.
If your blocker is really access state rather than example quality, the better next read is OpenAI image generation API verification.
Troubleshooting common gpt-image-1-mini example failures
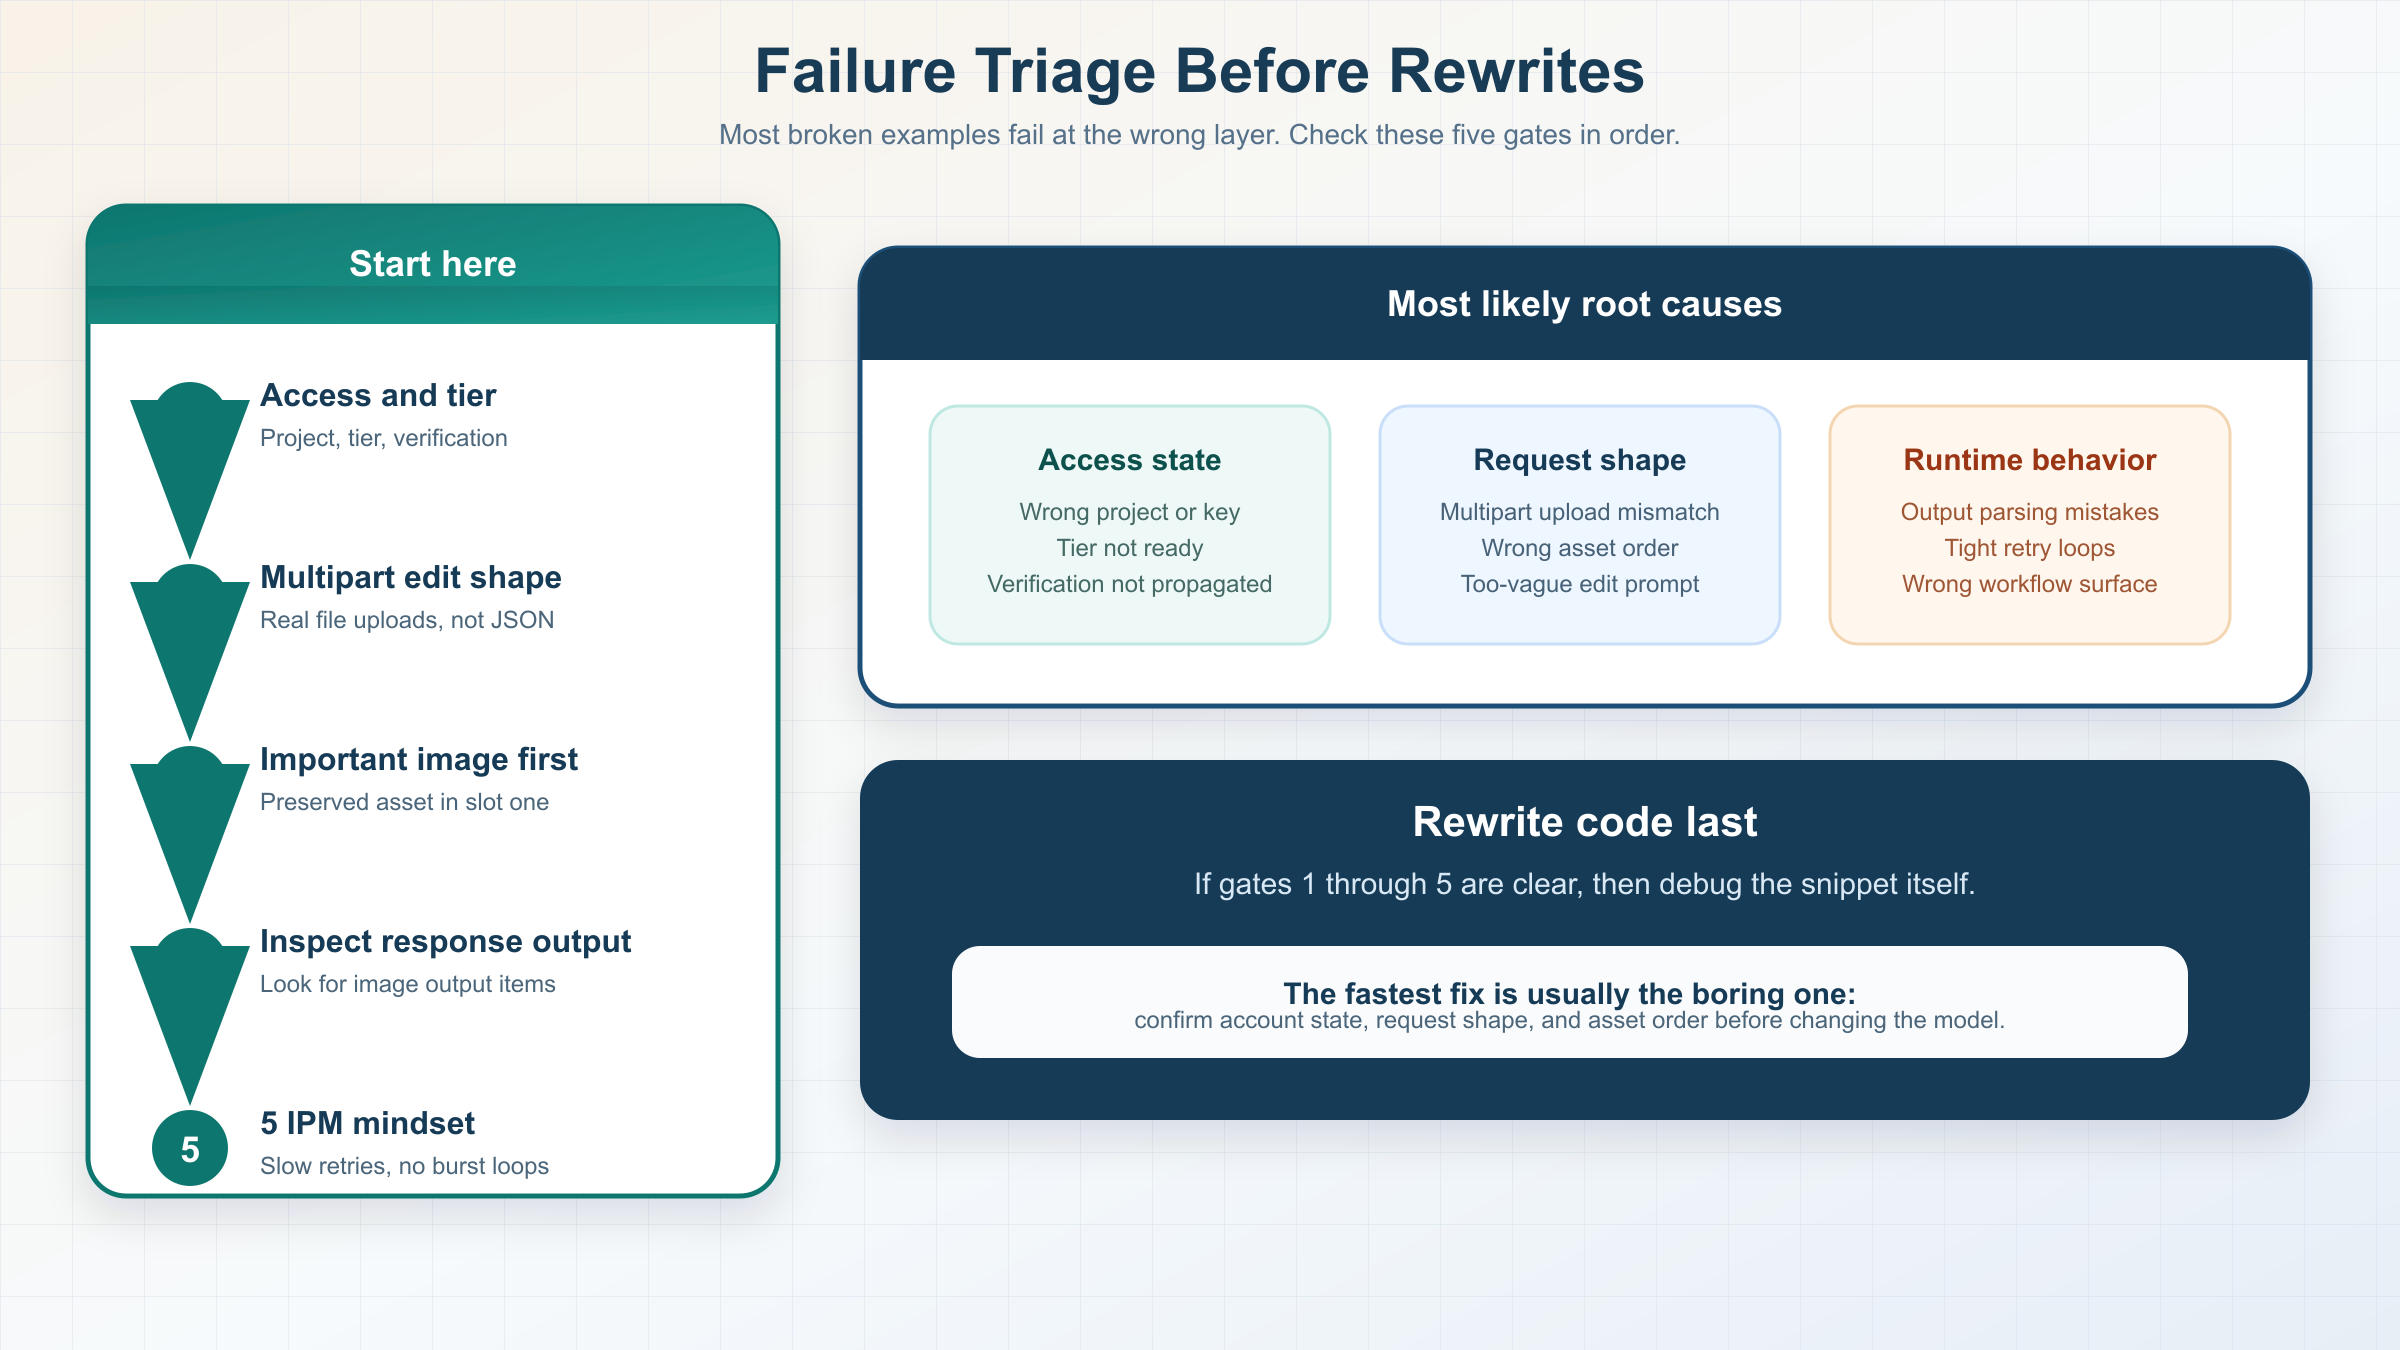
When a copied example fails, the root cause is usually more boring than the SERP makes it look. Most failures come from choosing the wrong surface, using the right surface with the wrong request shape, or debugging account state too late.
| Symptom | Likely cause | What to check first |
|---|---|---|
| The generation example returns access or availability errors | The project, tier, or verification state is not ready for mini | Confirm the org, tier, verification state, and whether the API key was created after verification finished |
| The edit example runs but ignores the reference asset | The important image was not first, or the prompt did not state what must stay fixed | Put the preserved image first and rewrite the prompt around preserved details, not just the change |
| The edit request fails after moving off the SDK | The raw request is not sending multipart file uploads correctly | Rebuild the call as multipart form-data with real file parts instead of JSON-wrapped binaries |
| The Responses example returns text but no usable image output | The workflow is handling the response output incorrectly or the tool route is not what you meant to test | Inspect response.output for image_generation_call items and prove the architecture need before using Responses |
| You hit rate limits surprisingly early | Mini image quotas are much smaller than text-model habits suggest | Check the official IPM figure, slow retries, and stop hammering the same example in a tight loop |
The last row is worth underlining. As of March 29, 2026, the official mini model page shows Tier 1 at 5 IPM. That is tiny compared with how many developers habitually test chat or text endpoints. If you rerun the same image example several times while also changing prompts or asset order, you can create what feels like a random failure when the real issue is simply minute-level image throughput.
If the generation example works but the edit example does not, the most likely explanation is not "mini edits are broken." It is usually that the asset order, prompt scope, or multipart request shape changed. If the direct Images API examples work but the Responses example feels flaky, the most likely explanation is that you introduced extra workflow complexity before you had a stable single-turn baseline.
When mini is enough and when GPT Image 1.5 is the safer example to copy
This is the part most exact examples pages refuse to answer directly.
OpenAI's current image guide says gpt-image-1.5 is the latest and most advanced GPT Image model, and it recommends GPT Image 1.5 for the best experience. The same guide says you can use gpt-image-1-mini when you want a more cost-effective option and image quality is not the priority.
So the honest rule is not "mini is now the default." The honest rule is:
- Copy mini examples first when cost is the first constraint.
- Copy GPT Image 1.5 examples first when output quality, higher-value edits, or fewer retries matter more than the lowest sticker price.
Mini is a strong fit for:
- internal concepts
- low-stakes marketing variants
- cheap prompt benchmarking
- batchable generation where the goal is volume before perfection
GPT Image 1.5 is the safer example to copy when you care more about:
- stronger overall image quality
- higher-value production output
- more expensive edit failures
- workflows where retry cost matters more than per-image list price
There is one more nuance that matters at scale. OpenAI's API pricing page says the Batch API saves 50% on inputs and outputs. That does not erase mini's cost advantage, but it does make the model choice more workflow-dependent for asynchronous jobs. If your team can batch image generation, the flagship lane can get closer than a flat price table makes it look.
That tradeoff is exactly why "examples" pages should not stop at runnable code. A cheap example is only the right example when the output clears your quality bar without forcing many retries, manual edits, or human cleanup. Once retries start stacking, the cheapest nominal model can become the slower and more expensive system in practice. Mini wins when "good enough, fast enough, cheap enough" is a real product requirement rather than a hopeful assumption.
If you want the full cost breakdown, read GPT Image 1 Mini pricing. If you want the broader qualitative call on whether mini is worth using, read GPT Image 1 Mini review.
The mistakes wrapper example pages still cause
The first mistake is copying the wrong abstraction. If you only need one prompt and one output image, do not start with Responses because it looks newer. OpenAI's own docs still point you back to the Images API for that job.
The second mistake is putting the wrong model in the Responses model field. If you use the hosted image_generation tool, the top-level model should be something like gpt-5 or gpt-4.1. Do not force gpt-image-1-mini into that slot just because the page you copied never explained the difference.
The third mistake is forgetting the first-image rule on mini edits. If you care about preserving one face, product, or logo most of all, put that image first. That is the mini-specific detail that changes real results.
The fourth mistake is treating the cheapest lane as the best default. Page-one wrappers keep marketing mini as if cheap automatically means right. OpenAI's official docs do not say that. They say mini is the cost-effective lane, while GPT Image 1.5 is still the best-experience lane.
The fifth mistake is debugging code before debugging account state. If the project is on the wrong tier, the org is not verified, or the propagation window has not finished, your example may fail even when the request shape is fine.
The sixth mistake is copying gateway vocabulary back into the official API without checking the OpenAI docs first. Third-party pages often compress several model and endpoint decisions into one UI abstraction. That can be useful inside their own product. It becomes a problem when the same labels get copied into OpenAI-native code and the reader assumes the abstraction maps one-to-one.
That is the real value a strong examples page should add. Not one more snippet. Better ordering.
Bottom line
If you searched for gpt-image-1-mini examples, the three examples above are the ones worth copying first. Use the Images API for one-shot generation. Use the Images API again for direct edits with input_fidelity. Move to Responses only when the product actually needs multi-turn image workflows.
And keep one rule above everything else: mini is the cheaper lane, not the universal lane. If the examples work and the quality is good enough, keep mini. If the workflow starts getting expensive to retry, copy the same route with GPT Image 1.5 instead of forcing mini to do a flagship job.