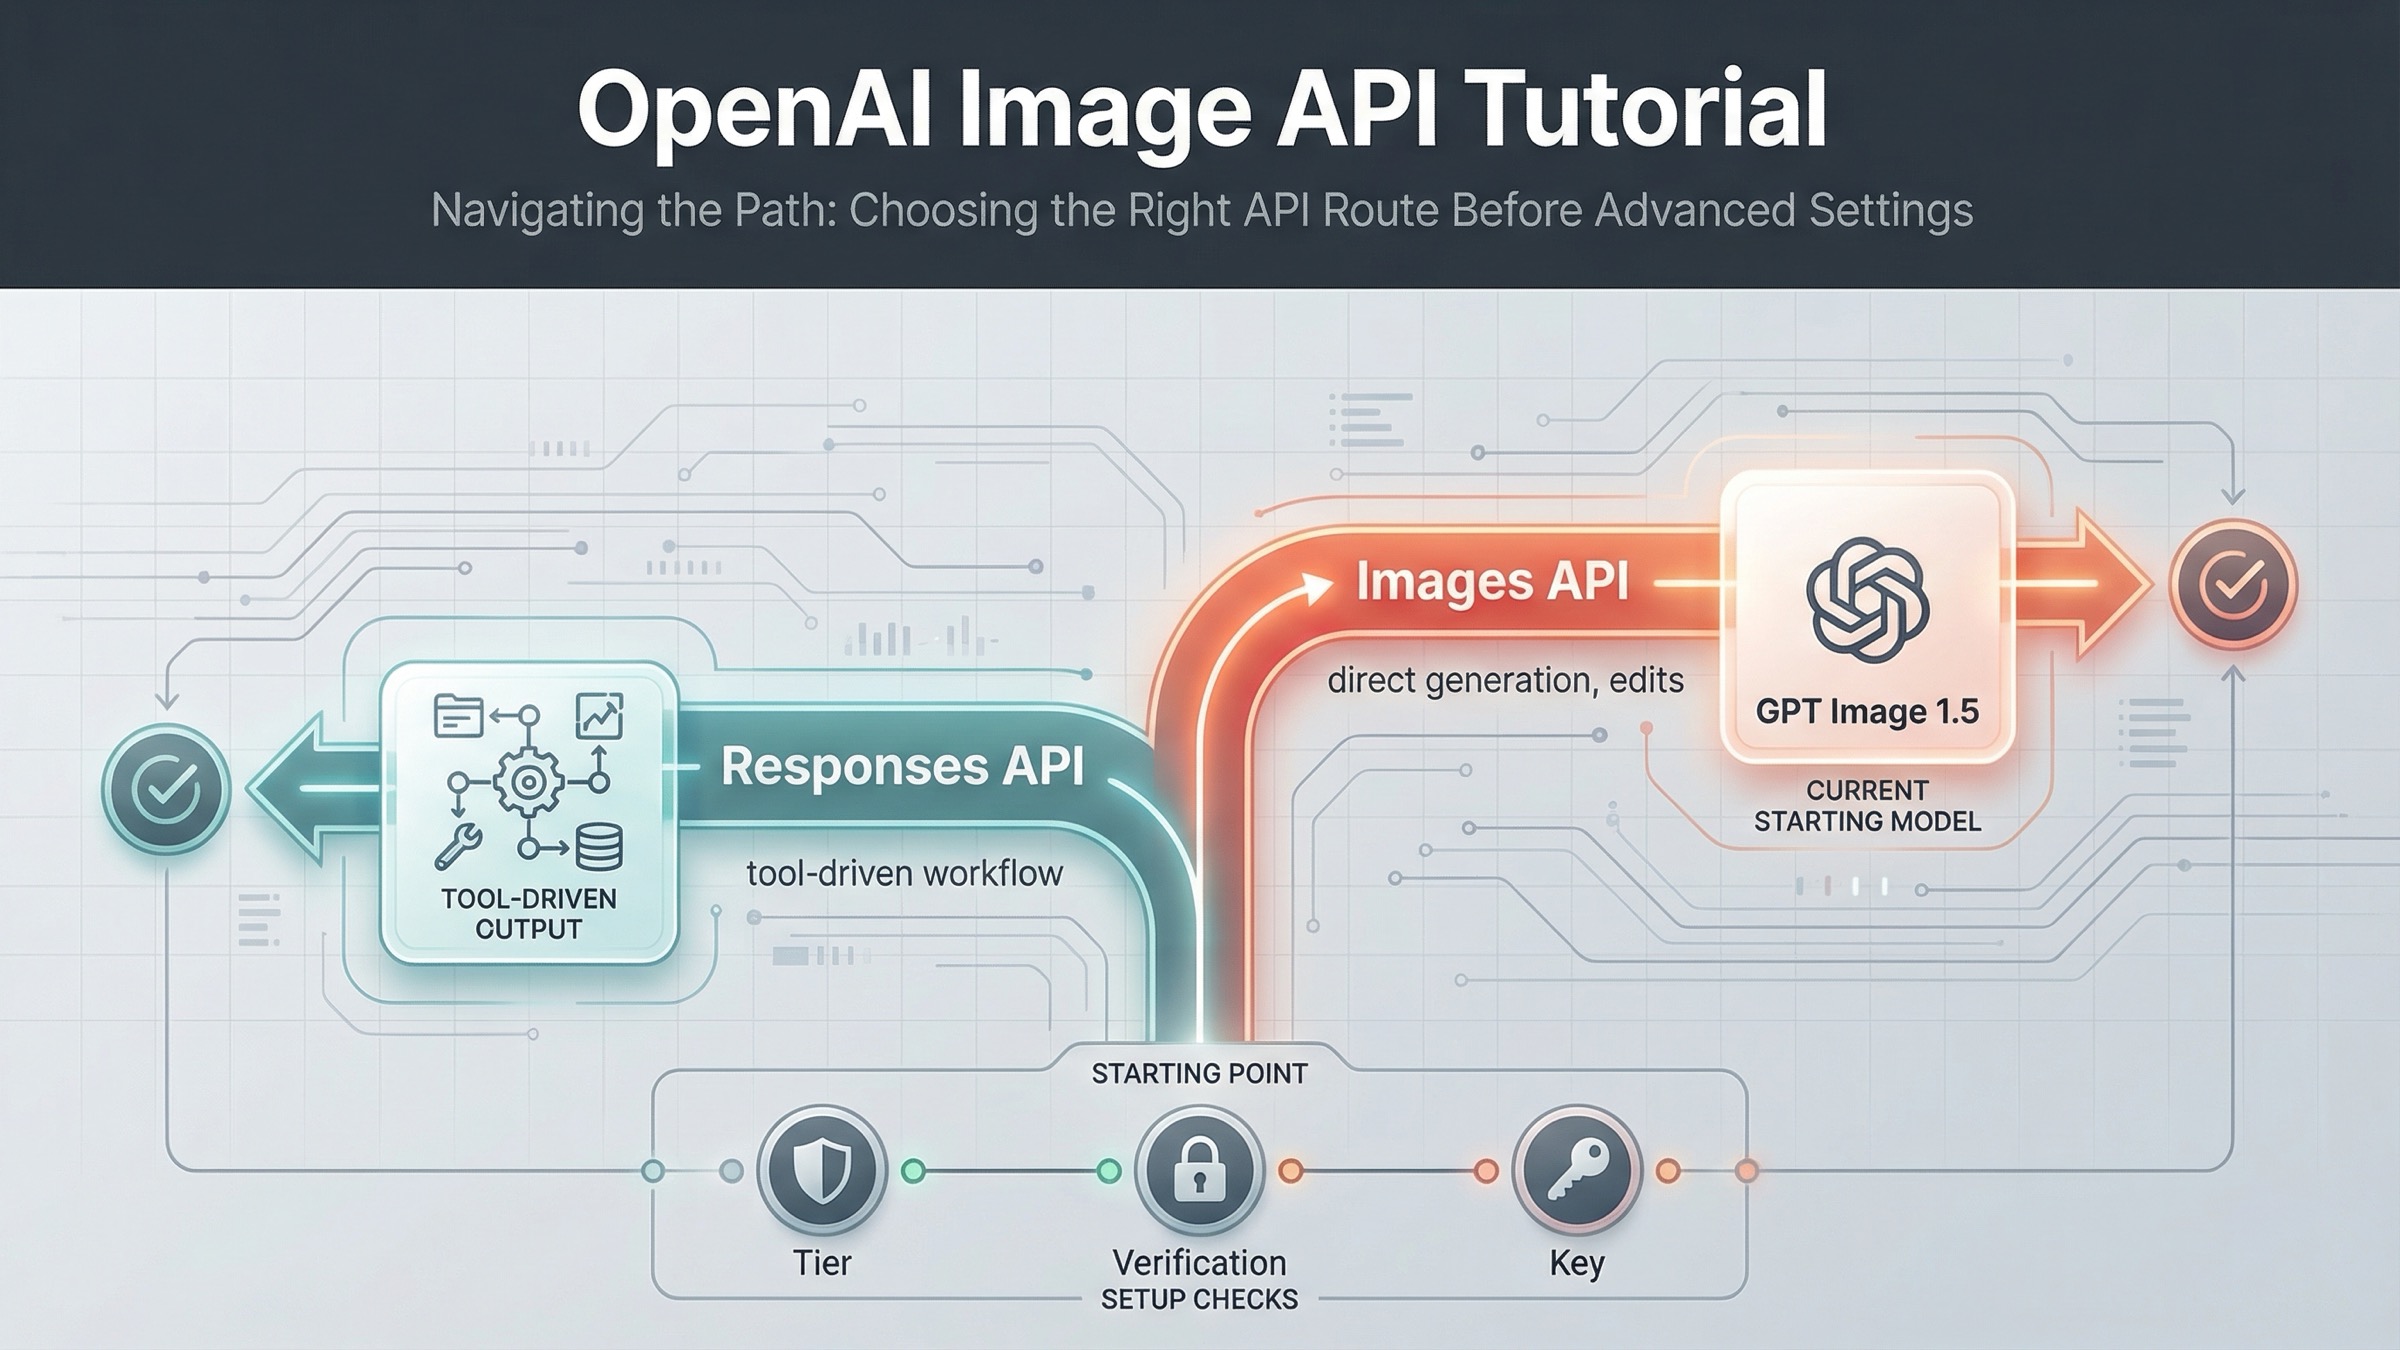
If you want a current OpenAI image generation API example that you can run today, start with the Images API and gpt-image-1.5. On March 23, 2026, that is the cleanest direct path for a simple generate-image request. Use the Responses API only when image generation is one tool inside a broader multimodal workflow.
That distinction matters because OpenAI's current image docs are split across several pages. The main image generation guide shows direct generation and editing with gpt-image-1.5. The image_generation tool guide shows image output inside responses.create(). The Images API reference confirms the raw endpoints. If you read only one page, it is easy to copy valid-looking code into the wrong surface.
The safest sequence is simple: get one direct generation request working first, save the returned base64 image to disk, then add edits, transparency, or streaming after the base path works. If your product later needs conversation state, other tools, or multimodal orchestration, that is when the Responses route becomes the better fit.
The fastest current OpenAI image generation API example
For this keyword, the best starting point is the direct Images API. The current raw endpoint is POST /v1/images/generations, and the current flagship direct model is gpt-image-1.5. You do not need a hosted tool or assistant workflow for a one-shot image request.
The simplest mental model is this:
- send a prompt
- receive a base64 image payload
- decode it
- save the file locally
Here is the shortest useful JavaScript example:
jsimport fs from "fs";
import OpenAI from "openai";

const client = new OpenAI({
  apiKey: process.env.OPENAI_API_KEY,
});

const result = await client.images.generate({
  model: "gpt-image-1.5",
  prompt: "Create a clean editorial illustration of a robot camera operator in a bright studio",
  size: "1024x1024",
  quality: "medium",
});

const imageBase64 = result.data[0].b64_json;
const imageBuffer = Buffer.from(imageBase64, "base64");
fs.writeFileSync("openai-image-example.png", imageBuffer);
The matching Python example is just as direct:
pythonfrom openai import OpenAI
import base64

client = OpenAI()

result = client.images.generate(
    model="gpt-image-1.5",
    prompt="Create a clean editorial illustration of a robot camera operator in a bright studio",
    size="1024x1024",
    quality="medium",
)

image_base64 = result.data[0].b64_json
image_bytes = base64.b64decode(image_base64)

with open("openai-image-example.png", "wb") as f:
    f.write(image_bytes)
And here is the raw cURL version for backend or debugging work:
bashcurl https://api.openai.com/v1/images/generations \
  -H "Authorization: Bearer $OPENAI_API_KEY" \
  -H "Content-Type: application/json" \
  -d '{
    "model": "gpt-image-1.5",
    "prompt": "Create a clean editorial illustration of a robot camera operator in a bright studio",
    "size": "1024x1024",
    "quality": "medium"
  }' \
  | jq -r '.data[0].b64_json' \
  | base64 --decode > openai-image-example.png
If your shell does not support base64 --decode, use the platform-equivalent flag instead. On macOS, that is usually base64 -D.
That is the best default example because it teaches the current direct contract without distracting the reader with orchestration they may not need yet. It also matches how the current docs are organized: the Image API guide shows direct generation and editing for the main path, while the Responses guide treats image output as a tool call inside a larger model interaction.
One detail many weak tutorials skip is that GPT image models return base64 image data by default, not a hosted image URL. That matters for both JavaScript and cURL because your first working test should prove you can decode and persist the file successfully, not only send the HTTP request.
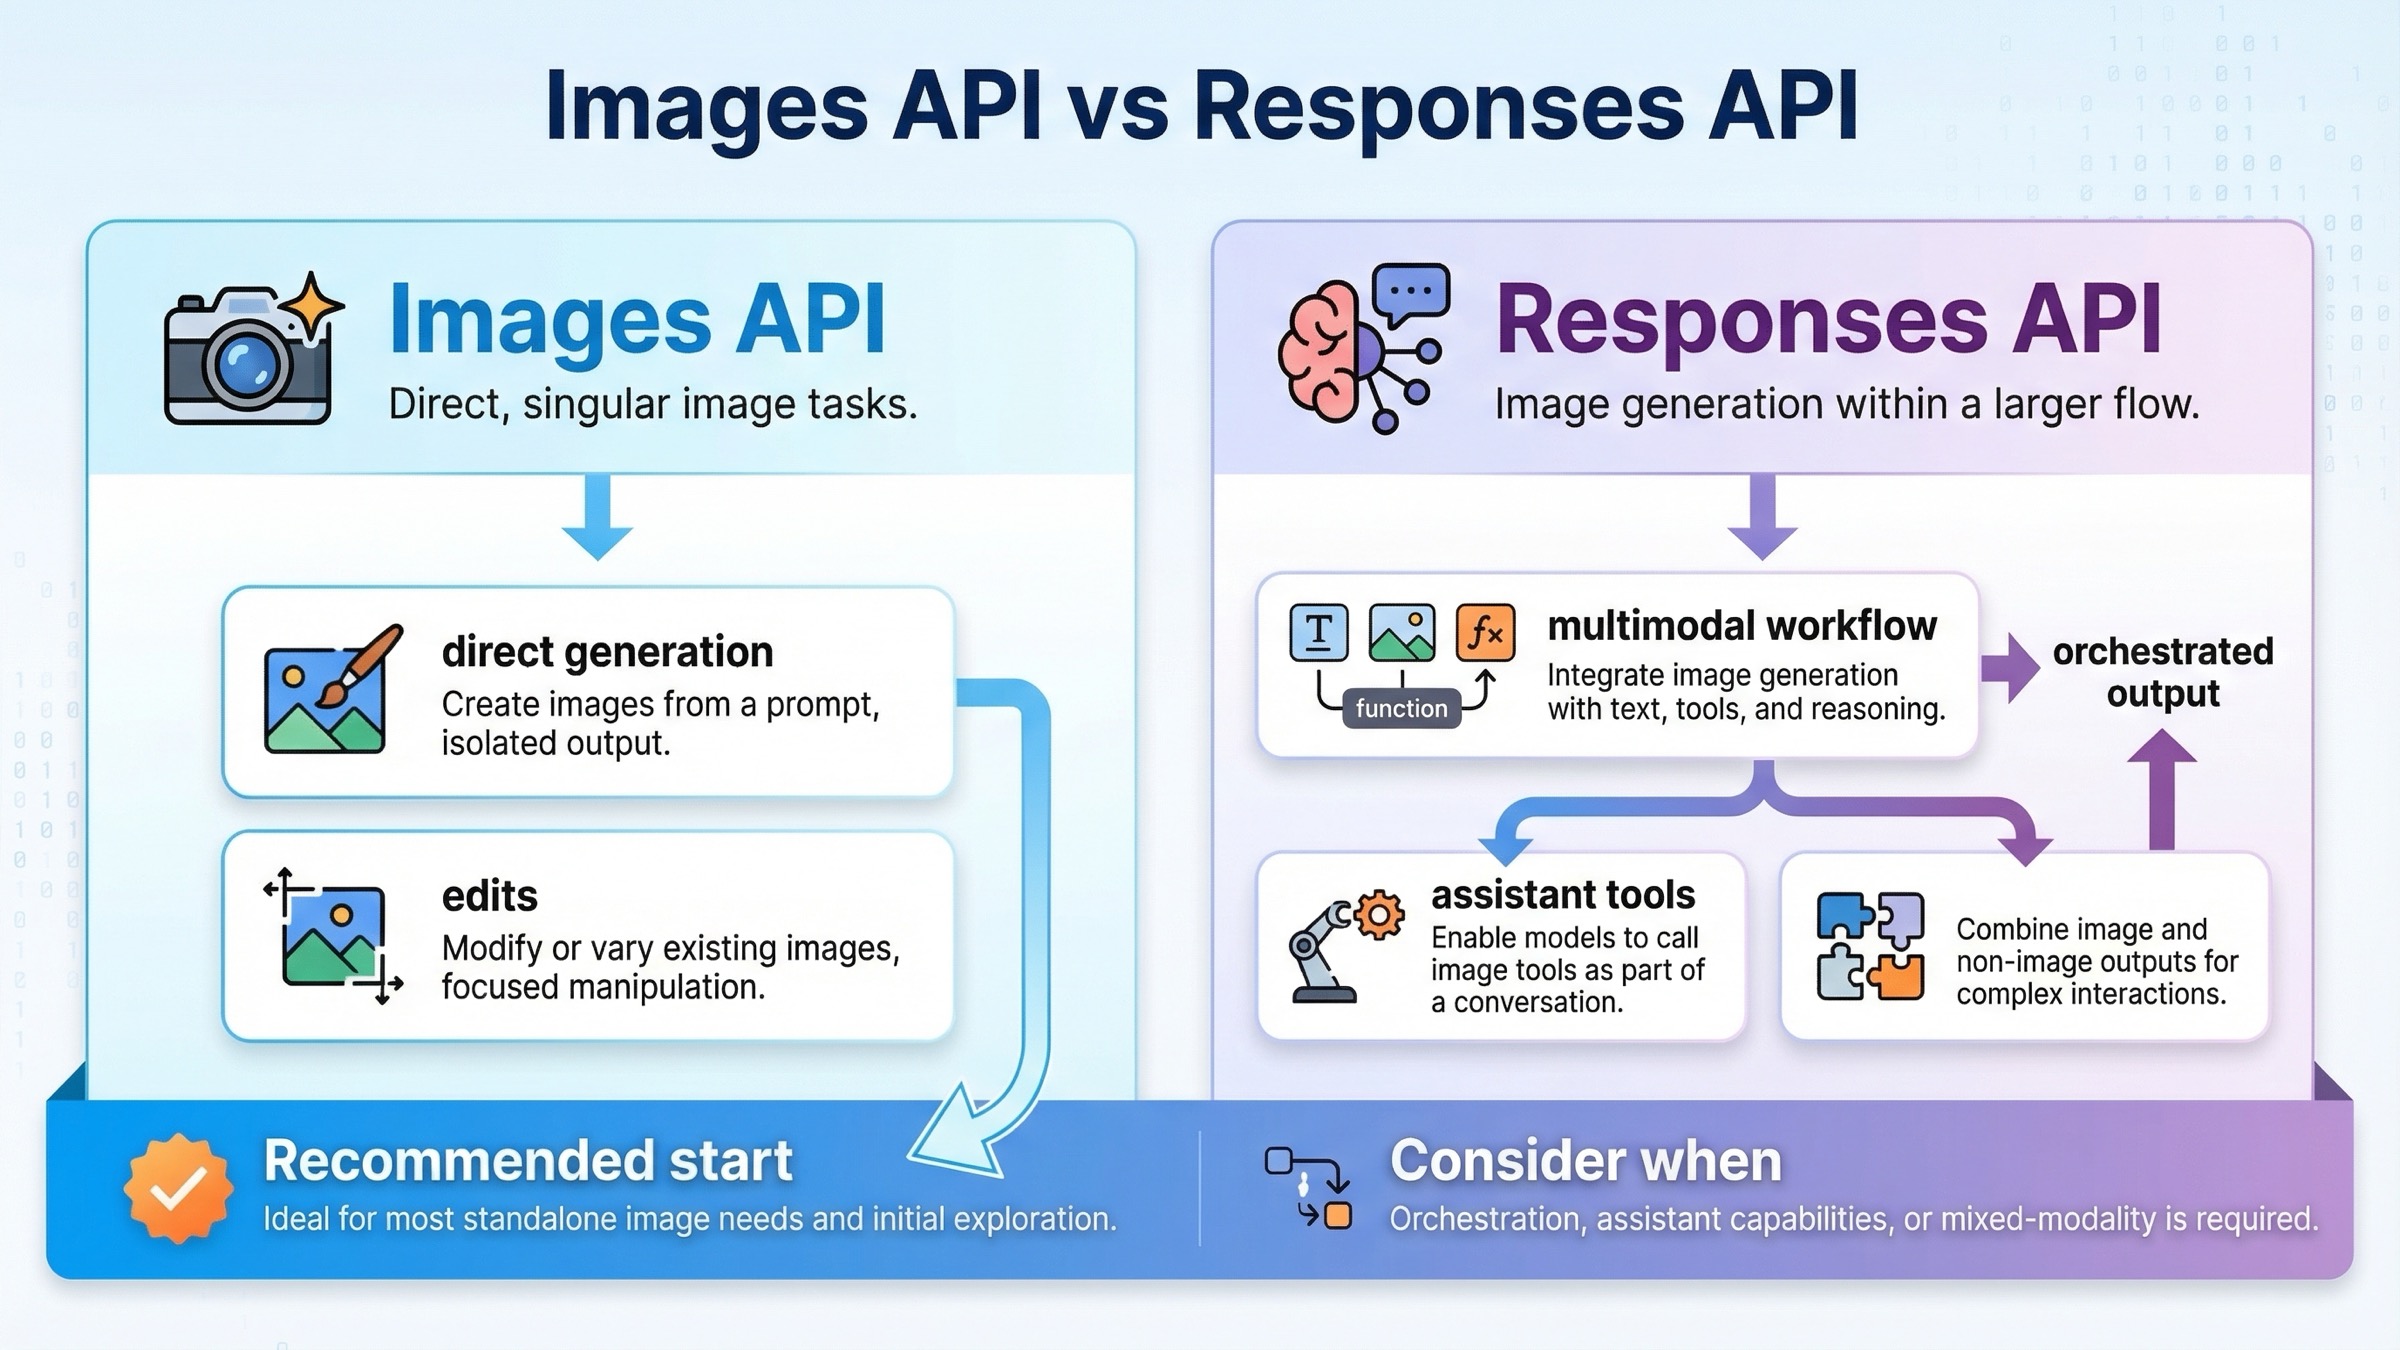
Images API vs Responses image_generation tool
If you are only trying to generate or edit an image, the direct Images API is easier to reason about. If you are building a larger assistant that may generate text, call tools, inspect images, and sometimes return image output, the Responses path makes more sense.
| Situation | Better default | Why |
|---|---|---|
| You want one request that generates an image and saves it to disk | Images API | Fewest moving parts and the clearest example path |
| You want to edit one or more source images | Images API | The current direct edit flow is documented here, including input_fidelity |
| You want a simple backend endpoint for image generation | Images API | Easier request contract and easier debugging |
| You are building a multimodal assistant that may generate images as one tool among others | Responses API | Image generation fits naturally inside a broader conversation and tool flow |
| You need image generation plus other reasoning steps in one request | Responses API | The tool route keeps everything inside one orchestration surface |
The most important rule is the one page one still does not say clearly enough: do not start with Responses just because it looks newer. Start with Responses when your product actually needs multimodal or agentic orchestration. Otherwise, you are making the first sample harder than it needs to be.
There is a second trap here. In the Responses flow, the model field should be a mainline model like gpt-5, not gpt-image-1.5. The tool guide explains that the hosted image_generation tool uses GPT Image models behind the scenes. In other words, the tool is the image layer. The top-level Responses model is still the reasoning model that decides when and how to call that tool.
That split also changes how you debug. If the direct Images API path fails, you usually inspect model availability, payload shape, or file decoding. If the Responses path fails, you may also need to reason about tool invocation, conversation output parsing, and the relationship between the top-level model and the hosted image tool. That is another reason this article keeps the simple example on the direct Images API path.
If you want the broader routing logic, not just the narrow example, read our deeper OpenAI Image API tutorial. This page is narrower on purpose: it is here to get the current example working first.
Before you run the sample, clear the access checks
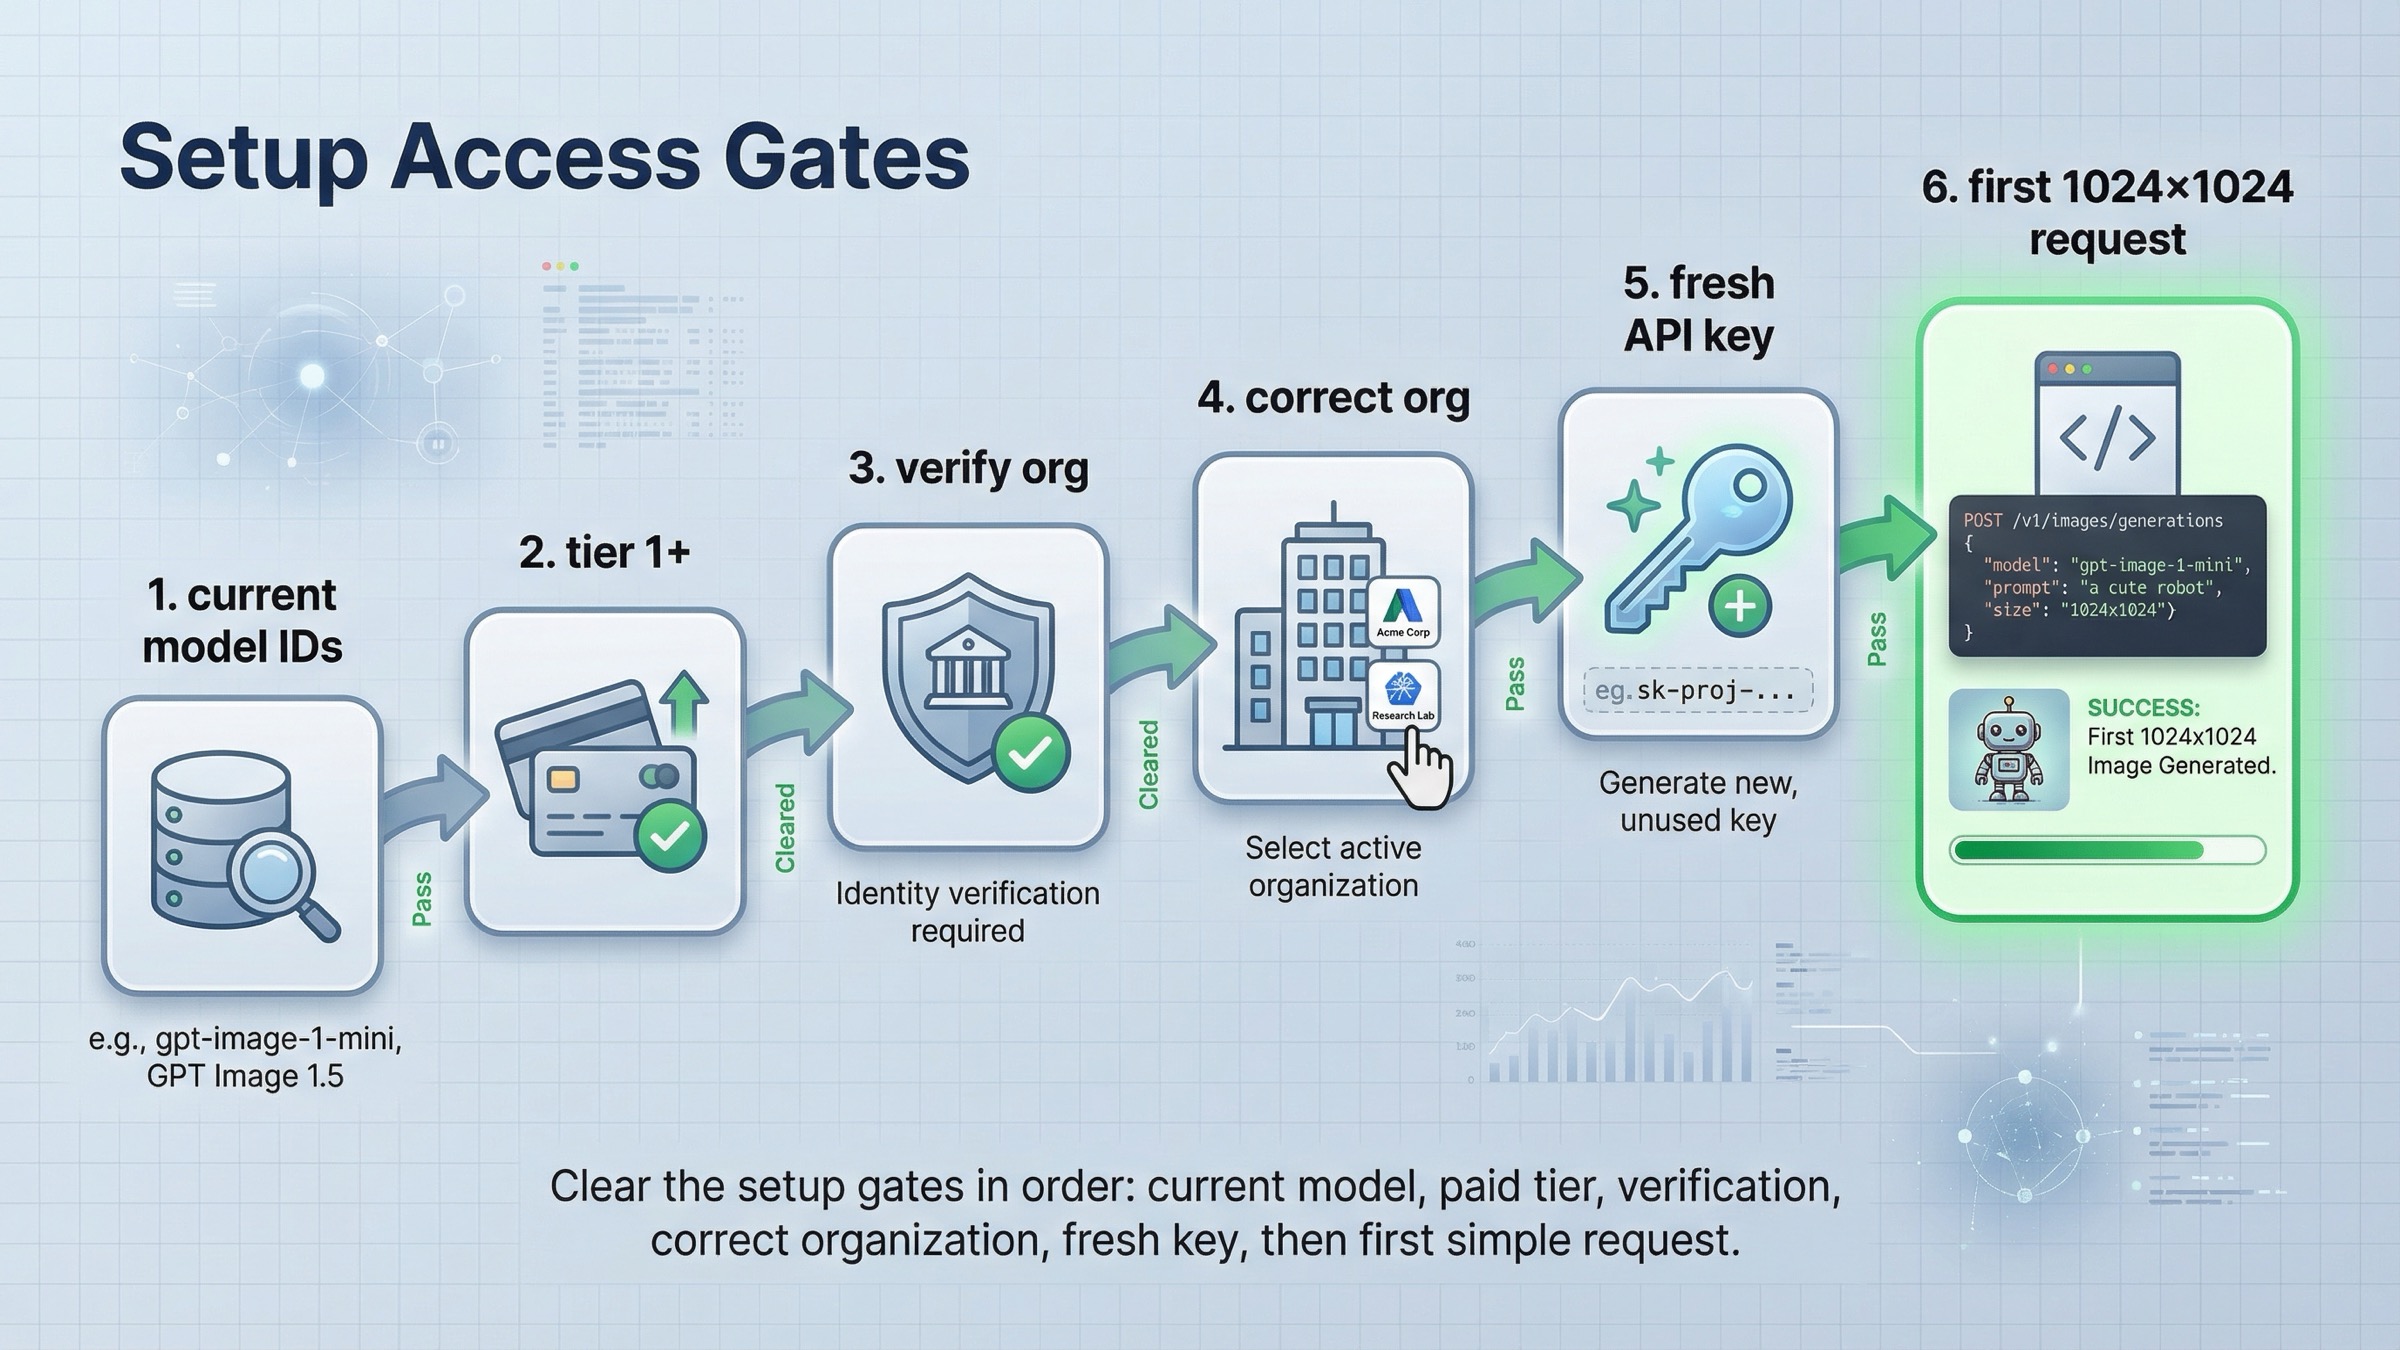
Many "this example is broken" complaints are really access problems. As of March 23, 2026, OpenAI's GPT Image 1.5 model page says Free is not supported, and the model page lists Tier 1 starting at 100,000 TPM and 5 IPM. That means a request can fail even when your code is correct.
There is another detail that confuses readers. The Help Center article on API model availability by usage tier and verification status says gpt-image-1 and gpt-image-1-mini are available on tiers 1 through 5, with some access still subject to organization verification. So if you copied a valid example and still get availability or permission errors, check your account surface before you rewrite the code.
The clean setup checklist is:
- Install the current SDK once.
- Set
OPENAI_API_KEYin your environment. - Confirm your account is on a supported usage tier.
- Confirm you are using the correct organization.
- Confirm you are using a current model name.
- Only then start changing request parameters.
In Node.js:
bashnpm install openai
In Python:
bashpip install openai
If you recently completed organization verification and still see not verified errors, OpenAI's organization verification article says to wait up to 30 minutes, then generate a new API key, refresh, and confirm the correct organization is active. That is a real operational fix, not a theory. It deserves to be in an example article because it is one of the first branches users actually hit.
The right debugging order matters. A lot of developers reverse it: they change prompt text, change SDK versions, or rewrite code before they verify that the account can actually call the model. For this topic, the clean operator rule is to debug access first, request shape second, and prompt quality last.
How to edit images or change output without changing APIs
Once the base example works, stay on the same API surface and add only the feature you actually need. You do not need to jump to Responses just to do image editing, transparent output, or a different file format.
The current edit flow still belongs on the direct Images API:
jsimport fs from "fs";
import OpenAI from "openai";

const client = new OpenAI({
  apiKey: process.env.OPENAI_API_KEY,
});

const result = await client.images.edit({
  model: "gpt-image-1.5",
  image: [
    fs.createReadStream("product-photo.png"),
    fs.createReadStream("logo.png"),
  ],
  prompt: "Add the logo to the product box as if it were printed on the packaging.",
  input_fidelity: "high",
});

const imageBase64 = result.data[0].b64_json;
fs.writeFileSync("product-with-logo.png", Buffer.from(imageBase64, "base64"));
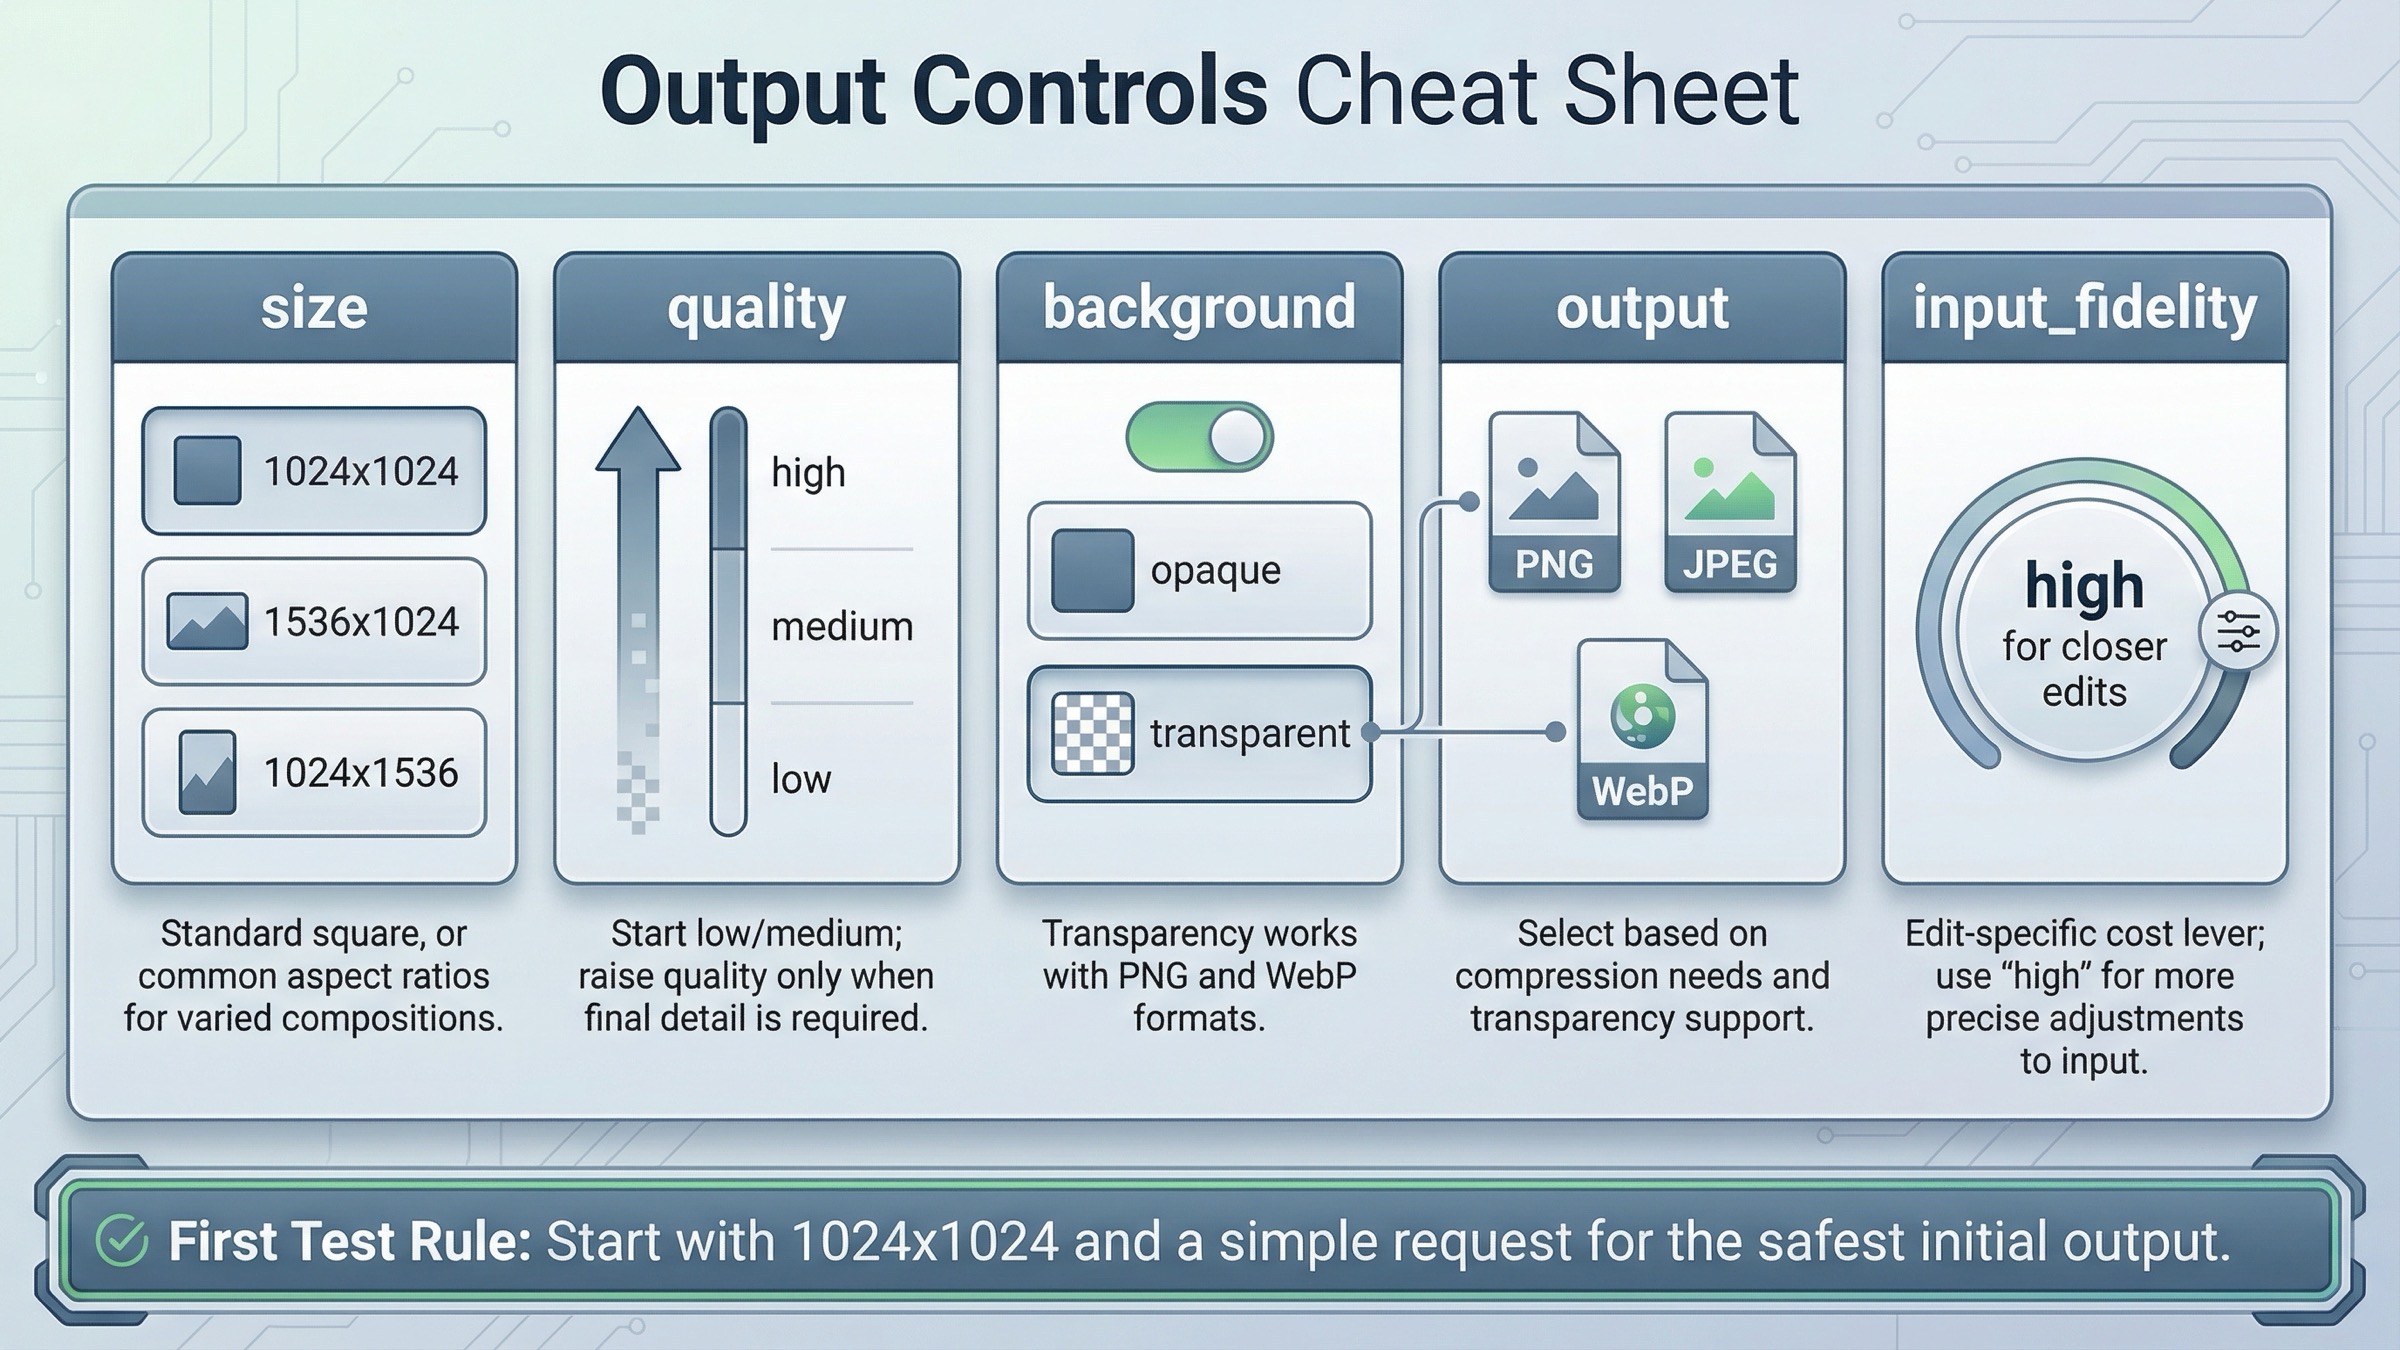
That input_fidelity: "high" flag is worth understanding. The current guide says it preserves source-image detail better, but it also increases image input token usage. Use it when the source image really matters. Skip it when you are doing a looser stylistic edit and cost is a bigger concern.
The same direct API also supports output tuning:
size: use1024x1024first unless you really need portrait or landscapequality:mediumis a good default for first-run testingbackground:transparentworks for GPT image models withpngorwebpoutput_format: usejpegorwebpwhen smaller files or lower latency matteroutput_compression: useful when you intentionally want compressed JPEG or WebP output
The practical rule is to keep the first request boring. A square image at moderate quality tells you whether access, request shape, decoding, and file output are all working. Once that is stable, then you can test transparency, high quality, or multiple input images.
If you also care about costs before you scale this into production, the next page to read is our OpenAI image generation API pricing guide.
When to switch to Responses instead of stretching the direct example
If your product is moving from "generate one image" to "run an assistant that may reason, call tools, accept multimodal input, and sometimes generate images," then the Responses route becomes the right abstraction.
Here is the cleanest current JavaScript example:
jsimport fs from "fs";
import OpenAI from "openai";

const client = new OpenAI({
  apiKey: process.env.OPENAI_API_KEY,
});

const response = await client.responses.create({
  model: "gpt-5",
  input: "Generate a transparent sticker-style icon of a paper airplane for a travel app",
  tools: [
    {
      type: "image_generation",
      background: "transparent",
      quality: "high",
    },
  ],
});

const imageBase64 = response.output
  .filter((item) => item.type === "image_generation_call")
  .map((item) => item.result)[0];

fs.writeFileSync("paper-airplane.png", Buffer.from(imageBase64, "base64"));
This example is correct, but it solves a different problem. It is better when image generation is only one part of a broader model interaction. It is not better just because it is newer or because it uses the Responses API. That is the distinction weak tutorials keep blurring.
Use the Responses path when:
- the same request may produce text and images
- image generation should be one tool inside a larger assistant
- you want the model to decide whether to generate, revise, or continue inside a conversation
- you expect the image step to sit next to other tools rather than replace them
Use the direct Images API when:
- you want the shortest onboarding route
- your backend endpoint does one image job
- you are debugging generation or edit behavior
- you want the cleanest code sample for a new teammate
Troubleshooting: the common failures weak tutorials skip
The first mistake is using an old model name because an older tutorial or notebook ranked well. This query still pulls in legacy material, including GPT Image 1 and even older DALL·E-era examples. If you are writing a fresh direct example today, gpt-image-1.5 is the current flagship name to anchor first.
The second mistake is putting gpt-image-1.5 directly in the Responses API model field. The tool guide is explicit that the hosted image generation tool uses GPT Image models behind the scenes, while the top-level Responses model remains something like gpt-5. If you miss that distinction, the sample can look "almost right" while still being structurally wrong.
The third mistake is misdiagnosing access errors as code errors. If the request returns availability or verification problems, check tier support and organization verification before you start changing the payload. The fix may be on the account side. If you want a deeper walkthrough for that branch, read our OpenAI image generation API verification guide.
The fourth mistake is expecting the output to behave like older DALL·E examples. For GPT image models, the direct Images API returns base64 image data by default. That is why the shortest good example includes a decode-and-save step instead of stopping at the HTTP response.
The fifth mistake is trying to solve every requirement in the first request. Readers often jump straight to portrait sizing, transparent backgrounds, high quality, multiple input images, or assistant workflows before they have one plain request working. That is the wrong sequence. First prove the direct path, then add only the next feature your product actually needs.
One more practical branch is SDK-versus-cURL debugging. If both the SDK example and the cURL example fail in the same way, the problem is rarely your application code. It is usually access, model naming, or organization context. If the cURL request works but your application does not, then the problem is probably in your environment variables, request parsing, or file write step.
FAQ
Should I use gpt-image-1.5 or gpt-image-1 for a fresh example?
For a fresh direct example on March 23, 2026, start with gpt-image-1.5. The official GPT Image 1.5 model page labels it as the latest image generation model. gpt-image-1 still matters for migration and legacy comparison, but it is not the best first example for a new tutorial page.
Why does the direct Images API example return base64 instead of a hosted image URL?
Because GPT image models return base64 image data by default. That is why the shortest useful sample includes the decode-and-save step. Older DALL·E examples often trained developers to expect a hosted URL, which is one reason stale tutorials still create confusion.
Do I need the Responses API to edit images or get transparent PNG output?
No. The direct Images API already supports image edits, input_fidelity, transparent backgrounds for GPT image models, and output tuning such as output_format and output_compression. Use Responses when you need orchestration, not when you just need one more image parameter.
Final recommendation
For the keyword openai image generation api example, the honest current answer is narrower than page one makes it look. Start with the direct Images API, use gpt-image-1.5, keep the first request small and square, and save the returned base64 image to disk. That is the fastest route to a working example on March 23, 2026.
Only switch to the Responses image_generation tool when your product genuinely needs image output inside a broader multimodal workflow. If you keep that split clear, most of the current confusion disappears before you even start optimizing prompts, edits, or output settings.