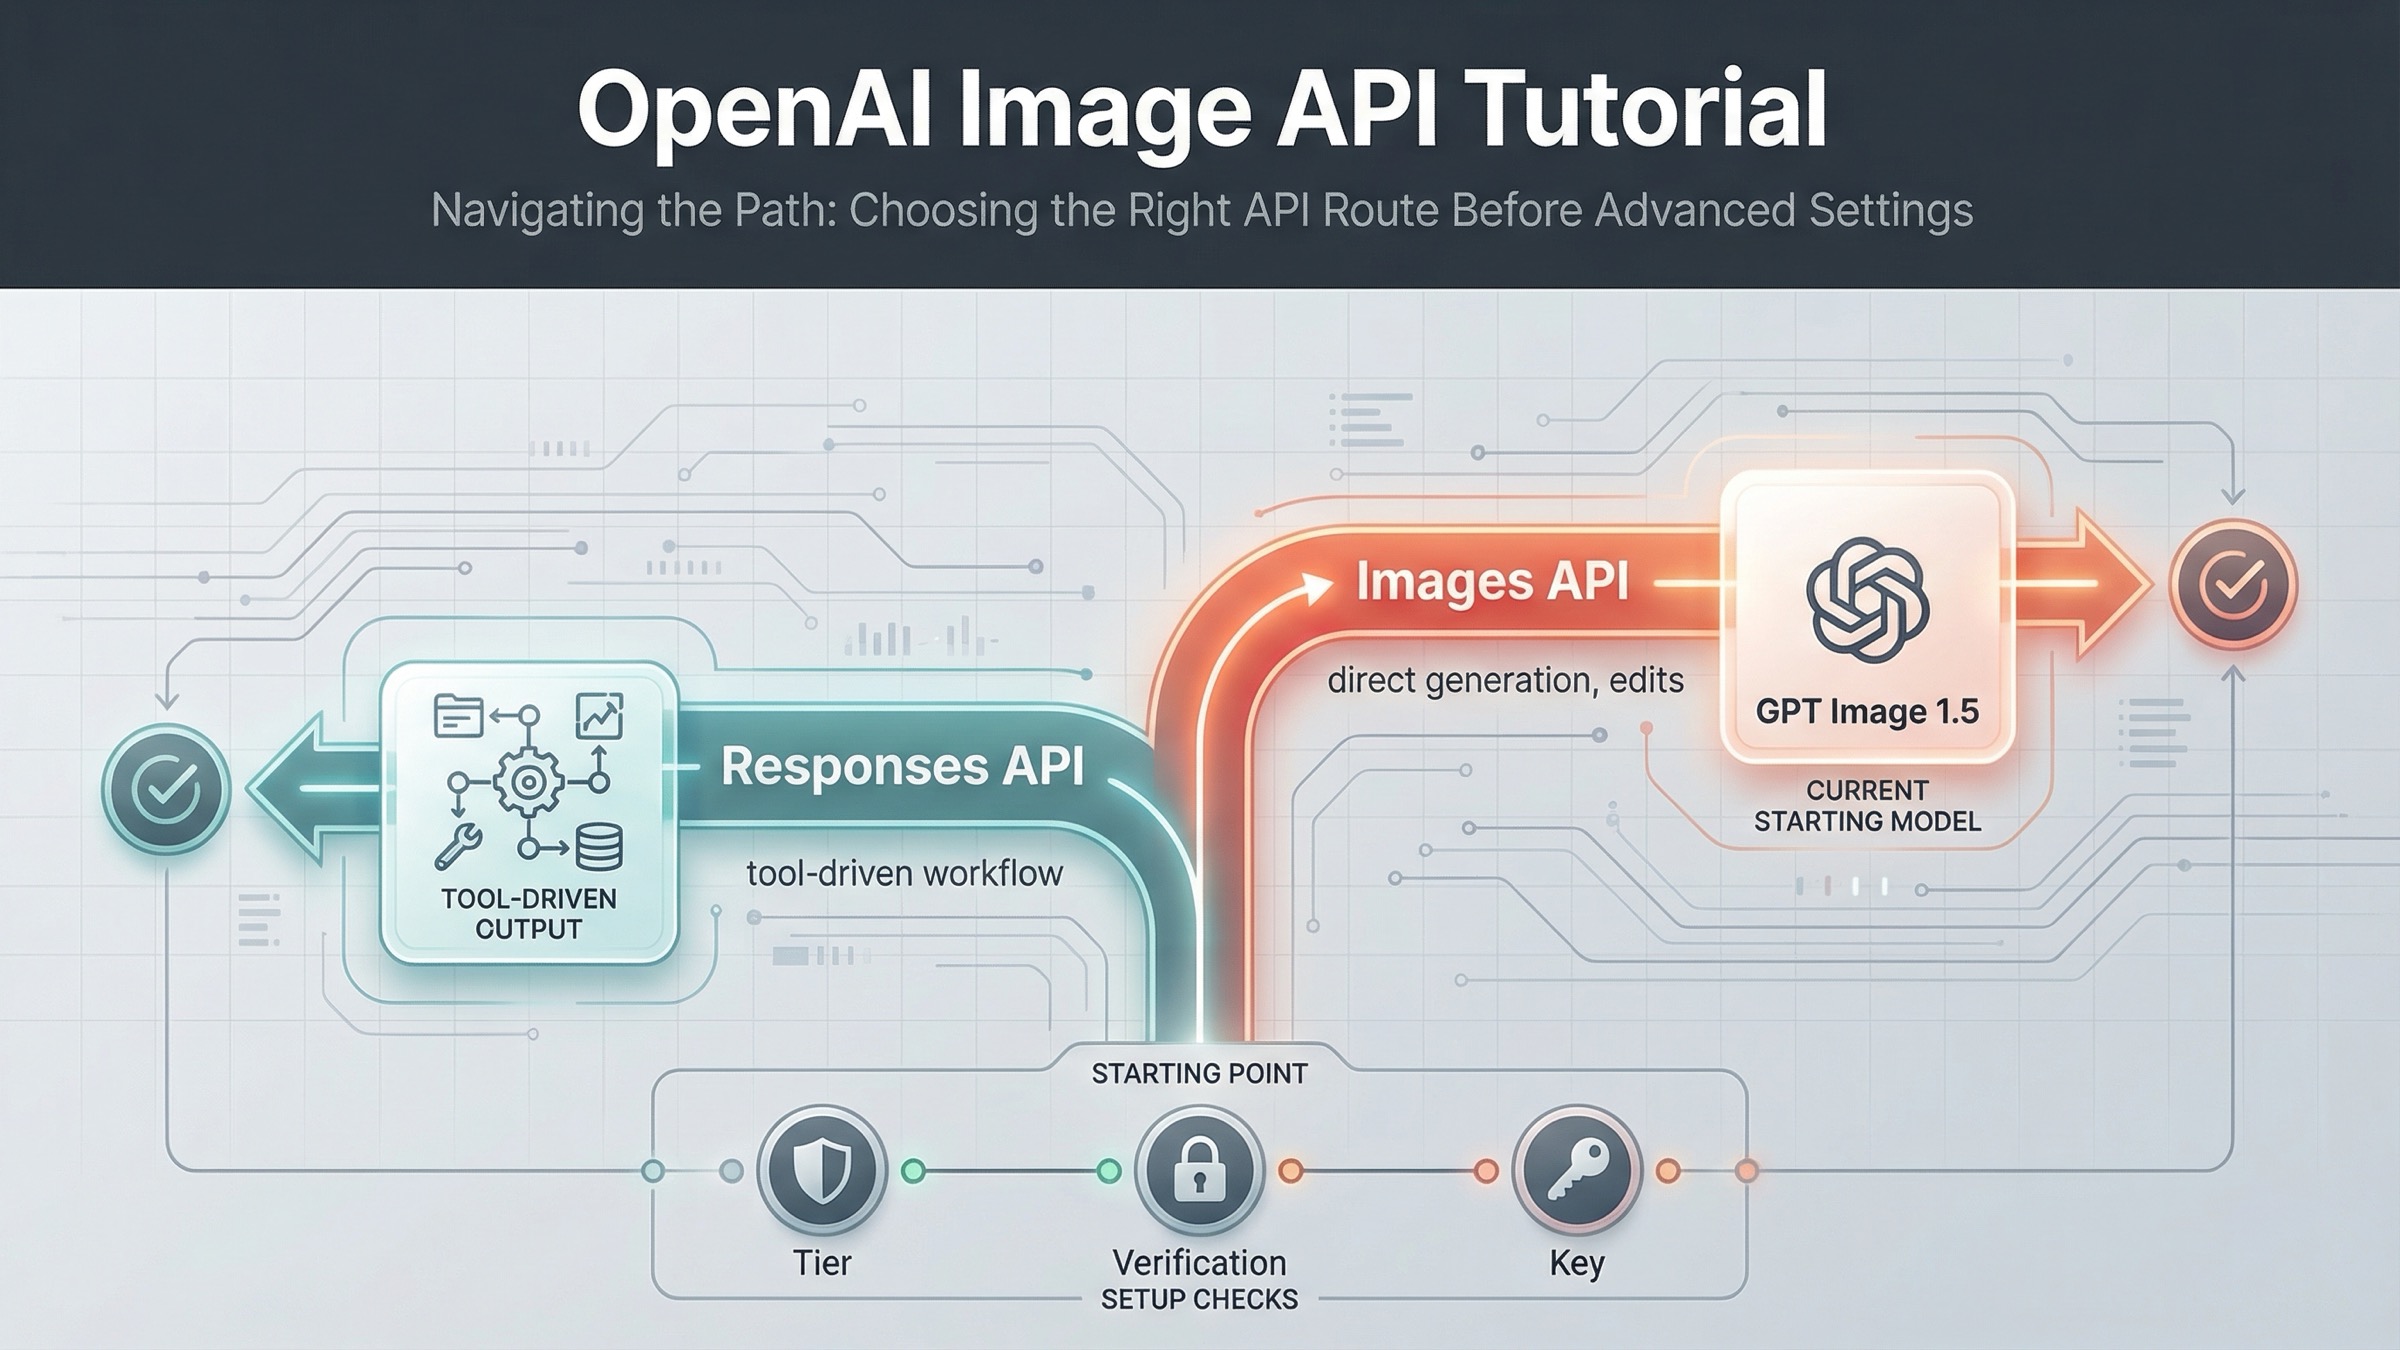
As of March 22, 2026, the safest current default is this: use the OpenAI Images API when you want the fastest direct path to generate or edit images, and use the Responses API only when image generation is one tool inside a broader multimodal workflow. That one decision removes most of the confusion that weaker tutorials create.
The reason this keyword keeps feeling harder than it should is that OpenAI's current image workflow is spread across several official pages. The main image generation guide covers direct generation and edits. The broader images and vision guide shows the built-in image_generation tool in the Responses API. The current model catalog lists GPT Image 1.5 as the flagship image model, gpt-image-1-mini as the budget lane, chatgpt-image-latest as the ChatGPT image alias, and DALL-E 3 as deprecated. If you read only one page, you get part of the answer, not the whole route.
That fragmentation is also why many developers debug the wrong problem first. They start from an older DALL-E tutorial, or they jump into SDK code before checking whether the account is on a supported usage tier, whether organization verification is still blocking image access, or whether the feature they really want belongs on the Images API instead of the Responses API. This tutorial is built to fix that sequence.
TL;DR
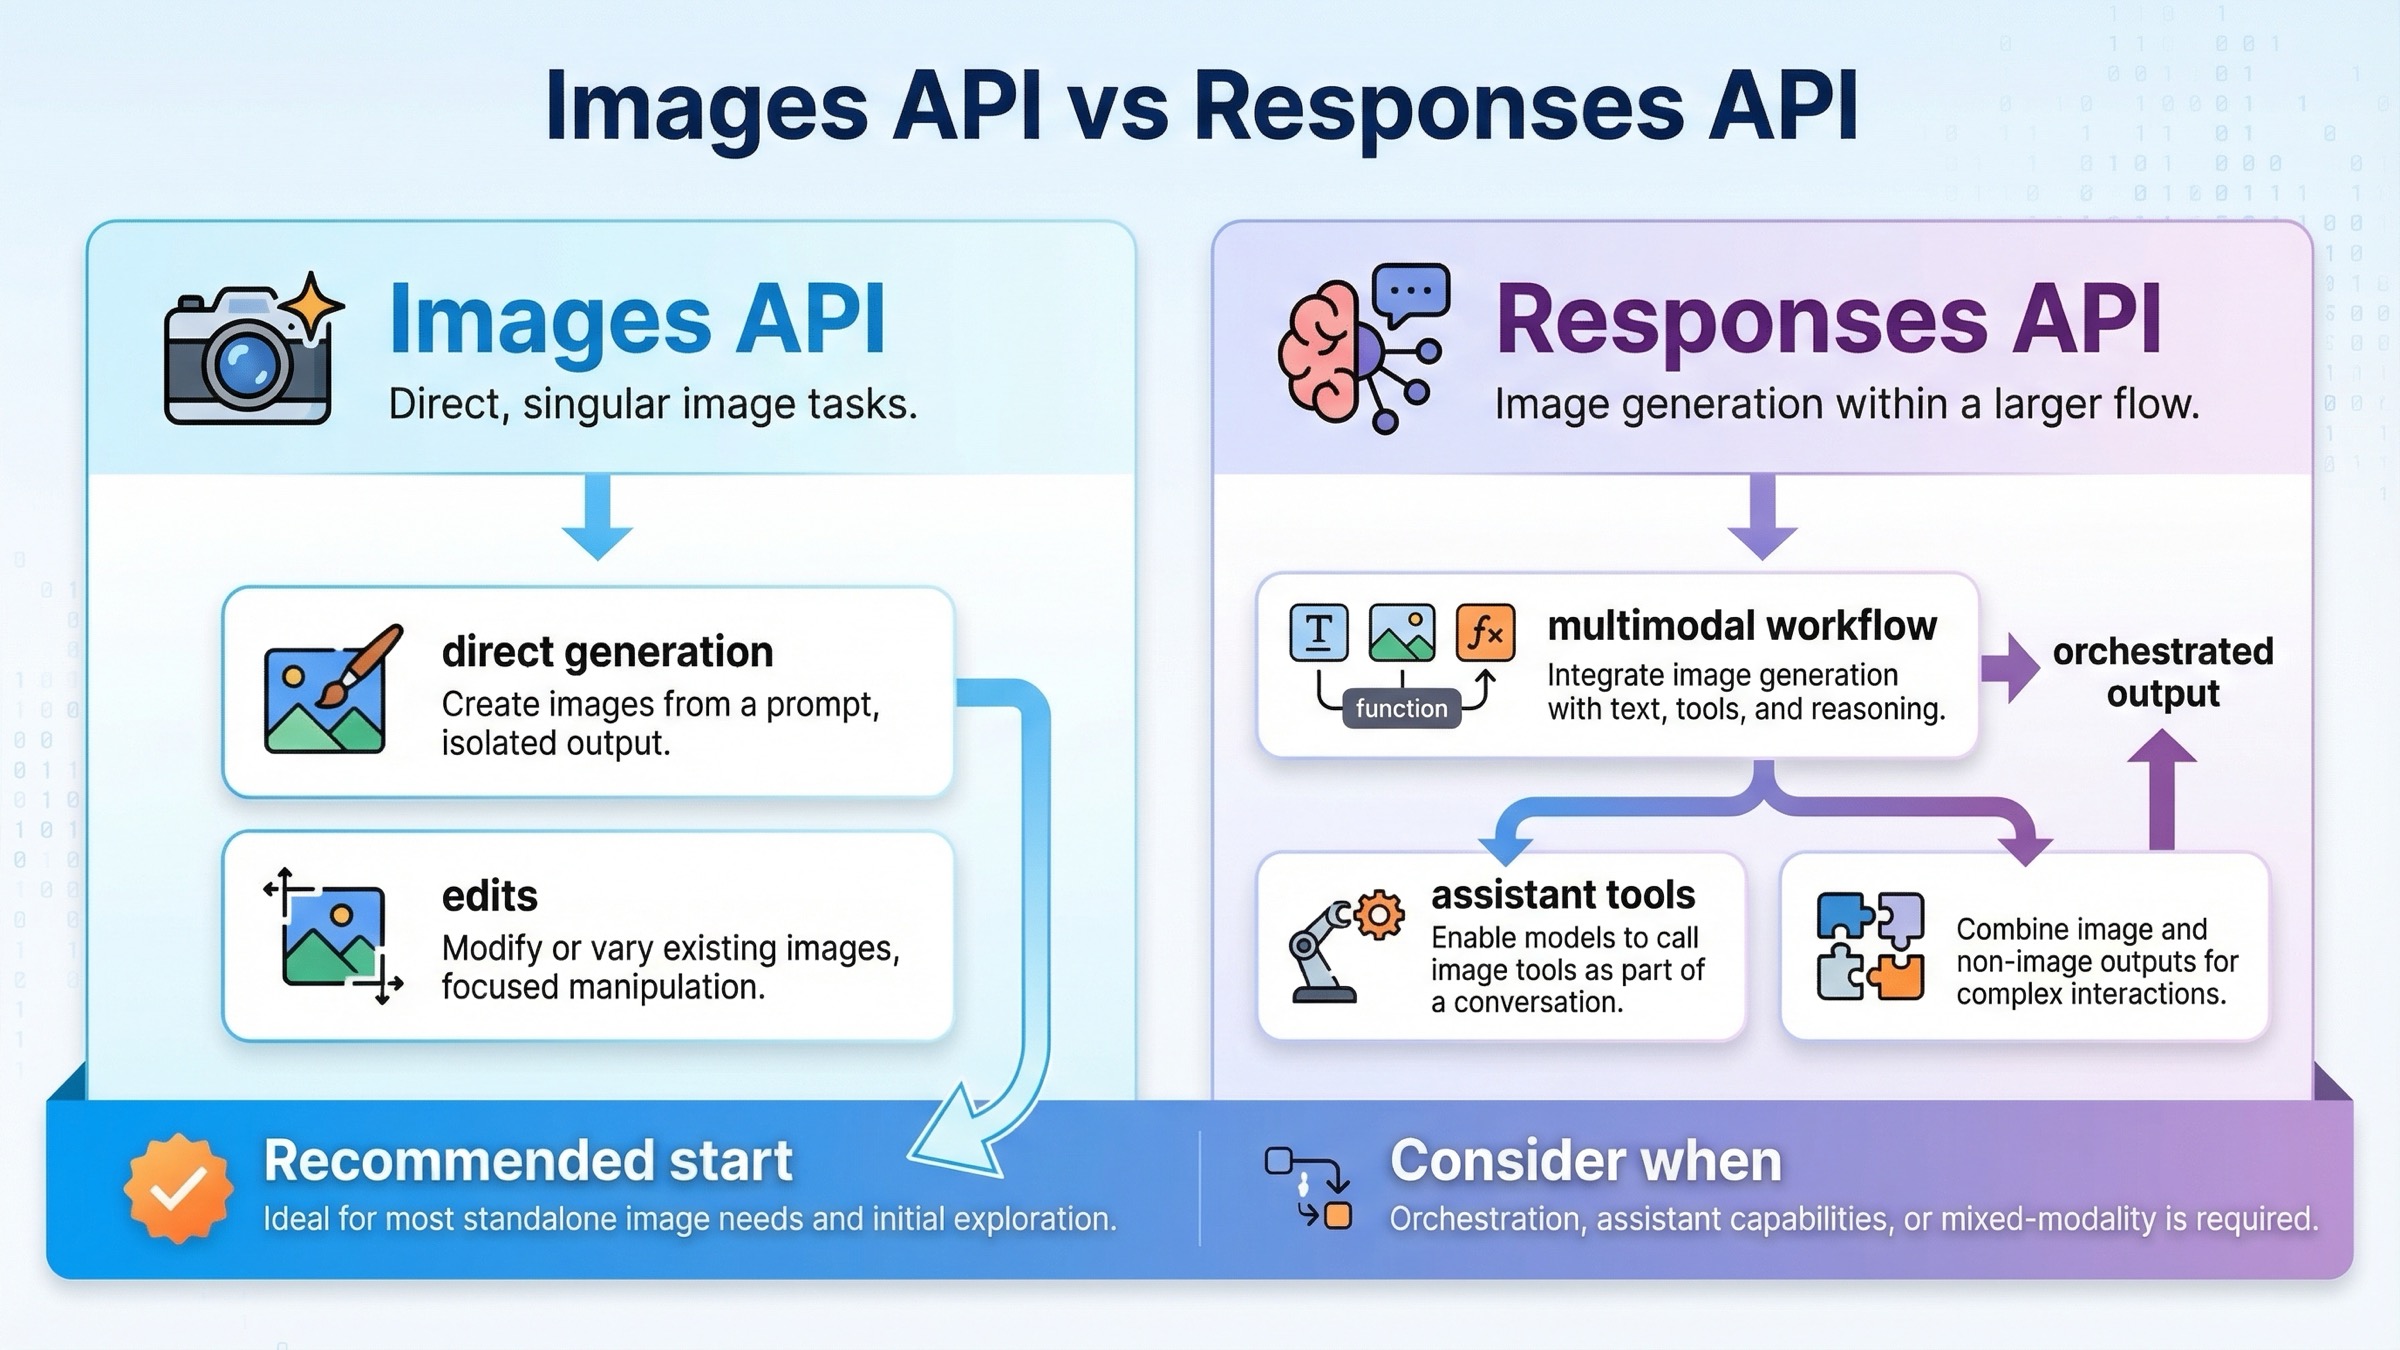
- Use the Images API when image generation or editing is the direct feature you are shipping.
- Use the Responses API when image generation is one tool inside a larger assistant or multimodal workflow.
- Start with
gpt-image-1.5, keep the first request small and square, and check tier access plus organization verification before you blame the SDK sample.
Start here: choose the right OpenAI image API path
If you only remember one section from this article, make it this one. The current OpenAI image stack is much easier to work with once you stop treating every image task as the same API job.
| Situation | Better default | Why |
|---|---|---|
| You want one request that generates an image and saves it to disk | Images API | Fewer moving parts, explicit image model choice, and the cleanest direct tutorial path |
| You want to edit one or more source images with a prompt | Images API | The official guide documents direct edit flows, masks, and input_fidelity here |
| You are building a multimodal assistant that sometimes returns images along with text or other tools | Responses API | Image generation becomes one tool inside a larger reasoning flow |
| You need the shortest onboarding route for a junior developer or a quick proof of concept | Images API | Less orchestration and fewer ways to choose the wrong abstraction too early |
| You need image generation, other tools, and conversation state in one workflow | Responses API | The built-in image_generation tool fits better when images are not the only output |
The practical rule is simple. If image generation itself is the product surface, start with client.images.generate() or client.images.edit(). That keeps model choice, pricing expectations, and output handling easy to reason about. If image generation is one step in a larger assistant or agent flow, start with client.responses.create() and attach the image_generation tool.
OpenAI's docs already point in this direction, but they do it across different pages. The image generation guide is direct and code-first. The images and vision guide shows the newer Responses pattern with a general text model driving a built-in image tool. That split is fine inside official docs. It is not fine for a tutorial if you never tell the reader which route to start with. So this article will keep routing first and parameters second.
There is one more reason to keep the route decision early: the setup friction is different. When a developer says "the OpenAI image API tutorial does not work," the root cause is often not the sample code. It is a mismatch between the API surface they chose, the account access they actually have, and the model they assumed was current.
Before you write code, confirm access and model IDs
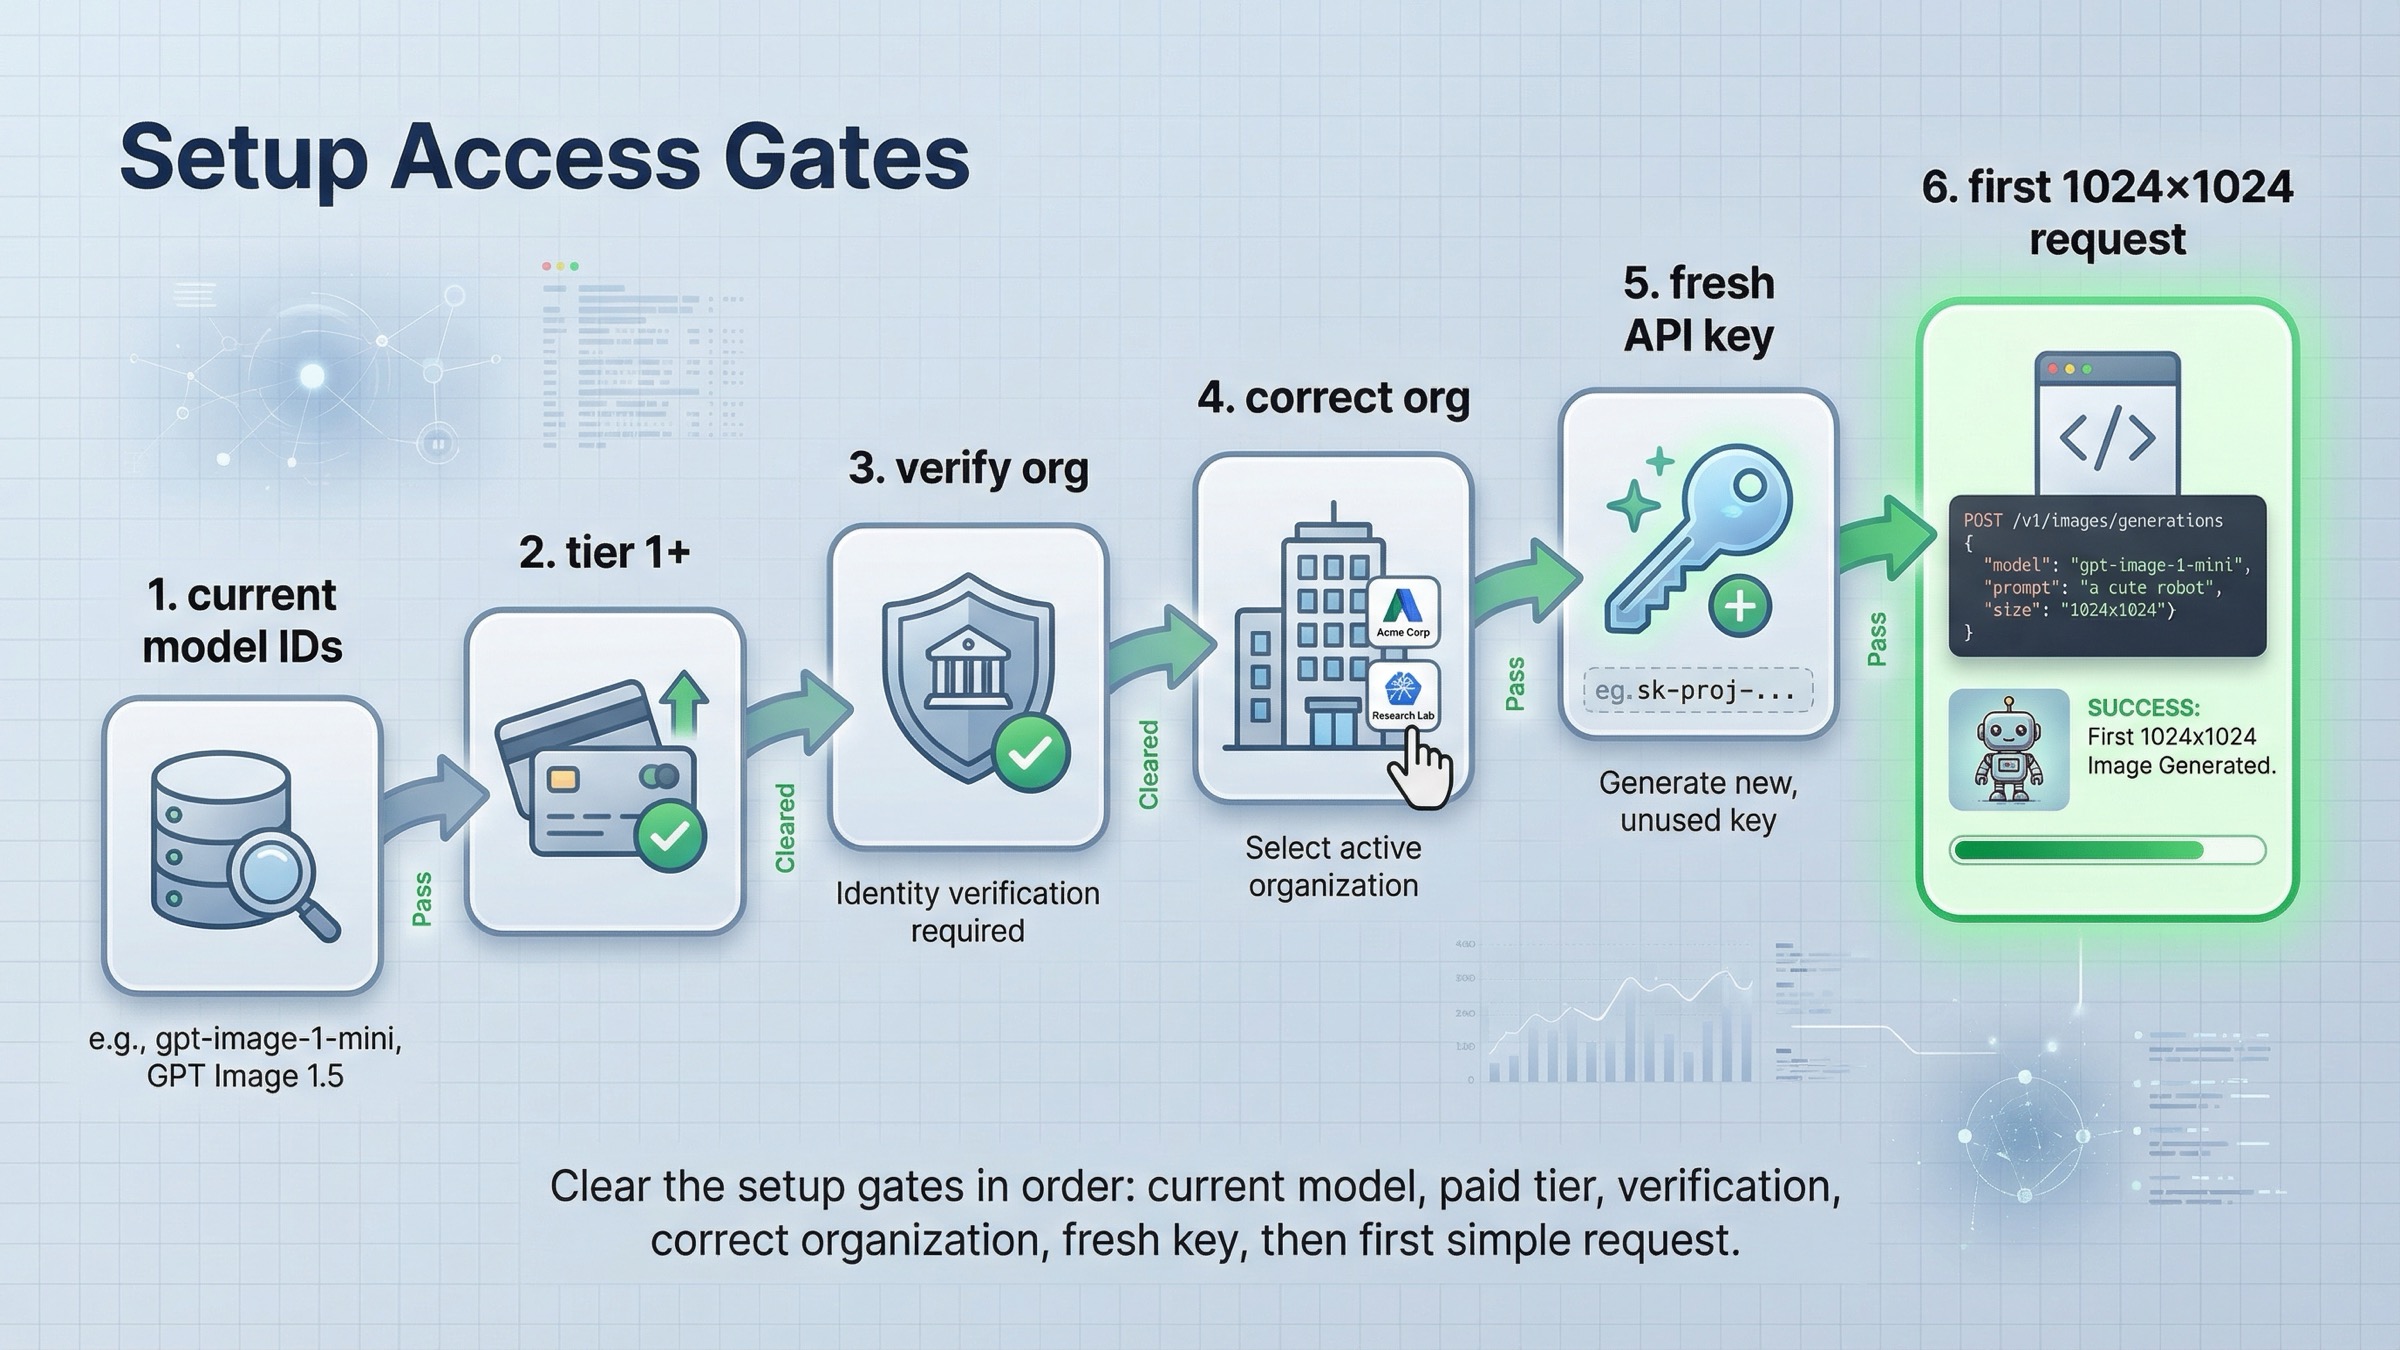
Before you copy any example, clear the setup gates that still block many otherwise valid tutorials.
First, use the current model names. OpenAI's current All models page lists the image family like this:
| Model | Current role | When to use it |
|---|---|---|
| GPT Image 1.5 | Current flagship image model | Best default for direct generation, edits, text rendering, and prompt following |
gpt-image-1-mini | Budget image lane | Start here when cost is the first constraint and you want to test whether the flagship is really necessary |
chatgpt-image-latest | ChatGPT image alias | Use only if you intentionally want the current ChatGPT image snapshot rather than a cleaner production model ID |
| GPT Image 1 | Previous image generation model | Legacy compatibility, migration, or older workflows only |
| DALL-E 3 / DALL-E 2 | Deprecated image models | Do not use them as the default basis for a fresh tutorial |
That model split matters because page one still surfaces older launch material and DALL-E-era examples. If you use those pages as your mental model, your tutorial can be "technically OpenAI" and still be strategically wrong on day one.
Second, confirm that your account is actually allowed to use the image model you want. The current API Model Availability by Usage Tier and Verification Status page says GPT-image-1 and GPT-image-1-mini are available to API users on tiers 1 through 5, with some access subject to organization verification. The current GPT Image 1.5 model page also shows Free not supported, with Tier 1 starting at 100,000 TPM and 5 IPM. That means a tutorial can fail before your code is even relevant.
Third, if image access looks blocked, check organization verification before you assume the SDK example is wrong. OpenAI's current API Organization Verification article says verification can unlock image generation capabilities in the API and that if the error persists you should wait up to 30 minutes, generate a new API key, refresh the session, and confirm the correct organization is active. That is a setup branch, not a code branch.
Fourth, install the current SDK once and keep the first request boring. In Node.js:
bashnpm install openai
In Python:
bashpip install openai
Then set OPENAI_API_KEY in your environment and aim for one small, square image first. OpenAI's current guide says 1024x1024 is the default size and that square images at standard quality are the fastest to generate. That makes the first test much easier to interpret. If your very first request is a multi-image edit, a transparent asset, and a large portrait size all at once, you will not know whether the problem is access, prompt, edit inputs, or the API path.
Fastest working example with the Images API
For a direct tutorial, the Images API is still the best place to start because it keeps the request and the mental model simple. You explicitly choose the image model, set the output options, and write the returned image data to disk.
This is the current pattern I would give a developer who wants the quickest direct generation example in JavaScript:
jsimport fs from "fs";
import OpenAI from "openai";

const client = new OpenAI({
  apiKey: process.env.OPENAI_API_KEY,
});

const result = await client.images.generate({
  model: "gpt-image-1.5",
  prompt: "Create a clean editorial illustration of a robot camera operator in a bright studio",
  size: "1024x1024",
  quality: "medium",
  output_format: "jpeg",
  output_compression: 80,
});

const imageBase64 = result.data[0].b64_json;
const imageBytes = Buffer.from(imageBase64, "base64");
fs.writeFileSync("openai-image-api-demo.jpg", imageBytes);
The matching Python version is just as short:
pythonfrom openai import OpenAI
import base64

client = OpenAI()

result = client.images.generate(
    model="gpt-image-1.5",
    prompt="Create a clean editorial illustration of a robot camera operator in a bright studio",
    size="1024x1024",
    quality="medium",
    output_format="jpeg",
    output_compression=80,
)

image_base64 = result.data[0].b64_json
image_bytes = base64.b64decode(image_base64)

with open("openai-image-api-demo.jpg", "wb") as f:
    f.write(image_bytes)
That is the right first success target because it teaches the whole direct path in one shot:
- choose the current image model explicitly
- keep size and quality conservative
- decode the returned base64 payload
- save one file locally
Once that works, you can move to edits. The current OpenAI guide also documents direct image editing on the Images API, including multi-image inputs and input_fidelity. This matters because the edit path is one of the easiest places to overcomplicate the first tutorial. If you are trying to preserve details from an input image, the official guide's current recommendation is to use input_fidelity: "high" when you need a closer edit rather than a looser reinterpretation.
jsimport fs from "fs";
import OpenAI from "openai";

const client = new OpenAI({
  apiKey: process.env.OPENAI_API_KEY,
});

const result = await client.images.edit({
  model: "gpt-image-1.5",
  image: [
    fs.createReadStream("woman.jpg"),
    fs.createReadStream("logo.png"),
  ],
  prompt: "Add the logo to the woman's jacket as if stitched into the fabric.",
  input_fidelity: "high",
});

const imageBase64 = result.data[0].b64_json;
fs.writeFileSync(
  "woman-with-logo.png",
  Buffer.from(imageBase64, "base64")
);
The important judgment call here is not "which endpoint is more modern." It is "which endpoint is more direct for the job I am doing today." For simple generation or editing, the answer is still the Images API. You can add orchestration later if you actually need it.
When the Responses API is the better tutorial path
The Responses API is the better fit when image generation is only part of a larger workflow. That is why the current OpenAI docs show image generation as a built-in tool inside a standard responses.create() call. In other words, the Responses API is not the default because it is newer; it is better when the surrounding workflow is broader.
The official pattern looks like this in JavaScript:
jsimport fs from "fs";
import OpenAI from "openai";

const client = new OpenAI({
  apiKey: process.env.OPENAI_API_KEY,
});

const response = await client.responses.create({
  model: "gpt-5",
  input: "Draw a transparent sticker-style icon of a paper airplane for a travel app",
  tools: [
    {
      type: "image_generation",
      background: "transparent",
      quality: "high",
    },
  ],
});

const imageBase64 = response.output
  .filter((item) => item.type === "image_generation_call")
  .map((item) => item.result)[0];

fs.writeFileSync("paper-airplane.png", Buffer.from(imageBase64, "base64"));
And in Python:
pythonfrom openai import OpenAI
import base64

client = OpenAI()

response = client.responses.create(
    model="gpt-4.1-mini",
    input="Generate a product hero image of a ceramic mug on a white background",
    tools=[{"type": "image_generation"}],
)

image_data = [
    output.result
    for output in response.output
    if output.type == "image_generation_call"
]

if image_data:
    with open("mug.png", "wb") as f:
        f.write(base64.b64decode(image_data[0]))
This route makes sense when the image request is embedded inside something larger:
- a tool-using assistant that may return both text and images
- a multimodal workflow that consumes text and image inputs together
- an agent step where image generation happens only after reasoning or other tools finish
It is a worse tutorial starting point when your reader simply wants "generate an image, then save it." In that narrower situation, the Responses route makes the cognitive load higher without improving the first success rate.
One subtle but important recency detail matters here. The OpenAI changelog says that on December 19, 2025, OpenAI added gpt-image-1.5 and chatgpt-image-latest to the Responses API image generation tool. That means older launch posts that described Responses support as coming later are historically accurate but no longer current. If your tutorial skips that date context, it can accidentally teach the right endpoint with the wrong historical assumptions.
Settings that change results and costs
Once you have one successful request, the next job is not to pile on complexity. It is to understand which settings actually change quality, cost, latency, or edit behavior.
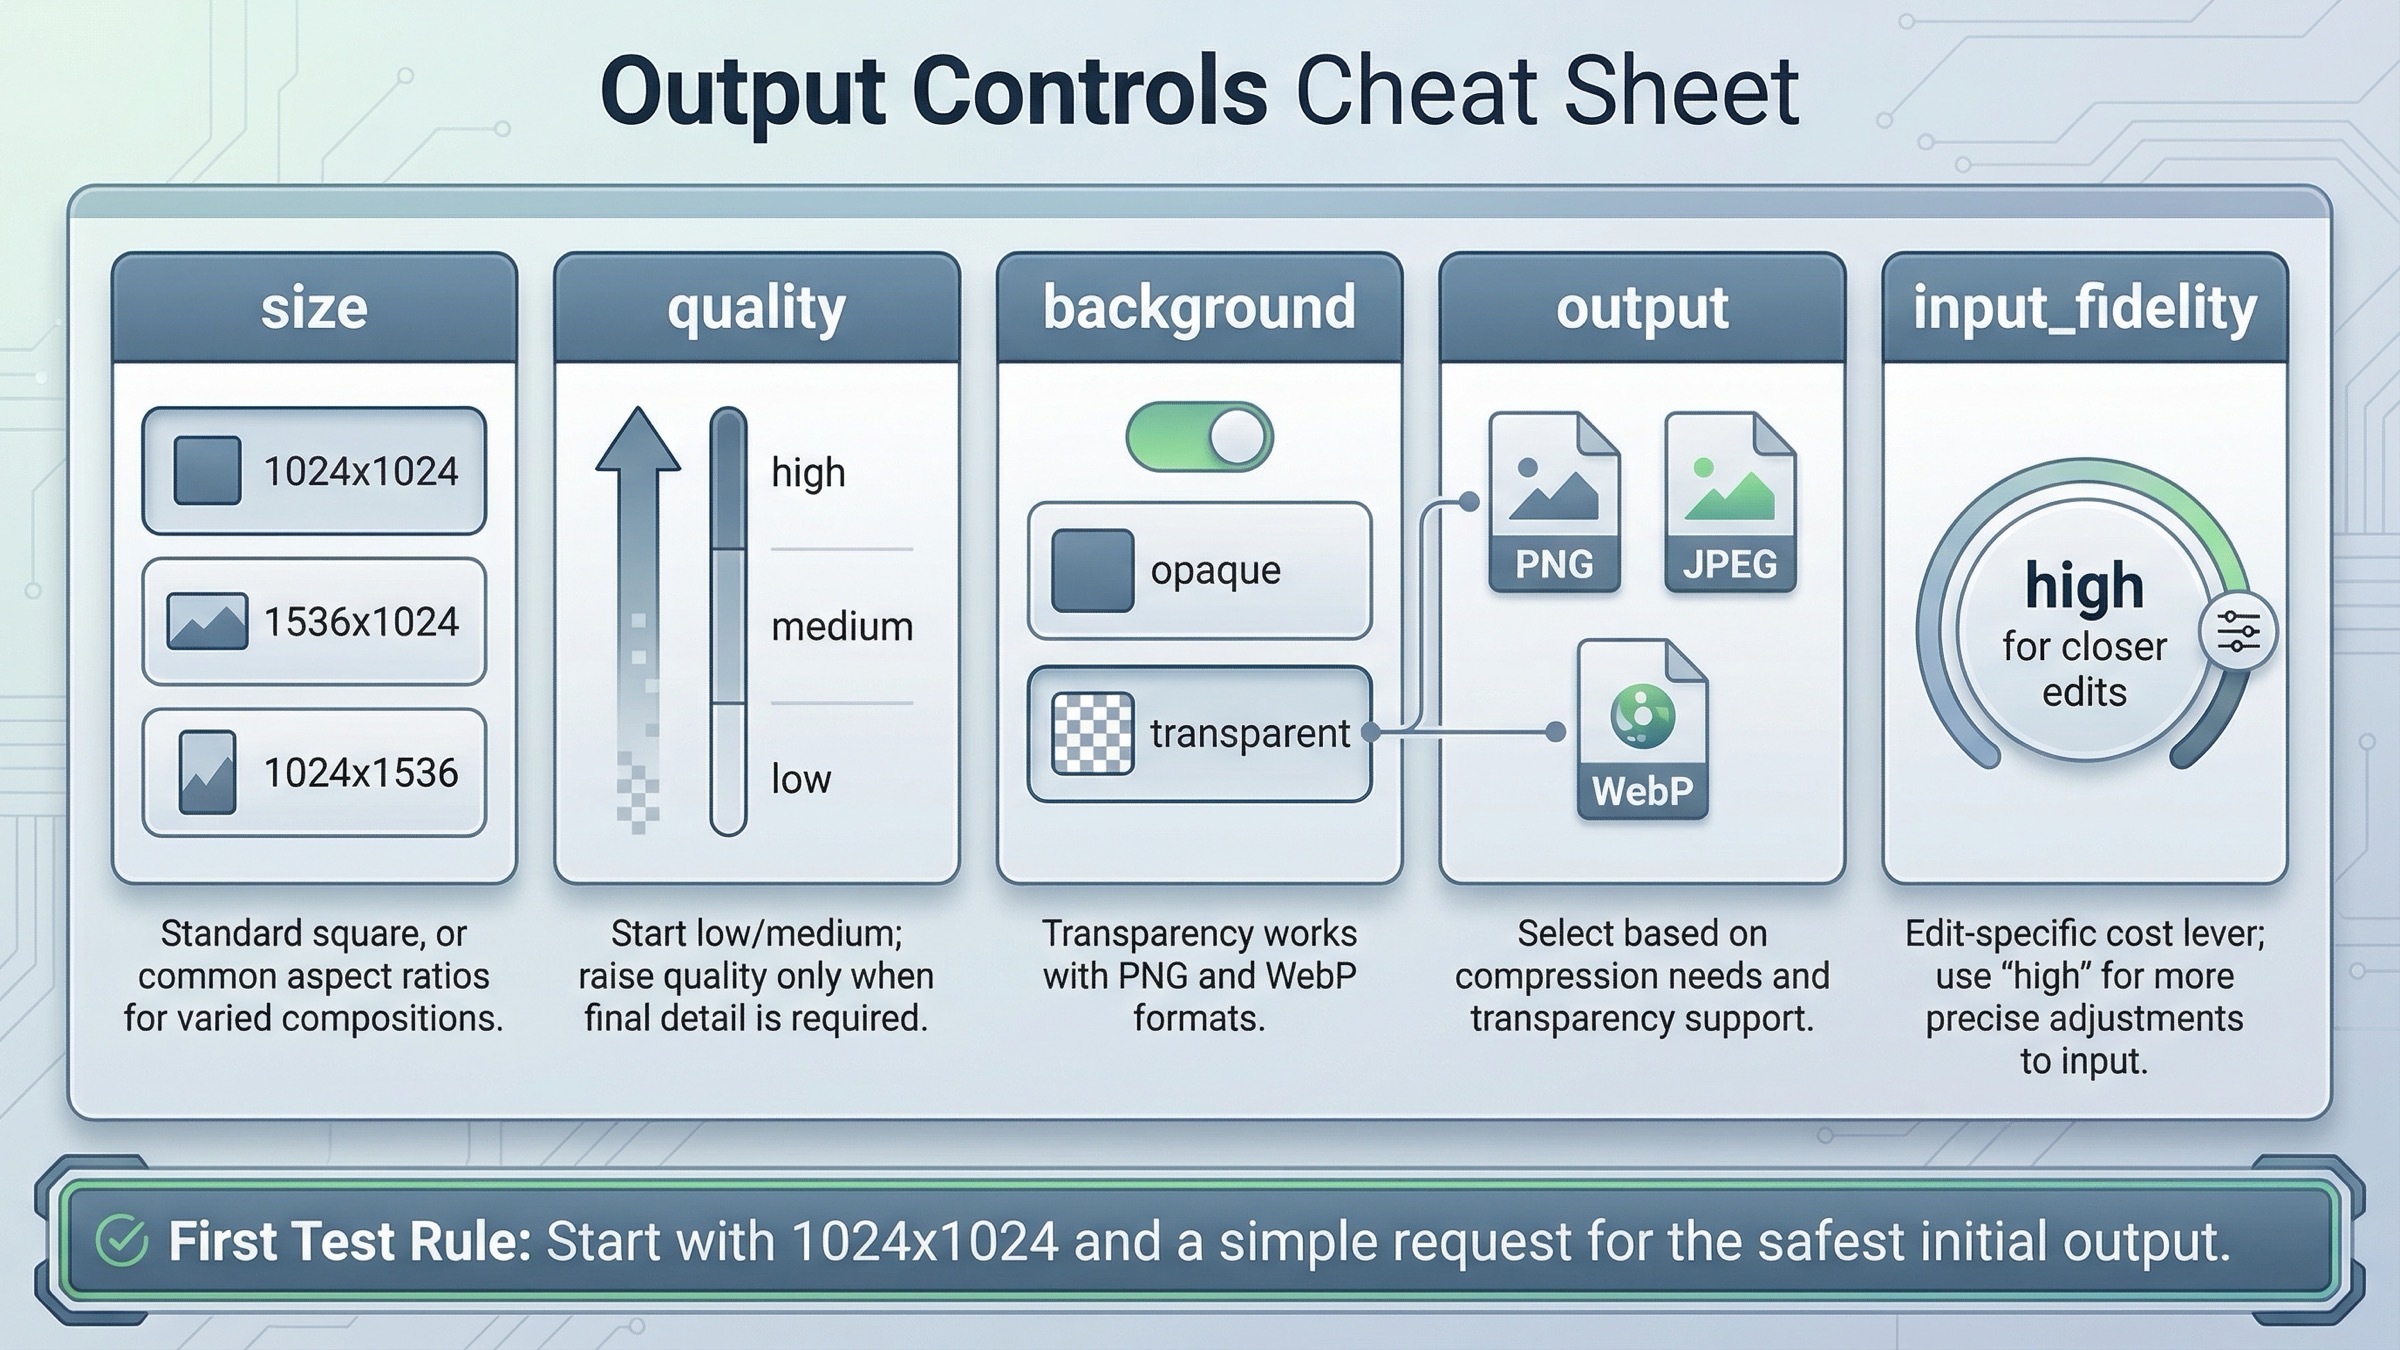
The current image generation guide highlights five settings that matter most for GPT Image workflows:
- size
- quality
- format
- compression
- background
The most practical way to think about them is by the decision they change.
Size changes both composition and cost. For a first test, stay at 1024x1024. The current guide explicitly says square images at standard quality are the fastest to generate. Move to 1024x1536 or 1536x1024 only when the composition requires it.
Quality changes both latency and spend. On the current GPT Image 1.5 model page, 1024x1024 low is $0.009, medium is $0.034, and high is $0.133. That is a meaningful spread. For prototypes, design iterations, and smoke tests, start at low or medium. Save high for the branch where visual polish actually matters.
Background matters when you need a transparent asset. The current guide says GPT Image models support transparent backgrounds when you set background: "transparent", and that transparency is supported with PNG and WebP, not arbitrary output types. It also notes that transparency works best at medium or high quality, which is the sort of detail many weak tutorials skip.
Output format and compression matter when latency or file size matters. OpenAI's current guide says the Image API returns base64-encoded image data, the default format is PNG, and you can request JPEG or WebP. It also says JPEG is faster than PNG, so if your first constraint is response speed rather than alpha support, JPEG is often the better choice.
Input fidelity matters when you are editing existing images. The current guide's input_fidelity: "high" examples are valuable because they point at a real production tradeoff. Higher fidelity preserves more of the input image, but it also uses more image input tokens per request. This is exactly the kind of option that belongs in a serious tutorial because it changes behavior, not just syntax.
The safest operating rule is this: change one variable at a time. Do not switch model, size, quality, output format, background, and multi-image edit inputs all at once. If you do, you will not know whether the result improved because of prompt quality, model choice, or a silent pricing increase.
If your real question has shifted from "how do I call the API?" to "what will this cost at scale?", the better follow-up is our guide to OpenAI image generation API pricing, because that decision turns into model-lane economics rather than pure tutorial flow.
Troubleshooting the failures most tutorials skip
This is the section that keeps a tutorial honest. A lot of image API guides stop at the happy path and quietly assume that if the reader failed, they probably copied the code wrong. That is not how this topic behaves in practice.
403 verification or playground access errors
If you see a verification-related 403, stop changing prompts and SDK versions. The current OpenAI help-center guidance says to check the active organization, wait up to 30 minutes for verification changes to propagate, generate a new API key, and retest. Community threads are still full of people who saw a green "Organization Verified" state and a blocked Images playground at the same time. That mismatch is why the tutorial needs a setup section before a code section.
429 errors on an account that looks funded
A misleading 429 is one of the most frustrating branches in this topic. The OpenAI Developer Community has multiple threads where users added credits and still hit rate_limit_exceeded on image models. The practical takeaway is that you should verify the account's usage tier, not just the visible balance. The current help-center model availability page says GPT image access is for tiers 1 through 5, with some access also subject to organization verification. If that gate is not satisfied, the code can be syntactically perfect and still fail.
Edit failures, mask problems, and stale output assumptions
When direct generation works but edits fail, the problem is often the edit inputs, not the model. The current guide says the image to edit and the mask must be the same format and size and less than 50MB. It also calls out the need for an alpha channel in masks. If you skip those details, the edit path feels random even when the API is behaving correctly.
There is also a subtler failure mode: the tutorial assumes a URL-centric output model from older DALL-E docs. The current Image API guide says the Image API returns base64-encoded image data and that the default format for GPT Image output is PNG. If you keep expecting a hosted URL because an older tutorial trained you to, your post-processing layer will be wrong even when the request succeeds.
When the problem looks broader than your own request, check OpenAI Status before you keep rotating credentials. As checked on March 22, 2026, OpenAI reported all systems fully operational, which means you should not assume there is an active platform incident behind a local image failure today. But checking status is still the right branch when a healthy tutorial suddenly stops behaving like yesterday.
If your main blocker is still access rather than implementation, our guide to OpenAI image generation API verification goes deeper on the org-verification path.
Production checklist and next steps
Once the first request works, the right next move is not "rewrite the whole thing with more abstractions." It is to stabilize the parts that will matter in production.
Use this order:
- Lock the route first. Keep the Images API if the feature is direct generation or edits. Move to Responses only when the surrounding workflow justifies it.
- Lock the model second.
Start with GPT Image 1.5 unless cost is the first constraint. Benchmark
gpt-image-1-minionly after the direct path works. - Lock one output shape. Pick a default size, quality, and output format before you add more user-facing options.
- Add troubleshooting visibility. Log the active org, model ID, endpoint, and whether the failure is setup, permission, or request-shape related.
- Separate tutorial success from cost success. A request that works once is not the same as a workflow that is affordable at scale.
That distinction is why a good tutorial should hand off cleanly to the adjacent decisions instead of pretending it solved everything. After you have the API call working, the next useful reads are:
- OpenAI image generation API pricing if you need to budget by quality, size, or model lane
- OpenAI image generation API verification if you are still blocked before the first image
- How to get an OpenAI API key if the project itself is not fully set up yet
- OpenAI API key requirements if you need the current account and billing prerequisites
The broad lesson is straightforward. A current OpenAI image API tutorial is not mainly about code syntax. It is about choosing the right API surface, using the current model IDs, clearing the setup gates early, and only then tuning the output controls that actually change quality, latency, and cost. Once you do that in the right order, the image workflow gets much simpler.
FAQ
Should I start with the Images API or the Responses API?
Start with the Images API unless image generation is only one step inside a broader assistant workflow. It is the cleaner route for direct generation and edits because model choice and output handling stay explicit.
What is the safest current model to use in a fresh tutorial?
For most developers, gpt-image-1.5 is the clean default because OpenAI's current model catalog lists it as the flagship image model. If cost is your first concern, benchmark gpt-image-1-mini after the direct path works.
Why does a valid sample still fail before it returns an image?
The most common reasons are usage-tier access, organization verification, the wrong active organization, or a stale API key. These are setup problems, not prompt-engineering problems.
When should I use chatgpt-image-latest instead of gpt-image-1.5?
Only when you specifically want the image snapshot currently used in ChatGPT. For a stable production tutorial, gpt-image-1.5 is usually the cleaner model ID to document and test against.