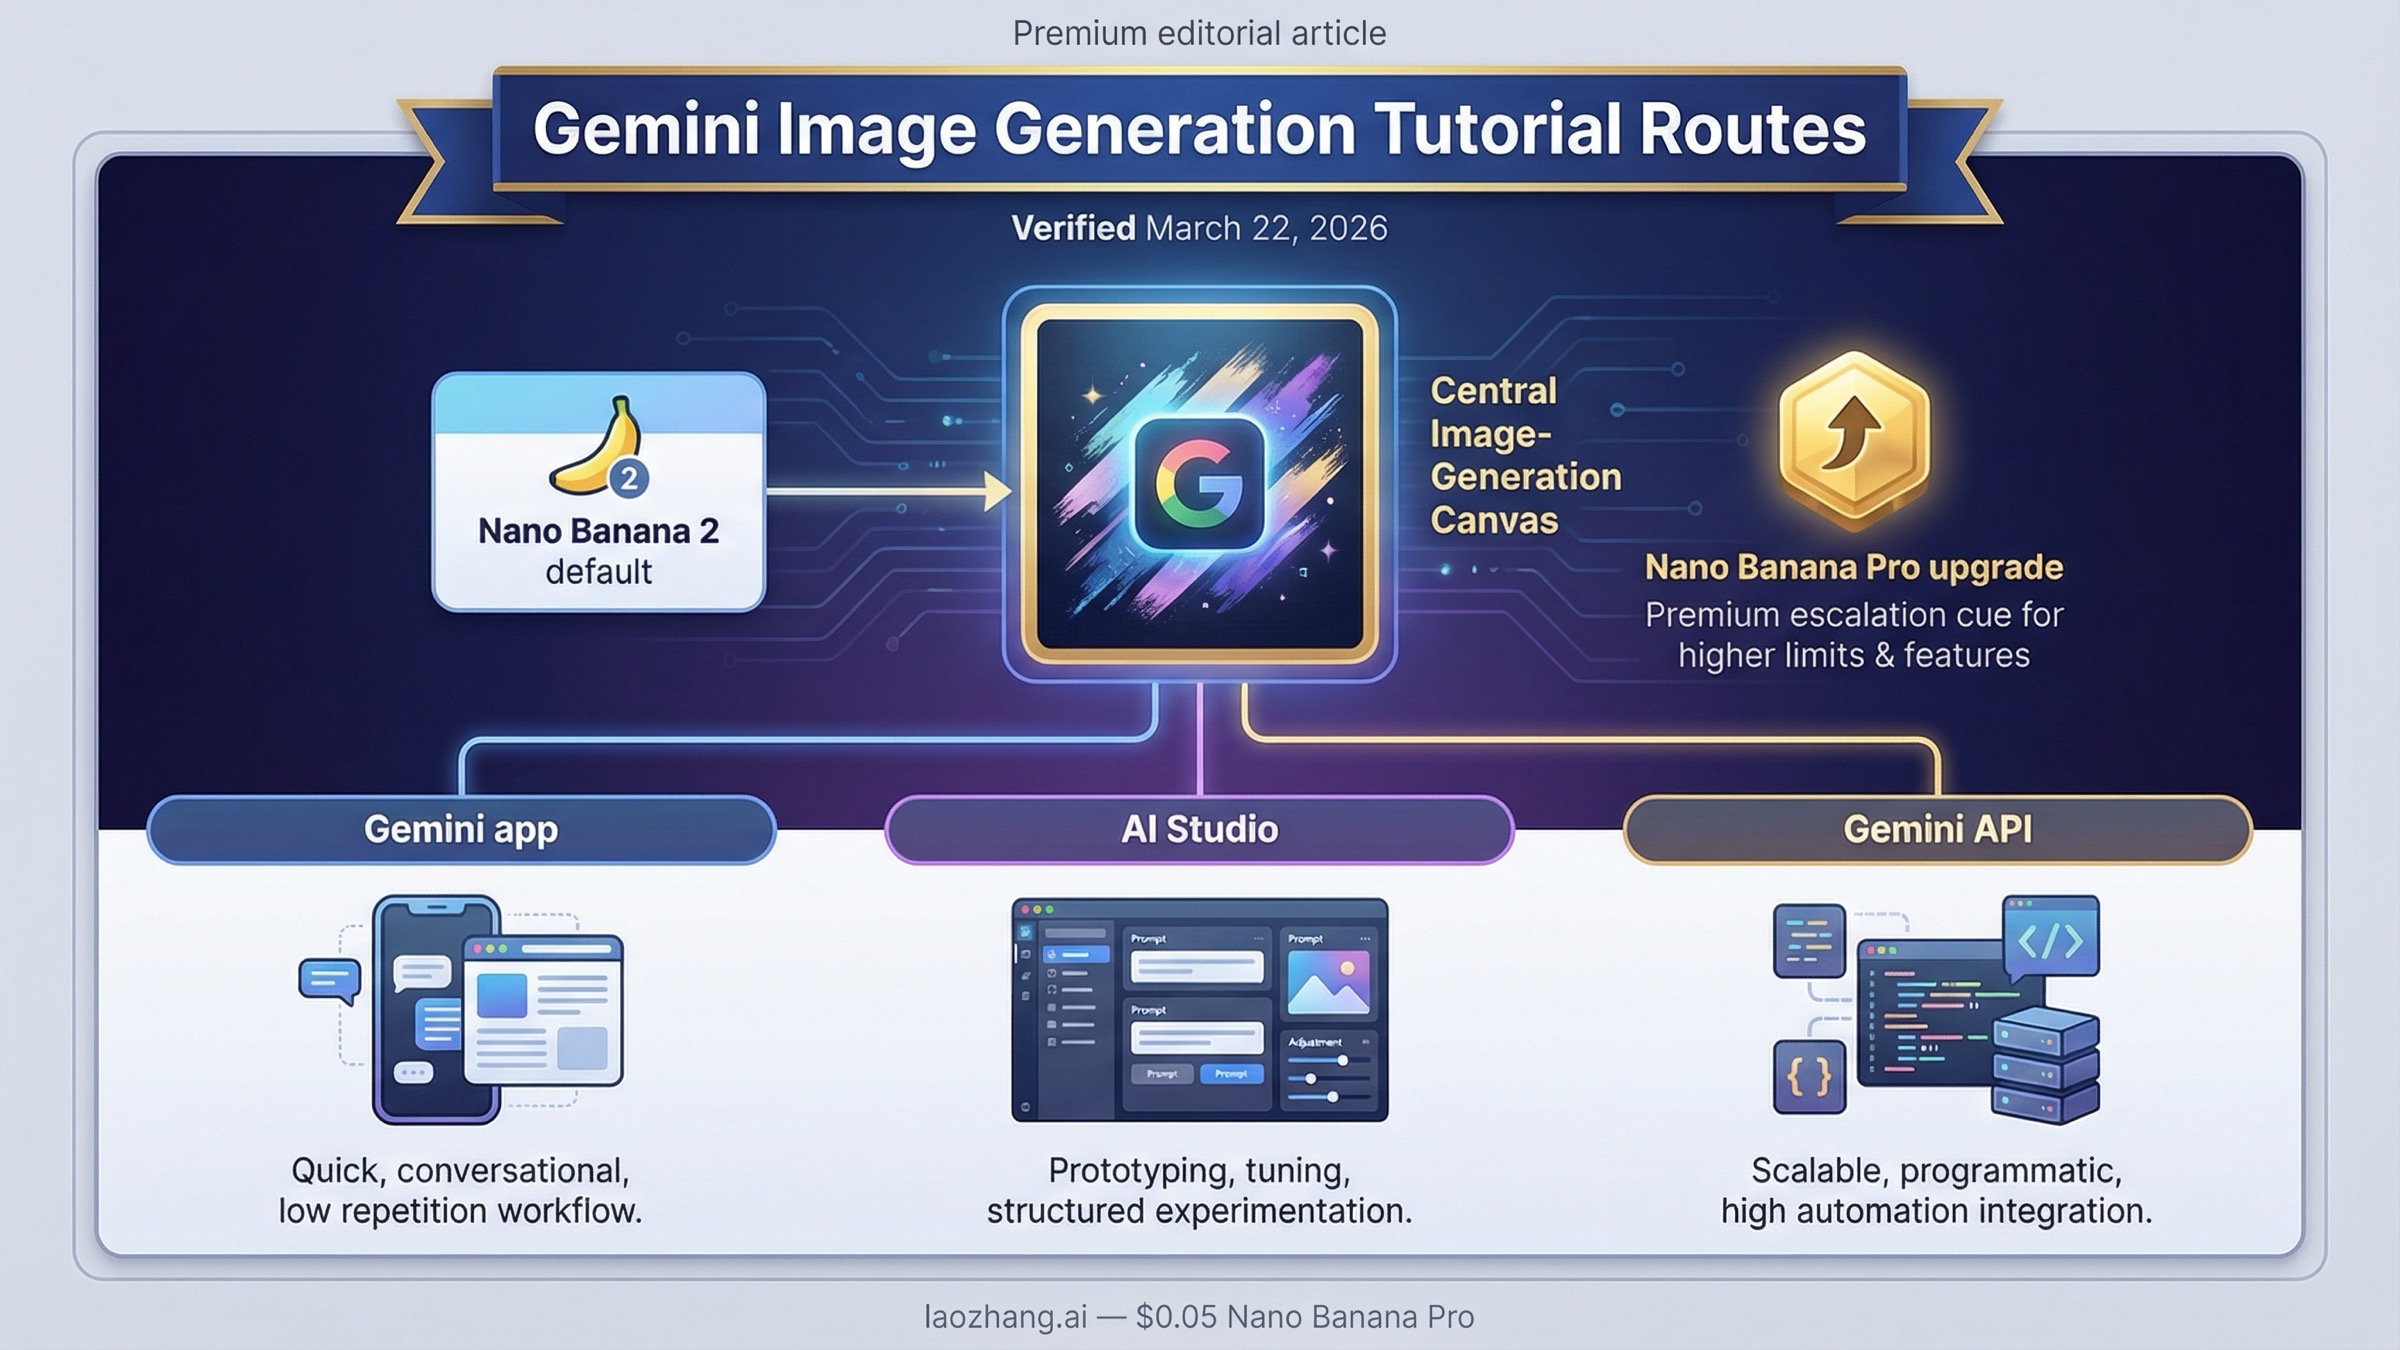
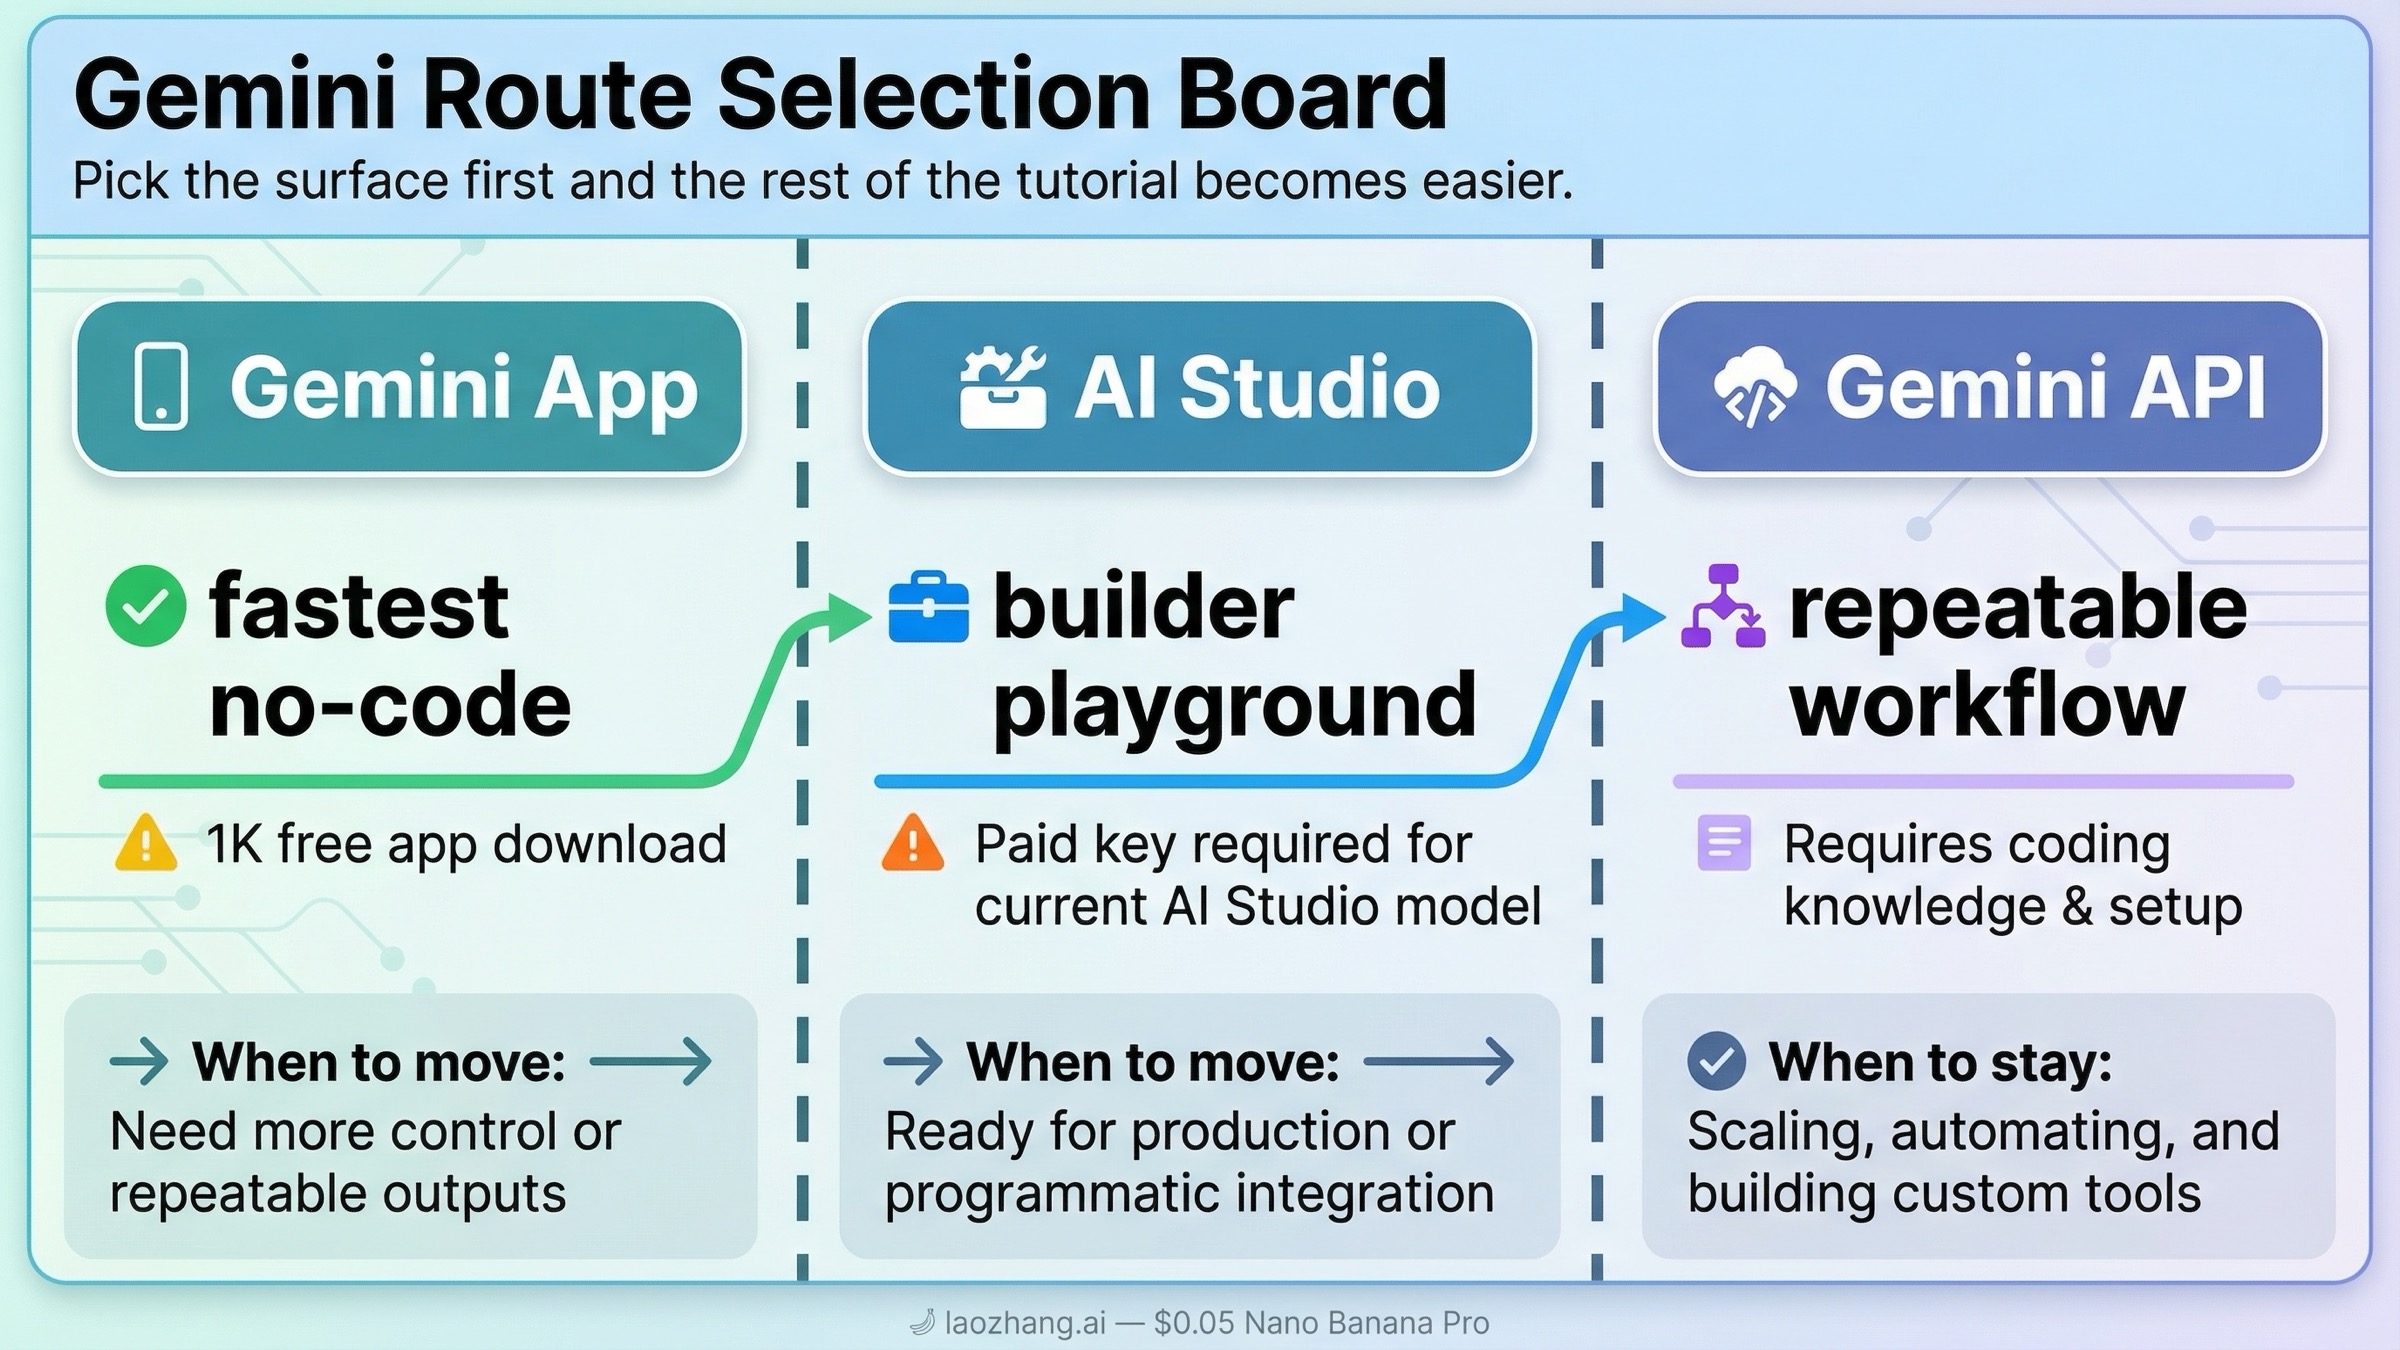
As of March 22, 2026, the best default for Gemini image generation is Nano Banana 2, and the first decision is not your prompt. It is your surface. Use the Gemini app if you want the fastest no-code route, use AI Studio if you want a builder-friendly playground, and use the Gemini API if you need a repeatable workflow you can ship in a product.
That split matters because page one still mixes three different jobs into one keyword. Some pages teach the app. Some teach the API. Some explain the new Nano Banana 2 rollout. Very few pages tell you which route to trust first, which current model name matters, and what changes once you care about pricing, quotas, edits, or 2K and 4K output.
If you only need the shortest useful answer, use this routing table first.
| If you want | Start here | Why this is the right default | When to switch |
|---|---|---|---|
| Fastest manual image generation with no code | Gemini app | Google's help page now centers Nano Banana 2 for create and edit flows, and the app is still the shortest route to a first image | Switch when you need repeatability, logging, or programmatic control |
| A builder UI before writing code | AI Studio | Good for prompt iteration and model testing in a UI, but for Nano Banana 2 the current Google developer post says a paid API key is required | Switch when you want scheduled jobs, automation, or app integration |
| Production workflow, retries, and explicit controls | Gemini API | Best route for stable prompts, image size and aspect-ratio control, and app-level integration | Switch up to Pro when text-heavy or premium assets justify the cost |
| Higher-fidelity text rendering or infographic-heavy output | Nano Banana Pro | Better premium route when the image is expensive to get wrong | Do not start here unless the job truly needs it |
Key Takeaways
- Use the Gemini app help flow if you want the fastest no-code image result.
- Use Google AI Studio only when you want a builder UI, and remember that Google's current Nano Banana 2 developer post says a paid API key is required for that model there.
- Use the Gemini image-generation docs and the pricing page when you need an API workflow you can budget and automate.
Start by choosing the right Gemini image route: app, AI Studio, or API
The biggest mistake people make with Gemini image generation is treating every Google surface as one product. They are related, but they are not interchangeable.
The Gemini app is the consumer route. Google's current Gemini Apps help page says you can create images with Nano Banana 2, edit a generated image, upload your own image for changes, or upload multiple images and ask Gemini to combine them into something new. The same page says free users download at 1K, while paid subscriptions download at 2K. That makes the app the best place to start if your goal is a fast manual result rather than a reusable workflow.
Google AI Studio is the builder playground. It sits between the app and the API. It is useful when you want to iterate on prompts in a UI before you commit to code. But this is where tutorial advice gets sloppy. Google's billing FAQ still says new accounts begin on the Free tier and that AI Studio remains free unless you link a paid API key for paid features. At the same time, Google's February 26, 2026 Nano Banana 2 developer post says a paid API key is required to use the model in AI Studio. The safe reading is not "AI Studio is free" or "AI Studio is paid" in the abstract. The safe reading is: AI Studio is a surface, but the current main Gemini image model is no longer a carefree free-testing lane.
The Gemini API is the production route. Use it when you need explicit model choice, structured prompts, retries, logs, and integration into your own app or service. Google's image-generation docs position this route for image generation, image editing, multi-turn refinement, aspect-ratio control, and explicit image sizes. Once your image workflow stops being a manual experiment and becomes an operational task, this is the route that matters.
That is why the right tutorial sequence is: pick the surface first, then prompt second, then optimize cost and image size only after the basic route works.
Use Nano Banana 2 by default, but know when Pro or the legacy 2.5 lane changes the answer
If you remember older Gemini image tutorials, this is where most of them go stale.
Google's current image-generation docs say Gemini 3.1 Flash Image Preview should be your go-to image generation model because it has the best all-around performance and intelligence-to-cost balance. That is the model Google now packages as Nano Banana 2. Google's deprecations page lists its release date as February 26, 2026 and shows no shutdown date announced. That is the cleanest reason to treat it as the default answer for new work.
You still need the rest of the lineup, because the default is not the only answer.
| Model | Current status | Current official image pricing | Best fit | What to watch |
|---|---|---|---|---|
gemini-3.1-flash-image-preview | Current default lane, released February 26, 2026 | No public free tier; about $0.045 at 0.5K, $0.067 at 1K, $0.101 at 2K, $0.151 at 4K | Best all-around default for new image generation and editing workflows | Preview quotas still matter |
gemini-3-pro-image-preview | Current premium lane | No public free tier; about $0.134 at 1K or 2K and $0.24 at 4K | Premium text-heavy, infographic, or higher-fidelity asset work | Much higher cost than Flash Image |
gemini-2.5-flash-image | Live legacy lane | No public free tier; about $0.039 standard and $0.0195 in batch | Cheapest official Gemini lane while it remains live | Google's deprecations page schedules shutdown for October 2, 2026 |
The practical rule is simple. Start with Nano Banana 2 unless you already know the image is expensive enough that Pro is worth it. Move to Nano Banana Pro when you need sharper text rendering, better infographic output, or a premium redo path in the app. Use Gemini 2.5 Flash Image only when you deliberately want the cheapest legacy lane and you understand that it is already on a retirement path.
That distinction is important because cheap and current are no longer the same answer. If you need the deeper cost math, use the dedicated Gemini image generation API pricing guide. If your real question is whether any of this is still free, the better companion page is Gemini image generation free tier. This tutorial should stay focused on getting you to a working first run.
How to generate images in the Gemini app or AI Studio if you want the fastest first run
If you are not ready to write code, do not start with the API just because it sounds more serious. Start where you can see the prompt-result loop clearly.
In the Gemini app, the sequence is short:
- Open Gemini and use Create image.
- Start your prompt with a clear action such as "create," "draw," or "generate."
- Describe the subject, style, background, and mood in one sentence or short paragraph.
- If you want an edit instead of a fresh image, upload an image and tell Gemini exactly what to change.
- If the result is close but still weak and you are on a paid plan, use Redo with Pro for the premium pass.
The app help page is useful here because it gives the right defaults without making you think about API fields. It also shows the current boundaries that matter in practice: image creation and editing are tied to Nano Banana 2, paid users get the higher-resolution download path, and Nano Banana Pro is positioned as a redo option rather than the main entry point.
AI Studio is the better choice when you want to test prompts like a builder instead of like a casual app user. The interface makes it easier to iterate on prompt structure, compare variants, and move toward code later. But treat it as a builder surface, not as a magical free shortcut. Google's current developer post for Nano Banana 2 says a paid API key is required there, so if AI Studio is your starting point, think of it as a faster experimentation surface for the same family of paid image workflows rather than as a different business model.
The right way to use both surfaces is progressive:
- Start in the Gemini app if you only need a result.
- Start in AI Studio if you want to learn the prompt and model behavior before coding.
- Move to the API only after you understand what prompt pattern and image size you actually want.
That sequence prevents a lot of wasted API debugging. Many people who say Gemini image generation feels inconsistent are actually switching surfaces too early. They start in code before they have decided what a good prompt even looks like.
If your main goal is image editing rather than fresh generation, the dedicated Gemini image-to-image editing guide goes deeper on local edits, multi-image blending, and edit-specific prompt patterns.
How to generate or edit images with the Gemini API
Once you know you need repeatability, the API route becomes the real tutorial.
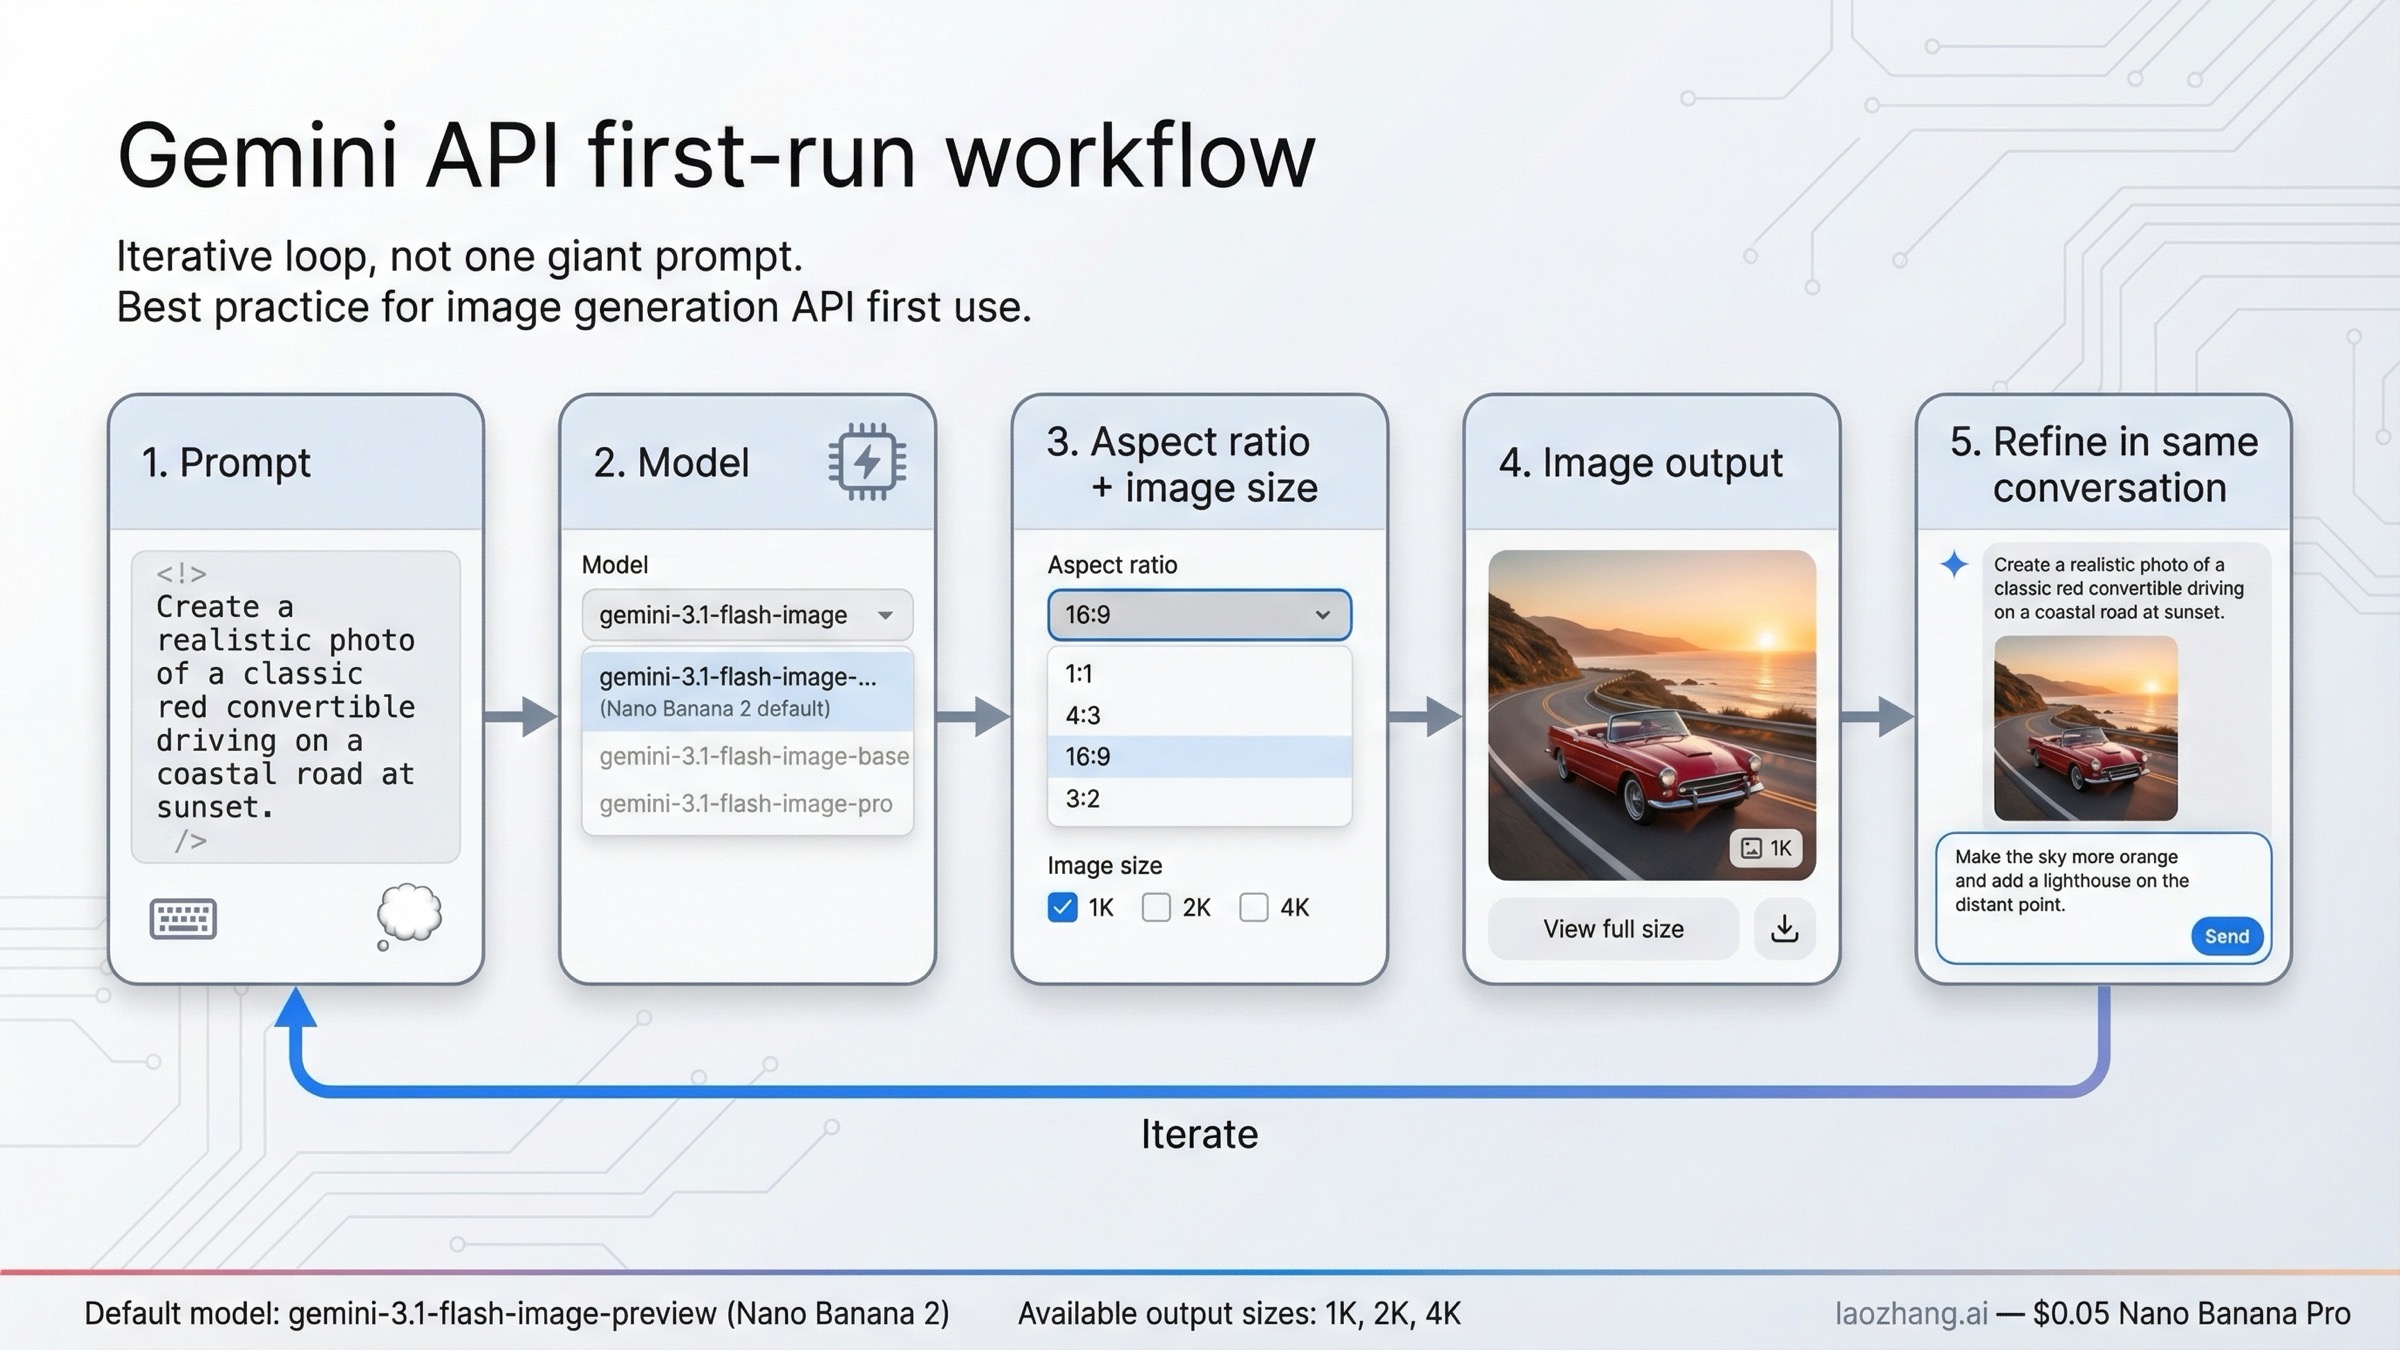
Google's current image-generation docs support both pure text-to-image and text-plus-image editing. They also support multi-turn refinement, which is more important than it sounds. The best Gemini image workflow is usually not one huge prompt and one final result. It is one clear prompt, one result, one adjustment, and another turn in the same conversation until the image is good enough.
For a first API run, keep the job simple. Use gemini-3.1-flash-image-preview, request a clear aspect ratio, and choose an explicit image size only if the output really needs it.
jsimport { GoogleGenAI } from "@google/genai";

const ai = new GoogleGenAI({ apiKey: process.env.GEMINI_API_KEY });

const prompt = `
Create a clean 16:9 product hero image of a matte black travel mug on a light concrete surface.
Use soft studio lighting, sharp detail on the mug texture, and leave calm negative space on the right.
`;

const response = await ai.models.generateContent({
  model: "gemini-3.1-flash-image-preview",
  contents: prompt,
  config: {
    responseModalities: ["TEXT", "IMAGE"],
    imageConfig: {
      aspectRatio: "16:9",
      imageSize: "2K"
    }
  }
});
That example is intentionally boring. It is supposed to work. It also captures the main controls that change output quality in real life:
- model changes cost, quality, and the safe default
- aspectRatio changes composition
- imageSize changes resolution and price
- prompt shape changes almost everything else
If you are editing rather than generating from scratch, keep the prompt narrower than you think. Provide the source image and say exactly what should change and what should stay fixed. Google's older but still useful prompt guide gives the right mental model: describe the scene instead of stacking keywords, and when you want a local edit, tell Gemini to change only that part while preserving the rest.
The other important API lesson is to treat image generation as an operational system, not a perfect one-shot function. Google's rate-limits page says live limits vary by model and account tier, and forum threads show why a real implementation still needs retries, logging, and sanity checks. If your JS SDK ignores imageSize, or if AI Studio and your SDK behave differently, confirm the SDK version and test the same prompt in AI Studio before you assume the model itself is wrong.
If your real task is large-scale generation at the best current price-performance point, the more specific follow-up is the cheapest Gemini 3.1 Flash Image Preview API guide.
Prompt patterns that produce better Gemini images
The fastest way to get weak Gemini output is to throw short keywords at it and hope the model reads your mind.
Google's prompt guidance is clear on this point: a descriptive scene usually works better than a disconnected keyword pile. That principle still holds in the Gemini 3.1 image line. The model responds better when you tell it what the image should look like, what the subject is doing, what the setting is, what the lighting should feel like, and what should stay consistent.
Here are the four prompt jobs that matter most for a practical tutorial.
1. Descriptive text-to-image.
Use this when you are creating something from scratch. A strong pattern is subject + action + environment + style + composition. For example: "Create a photorealistic 16:9 image of a ceramic coffee mug on a weathered wooden table at sunrise, with soft side lighting, visible steam, and shallow depth of field." That is much stronger than "coffee mug cinematic realistic."
2. Local edit without rewriting the whole image.
Use this when you already have an image and only want one area changed. The right pattern is blunt: "Using the provided image, change only the blue sofa to a dark green velvet sofa. Keep the lighting, the room layout, and the other furniture exactly the same." This is where most edit prompts fail. They describe the new thing, but they do not protect the old image.
3. Multi-image composition or style transfer.
Gemini's image stack supports multi-image workflows, and Google's docs also discuss larger reference-image use cases. The prompt needs to say what each input contributes. Example: "Use the bag from image one and place it in the studio setup from image two. Keep the bag proportions realistic and match the soft top lighting from image two." If you skip that role assignment, the model has too much freedom.
4. Text-heavy or infographic generation.
This is where Nano Banana Pro becomes more attractive. If the image needs readable labels, poster copy, or diagram text, say exactly what text should appear and what style the graphic should follow. A useful pattern is: "Create a clean 16:9 infographic explaining the water cycle with the labels 'Evaporation,' 'Condensation,' and 'Precipitation' in bold sans-serif text. Keep the layout simple and legible." Vague requests like "make an infographic about the water cycle" invite prettier but less usable output.
The short rule behind all four patterns is the same: tell Gemini what matters, tell it what must stay fixed, and tell it what visual language you want. That is more important than adding more adjectives.
Troubleshooting: why Gemini image generation feels harder than it should
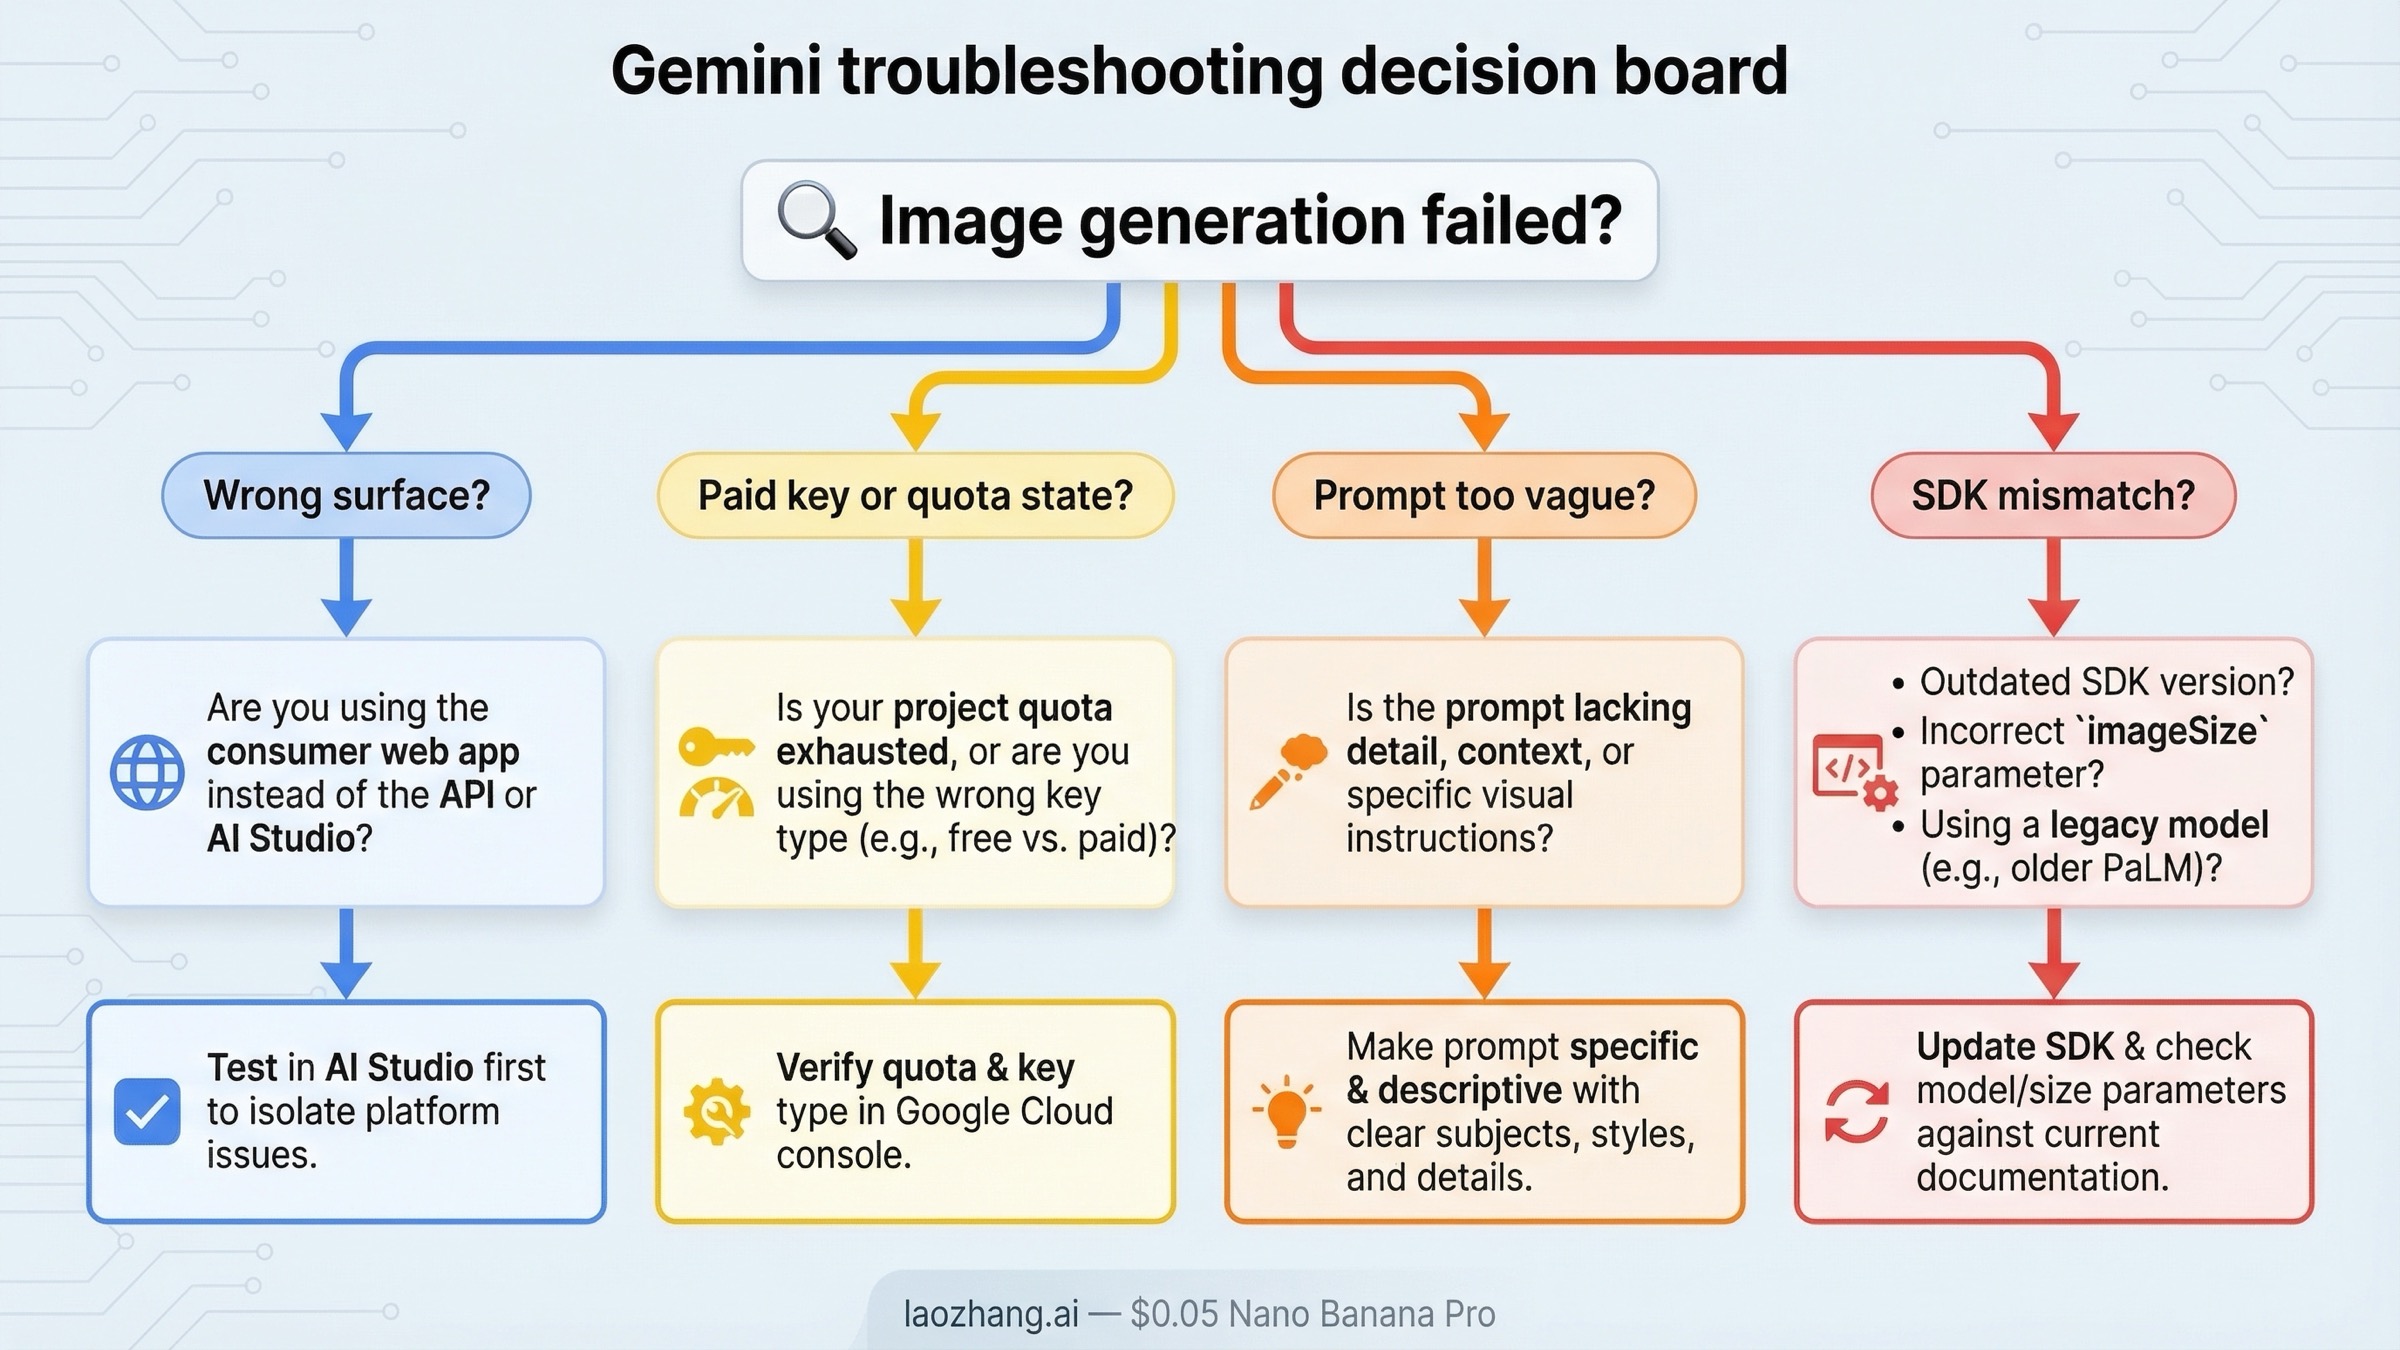
The frustrating part of Gemini image generation is that many failures do not look like product-surface problems at first. They look like bad prompts.
The first common failure is using the wrong surface. If you are trying to learn prompt behavior, the app or AI Studio is usually a better first step than the API. If you are trying to ship the feature in your own product, the app is the wrong benchmark. Many people bounce between surfaces and then conclude the model is inconsistent when the real problem is route confusion.
The second failure is free-versus-paid confusion. Google's current official pages are accurate, but they describe different parts of the system. The billing page explains free-tier posture in general. The Nano Banana 2 developer post explains the current AI Studio requirement for that model. The pricing page explains the live public image API rows. If you collapse those three pages into one mental model without separating their scope, everything sounds contradictory.
The third failure is prompt vagueness. Gemini is more forgiving than some older image stacks, but it still cannot infer the protected parts of your image if you never name them. If your edit keeps changing too much, narrow the request. If your new image looks generic, add more scene language and composition detail.
The fourth failure is quota or activation friction. Google's rate-limits page says live limits vary by model and account tier, and forum threads show that paid-key behavior can still feel unclear to users immediately after account changes. If AI Studio tells you you are out of free generations or rate-limited even after linking a paid key, confirm which project is active, give the billing state time to settle, and check live usage in AI Studio rather than trusting assumptions from an older quota screenshot.
The fifth failure is SDK mismatch. Official docs show imageSize support, but developers have reported cases where a JS SDK ignored the 2K setting while AI Studio handled the same prompt correctly. That does not mean the API lacks the feature. It means you should test the same request across the SDK and AI Studio, update the SDK when needed, and verify the output resolution before you build the rest of the workflow around it.
The sixth failure is starting with the wrong model. If you choose Gemini 2.5 Flash Image because it is the cheapest row, you may optimize for the wrong thing. It is still live, but Google's deprecations page already puts it on a shutdown path for October 2, 2026. For a fresh workflow, the default answer should still be Nano Banana 2 unless you have a specific reason to optimize for the legacy lane.
If your problem is not "how do I start?" but "why did the current app or API stop working the way I expected?", the more focused follow-up pages are Gemini image generation limit reset and Gemini image API free tier.
Bottom line
The best Gemini image generation tutorial in 2026 is not a list of model names and it is not a copy of one Google doc page.
Start with Nano Banana 2. Use the Gemini app for the fastest no-code first run. Use AI Studio when you want a builder-friendly prompt playground and understand that the current main model is a paid-key route there. Use the Gemini API when you need a repeatable workflow with image size, aspect-ratio, retries, and integration control. Move up to Nano Banana Pro only when text-heavy or premium assets justify the jump, and treat Gemini 2.5 Flash Image as the cheapest legacy lane rather than the default future-proof path.
Once those route decisions are clear, Gemini image generation becomes much easier than the current SERP makes it look. The hard part is usually not the model. It is starting on the right surface with the right expectations.