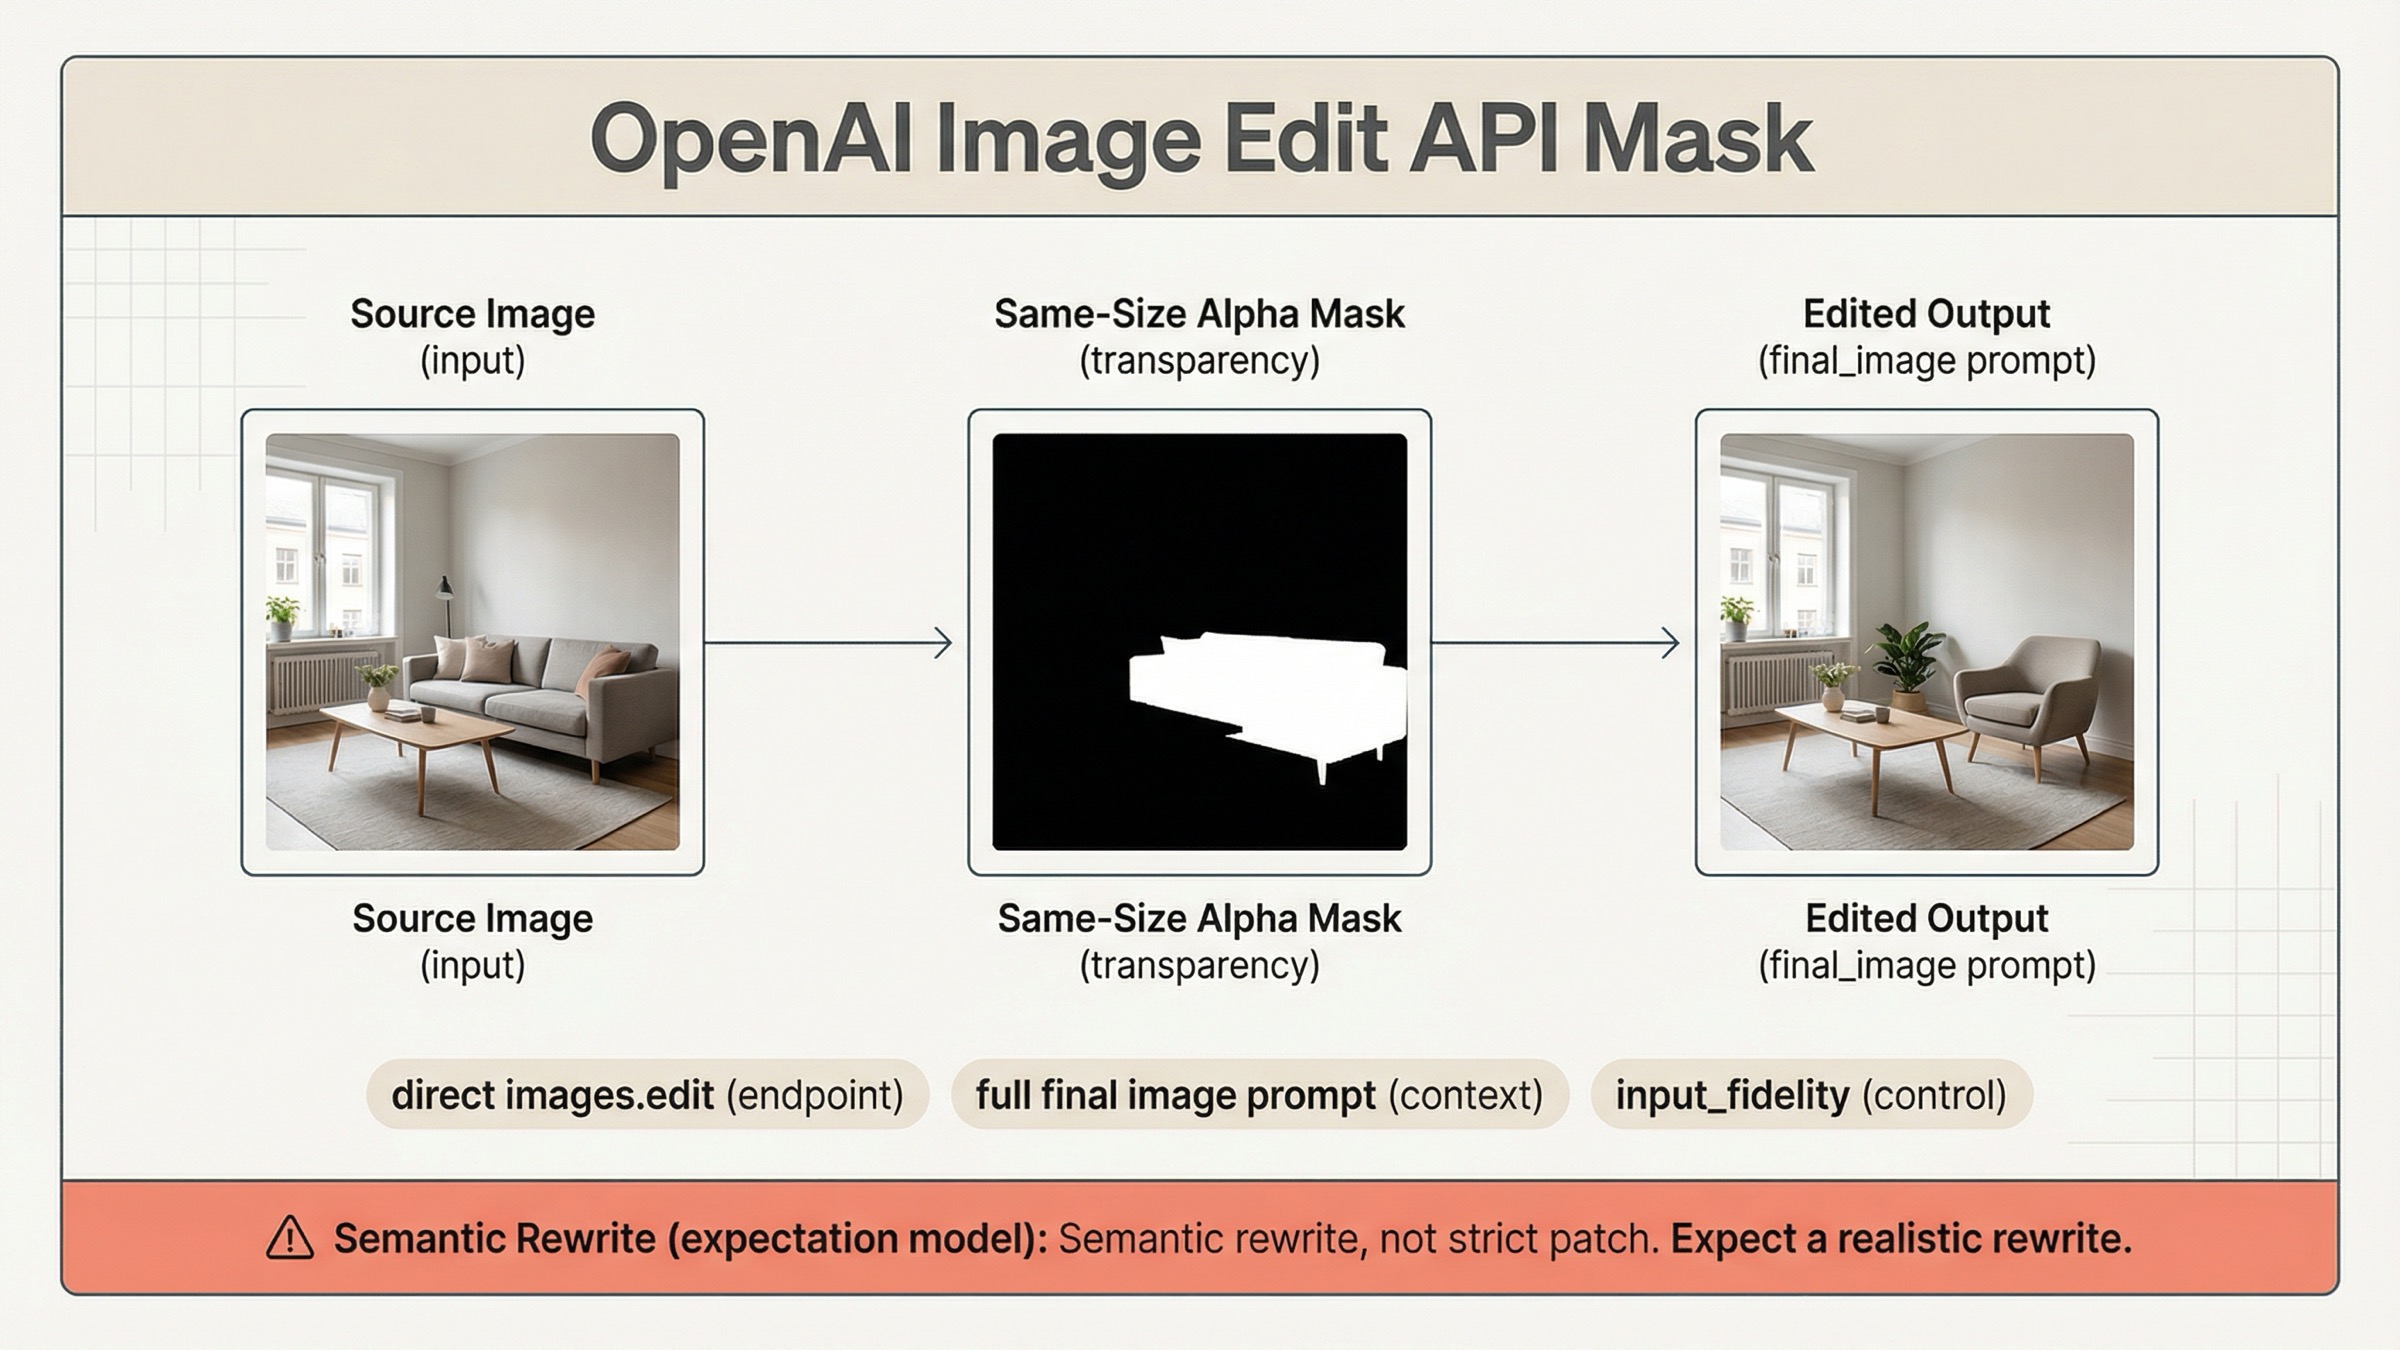
If you are trying to use a mask with the OpenAI image edit API on March 29, 2026, the safest default is direct images.edit() on gpt-image-1.5, not a more complicated Responses workflow. Send one source image, one same-size alpha mask, and a prompt that describes the full intended final image, not just the erased area.
That route matters because OpenAI's current mask guidance is split across the image generation guide, the input fidelity section, the Responses image tool guide, and the current /v1/images/edits contract. If you only read one page, it is easy to upload a valid mask and still get the wrong mental model.
The key warning is in OpenAI's own docs: GPT Image masking is prompt-based and may not follow the exact mask shape with full precision. That is why developers still report "whole image got rewritten" failures in current community threads. The mask is a focus guide, not a guarantee of strict Photoshop-style local patching.
TL;DR
- Start with direct
client.images.edit()orPOST /v1/images/editsongpt-image-1.5. - Make the mask valid before debugging anything else: same size, same format, under
50 MB, and with a real alpha channel. - Write the prompt as the full final image, then add preservation instructions for everything that should stay unchanged.
- Add
input_fidelity="high"only when faces, logos, products, or layout-sensitive details must survive the edit cleanly. - Treat the mask as guidance for a constrained semantic rewrite, not as a hard promise that only those exact pixels can change.
Start Here: The Current OpenAI Mask Edit Workflow
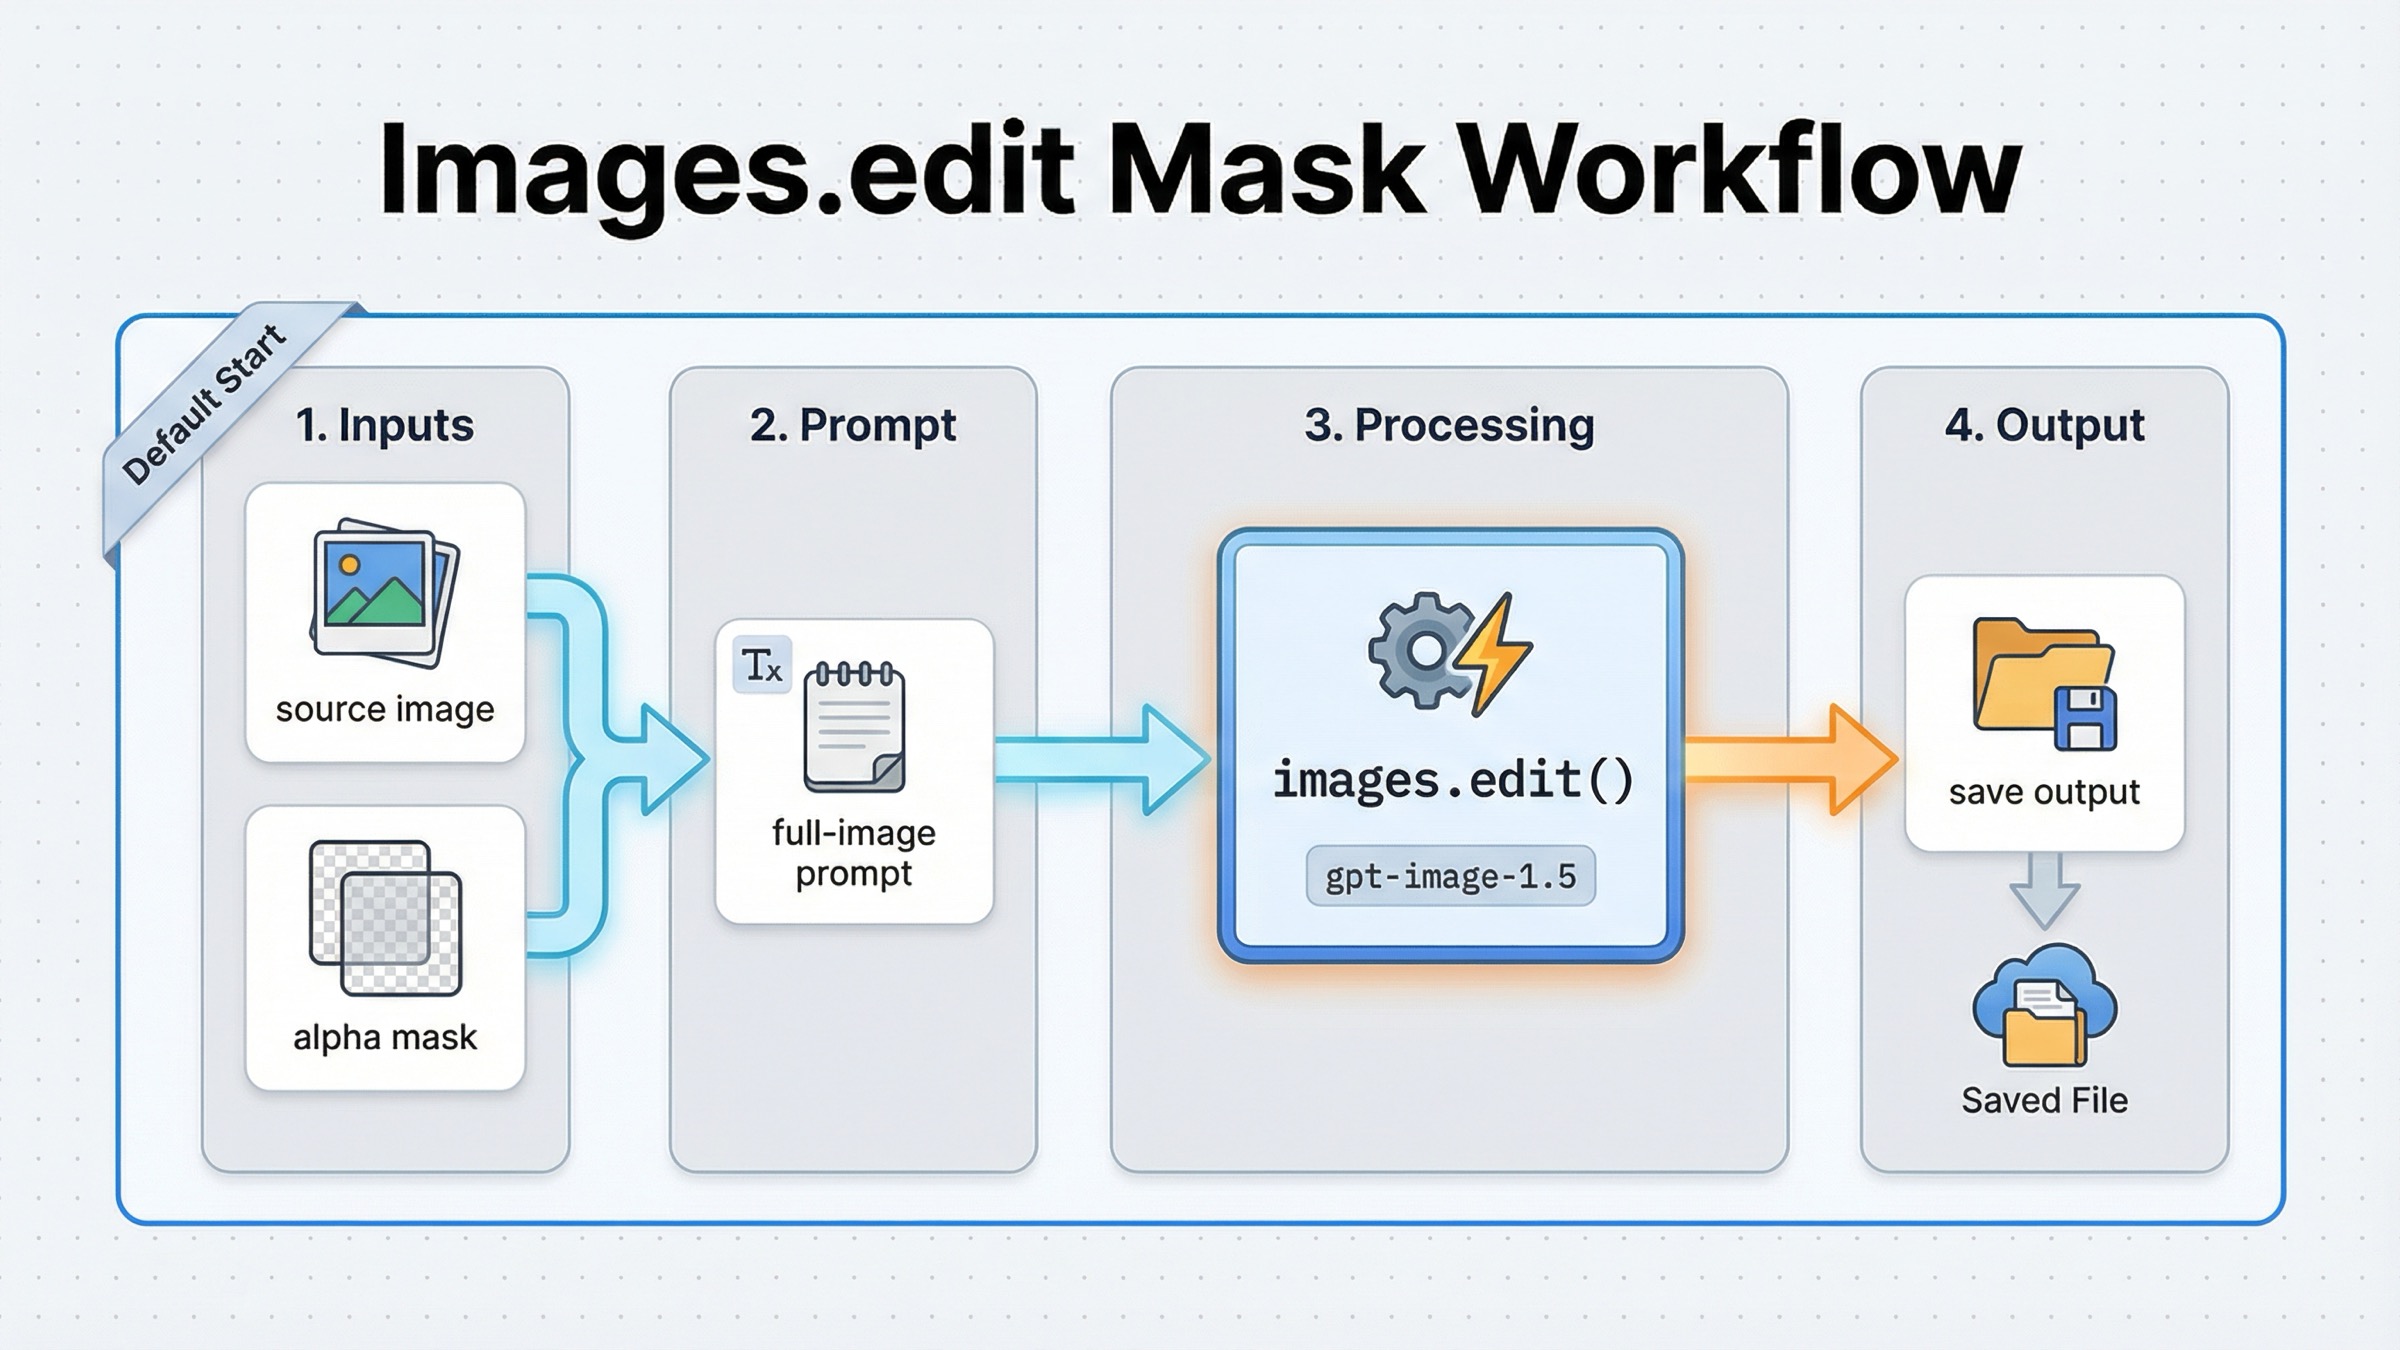
For a normal mask-first edit, you do not need a conversation wrapper. OpenAI's current guide still shows the shortest reliable path as the direct Images API: upload the source image, upload the mask, write the final-image prompt, and save the returned base64 output. That is the right default when your real job is "edit this image here," not "run a multimodal assistant that sometimes edits images."
The current JavaScript shape is:
jsimport fs from "fs";
import OpenAI, { toFile } from "openai";

const client = new OpenAI();

const result = await client.images.edit({
  model: "gpt-image-1.5",
  image: await toFile(fs.createReadStream("sunlit_lounge.png"), null, {
    type: "image/png",
  }),
  mask: await toFile(fs.createReadStream("mask.png"), null, {
    type: "image/png",
  }),
  prompt:
    "A sunlit indoor lounge area with a pool containing a flamingo. Preserve the room, lighting, reflections, and camera angle.",
  input_fidelity: "high",
  size: "1024x1024",
  quality: "medium",
});

const imageBase64 = result.data[0].b64_json;
const imageBytes = Buffer.from(imageBase64, "base64");
fs.writeFileSync("lounge.png", imageBytes);
The Python version is just as direct:
pythonfrom openai import OpenAI
import base64

client = OpenAI()

result = client.images.edit(
    model="gpt-image-1.5",
    image=open("sunlit_lounge.png", "rb"),
    mask=open("mask.png", "rb"),
    prompt=(
        "A sunlit indoor lounge area with a pool containing a flamingo. "
        "Preserve the room, lighting, reflections, and camera angle."
    ),
    input_fidelity="high",
    size="1024x1024",
    quality="medium",
)

image_base64 = result.data[0].b64_json
image_bytes = base64.b64decode(image_base64)

with open("lounge.png", "wb") as f:
    f.write(image_bytes)
If you need the raw HTTP form, the important detail is that the classic local-file route is still multipart:
bashcurl -s -X POST "https://api.openai.com/v1/images/edits" \
  -H "Authorization: Bearer $OPENAI_API_KEY" \
  -F "model=gpt-image-1.5" \
  -F "mask=@mask.png" \
  -F "image[]=@sunlit_lounge.png" \
  -F 'prompt=A sunlit indoor lounge area with a pool containing a flamingo'
That should be your first implementation because it keeps the contract obvious. One source image, one mask, one edit prompt, one result. If your broader question is really about OpenAI edit routing in general, the better companion page is the broader OpenAI Image Editing API guide. This article stays narrower on purpose.
There is one newer wrinkle worth knowing. The current /v1/images/edits contract is no longer multipart-only. OpenAI's current endpoint definition also allows application/json requests using images and an optional mask as image_url or file_id references. That means you can stay on the direct Images API even when your assets are already uploaded, instead of moving to Responses just to avoid local multipart uploads.
Build A Mask The API Will Actually Accept
The quickest wasted hour on this keyword is debugging prompt quality when the real problem is that the mask itself is invalid. OpenAI's current mask rules are strict in a few places and loose in one place.
The strict parts are mechanical:
- the source image and the mask must use the same format
- they must use the same pixel dimensions
- the payload must stay under
50 MB - the mask must contain an alpha channel
The loose part is behavioral. A valid mask tells the model where to focus, but it does not force exact boundary-following with GPT Image. OpenAI says the transparent areas of the mask are replaced and the filled areas are preserved, but it also says GPT Image masking is prompt-based and may not follow the exact shape precisely. Those two statements are compatible. The mask constrains the edit region semantically, not with perfect deterministic edge behavior.
In practice, the easiest production checklist is:
- export the source image and mask at the same final dimensions before upload
- save the mask as a real RGBA PNG if there is any chance your editor strips alpha
- verify the "changed" region is transparent, not merely painted white on an opaque layer
- keep the masked region as narrow as the job allows
If you are composing with multiple reference images, remember one non-obvious rule from the current docs: the mask applies to the first input image. That matters because some developers assume a later reference image can also be locally masked. It cannot. The first image is the base scene; everything else is supplemental reference context.
If your tool only produces a grayscale mask, OpenAI's own guide shows converting it to RGBA and copying the grayscale data into alpha. The important operational point is not the exact utility script. It is knowing that a black-and-white bitmap without alpha is often not enough by itself.
Write Prompts For The Full Final Image, Not The Hole
The single most important sentence in OpenAI's current mask guide is that you should describe the full new image, not only the erased area. If you miss that, the mask file can be technically valid and the result can still feel wrong.
That changes how you should think about prompts. You are not asking the model to "fill the blank." You are asking it to produce a coherent final image with one constrained change. So the prompt has to do three jobs at once:
- say what should change
- say what should stay
- describe the final visual state clearly enough that the edit does not drift
Bad prompt:
textPut a flamingo in the pool.
Better prompt:
textA sunlit indoor lounge area with a pool containing a flamingo.
Preserve the pink room walls, the pool tile pattern, the reflections, the furniture, and the camera angle.
Do not redesign the rest of the room.
Bad preservation-heavy prompt:
textReplace the label.
Better preservation-heavy prompt:
textReplace only the blank label area on the bottle with a clean gold logo.
Preserve the bottle shape, cap, glass reflections, lighting, shadows, background, and camera framing.
Do not change any other packaging detail.
This is also where the GPT Image 1.5 prompting guide helps more than most page-one tutorials. The practical pattern is not "write a giant perfect prompt once." It is "name the one change, list the preserved elements, then iterate in smaller follow-up edits if needed." When teams overload the first prompt with every nice-to-have instruction, the model gets more room to reinterpret the scene instead of less.
If the output is close but not stable, narrow the next request. Ask for one correction at a time. "Keep everything the same, but enlarge the logo slightly" is usually a better second step than rewriting the whole prompt from scratch.
When input_fidelity=high Changes The Outcome
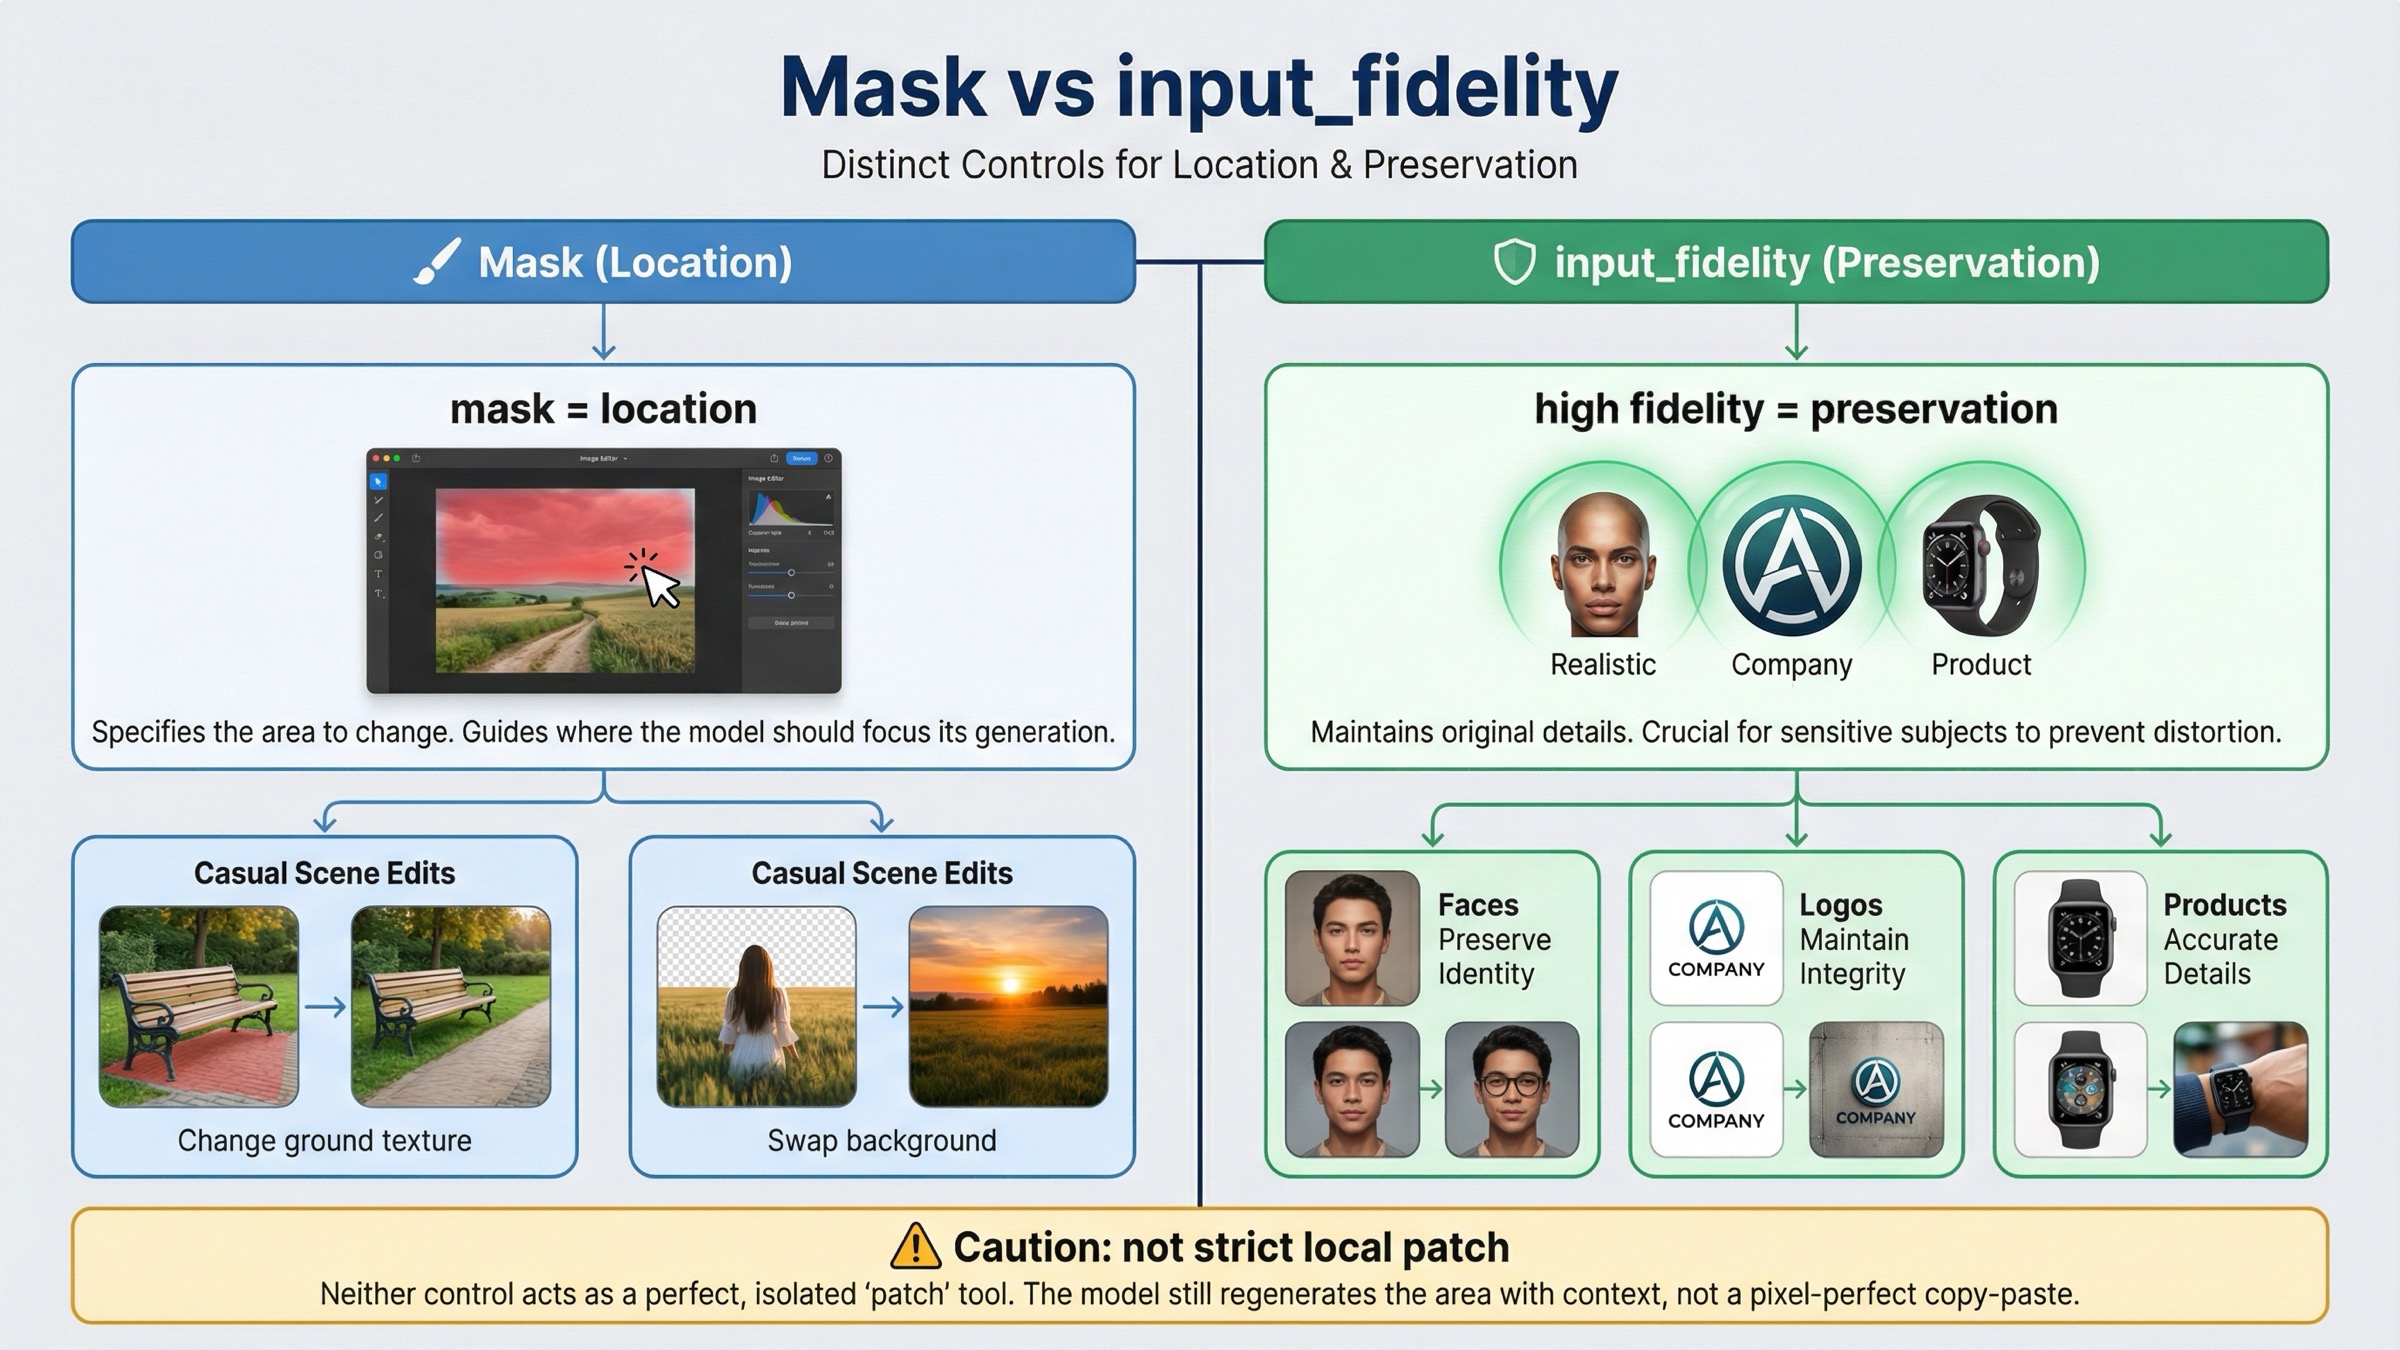
Masks and input_fidelity solve different problems. The mask tells the model where to focus. input_fidelity tells the model how hard to work to preserve important details from the input images. If you mix those two jobs together, you will either overspend on fidelity you do not need or blame the mask for drift that was actually a preservation problem.
OpenAI's current guide says the default input_fidelity is low, and that high is especially useful for faces, logos, and other distinctive details. It also notes that on gpt-image-1.5, the first 5 input images receive higher-fidelity preservation. That matters most when the edit must preserve identity, branding, or a product shot that should remain obviously the same object after the change.
Use this rule:
| Situation | Is the mask alone usually enough? | Add input_fidelity="high"? | Why |
|---|---|---|---|
| Replace a simple object in a casual scene | Often yes | Usually no | The mask handles location and the rest of the image is not detail-critical |
| Add or restyle something near a face | Sometimes | Usually yes | Identity drift is expensive and the docs explicitly call out faces as a preservation case |
| Place a logo on packaging, clothing, or signage | Rarely | Yes | The mask gives position, but fidelity helps keep the logo and product recognizable |
| Edit a branded product hero shot | Rarely | Yes | Composition, reflections, and product geometry usually matter more than speed |
| Expect a strict local patch with zero spillover | No | Not enough by itself | Fidelity preserves details better, but it still does not turn GPT Image into deterministic layer surgery |
The cost tradeoff is real. OpenAI notes that higher input fidelity uses more image input tokens. So do not turn it on by habit for every tiny change. Turn it on when the cost of drift is greater than the extra preservation spend.
If you want the wider model-routing view behind this decision, the related OpenAI image generation API models guide helps. For this keyword, the narrower operational truth is simpler: a mask controls location; input_fidelity controls preservation pressure.
Why Masked Edits Still Rewrite More Than Expected
The docs are actually more honest about this than many third-party tutorials. In the current OpenAI guide, the mask section says GPT Image uses the mask as guidance and may not follow the exact shape with complete precision. That is the official version of the complaint developers keep rediscovering in community threads.
The OpenAI Developer Community has been surfacing the same pain since at least April 27, 2025: a valid mask can still feel like it triggered a broader scene rewrite. That does not mean the API is broken. It means the underlying edit model is semantic and prompt-led, not a classic deterministic inpainting engine where the unmasked region is always mechanically frozen.
The usual reasons are:
- the prompt describes only the inserted object and leaves the rest of the final scene underspecified
- the change touches high-salience details such as faces, logos, reflections, or layout without using
input_fidelity="high" - the masked area is large enough that the model has to reinterpret nearby context to make the result coherent
- the team is carrying over a DALL·E 2 or Photoshop mental model that is stricter than current GPT Image behavior
The fix is not "never use masks." The fix is to test masks with the right expectation. Think of the workflow as constrained rewrite with preservation instructions, not pure patch replacement. That framing changes implementation choices in useful ways:
- keep edits smaller when possible
- preserve explicitly in the prompt
- add high fidelity only when the scene justifies it
- crop or segment earlier if the job needs extremely local control
If the product requirement really is "change these pixels and absolutely nothing else," you should test that constraint early rather than assuming the mask feature alone guarantees it. For many product builders, that is the decision this keyword is actually hiding.
Images API Vs Responses For Mask-Heavy Workflows
Responses is useful, but many mask-first workflows reach for it too early. OpenAI's current image generation guide says the Responses API is for conversations and multi-step flows. It adds multi-turn editing and image file IDs in context. The current tool guide also says that when you use gpt-image-1.5 there, the action parameter can be auto, generate, or edit, and OpenAI recommends leaving it on auto unless you truly need to force the behavior.
That means direct Images API remains the default when your workflow is:
- take one image
- apply one mask
- save one output
- retry with a tighter prompt if needed
Responses becomes the better route when the edit is one tool call inside a broader assistant workflow, when you need conversation state across multiple edit turns, or when the product already stores and reuses file IDs as part of a longer multimodal pipeline.
One current nuance makes the direct Images API stronger than many older tutorials suggest. The current /v1/images/edits contract also supports JSON requests with images and an optional mask via image_url or file_id, not only local multipart uploads. So if your only reason for moving to Responses was "we already uploaded the assets," that reason is weaker now.
If you are still deciding between the two surfaces for a broader build, read the full OpenAI Image API tutorial after this page. For the exact mask query, the default remains the same: use the shortest surface that solves the direct edit cleanly.
Troubleshooting: Why The Mask Still Fails Or Overreaches
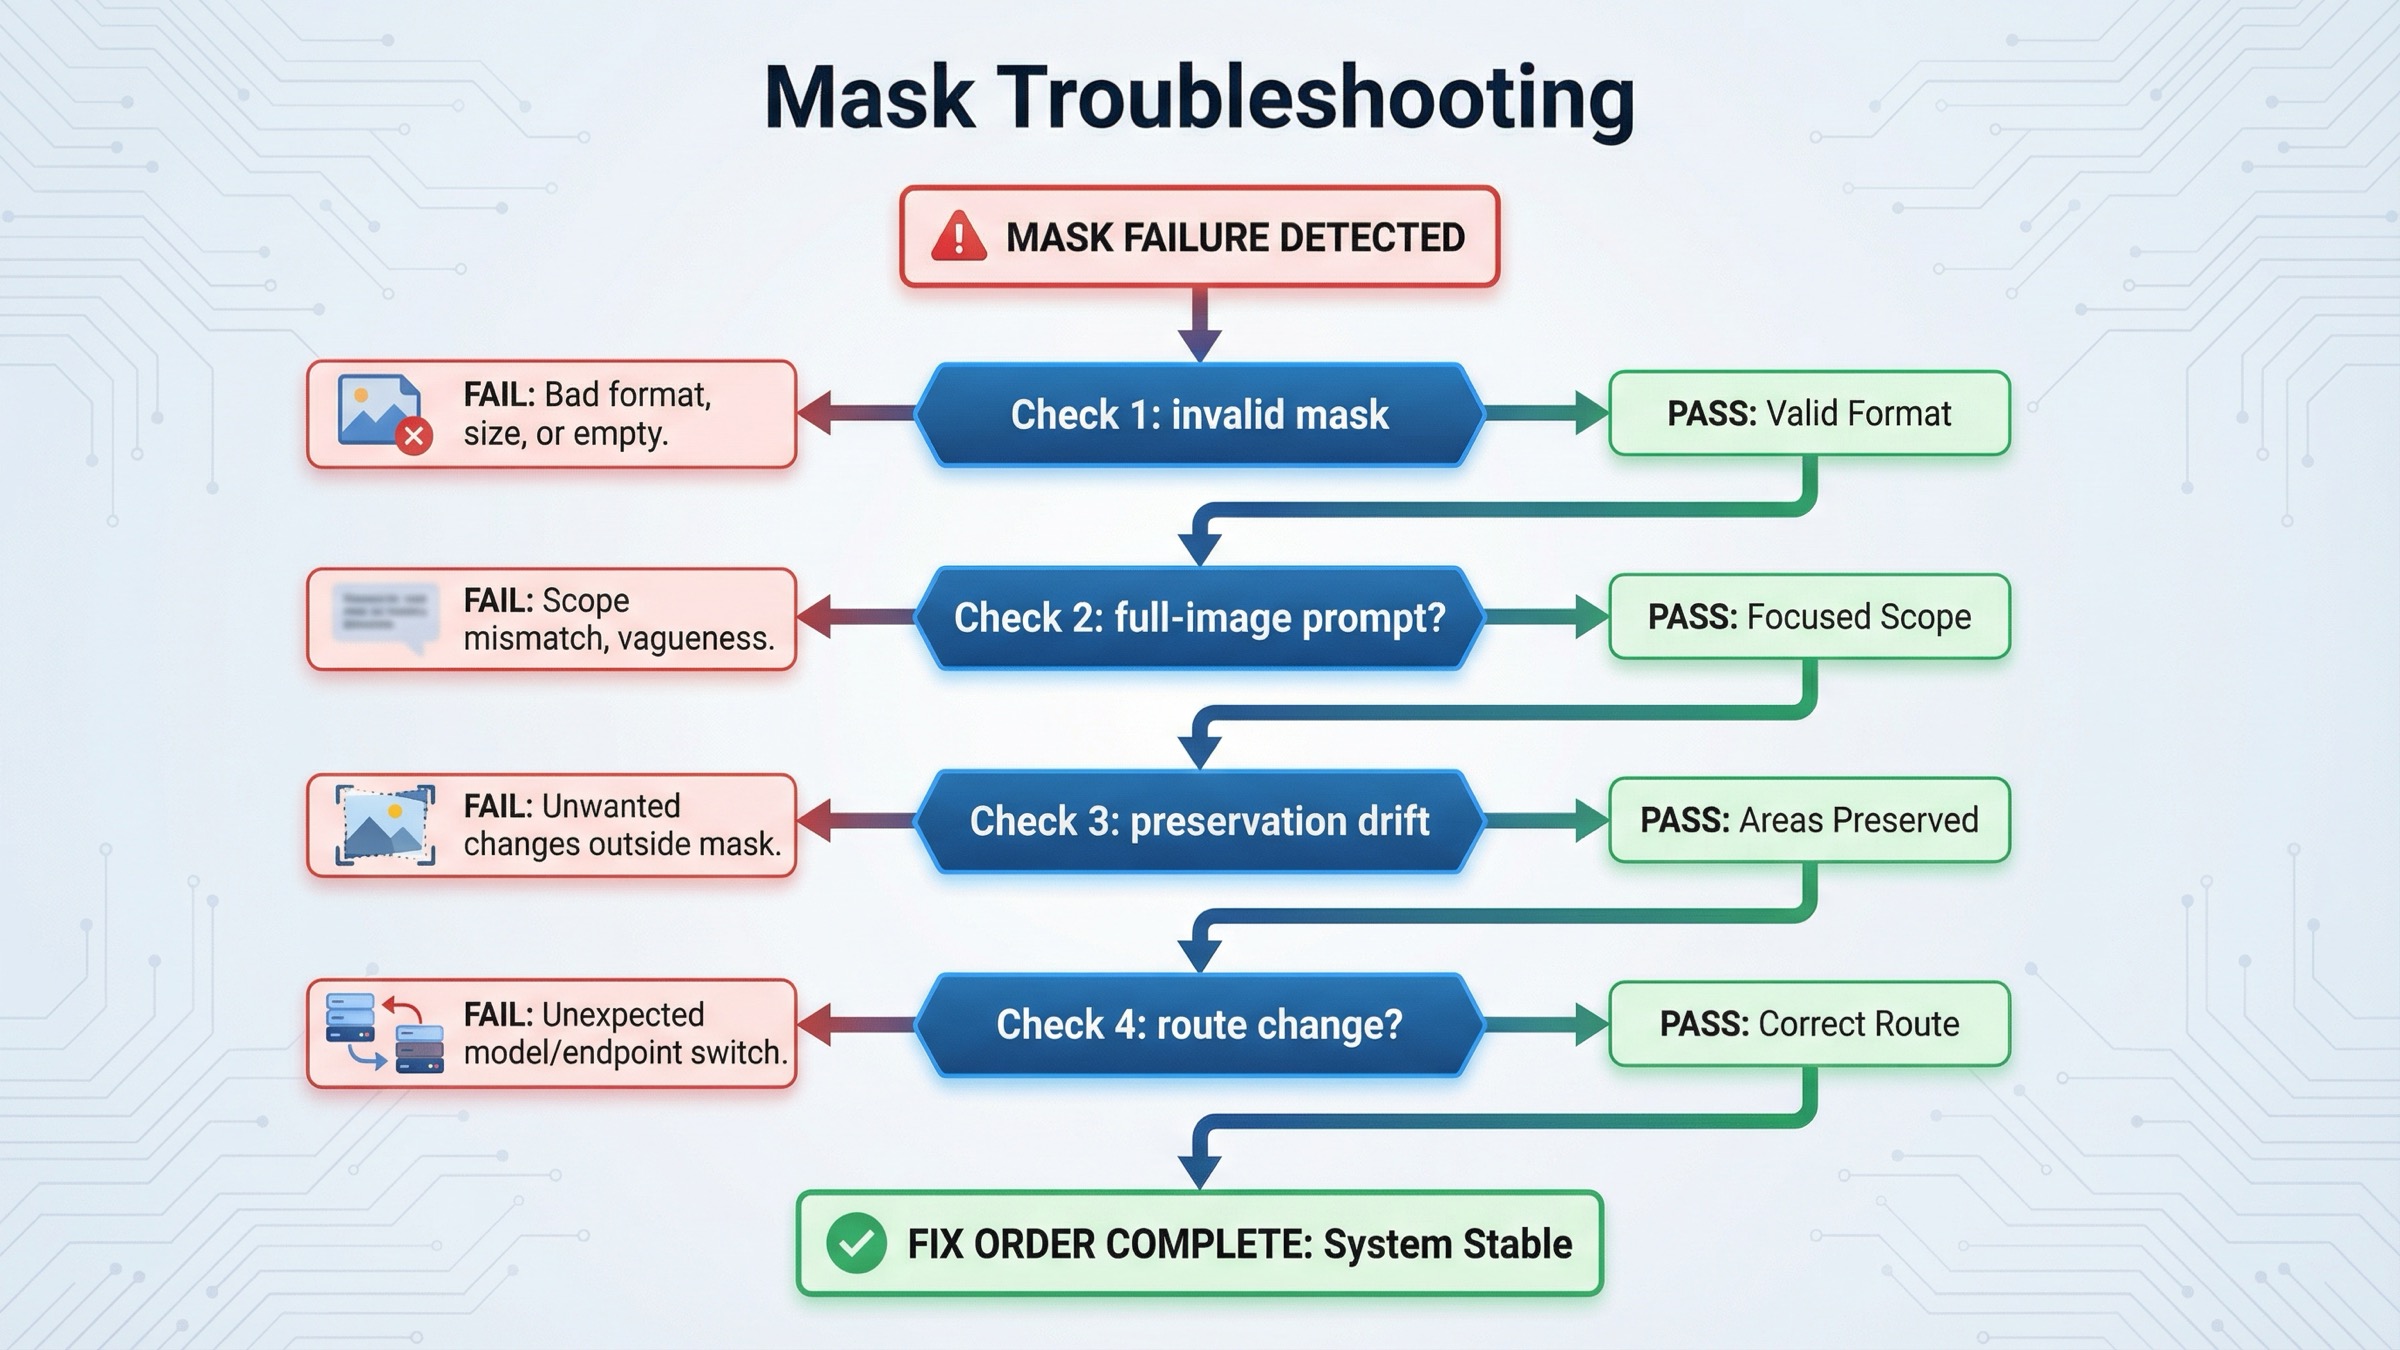
Use this order. It saves more time than tweaking prompts randomly.
-
The API rejects the mask or ignores it completely. Check format, dimensions, size, and alpha first. If the mask is not the same size as the base image or does not actually contain transparency, nothing downstream is worth debugging yet.
-
The model changed the right region, but the whole scene looks different. Your prompt is probably too narrow on the changed object and too vague on the preserved scene. Rewrite it as a full final-image description and add an explicit preserve list.
-
The edit spills beyond the masked area. That is often normal GPT Image behavior when the model needs to reinterpret surrounding context. Try shrinking the masked area, tightening the preserve instructions, and reducing the amount of requested change in one step.
-
Faces, logos, or branded objects drift even though the mask is correct. This is usually a preservation problem, not a masking problem. Turn on
input_fidelity="high"and make the must-keep details explicit in the prompt. If you are using multiple source images, place the most important preserved detail early in the input set. -
The product needs several iterative edits with stored asset references. At that point, consider Responses or the JSON
/v1/images/editsroute withfile_idinputs. Do not move surfaces earlier than that. -
You need true pixel-local reliability. Test that requirement directly. If the business rule is stricter than what constrained semantic rewriting can satisfy, pre-cropping, segmentation, or a narrower preprocessing step may be the real fix.
This is the practical reason page one still leaves room for a dedicated mask article. Most current results explain one part of the problem well, but few of them give one clean triage sequence from file validity to prompt scope to preservation control to surface choice.
FAQ
Does a transparent mask area always mean only those exact pixels can change?
No. OpenAI's current docs say the transparent region is the part to be replaced, but GPT Image masking is still prompt-based and may not follow the exact shape with complete precision. Think constrained rewrite, not deterministic local surgery.
Should I use Responses for mask edits instead of images.edit()?
Not by default. Use direct Images API first for one-shot mask edits. Move to Responses when the edit belongs inside a multi-turn conversation, assistant flow, or broader multimodal tool chain.
If the mask is correct, why did my logo or face still drift?
Because the mask controls location, not preservation strength. That is the classic case for input_fidelity="high" plus a prompt that explicitly says which identity, branding, or product details must remain unchanged.
Final Recommendation
For current OpenAI mask edits, the default is simple: start with gpt-image-1.5 on the direct Images API, make the mask mechanically valid, write the prompt as the full final image, and only add input_fidelity="high" when you truly need stronger preservation. That combination fixes more real-world failures than starting with a bigger framework.
If the result still rewrites more than you expected, do not assume the mask upload failed. First test whether the product expectation is stricter than the current GPT Image masking model. That is usually the real fork in the road. For the broader edit route, continue with the main OpenAI Image Editing API guide. For current OpenAI capability checks before rollout, the related OpenAI image generation API verification guide is the next practical read.