Short answer: the fastest way to get realistic Nano Banana Pro images is to stop prompting for "photorealism" as a style label and start prompting for a real scene. Describe who or what is there, what the camera is doing, how the light behaves, and which imperfect details make the shot feel observed instead of rendered. Only add reference images when a face, product, or layout actually needs to stay locked. If the base scene already looks fake, more references usually make it worse.
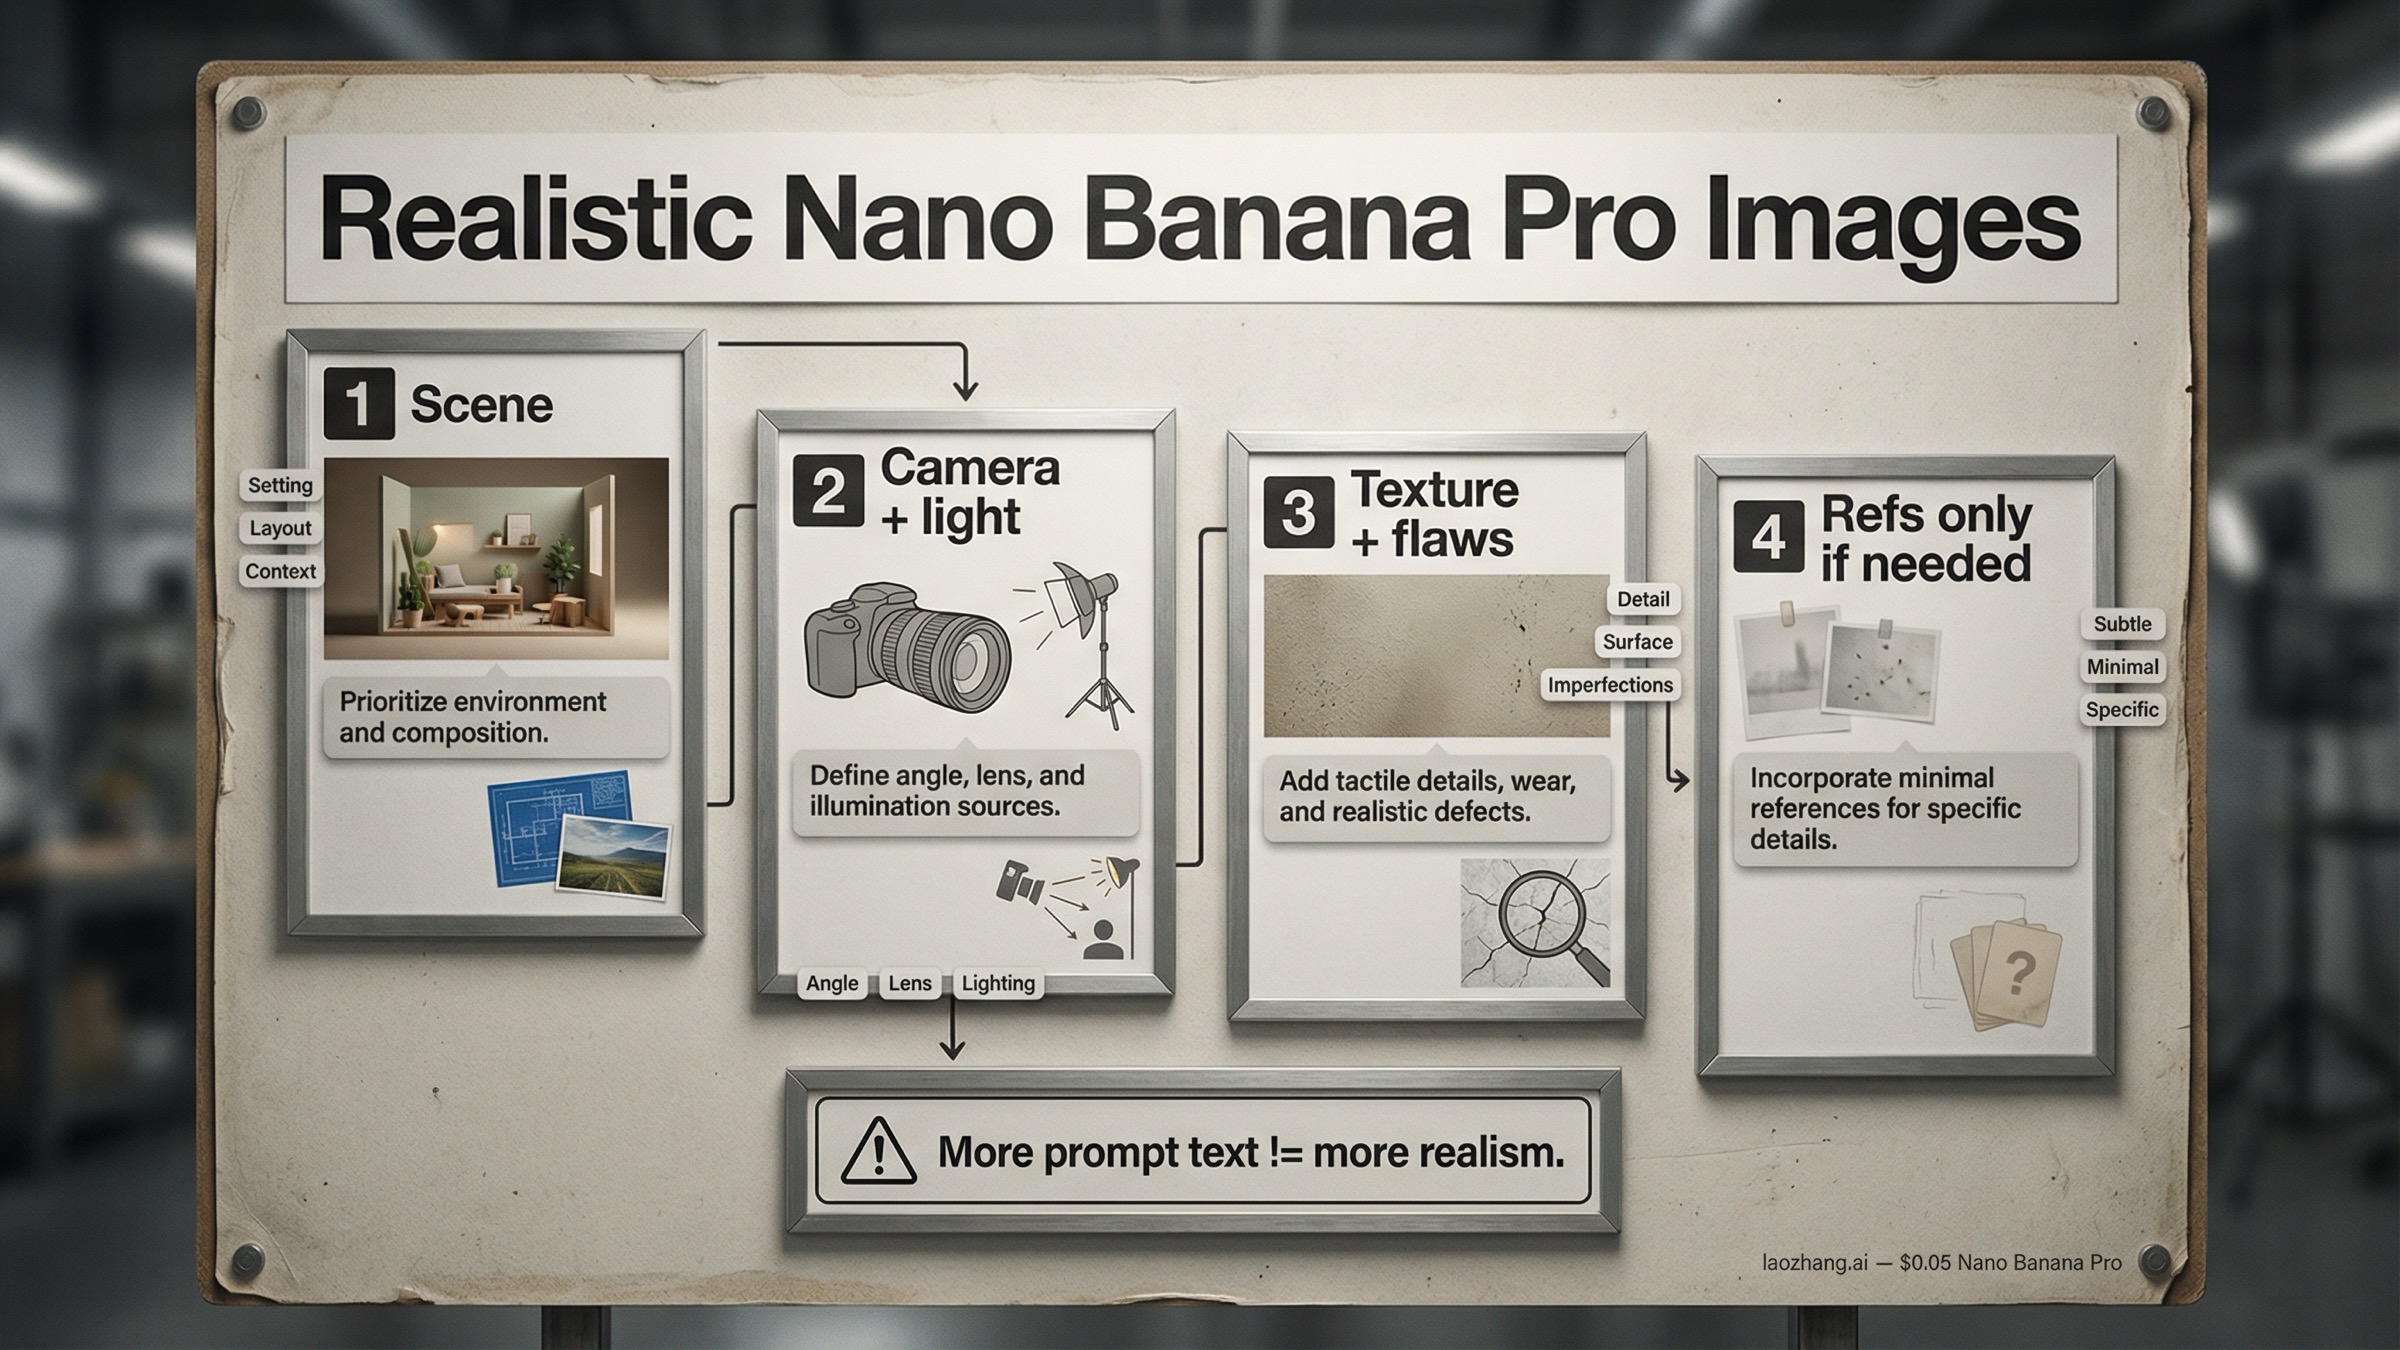
Nano Banana Pro is Google's gemini-3-pro-image-preview, the current Pro image lane in the Gemini family. Google's official prompt tips for Nano Banana Pro still boil strong prompts down to six parts: subject, composition, action, location, style, and edit instructions. In practice, realism improves when you treat those as layers, not one giant adjective pile. Start with the physical scene, then add camera and lighting, then texture and imperfection cues, and only then decide whether a reference image is actually needed.
That staged approach matters because the live nano banana pro realistic images query family keeps surfacing the same two failure modes. One is the giant JSON prompt that tries to force realism by specifying every pore, every lens setting, and every background object in one shot. The other is the iterative workflow that keeps editing, reframing, or changing angles until the image gets softer, cleaner, and more obviously AI-made. The better move is simpler: get one believable shot first, then preserve it carefully. If you later need deeper reference-image slot logic, our Nano Banana Pro reference images guide is the right next page.
TL;DR
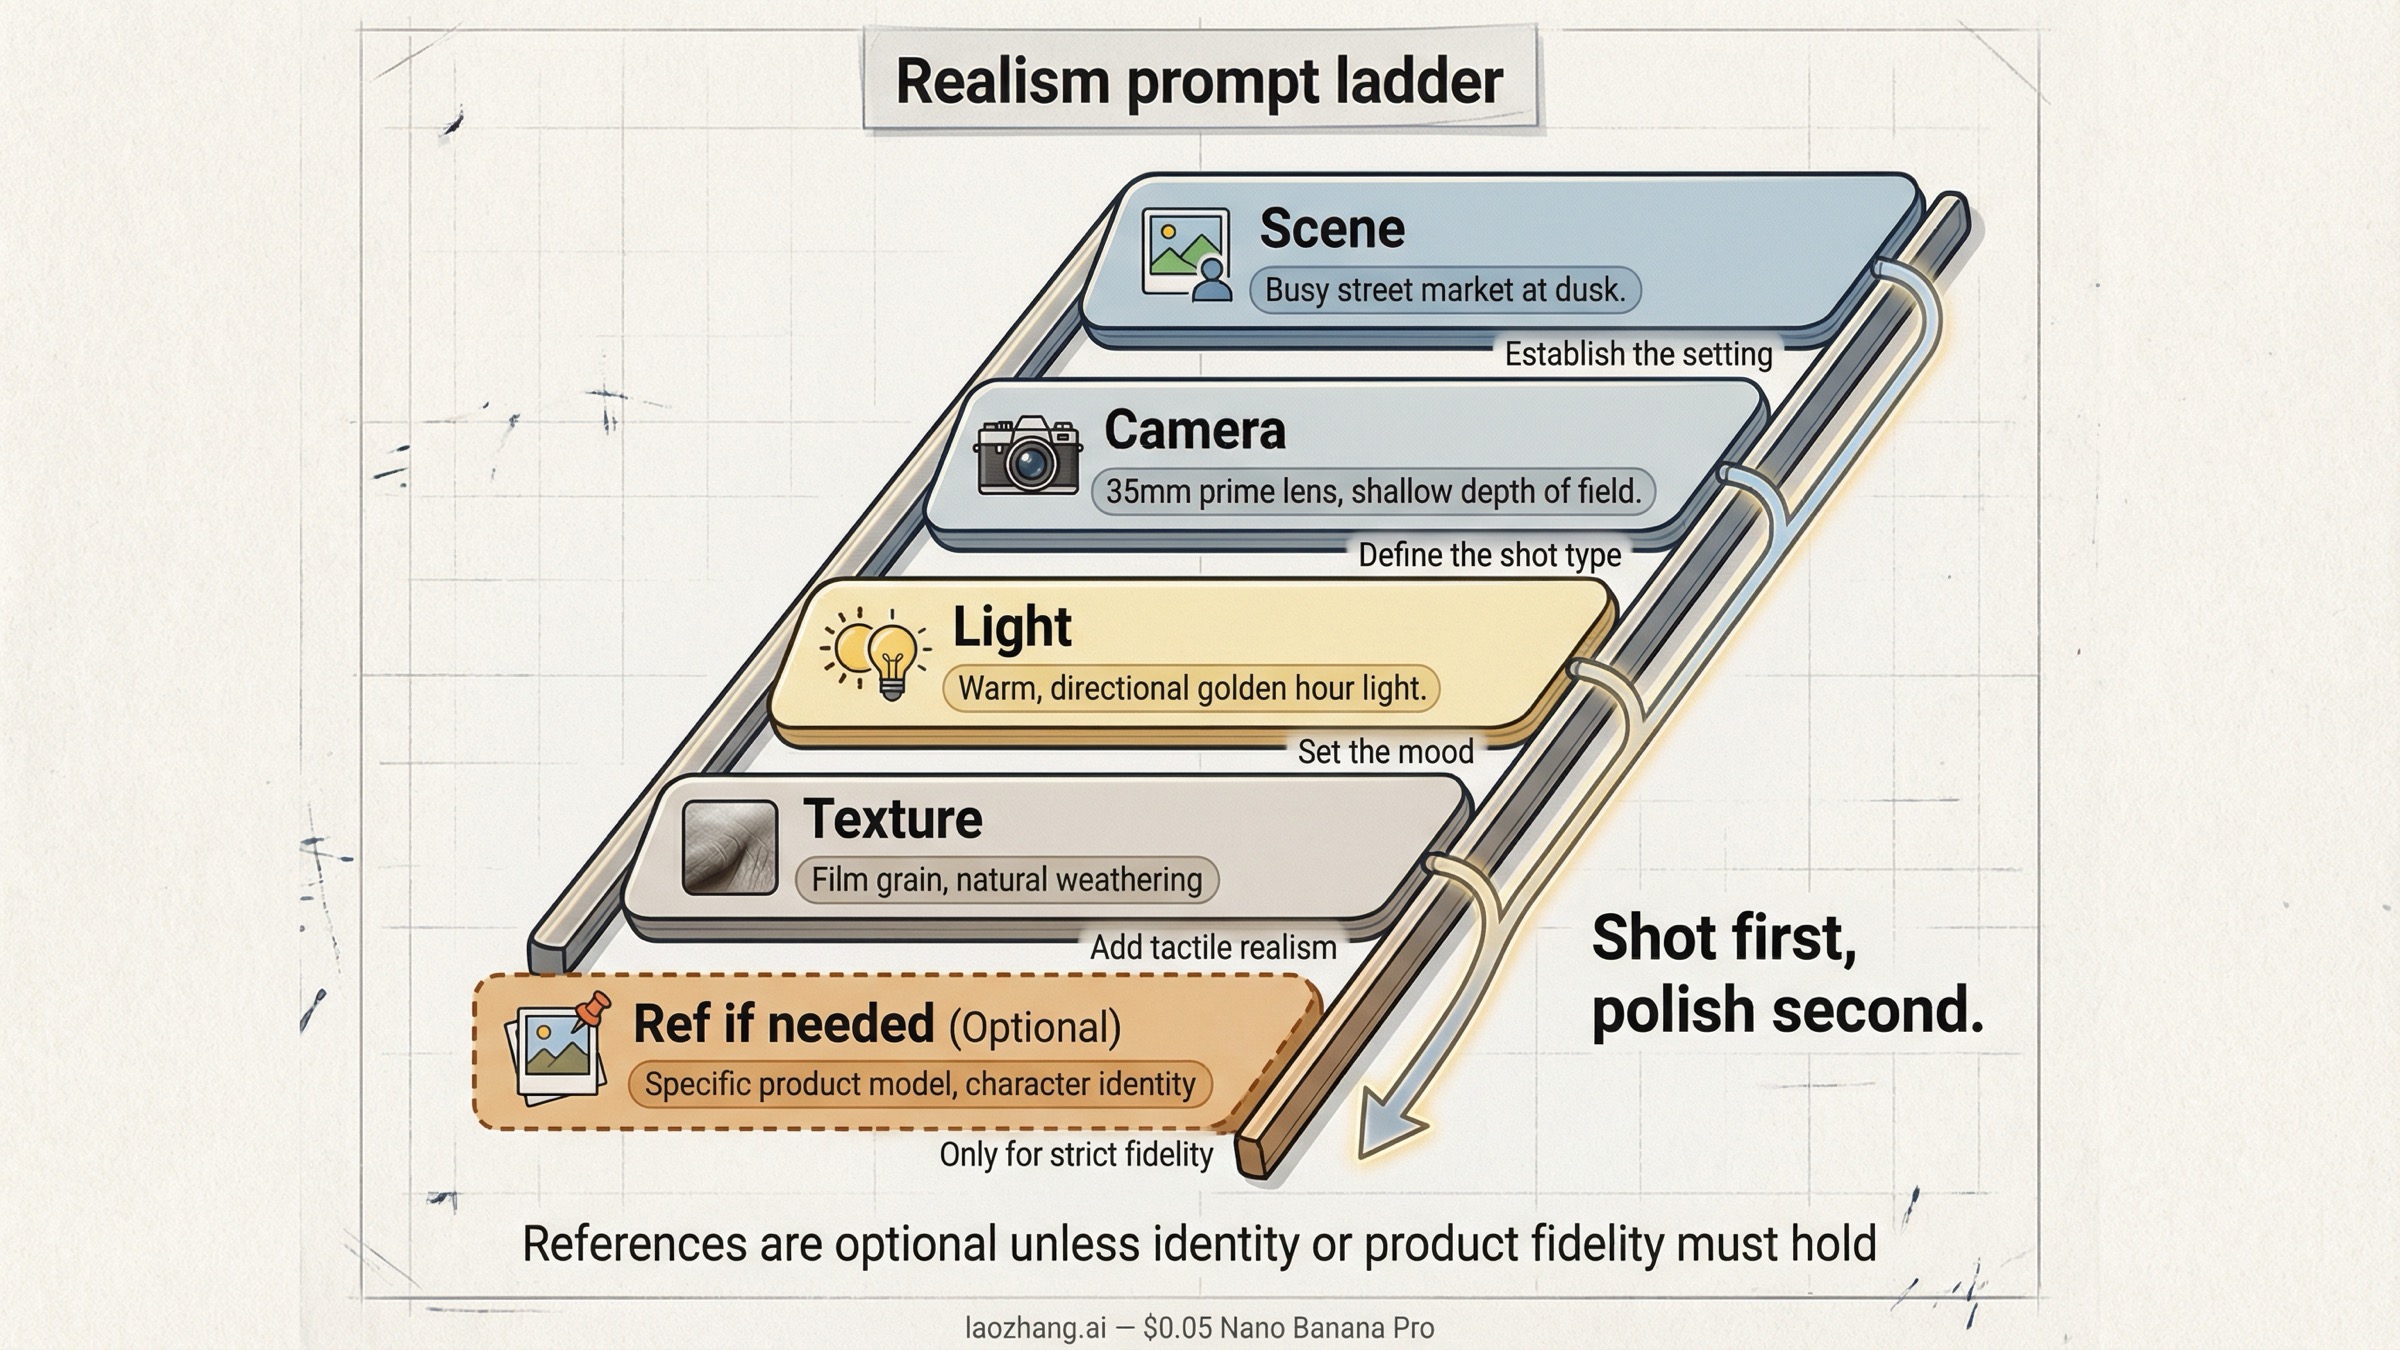
- The best default is a staged realism prompt: scene first, camera and lighting second, texture and imperfections third, references last.
- Use Google's current prompt anatomy: subject, composition, action, location, style, and edit instructions.
- Camera notes help when they describe a believable shot. They hurt when they turn into random spec spam.
- Most "AI-looking" images fail because they are too clean, too evenly lit, or too stylistically abstract, not because they are missing more adjectives.
- Start with zero or one reference image. Add a second only when you truly need to lock identity, product fidelity, or layout.
- If realism drops after angle changes or repeated edits, reset from the last good image and re-render through Pro instead of stacking more transformations.
- As checked on March 28, 2026, Google still treats Nano Banana Pro as a preview model, supports up to 14 references overall, and lists output pricing at the equivalent of $0.134 per 1K or 2K image and $0.24 per 4K image on the official pricing page.
Start with the physical scene, not the style label
Most weak realism prompts open like this: "photorealistic cinematic portrait, ultra detailed, realistic lighting, 8k, masterpiece." That feels specific, but it still leaves the model with almost no physical scene to build from. It knows you want something polished, but it does not know what makes the image feel like an observed moment instead of a rendered concept.
Realism starts one layer below style. Before you worry about whether the image looks cinematic, editorial, documentary, or premium, you need a believable physical situation. Who is in the frame? What are they doing? Where are they standing or sitting? What kind of room, street, store, kitchen, studio, or event space is this? Are they looking at the camera or past it? Is the shot rushed, posed, calm, awkward, flatly lit, warmly backlit, or caught halfway through a real action?
That is why Google's prompt guidance is more useful than most of page one. The prompt tips page does not just say "be detailed." It breaks the job into subject, composition, action, location, style, and edit instructions. That is the right skeleton for realism because it forces you to describe a real shot before you start decorating it.
Use this as the default realism template:
textSubject: who or what is in the frame, with the one or two details that matter most.
Composition: what the camera sees, from what distance, and in what aspect ratio.
Action: what is happening in the exact moment of the shot.
Location: where the scene happens and what is physically around the subject.
Style: realistic photo language, not just a mood label.
Edit instructions: only if something must stay unchanged or be altered precisely.
Then turn that outline into one natural-language brief:
textA tired florist closing her shop at dusk, standing half inside the doorway while wrapping the last bouquet.
Shot as a slightly wide phone photo from a few feet away, 4:5 vertical, eye level.
She is looking down at the flowers instead of at the camera.
The shop has a cramped front counter, handwritten price cards, a refrigerator hum in the back, and a few stems on the floor.
Realistic evening storefront photo, mixed cool street light and warm indoor light, small reflections on the glass door, no polished studio look.
That kind of prompt gives Nano Banana Pro something physical to reason about. It also makes it easier to debug. If the image still looks fake, you can ask whether the scene is too abstract, whether the camera is wrong, whether the lighting is too vague, or whether the textures are still too clean. When the only instruction is "photorealistic masterpiece," there is nothing to debug except "make it better."
The practical rule is simple. If a person reading your prompt cannot imagine the actual shot, the model probably cannot either. Write the shot first. Add the polish second.
Add camera, lighting, and framing like a photographer
Once the physical scene is believable, the next realism jump comes from camera and lighting language. This is where many prompts either become useful or collapse into nonsense.
Useful camera language describes how the scene would really be photographed. That includes things like:
- phone snapshot vs full-frame portrait lens
- close-up vs waist-up vs full-body distance
- low angle, eye level, or overhead
- shallow depth of field vs flat deep-focus snapshot
- soft window light, flat indoor flash, mixed practical lighting, overcast daylight, or storefront neon spill
Bad camera language is usually just spec collecting. Readers copy every number they have seen online, stack incompatible settings together, and hope the model averages them into something realistic. That often backfires. "24mm wide-angle phone photo" is useful. "24mm, f/1.2, ISO 80, 1/4000, deep focus, night street, flash-lit, cinematic bokeh" is a conflict pile.
Three camera patterns work especially well for realistic Nano Banana Pro images:
Casual phone photo. Use this when you want the image to feel quick, social, or lightly unposed. Mention the wider lens feel, flatter lighting, slightly awkward framing, deep focus, and a touch of real-world mess. The realism comes from restraint. You want normal life, not luxury campaign language.
Portrait or editorial realism. Use this when the face matters more than the environment. Mention subject distance, lens feel, lighting direction, and what is in or out of focus. Resist the urge to over-stylize. A real portrait usually feels more believable when the lighting and pose are clear but the environment is still slightly imperfect.
Product or lifestyle shot. Use this when the object has to look materially believable. Mention how the surface reacts to light, whether the shot is handheld or locked, what kind of room it sits in, and what texture or wear you expect to see. Realistic products usually fail when the prompt describes them as "premium" but never explains the light, surface behavior, or physical surroundings.
Google's Nano Banana Pro prompt tips page explicitly calls out camera and lighting details because they change the shot more than people realize. A low-angle shallow-depth portrait and a wide phone-camera snapshot can describe the same subject and still feel like two completely different realities. If the output feels fake, do not immediately add more adjectives. First ask whether you have described the actual photographic situation clearly enough.
The same rule applies to lighting. Real light is directional, imperfect, and situational. A believable kitchen scene has different light behavior from a conference room, a rainy street, a product table, or a beauty portrait. Call that out. "Soft light" is vague. "Flat indoor flash with a bright foreground and harsh shadow edges" is specific. "Window light from camera-left with a dim room behind the subject" gives the model physical logic. That logic is what makes an image feel photographic.
One more note: aspect ratio matters more than many realism guides admit. If you want a believable phone story shot, social crop, or magazine-style frame, say so early. Framing affects composition, and composition affects whether the image feels intentionally photographed or generically generated.
Use texture, imperfections, and scene entropy to kill the AI look
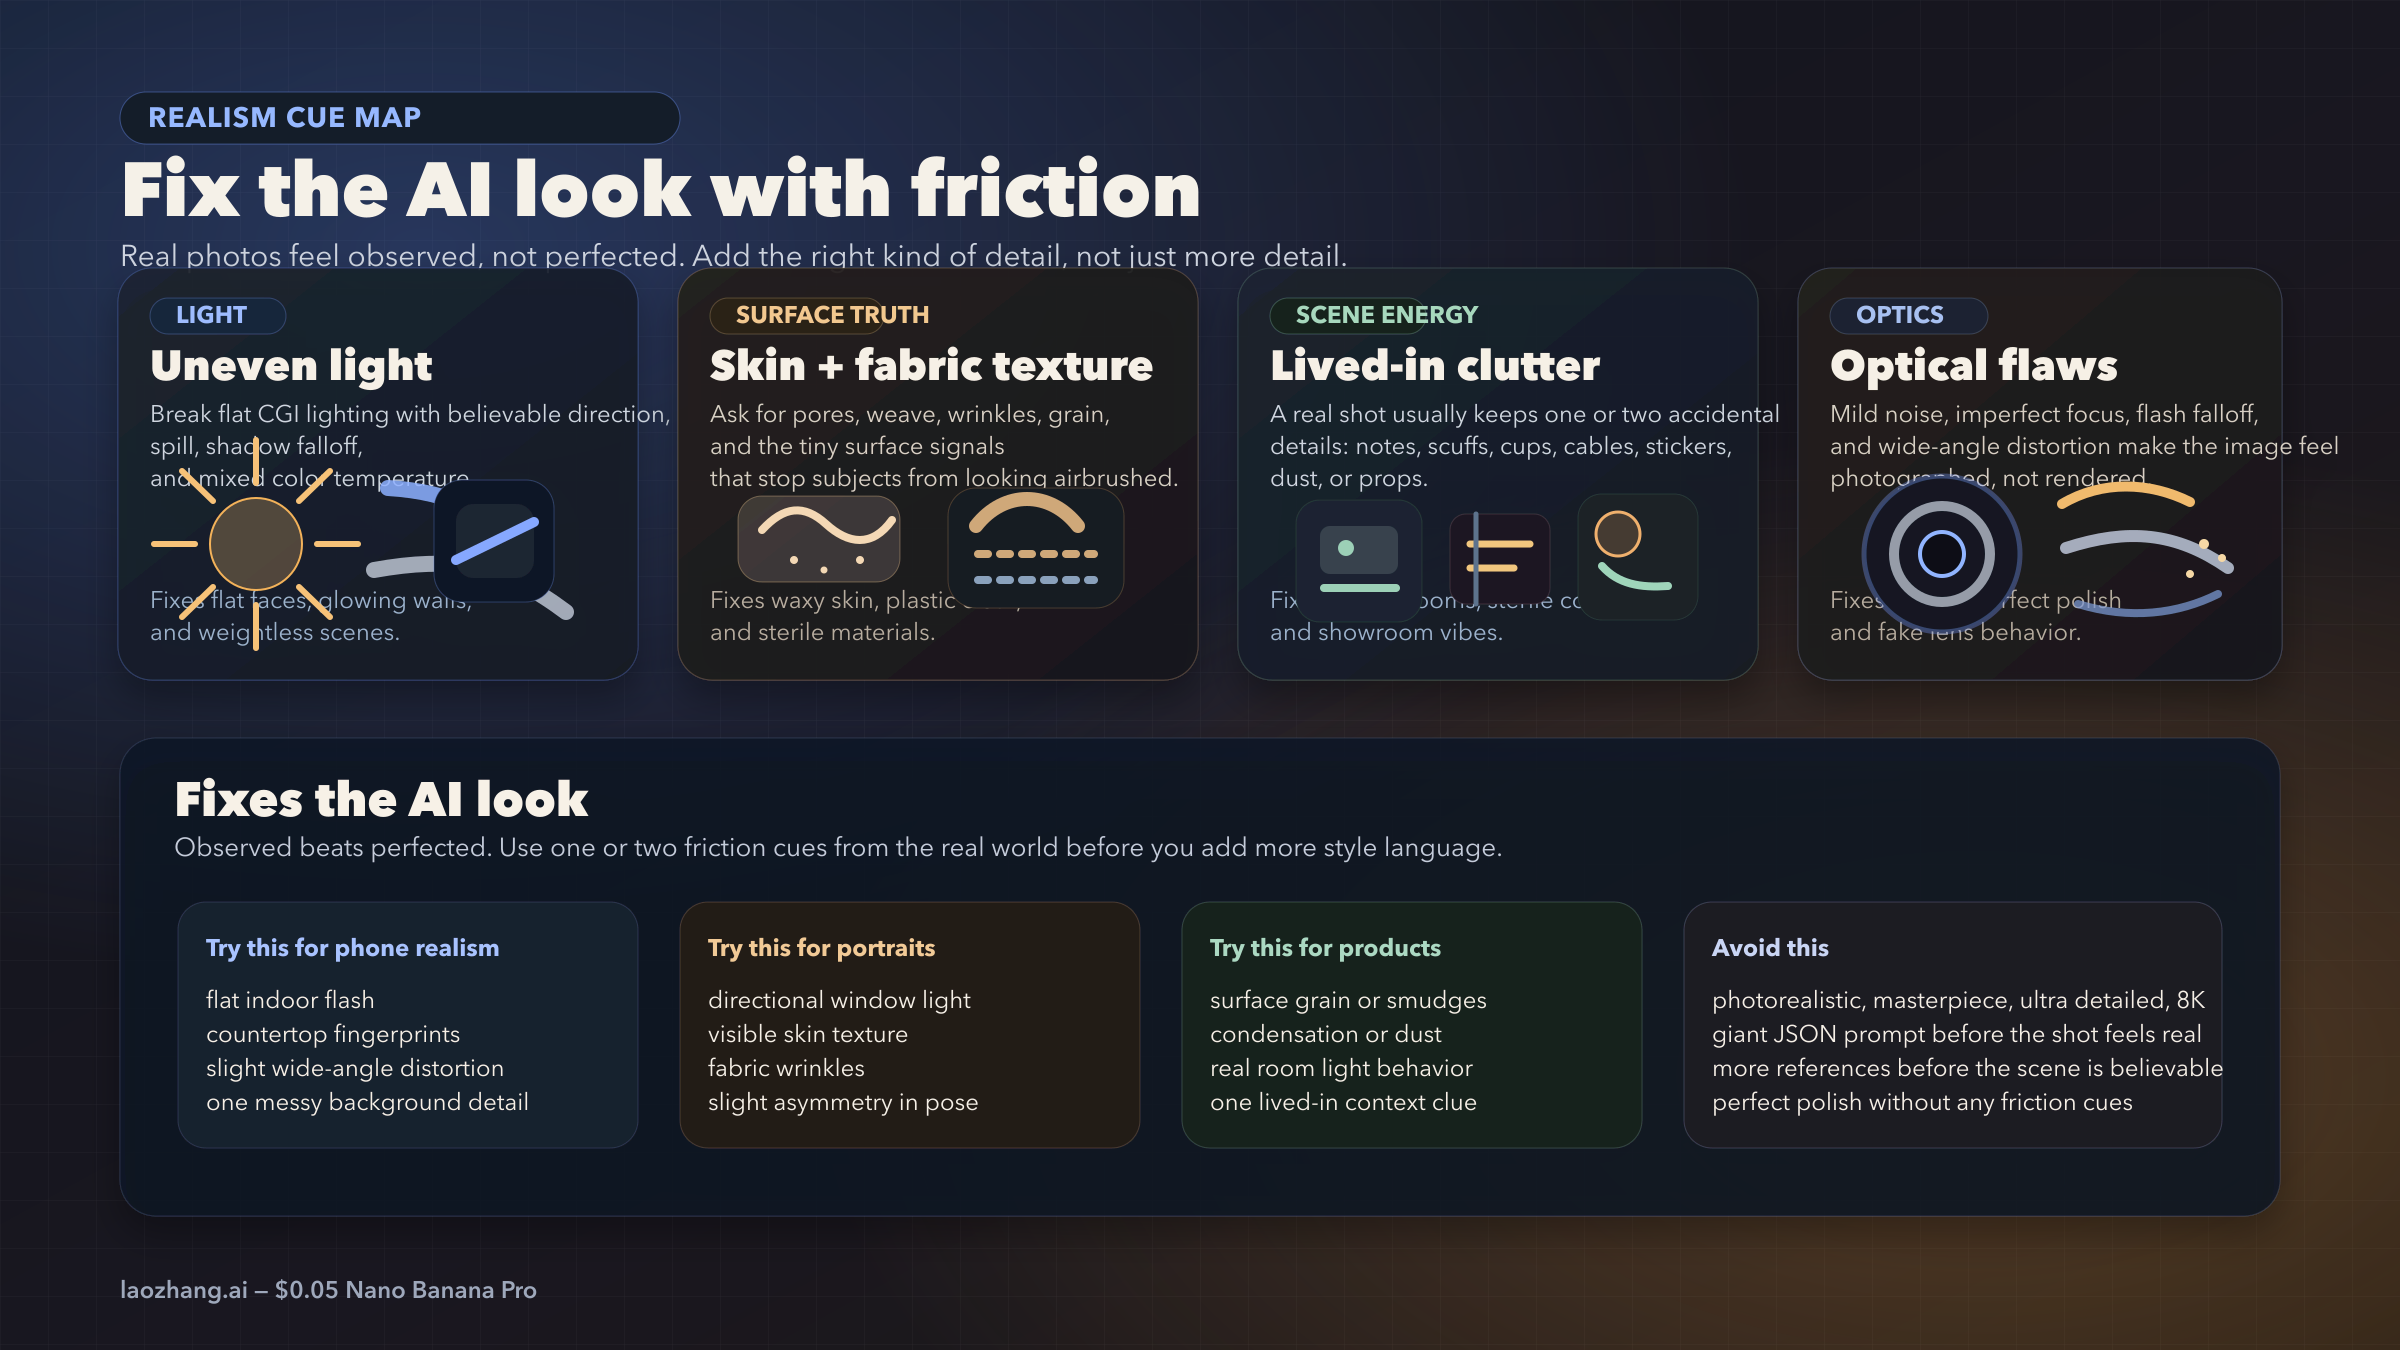
The classic AI look is not always about anatomy or hands. More often it is about smoothness. Skin looks too even. Surfaces look too clean. Rooms feel vacuum-sealed. Reflections are too perfect. Every object seems carefully placed. The image has no friction.
Real images almost always have friction. Shirts crease. Glass smudges. Skin has visible texture. Background objects are slightly misaligned. Cheap lights spill in ugly ways. A countertop has fingerprints or dust. A room has one thing that feels accidentally present rather than beautifully art-directed. You do not need to turn the image into chaos. You just need enough ordinary imperfection that the shot stops feeling synthetic.
That is why realism often gets worse when users chase "high detail" without naming what kind of detail they want. The model gives them more sharpness, more polish, more perfect symmetry, and more glowing surfaces. None of that automatically creates realism.
Use this table as the default realism-cue checklist:
| Realism cue | What it fixes | Best use |
|---|---|---|
| Visible skin texture, fabric grain, or material finish | Smooth plastic-looking surfaces | Portraits, fashion, product close-ups |
| Uneven or directional lighting | Flat CGI-style lighting | Indoor snapshots, events, room scenes |
| Small scene imperfections like clutter, scuffs, or fingerprints | Dead, over-clean environments | Phone photos, interiors, product lifestyle shots |
| Mild optical flaws like sensor noise, flash falloff, or wide-angle distortion | Over-polished "perfect render" look | Casual photos, documentary scenes, selfies |
| Imperfect reflections, wrinkles, condensation, or smears | Generic object surfaces | Food, cosmetics, electronics, glassware |
| Slight asymmetry in pose, gaze, or composition | Over-staged mannequin energy | Portraits, lifestyle images, social scenes |
The goal is not grime for its own sake. The goal is specificity. If you are generating a realistic indoor snapshot, say there are refrigerator stickers, slight countertop fingerprints, and uneven overhead light. If you are generating a realistic product shot, say there are tiny scuffs on the cap, soft dust on the table, or a faint condensation ring beside the bottle. If you are generating a realistic event image, say the badge is slightly crooked, the banner has mild wrinkles, and the room lighting is flat instead of glamorous.
This is also where many pages on the current SERP fall short. They give users bigger prompt frameworks but do not explain why those prompts still look synthetic. The missing layer is entropy. Real scenes are never perfectly optimized for beauty. They carry residue from the world around them.
Keep the entropy controlled. One or two imperfect cues are often enough. Five or six can make the prompt feel noisy or self-conscious. Use the details that belong to the scene, not a random collection of cinematic grime.
Add references only when realism needs a face, product, or layout anchor
Reference images are useful for realism, but they are not the first tool to reach for. They are a lock, not a rescue.
If the base scene still looks fake, reference images usually do not solve the real problem. They might keep a face closer to the source, or preserve the product silhouette better, but they do not automatically fix bad lighting logic, sterile surfaces, or an implausible scene. That is why the best realism workflow starts without them unless identity or product fidelity is already the main requirement.
Use a reference image when one of these is true:
- the person needs to still look like the same person
- the product shape, label, or material finish has to survive
- an existing layout or composition needs to be preserved while style changes
Do not use reference images as a generic mood-board stack. Google's current image docs say Gemini 3 image models support up to 14 references overall, and Pro supports up to 6 high-fidelity object references plus up to 5 character-consistency references. That is the ceiling, not the default. For realistic images, the practical starting point is usually zero, one, or two.
The reason is simple. Realism likes hierarchy. If you upload a face reference, a style reference, a pose reference, an environment reference, a fashion reference, and two more "inspiration" images before the model even knows what physical shot you want, realism gets diluted. The model is solving too many problems at once.
A tighter rule works better:
- No references: when the scene itself is the main challenge and identity does not matter yet.
- One reference: when you need the face or product to stay grounded in something real.
- Two references: when you need both identity and one secondary influence, usually scene or style.
Beyond that, move carefully. If you need broader slot discipline, use the dedicated reference-images guide after the basic realism workflow is already working.
This is also the right place to handle the "realism drops after angle changes" complaint that keeps appearing in community threads. When users generate a strong realistic image, then pass it through another angle-changing or transformation surface, the result often loses micro-detail, sharpness, or texture fidelity. The safer move is to treat the last good output as a new reference image, re-state the camera change clearly, and rerun the scene through Pro rather than assuming another tool will preserve the entire realism stack automatically.
The same principle applies to repeated edits in one conversation. Google's broader Nano Banana workflow encourages iterative refinement, and that is useful, but realism can slowly soften if every turn asks the model to reinterpret the same scene again. When that starts happening, reset. Take the last best image, shorten the prompt, keep only the new change, and generate from a cleaner branch.
Troubleshooting: why realism falls apart after edits, angles, or stacked prompts
Most realism failures look different on the surface, but they come from the same small set of causes: the scene was too abstract, the camera logic was muddy, the image got too polished, or the model was asked to preserve too many things at once.
Use this diagnosis table before you rewrite the whole prompt:
| Symptom | Likely cause | What to change first |
|---|---|---|
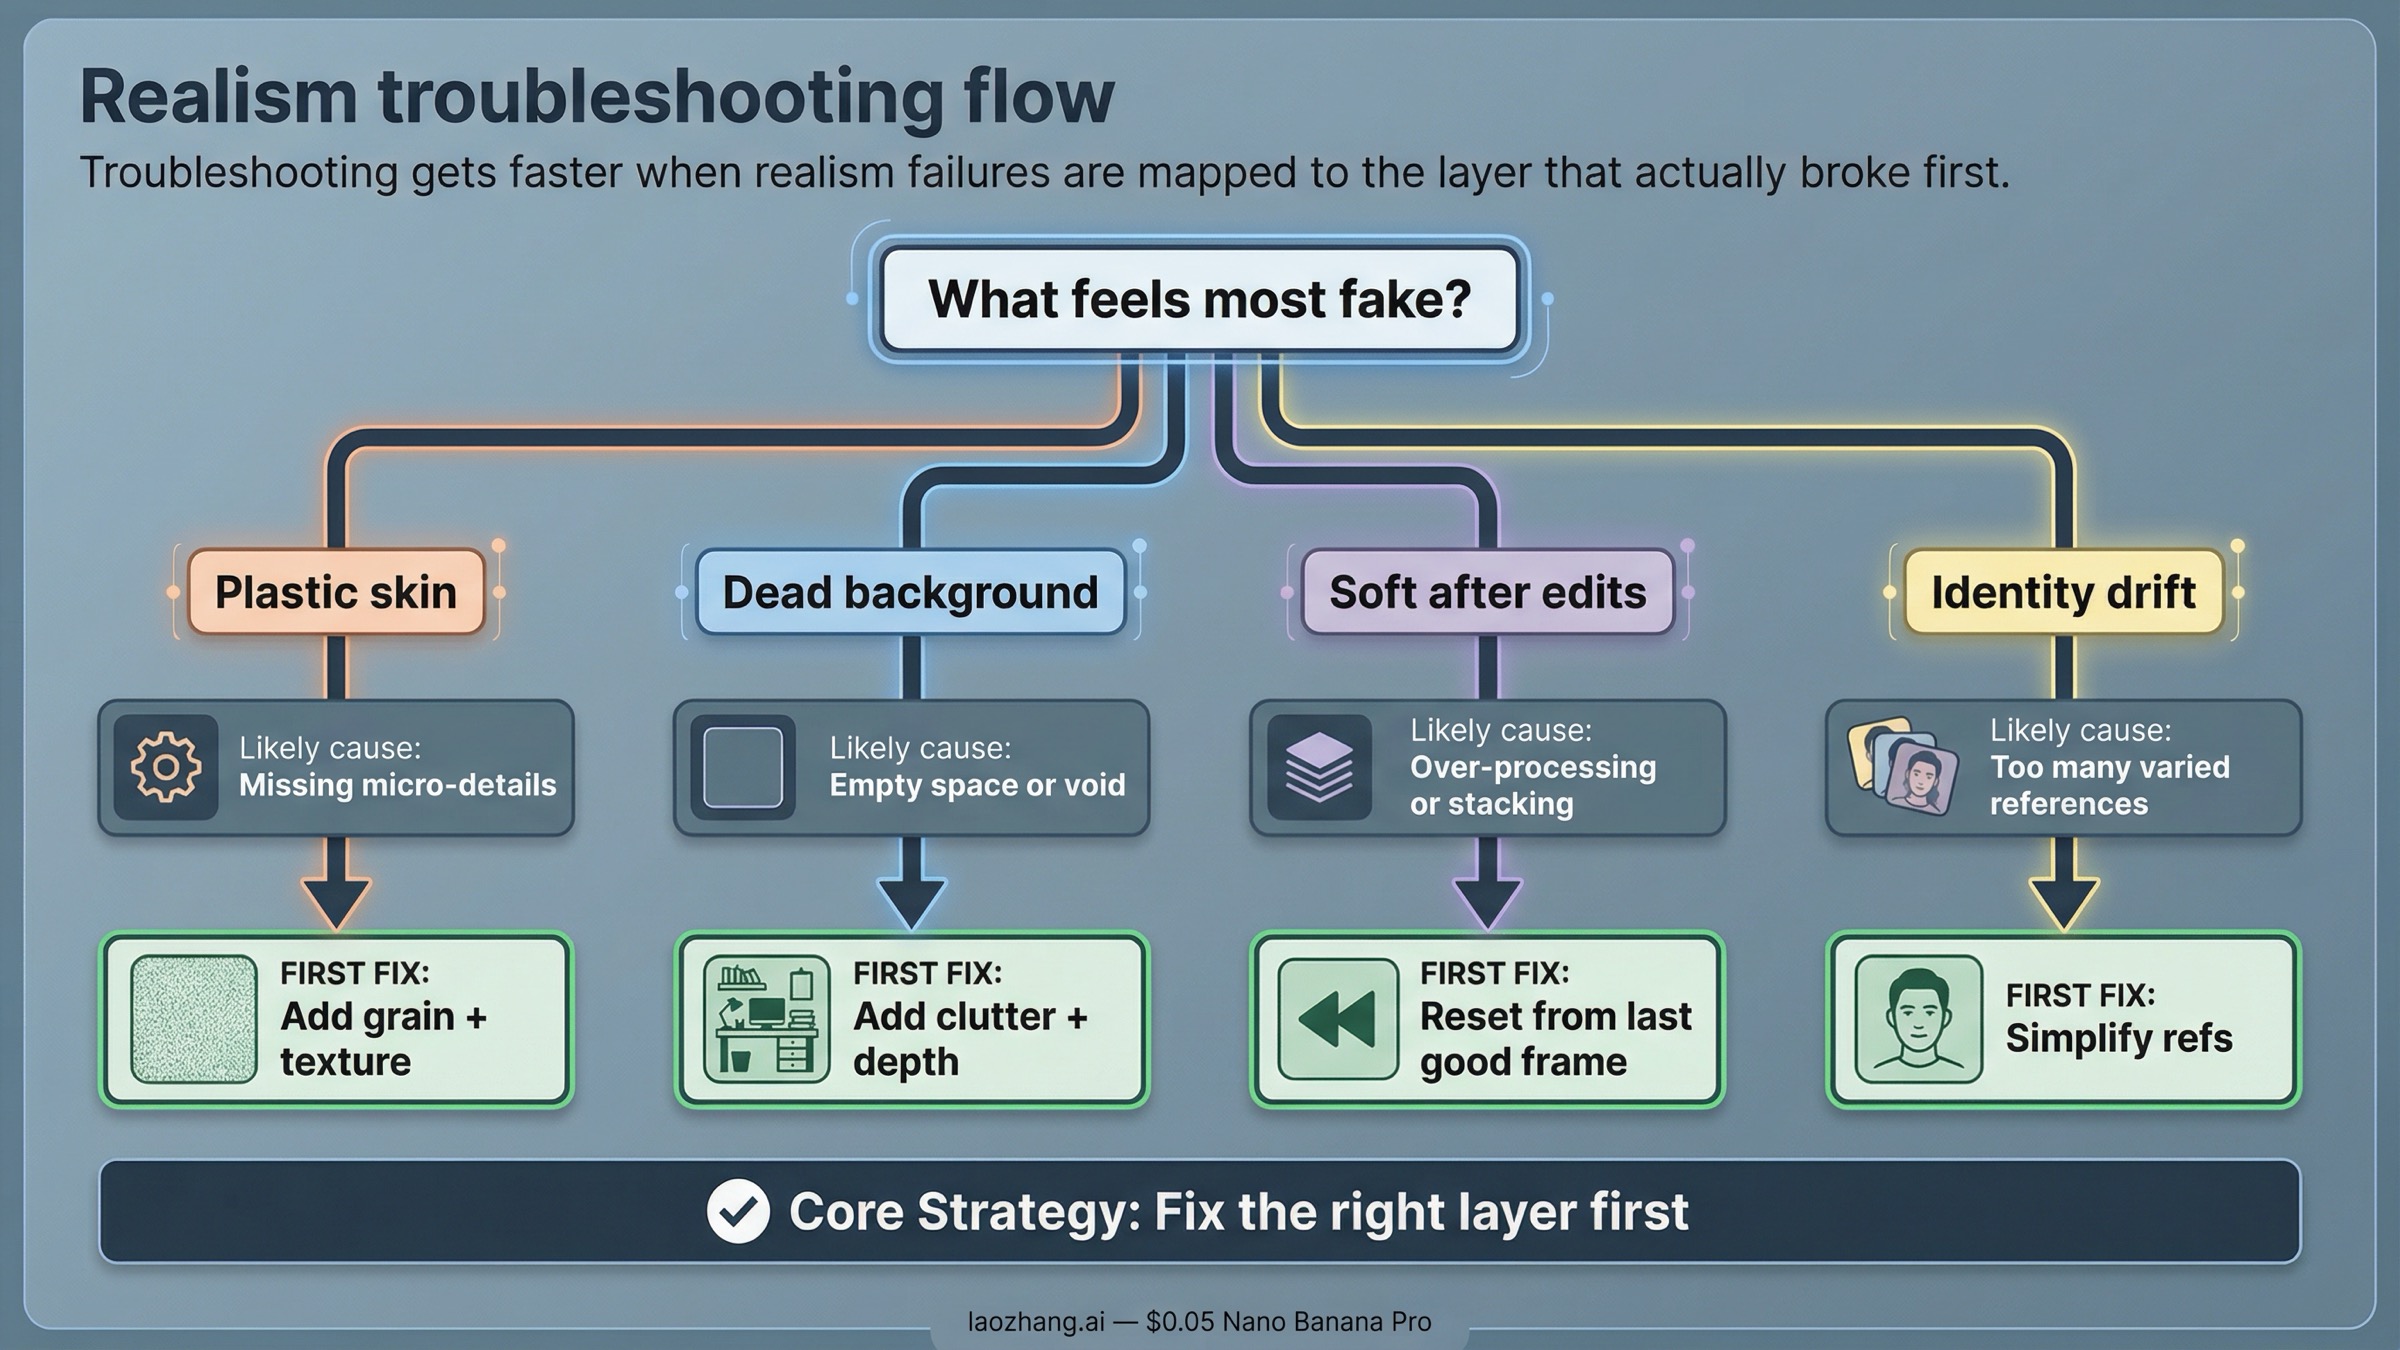
| Skin looks waxy or plastic | Too much beauty or polish language, not enough texture cues | Remove extra style adjectives and add natural skin texture, uneven light, and normal facial detail |
| Background feels empty or fake | Scene is under-described and too optimized | Add real objects, clutter, wear, or physical context that belongs to the location |
| Image looks cinematic but not believable | Style words overpower the physical shot | Rebuild the prompt around the actual scene and camera setup before re-adding style |
| New angle loses sharpness or realism | Follow-up transformation reinterpreted the image instead of preserving texture | Use the last good output as a fresh reference and rerender the changed angle through Pro |
| Repeated edits make the image softer | Too many stacked turns in one branch | Reset from the best previous frame with a shorter prompt and only the next required change |
| Face or product starts drifting | Too many competing references or scene changes | Cut the reference set back to the minimum identity lock and simplify the new request |
| Surface texture disappears | Material cues were never explicit or got overridden by lighting/style | Name the texture directly and reduce decorative style instructions |
The important habit is to change one layer at a time.
If the image looks fake, do not immediately add another reference. Ask whether the scene itself is real enough. If the scene is fine but the lighting feels artificial, change the lighting. If the lighting is fine but the skin still looks too smooth, add texture language. If the identity is drifting, simplify the reference setup. If the angle change made the image softer, stop chaining edits and rerender from the last strong frame.
This is why giant realism prompts often disappoint. They make every realism layer harder to troubleshoot because all the decisions are buried together. Strong realism workflows are easier to debug precisely because they are layered.
There is also one operational caveat worth keeping visible. As checked on March 28, 2026, Google's pricing page still labels Nano Banana Pro as a preview model and notes that preview models can have more restrictive rate limits. Google's rate-limits page also says active limits depend on usage tier and should be viewed in AI Studio. That means some "bad realism" reports are not purely prompt issues. Capacity, rate limits, and preview-surface quirks can still affect output consistency. When the result suddenly degrades for no clear prompt reason, it is worth retrying cleanly before you rebuild the whole workflow.
If the failure turns into a refusal or policy block rather than a quality drop, move to the dedicated follow-up pages on image-generation refusals and image safety errors. Those are not realism problems. They are request-shape and policy problems.
When Pro is worth paying for and when Nano Banana 2 is enough
This keyword is not really about specs. It is about whether Nano Banana Pro saves enough failed attempts to justify using it for realistic images.
Use Nano Banana Pro when the output itself is the deliverable. That usually means:
- realistic portraits where identity matters
- believable product or lifestyle images where material fidelity matters
- poster, ad, or editorial images where realism and readable text both matter
- scenes that require complex instructions, tighter composition, or a more careful edit path
Use Nano Banana 2 when you are still exploring. It is usually the better choice for:
- cheaper first-pass ideation
- fast scene testing before you care about final fidelity
- rough layout or lighting experiments
- higher-volume iteration where you expect to throw many attempts away
As checked on March 28, 2026, Google's official pricing page lists Nano Banana Pro output at the equivalent of $0.134 per 1K or 2K image and $0.24 per 4K image. That is reasonable when the image needs to look finished. It is wasteful when you are still guessing at the scene.
The easiest decision rule is this:
- If you are still discovering the shot, use the cheaper or faster route first.
- If you already know the shot and realism is the point, move to Pro and keep the workflow disciplined.
That discipline matters more than one magical prompt. Realistic Nano Banana Pro images usually come from a better sequence, not a longer sentence. Write the shot like it happened in the world. Add camera and lighting like a photographer. Add texture and imperfection like someone who has actually looked at the kind of image they want. Then use references only where fidelity really matters.
If you want to keep going after this page, the best next step depends on what is still blocking you:
- For broader prompt technique, go to Nano Banana Pro prompt mastery.
- For reference-heavy work, go to Nano Banana Pro reference images.
- For style-transfer jobs, go to Nano Banana Pro clone image style.
- For output-size planning, go to Nano Banana Pro 4K image generation guide.
- For implementation, go to Nano Banana Pro API setup.
The main thing to keep is the order. If your first render looks fake, do less, not more. Reset the shot, rebuild the physical scene, and make it believable before you ask Nano Banana Pro to do anything fancy.