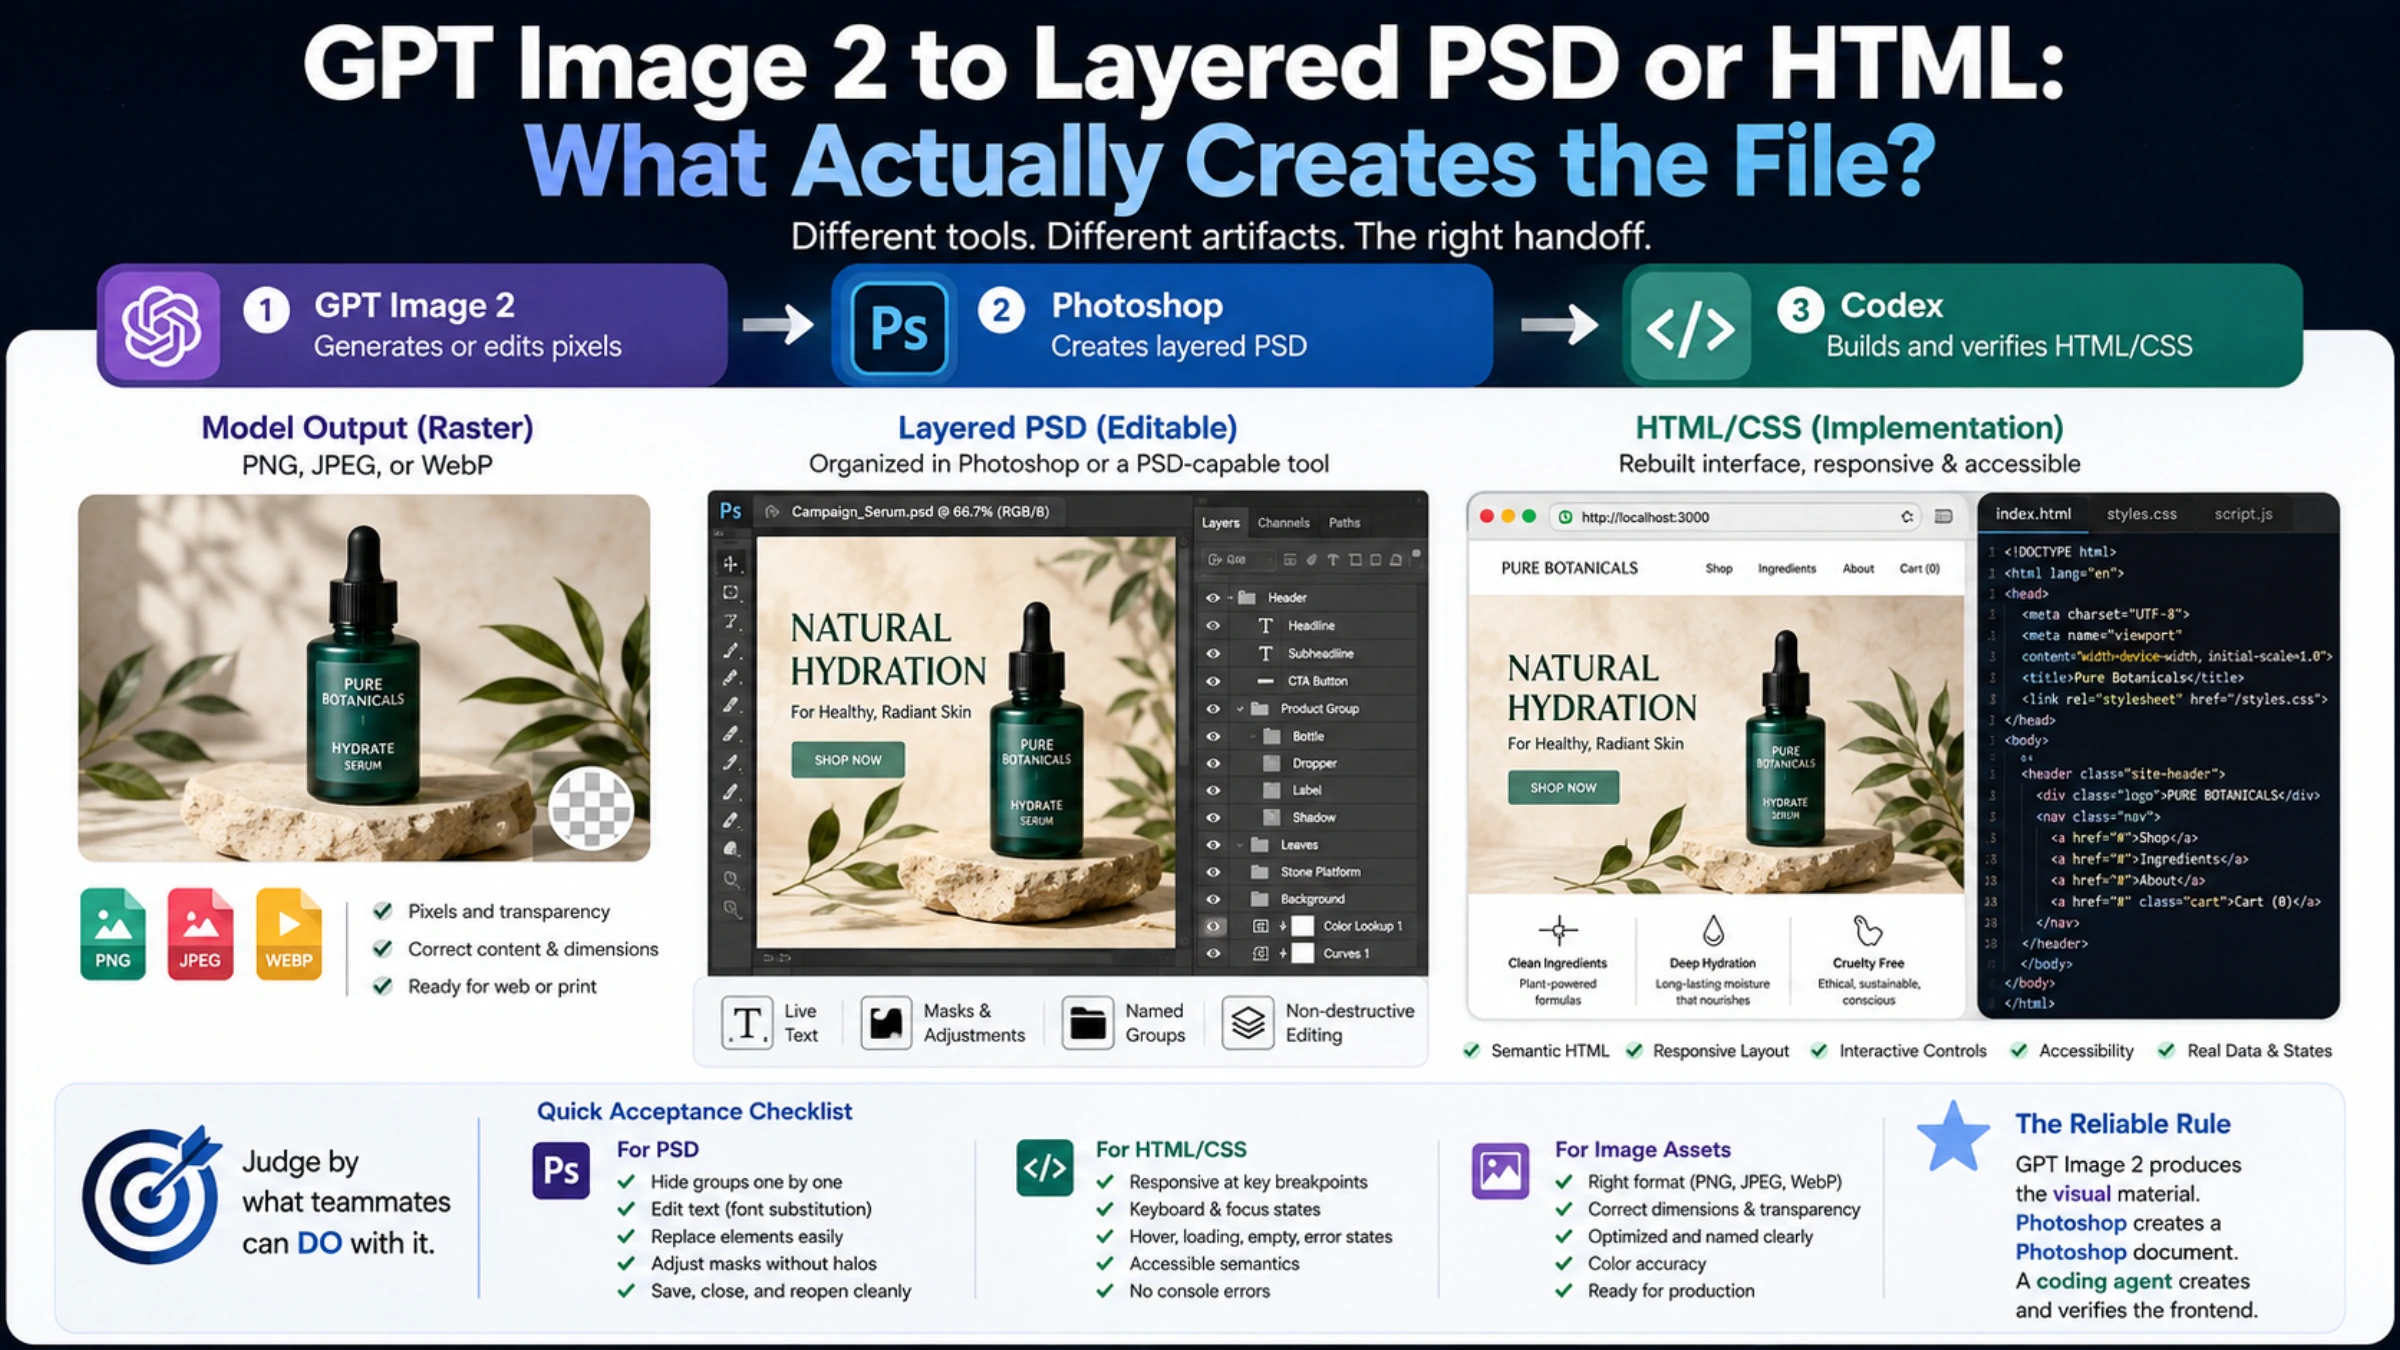
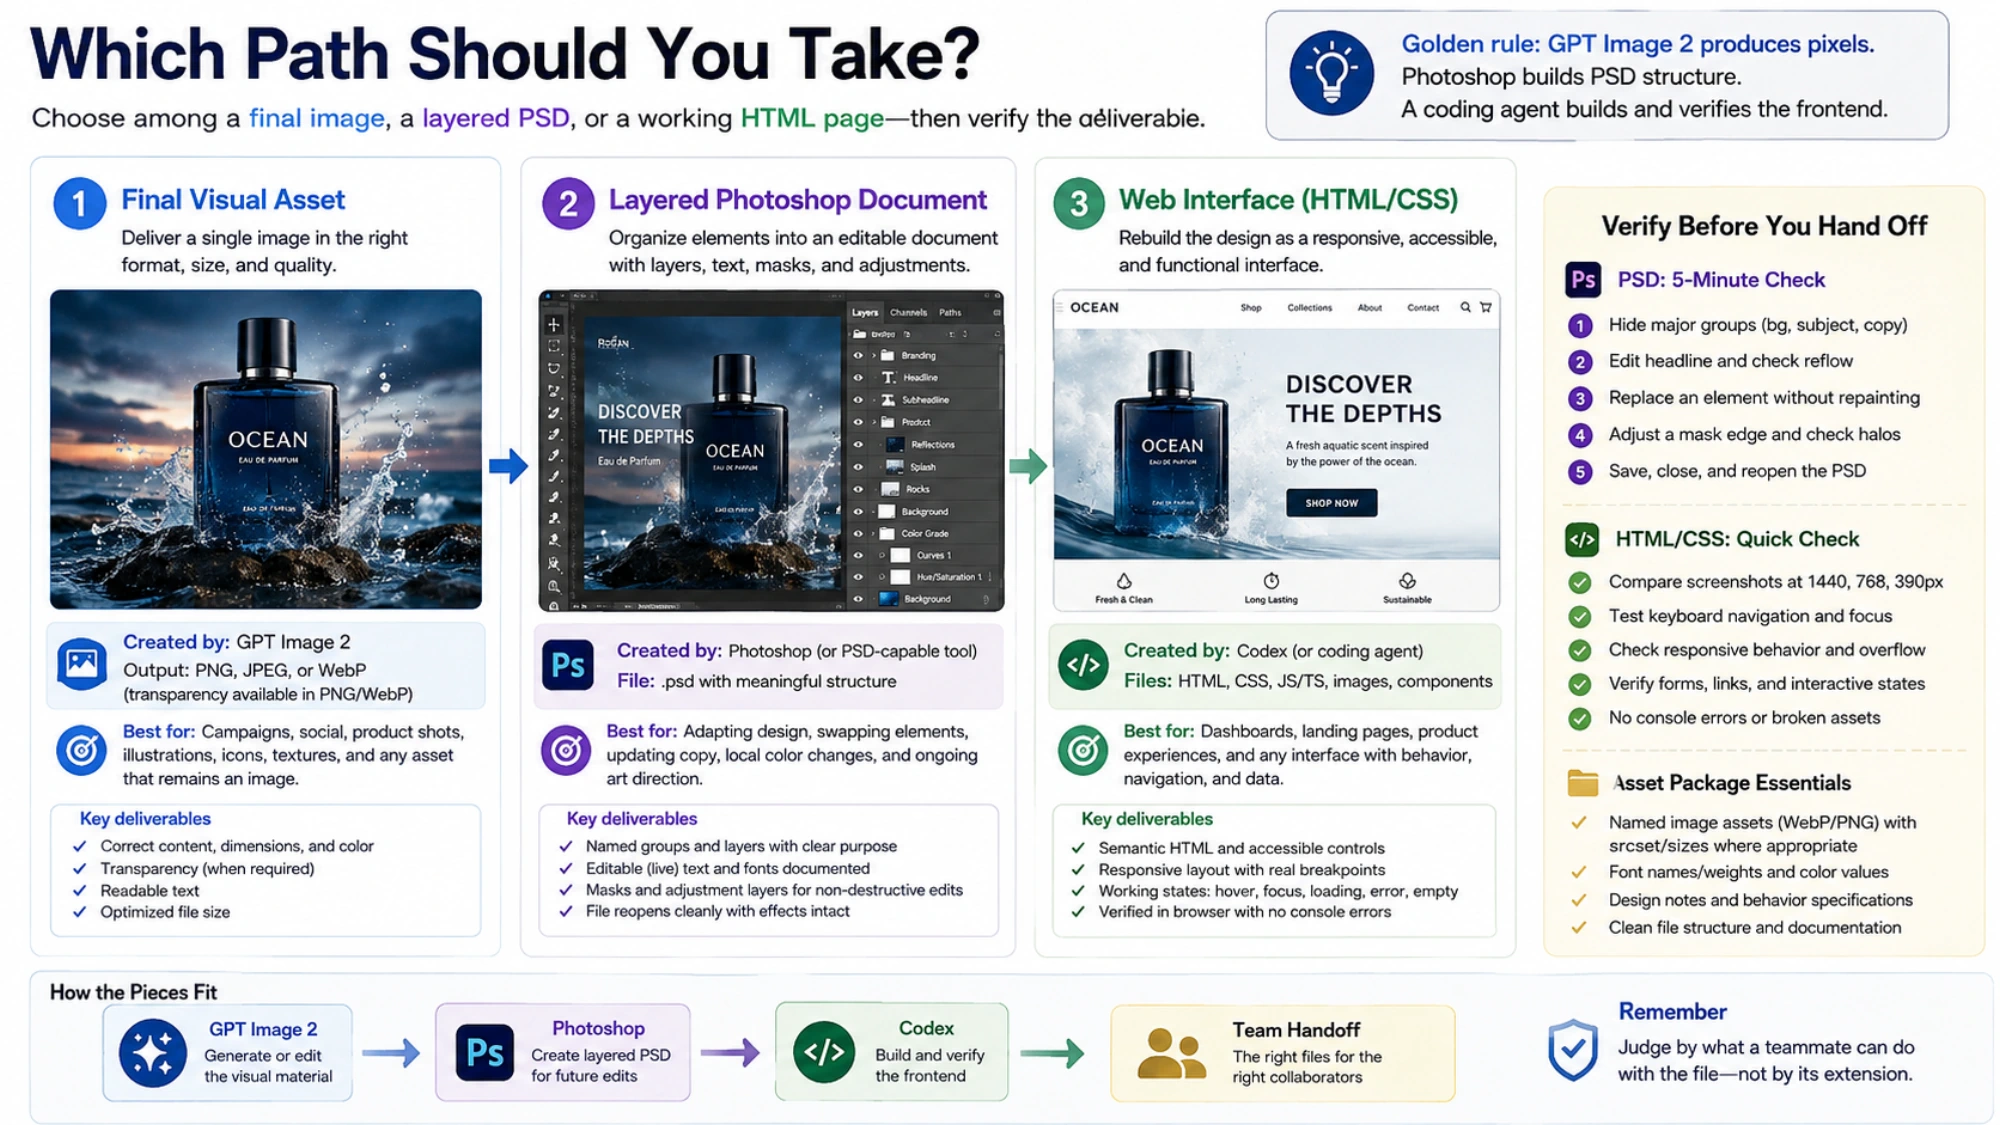
GPT Image 2 does not directly return a layered PSD through the Image API. Its documented output formats are PNG, JPEG, and WebP. To get a Photoshop document with meaningful layers, you need an editor or another tool that assembles the images, masks, and text into a PSD. OpenAI's output-format documentation defines that distinction.
You can still use GPT Image 2 to produce the visual material. The practical choice is whether you need to adjust the whole image, move individual objects, rewrite the copy, or turn the design into a working webpage. Each requires different structure inside the final file.
Decide what must remain editable
For a campaign graphic, “editable PSD” might mean replacing a price next week and swapping a product next month. Write those revisions down before generating or splitting assets. They determine which parts need separate layers.
| Revision you need | Structure to create | What will not be enough |
|---|---|---|
| Change overall brightness or color | Image layer plus adjustment layers | A new flattened export after every adjustment |
| Move or replace a product | Separate cutout or masked layer, with a complete background underneath | A cutout placed over the same product in the original image |
| Rewrite a headline or price | A Type layer with the required font and text | Letters isolated as an image layer |
| Rearrange a layout | Separate objects, type, and a background that survives movement | Arbitrary strips or fragments labeled as layers |
| Build a responsive webpage | HTML, CSS, appropriate components, and image assets | A PSD alone, or one screenshot embedded in HTML |
PSD preserves the structure you create; it does not recover it just because you save a PNG with a different extension. Adobe documents PSD's support for layers, effects, and editing capabilities. A valid PSD containing one image layer is useful for some edits, but it will not let you rewrite words baked into those pixels.
Build the PSD in Photopea or Photoshop
The following is a manual production method, with AI generation or editing used where it helps create assets. The same layer planning applies in Photoshop; Photopea provides a browser-based way to open images, add layers, and save a PSD.
Prepare a complete background and separate assets
Start from the approved composition, but keep an untouched reference copy. Decide which elements will move or change. For example, a promotional card may need a background, product, product shadow, headline, price, and logo. Keep an existing approved logo as its own asset rather than asking an image model to reproduce it.
If you are generating the design from scratch, creating a text-free background and separate subjects can reduce later cleanup. If you already have a finished flattened image, extract or recreate the required subjects and repair what sits behind them. A subject layer is only half the work: moving it reveals the background it previously covered. On a working copy, remove the subject and any shadow that will move with it, then fill or reconstruct that area. Check that textures and edges continue across the repair. Keep this clean background underneath the separate subject; leave the untouched original available only as a reference.
For API users, OpenAI documents transparent backgrounds for GPT Image 2 in preview. Use background="transparent" with output_format="png" or "webp"; omit output_compression for PNG. JPEG cannot preserve transparency. A third-party generation interface may not expose these options.
Preserve that transparency when downloading and importing the asset. A subject generated on white still needs background removal, and deleting every white pixel can also erase white clothing, packaging, or highlights. Use a selection or mask that separates the subject from its surroundings.
For edits to the source image, masks can help identify the area to change. OpenAI notes that image editing may not follow a mask's exact shape. Inspect the cutout edges and the repaired area in the actual editor before relying on them for production.
Assemble the document without duplicating the subject
- Open the clean background in Photopea with File > Open. Use the intended final canvas dimensions so placement and exports have a consistent reference.
- Drag each separate asset into the main canvas of the open document. Photopea documents that this inserts it as a Smart Object layer; dropping it in the document-tab area has a different effect. See Photopea's opening and saving guide.
- Position and scale the assets against the reference composition. Matching canvas dimensions helps alignment, but separately generated images can still shift or change proportions.
- Name layers by function, such as Product, Product shadow, Headline, and Background. Group elements that should move together. A shadow can remain separate when you need to reposition or recolor it independently.
- Hide the reference image before checking the result. If it remains visible under the cutout, moving the product may expose the original product underneath.
An imported Smart Object preserves the imported asset as a separate object. It does not turn all the objects inside that asset into editable sublayers. If your product, label, and shadow arrive in one PNG, they still need additional separation if you want to change them independently.
Replace baked-in lettering with editable type
Extracted letters are still pixels. For character edits, remove the old lettering from the background and recreate it with the Type tool. Photopea identifies Type layers with a T thumbnail; selecting the Type tool lets you edit their text.
Match the wording first, then set the font, size, weight, color, alignment, and spacing. Keep a price or date separate from the headline if they will change independently. Allow room for a longer replacement: a price update or translated headline can require more space than the original.
OCR can help transcribe the words, but it does not restore the original font or spacing. If you do not have the font, choose an agreed substitute and record it for the recipient. Do not leave the old raster lettering visible behind the new Type layer, or revisions will reveal two versions of the copy.
Save, reopen, and try the promised revisions
Use File > Save as PSD in Photopea to download the document with its structure. Open the downloaded file in the editor your recipient will use. Cross-editor compatibility is something to check in that file, especially when it contains effects, masks, or fonts.
Try a realistic revision before handing it over:
- Replace the headline and price with different text. Confirm that the characters are editable and the layout still works.
- Move the product away from its original position. Check for a duplicate product, an empty area, or a conspicuous repair underneath.
- Hide the subject and shadow independently if that was a requirement. Check cutout edges at 100% zoom.
- Save, close, and reopen the file. Confirm that the layers, masks, type, and appearance survive.
This test is more informative than the layer count. Ten segmented pieces cannot compensate for a missing background or a headline that still cannot be edited.
What Adobe in ChatGPT adds
Adobe's current connection instructions changed after the original Photoshop-only integration. Its Adobe for ChatGPT help page, updated August 6, 2026, says the Adobe plugin replaced the old Photoshop plugin. The documented entry is Plugins > Adobe > Install plugin. If you used the earlier connection, follow the current reconnection instructions to access the available Photoshop tools and broader Adobe toolkit.
Adobe's April Photoshop-in-ChatGPT tutorial shows a useful example: an edit opened in Photoshop on the web retains a Hue/Saturation adjustment layer and mask. That demonstrates non-destructive editing around an image. It does not demonstrate automatic recovery of every object or editable text from a flattened design.
Check the tools available in your actual chat before planning the handoff. Can it make the required edits, open the work in the editor, and provide the file you need? If the required PSD export or layer assembly is unavailable, continue in Photopea or Photoshop using the method above. Plugin availability alone does not guarantee a downloadable document with every requested layer.
Evaluate an automatic image-to-PSD service by the file
Some tools combine image extraction, background repair, and PSD assembly. Their output may save work, but the useful question is how much of your intended revision it supports.
A PSD writer packages the layers supplied to it. It cannot recover hidden pixels or live typography simply by writing a PSD. Background reconstruction, text recreation, and accurate positioning must happen somewhere in the process, whether automatically or manually.
Use a representative design with overlapping objects, text, and a visible background. Open the returned file and perform the same revision test. If you cannot edit the price, need to repaint the background after moving the product, or find flattened groups where you expected separate objects, include that repair work when judging the result. A preview image and a list of layer names cannot establish editability.
Turn the approved design into HTML and CSS
A layered PSD can supply assets and measurements, but a webpage also needs layout rules and behavior. A screenshot captures one viewport and one state; it does not tell a developer what happens on a narrow screen, how a form submits, or which controls need loading and error states.
Codex accepts visual references. OpenAI's image-input guidance recommends explaining what the image shows, the area that matters, the desired result, and the constraints. Provide the approved design together with the repository, real copy, intended interactions, and available assets.
The implementation should use real text for headings and descriptions, links for navigation, and controls for actions. Photos and illustrations can remain images. Embedding the entire design as one image may resemble the reference at one width, but it does not create selectable text, working buttons, or responsive content.
For a useful web handoff:
- Export only the image assets the page needs. Photoshop can export layers as individual files. Include font details, colors, and any behavior the picture cannot show.
- Implement the design within the project's existing framework and components. Define how columns, spacing, navigation, and typography adapt when the viewport changes.
- Supply appropriately sized media. MDN explains how
srcset,sizes, and<picture>support responsive image selection and art direction. - Open the local page at wide, tablet, and phone widths. Check wrapping, overflow, keyboard focus, navigation, forms, loading and error states, and browser-console errors as applicable.
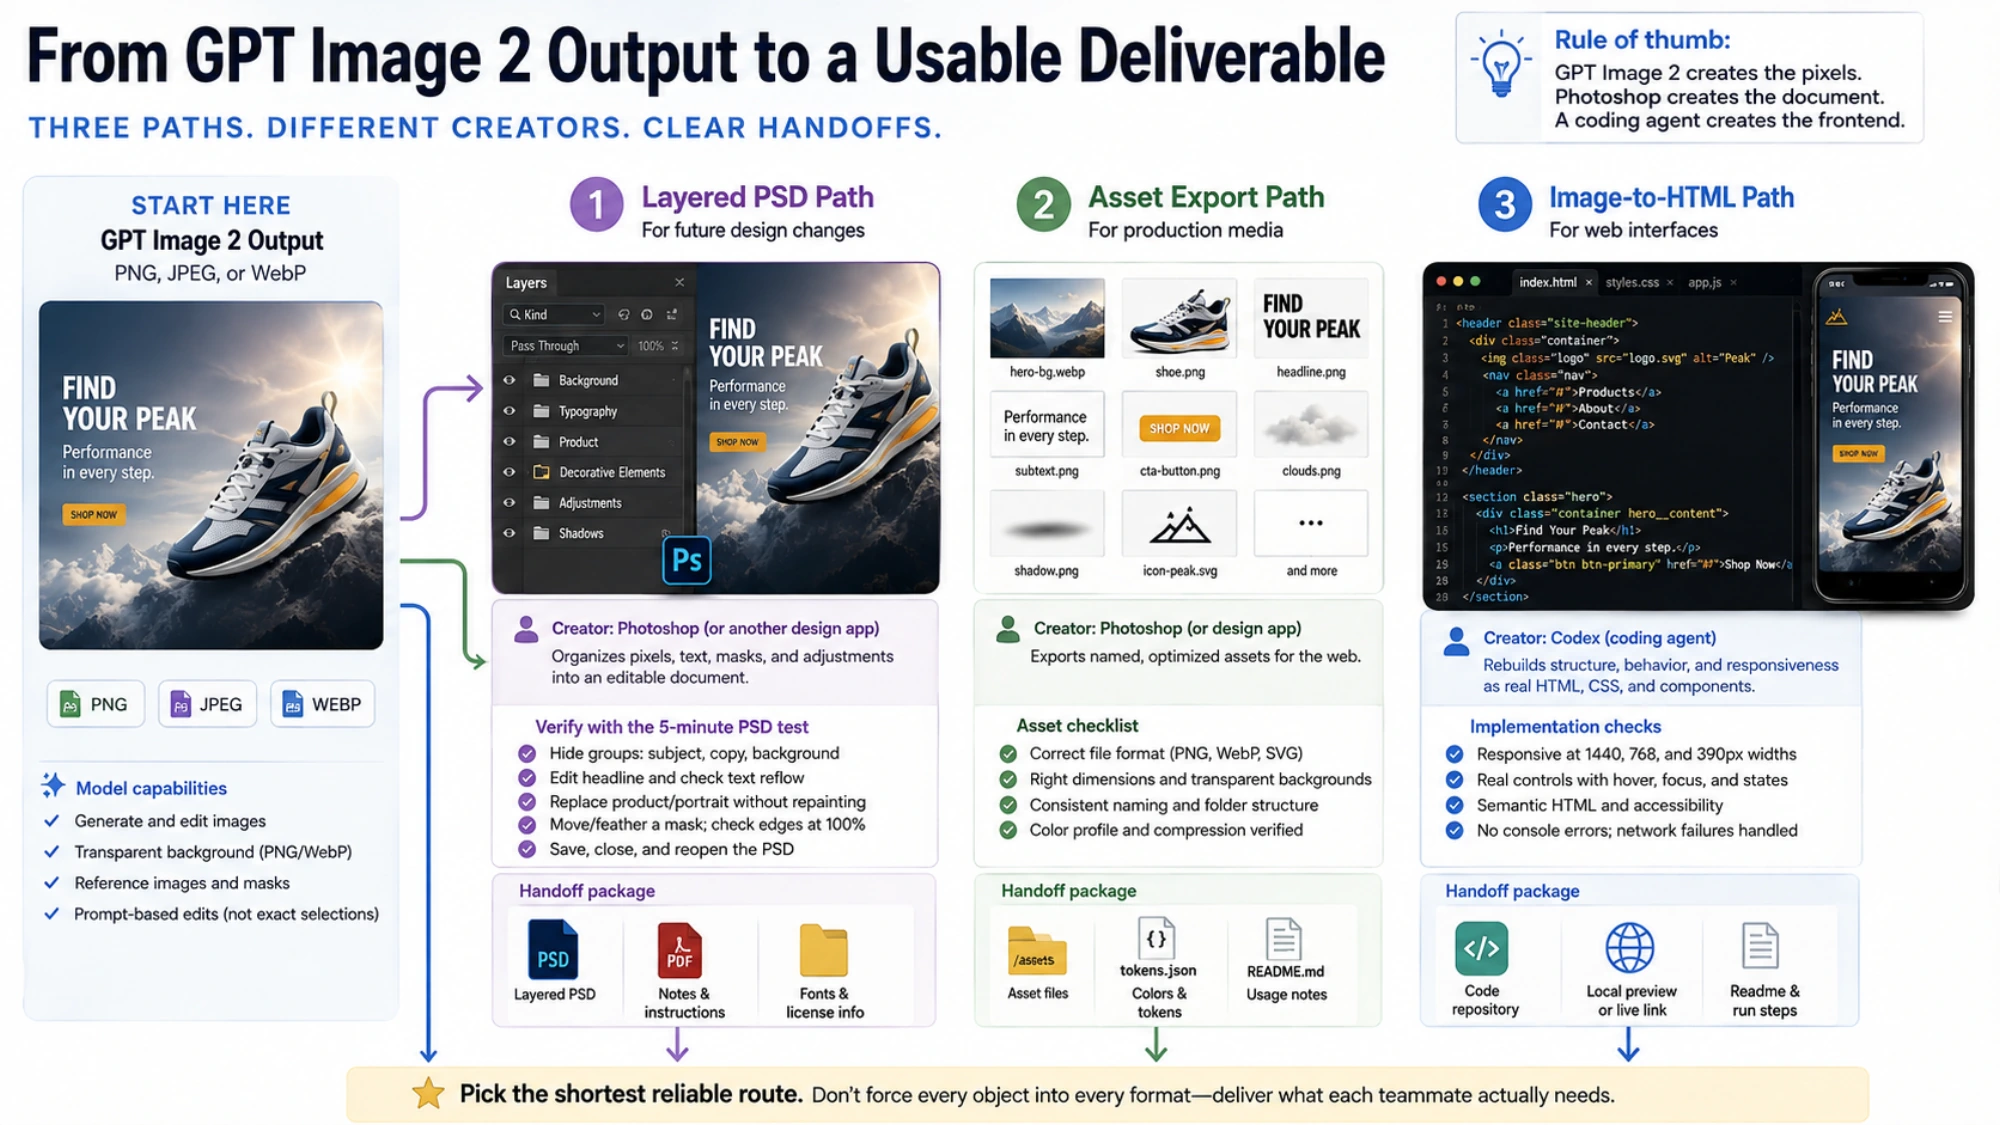
For localized changes to the generated image before assembly, the OpenAI image mask-editing guide covers the API request details. For delivery, keep the PSD for visual revisions, exported assets for production media, and the code project for responsive behavior. Each should pass the checks for the work its recipient needs to do.