
As of March 22, 2026, the safest default for Gemini image generation code is the native Gemini API with gemini-3.1-flash-image-preview. Start there unless you already know you need the higher-cost gemini-3-pro-image-preview lane for text-heavy graphics, search-grounded image work, or premium output that is expensive to get wrong.
That recommendation matters because the current Gemini image stack is easy to misread from page one. Some Google pages are about the Gemini app, some are about AI Studio, some are raw API docs, and some older tutorials still center on the 2.5 image line. For a developer, the right first move is narrower: pick the current image model, copy one working native request, save one returned image, then decide whether editing, Pro, or batch mode changes the route.
The other key caveat belongs right up front. Gemini Apps, AI Studio, and the Gemini API are related surfaces, but they do not share one simple free-versus-paid rule. Google's current billing page still says new accounts begin on the Free tier, but Google's February 26, 2026 Nano Banana 2 developer post also says a paid API key is required to use that model in AI Studio. If you skip that distinction, you can end up debugging the wrong problem before your code is even settled.
TL;DR
- Use the native Gemini API, not a generic compatibility layer, for most new image-generation code. The native route is where
imageSize,aspectRatio, multi-turn editing, and richer image features actually live. - Start with
gemini-3.1-flash-image-previewfor most new work. Move togemini-3-pro-image-previewwhen text rendering, infographic output, or premium image quality changes the business result enough to justify the higher price. - Keep your first request boring. Generate one image, save it, and verify the output before you add editing, Google Search grounding, batch mode, or a larger prompt pipeline.
- Use explicit
imageSizeandaspectRatiosettings on the Gemini 3 image models. Google's current docs expose512,1K,2K, and4Kresolution tiers and a much wider aspect-ratio set than the legacy 2.5 image line. - Treat pricing, paid-key rules, shutdown dates, and rate limits as live facts. Right now,
gemini-2.5-flash-imageis still the cheapest official lane, but Google's deprecations page also schedules it to shut down on October 2, 2026.
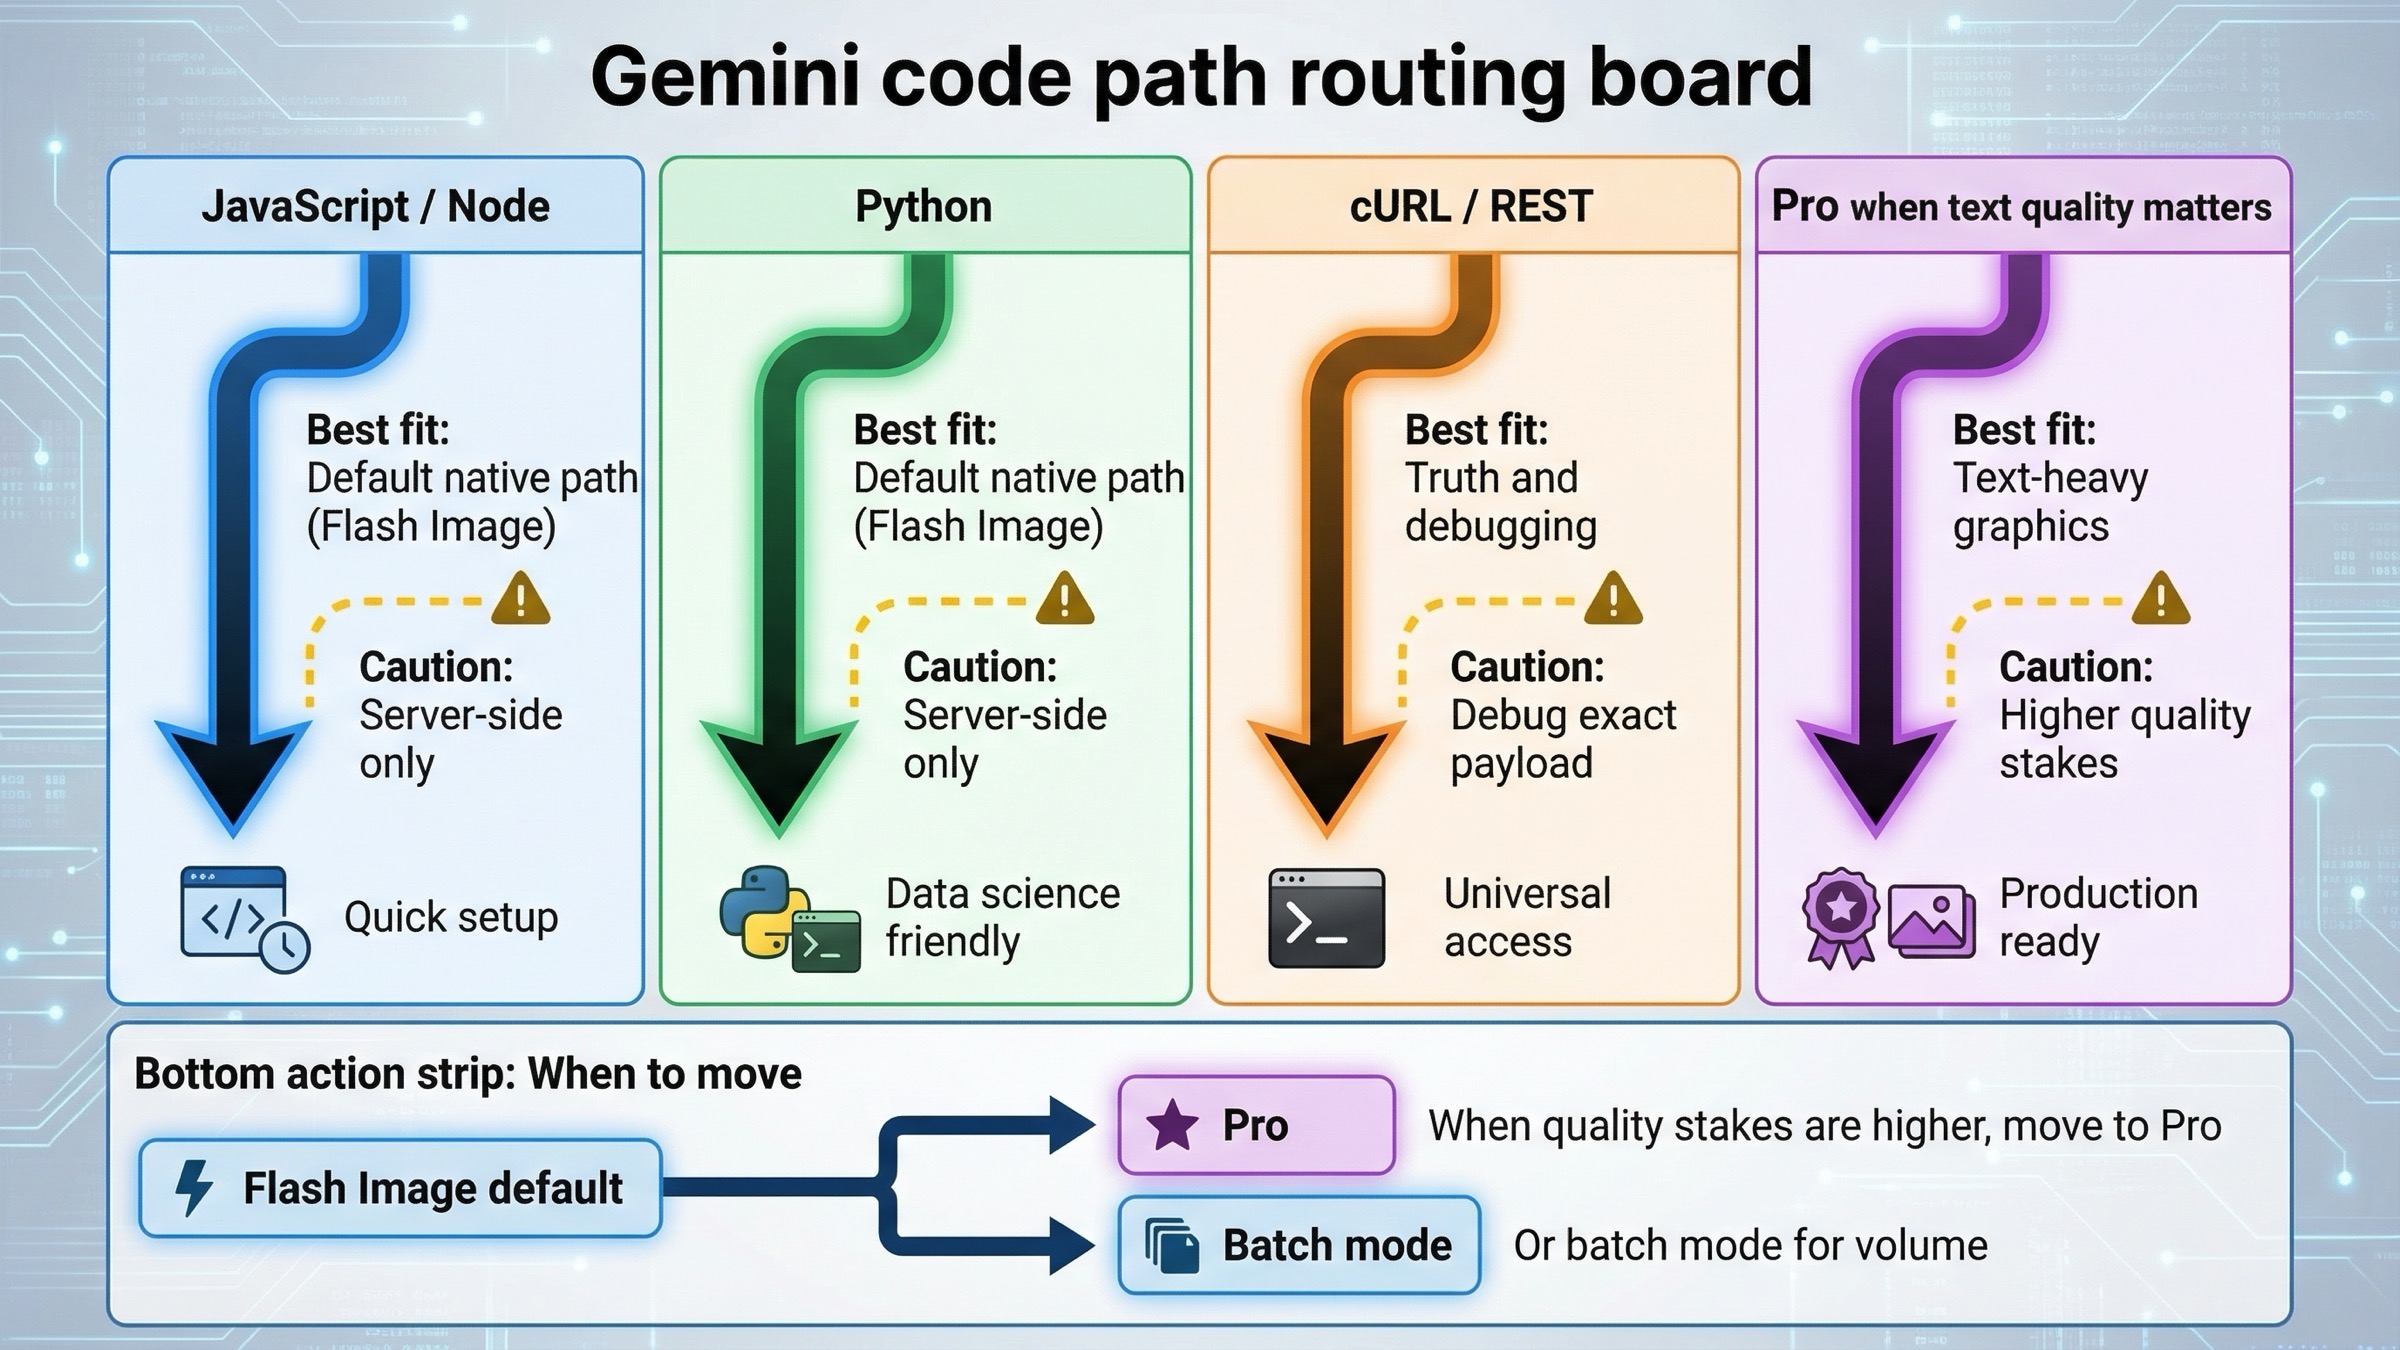
| Route | Best for | Start with this model | Why this is the right default | Main caveat |
|---|---|---|---|---|
| JavaScript / Node.js native SDK | Server-side apps, Next.js API routes, backend workers | gemini-3.1-flash-image-preview | Cleanest current SDK path for imageSize, aspectRatio, and returned inline image data | Keep the key on the server, not in the browser |
| Python native SDK | Batch tools, editing workflows, quick prototyping, scripts | gemini-3.1-flash-image-preview | Easiest current path for image iteration, local file inputs, and multi-turn backend flows | It is easy to overgrow a script into a production service without fixing logging and quota handling |
| Raw REST / cURL | Debugging, low-level inspection, unsupported languages | gemini-3.1-flash-image-preview | Best way to see the exact request and response shape without SDK abstractions | More boilerplate, and you must decode the returned inline image yourself |
| Premium text-heavy or infographic work | Posters, diagrams, polished product assets | gemini-3-pro-image-preview | Better premium lane when sharper text rendering or higher-stakes output justifies the cost | Standard pricing is materially higher than Flash Image |
If your real question is broader than code, start with Gemini Image Generation Tutorial: App, AI Studio, and API. If your next problem is cost rather than syntax, jump to Gemini image generation API pricing. If you mainly care about edits and reference images, Gemini image-to-image editing is the better companion page.
Start with the right Gemini image code path
The biggest mistake in this topic is starting from the wrong surface. A lot of developers search for "Gemini image generation code examples" after they have already seen the Gemini app create an image or AI Studio render one in the browser. That makes the API feel simpler than it is. The API does not inherit app-side assumptions for free. You still need the right model ID, the right billing expectations, the right response handling, and the right quota expectations for your project.
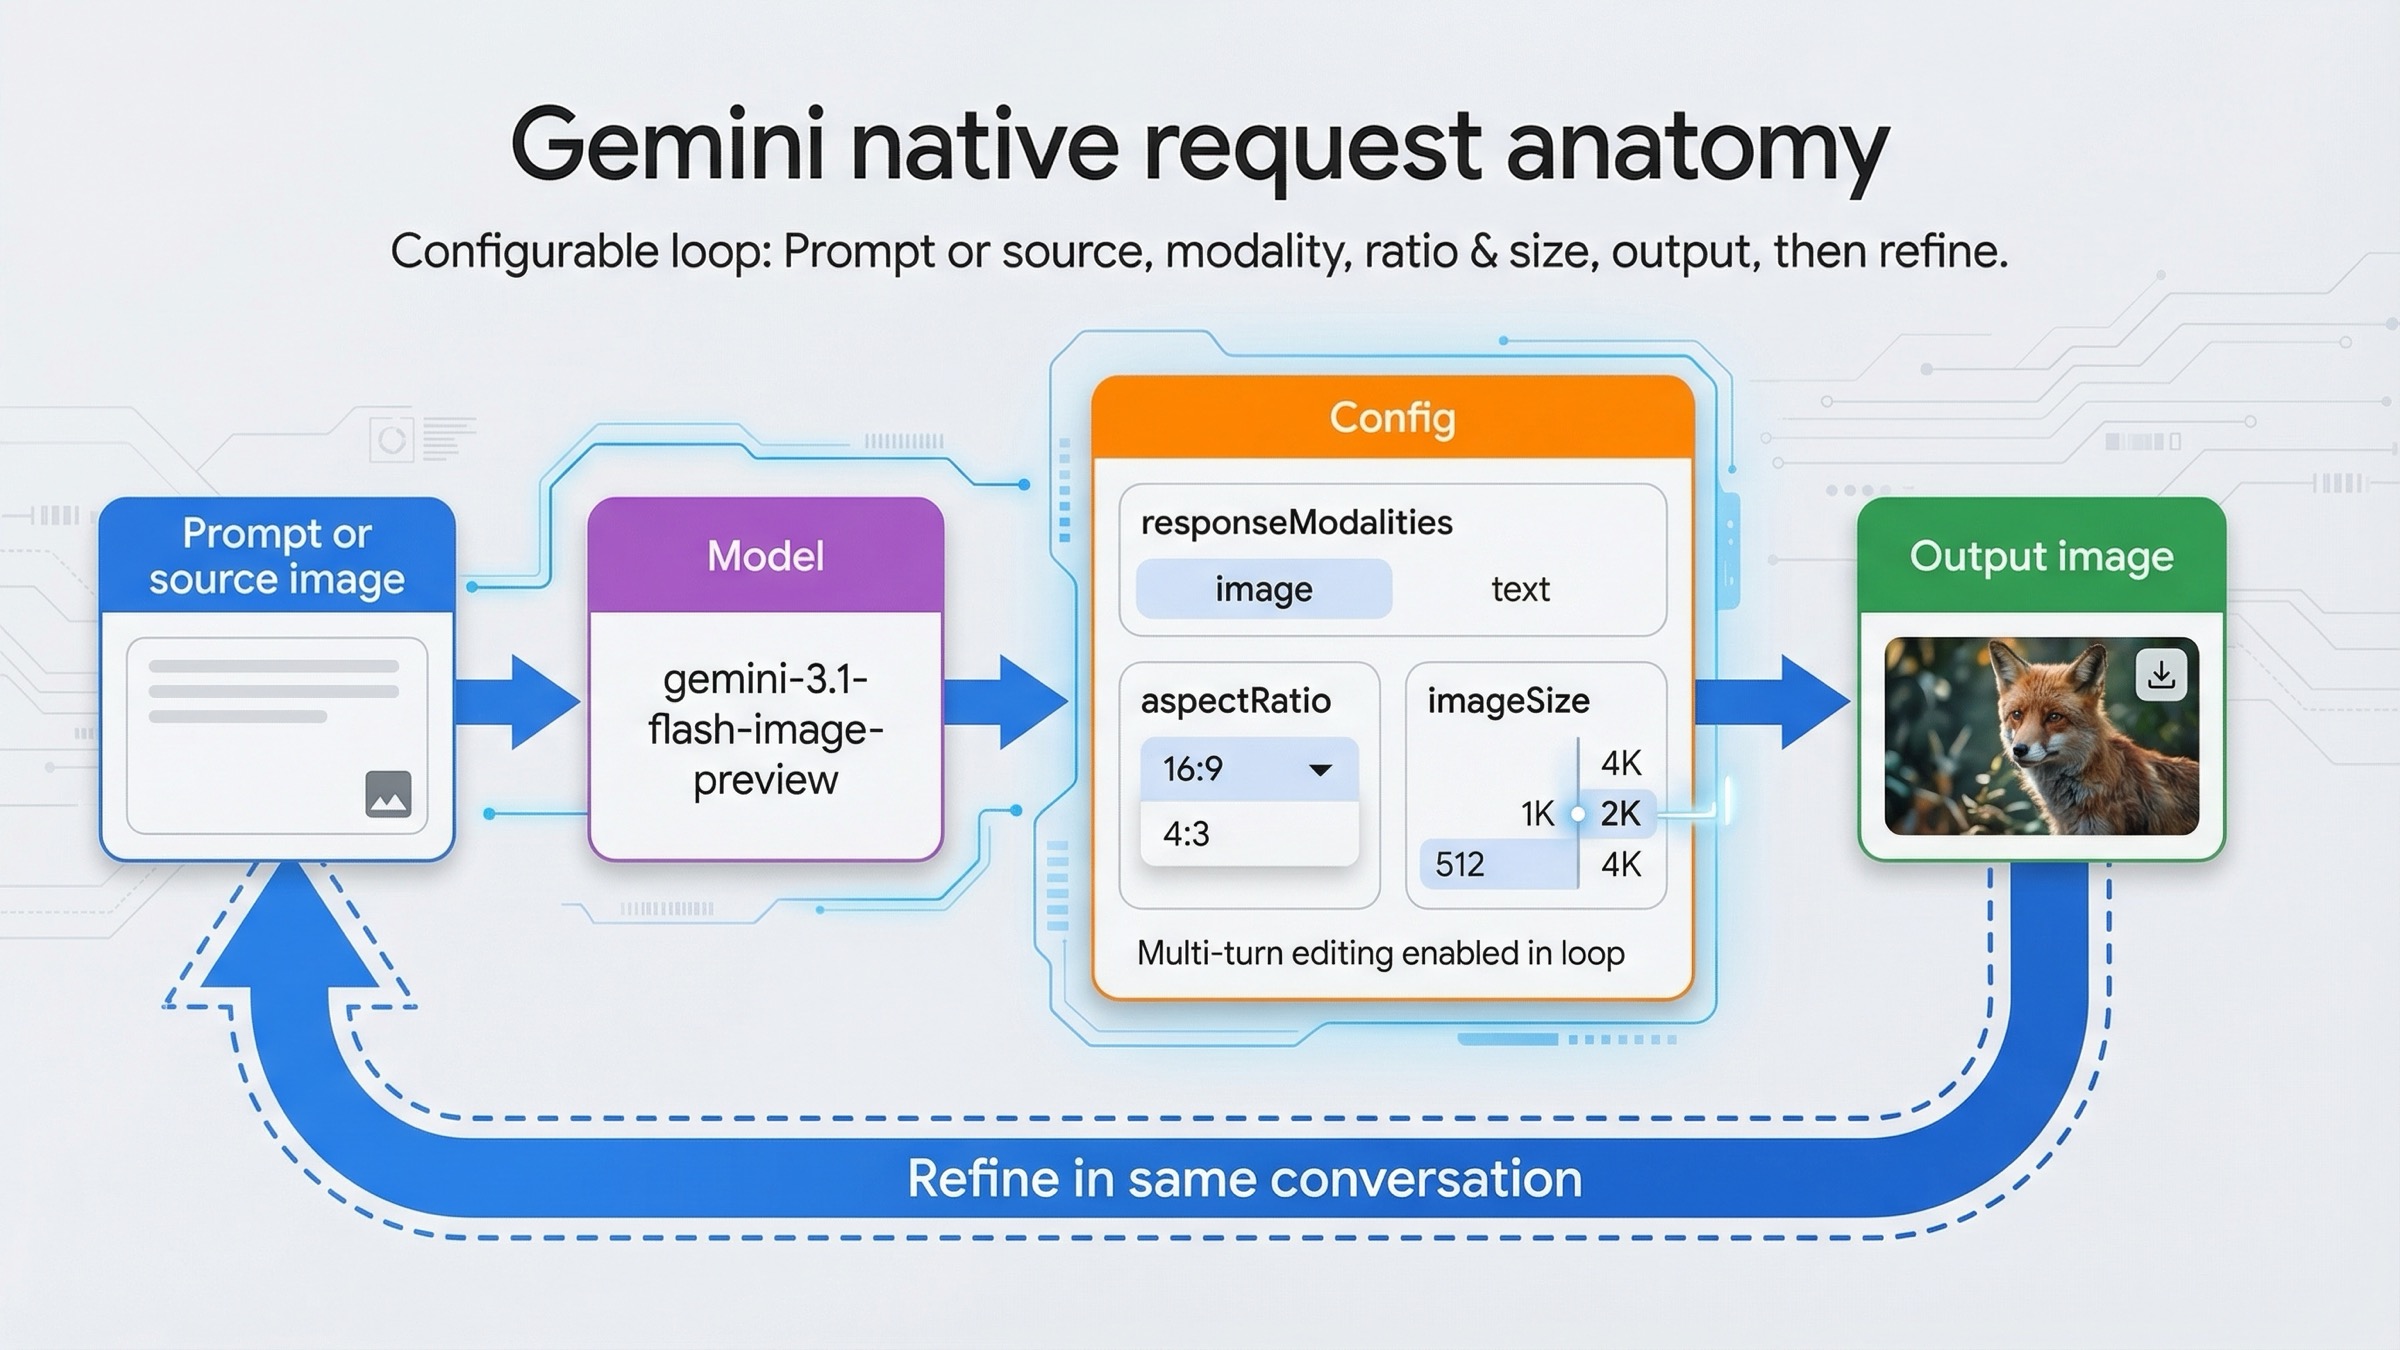
For most new code, the best path is the current native Gemini API docs on Gemini API image generation and editing. That page explicitly recommends Gemini 3.1 Flash Image Preview as the go-to image-generation model, and it shows the request features that matter in real code: responseModalities, aspectRatio, imageSize, multi-turn editing, and model-specific image controls. That is why this article stays on the native Gemini route instead of centering OpenAI compatibility. Compatibility layers are useful for migration, but they are not the clearest way to learn a feature set that is still moving quickly.
That does not mean every Gemini image model is the same choice. Google's current pricing page makes the split clearer than many third-party tutorials do. gemini-3.1-flash-image-preview is the fast current default. gemini-3-pro-image-preview is the higher-cost premium lane. gemini-2.5-flash-image is still live and still the cheapest official route, but Google's deprecations page already gives it an October 2, 2026 shutdown date. So if you are writing a fresh tutorial, "cheapest" and "best default" are no longer the same answer.
The practical rule is simple. If you are building something new, start with Flash Image. If you are building posters, diagrams, infographics, or other text-heavy assets where the first draft is often not good enough, keep Pro in scope. If you are using the 2.5 image lane for economics, do it deliberately and say out loud that you are choosing the legacy lane rather than the future-proof one.
One more route decision matters. Use AI Studio as a testing surface if it helps you discover a better prompt, but do not mistake AI Studio for the contract your app will run under. Google's own Nano Banana 2 developer post says a paid API key is required there for the model. That means your app architecture, logging, and quotas should be designed for the API path even if your first prompt iterations happen in a UI.
JavaScript example: the shortest current Node or server-side route
If you are working in Next.js, Node.js, or a backend service that already speaks JavaScript, the cleanest current path is @google/genai. Keep the client on the server, load GEMINI_API_KEY from the environment, and save the returned inlineData buffer to disk or object storage.
This is the most practical first example because it exercises the moving pieces that tend to break later: current package name, current model name, explicit image controls, and response parsing. Keep it narrow. Your goal is not to build the full pipeline on day one. Your goal is to prove that one image returns correctly and that the output size and aspect ratio match what you asked for.
javascriptimport { GoogleGenAI } from "@google/genai";
import fs from "node:fs";

const ai = new GoogleGenAI({ apiKey: process.env.GEMINI_API_KEY });

const prompt = `
Create a clean 16:9 product hero image of a matte black travel mug
on a light concrete surface. Use soft studio lighting, crisp texture,
and calm negative space on the right for marketing copy.
`;

const response = await ai.models.generateContent({
  model: "gemini-3.1-flash-image-preview",
  contents: prompt,
  config: {
    responseModalities: ["IMAGE"],
    imageConfig: {
      aspectRatio: "16:9",
      imageSize: "2K",
    },
  },
});

for (const part of response.candidates[0].content.parts) {
  if (part.inlineData) {
    const buffer = Buffer.from(part.inlineData.data, "base64");
    fs.writeFileSync("travel-mug-hero.png", buffer);
  }
}
There are four details here worth keeping. First, the model is gemini-3.1-flash-image-preview, not an older 2.5-era example. Second, responseModalities: ["IMAGE"] tells Gemini to return the image without extra text when you do not need a caption or explanation. Google's docs say the default behavior is text plus image, which can be useful in conversational editing flows, but it is unnecessary for a simple "save the file" request. Third, imageConfig is where the useful Gemini-native control lives. If you care about output shape, say so directly. Fourth, this belongs in a server context. Do not push a permanent Gemini API key into public frontend code just because the example itself is short.
Once that works, the next useful JavaScript decision is whether you want pure image output or a mixed text-plus-image response. If you are generating assets in a backend worker, image-only is cleaner. If you are building a creator tool where the user benefits from Gemini explaining what it changed or suggesting a next iteration, keep the text output on. That is one of the under-discussed advantages of the native Gemini image flow: you can treat image generation as a conversation, not just a fire-and-forget image endpoint.
JavaScript is also where many teams overcomplicate too early. You do not need Google Search grounding or multi-turn chats in your first request. Add them only when your product genuinely needs them. The best progression is boring but effective: first image, then editing, then stored outputs, then retries, then quotas, then optional grounding.
Python example: the cleanest current path for editing and iteration
Python is often the easiest place to learn Gemini image generation because the official docs are clear, the current SDK is compact, and image-editing patterns read naturally. That makes Python a strong default when you are building scripts, operations tools, internal content pipelines, or backend workers that need to iterate on visuals rather than just request one image once.
The biggest reason Python feels good here is that you can move directly from a generated image workflow to an editing workflow without changing mental models. Gemini's docs show image generation and image editing as the same basic generate_content call with different inputs. That is a better fit for real image work than older text-to-image APIs that treat every change as a completely separate endpoint.
pythonfrom google import genai
from google.genai import types
from PIL import Image

client = genai.Client()

base_image = Image.open("living-room.png")
prompt = """
Using the provided image of a living room, change only the blue sofa
to a vintage brown leather chesterfield sofa. Keep the pillows,
lighting, coffee table, and room layout unchanged.
"""

response = client.models.generate_content(
    model="gemini-3.1-flash-image-preview",
    contents=[prompt, base_image],
    config=types.GenerateContentConfig(
        response_modalities=["TEXT", "IMAGE"],
        image_config=types.ImageConfig(
            aspect_ratio="4:3",
            image_size="2K",
        ),
    ),
)

for part in response.parts:
    if part.text is not None:
        print(part.text)
    elif part.inline_data is not None:
        image = part.as_image()
        image.save("living-room-edit.png")
Two things are doing most of the work in that example. The first is the prompt discipline. If you want a local edit, protect the parts of the image that should remain fixed. Gemini is strong at instruction following, but it still needs the constraint named plainly. The second is that the base image is part of the contents array right alongside the text prompt. That is the mental model to keep for current Gemini image editing: you are providing context and then asking for a controlled change, not switching to an entirely separate "edit mode" product.
This is also the point where multi-turn workflows become more useful than giant one-shot prompts. Google's image-generation docs explicitly recommend conversational or multi-turn editing for iterating on images. That matters because the best production prompt is often not the biggest prompt. It is one initial instruction, one returned result, and one targeted follow-up. If the first result gets you 80% of the way there, do not throw away the whole thread and start over with an even more bloated prompt. Use the next turn to ask for the exact delta.
Python is especially strong for those follow-up steps because it pairs well with asset pipelines, moderation hooks, or post-processing code you may already have. But that convenience can hide a real mistake: many teams prove the concept in a notebook or script and never come back to productionize the boring parts. If the image flow will matter to a user-facing app, add retries, log the model and size you requested, and capture usage behavior before the script becomes invisible production infrastructure.
cURL and raw REST example: when you need low-level debugging or language-agnostic integration
If the SDK feels mysterious, or if your runtime is not Python or Node, raw REST is still the cleanest truth source. cURL is not the most ergonomic path for a full app, but it is the best way to see the exact request shape that the Gemini API expects. That makes it extremely useful for debugging model choice, request serialization, proxy layers, and payload differences between your code and AI Studio.
bashcurl -s -X POST \
  "https://generativelanguage.googleapis.com/v1beta/models/gemini-3.1-flash-image-preview:generateContent" \
  -H "x-goog-api-key: $GEMINI_API_KEY" \
  -H "Content-Type: application/json" \
  -d '{
    "contents": [{
      "parts": [
        {
          "text": "Create a 16:9 studio photo of a white sneaker on a soft gray background with crisp side lighting and premium ecommerce styling."
        }
      ]
    }],
    "generationConfig": {
      "responseModalities": ["IMAGE"],
      "imageConfig": {
        "aspectRatio": "16:9",
        "imageSize": "2K"
      }
    }
  }'
The main reason to keep a cURL example in your toolbox is not because cURL is beautiful. It is because cURL removes uncertainty. If the request works there but not in your SDK, you know the problem is probably the client version, the way your wrapper builds the payload, or your response parsing logic. If the request fails in cURL too, you know the issue is closer to the API contract, project billing, rate limits, or the specific model you chose.
Raw REST is also the cleanest route for unsupported languages or low-dependency service environments. If you are integrating Gemini image generation into Go, Rust, PHP, or an internal platform that wants to own its own request stack, this is the right starting point. The downside is obvious: you must handle the response decoding yourself, and you lose the convenience helpers that the official SDKs give you for parts, chats, or file uploads. That is why REST is the truth source and debugging tool, not the default comfort path.
The other benefit is architectural clarity. When you only look at SDK examples, it is easy to forget what is actually happening over the wire. cURL forces you to see generateContent, contents, generationConfig, responseModalities, and imageConfig in their explicit form. That is helpful when you later need to compare a proxy, build an internal wrapper, or explain the request contract to another team.
Editing, multi-turn flows, and higher-resolution options that actually change your code
This is the section where Gemini-native image generation pulls away from shallow example pages. A lot of tutorials stop after one text-to-image call. That is useful for a demo, but it is not where most real product value lives. Real image workflows need controlled edits, reference images, higher resolutions, and iterative changes that preserve the good parts of the last result.
Google's current image docs are strong on this point. They explicitly recommend multi-turn image editing, and they show chat-based examples where the model first creates an infographic and then changes the language on the graphic in a later turn. That is not just a toy example. It shows the right conceptual shift: Gemini image generation is not only an endpoint that returns pixels. It is a conversational image system where later edits can stay grounded in the same working context.
javascriptimport { GoogleGenAI } from "@google/genai";
import fs from "node:fs";

const ai = new GoogleGenAI({ apiKey: process.env.GEMINI_API_KEY });

const chat = ai.chats.create({
  model: "gemini-3.1-flash-image-preview",
  config: {
    responseModalities: ["TEXT", "IMAGE"],
  },
});

await chat.sendMessage({
  message:
    "Create a vibrant infographic that explains photosynthesis like a colorful kids cookbook.",
});

const response = await chat.sendMessage({
  message: "Update this infographic to be in Spanish. Do not change any other elements.",
  config: {
    responseModalities: ["TEXT", "IMAGE"],
    imageConfig: {
      aspectRatio: "16:9",
      imageSize: "2K",
    },
  },
});

for (const part of response.candidates[0].content.parts) {
  if (part.inlineData) {
    fs.writeFileSync(
      "photosynthesis-es.png",
      Buffer.from(part.inlineData.data, "base64")
    );
  }
}
This is where imageSize and aspectRatio stop being optional trivia. On the Gemini 3 image models, the official docs expose 512, 1K, 2K, and 4K tiers plus a wide aspect-ratio list including 16:9, 9:16, 21:9, 4:1, and 1:4. That means the native Gemini request shape carries a real production advantage. If you are building ecommerce assets, slides, banner ads, app-store graphics, or social crops, output control changes how much post-processing you need later. That is why generic "just change the model string" migration advice is weak for image work.
The Pro lane also belongs in this section, not as a generic luxury add-on but as a code-path decision. Google's current pricing page and app help page tell the same story from different angles. Flash Image is the fast default. Pro is the more expensive route when text rendering, diagram quality, or higher-stakes output changes the result enough to matter. In other words, Pro is not the first example you teach, but it is the model you should name when the job sounds like poster copy, infographic labels, or premium product art rather than quick iteration.
There is one more capability edge worth noting. The current pricing page lists separate pricing for Google Search and image-based grounding on the Gemini 3 image line, and the image docs show search-grounded, multi-turn visual flows. That means some premium visual workflows are no longer just "prompt in, image out." They can also include retrieved context. That is powerful, but it is not a day-one requirement. Teach the base image request first, then add grounding only when the product actually needs current factual context inside the image-generation loop.
Pricing, batch mode, and when Pro is worth it
For code examples, pricing should not dominate the page. But it cannot be ignored either, because model choice and resolution are part of the implementation decision, not just a procurement footnote.
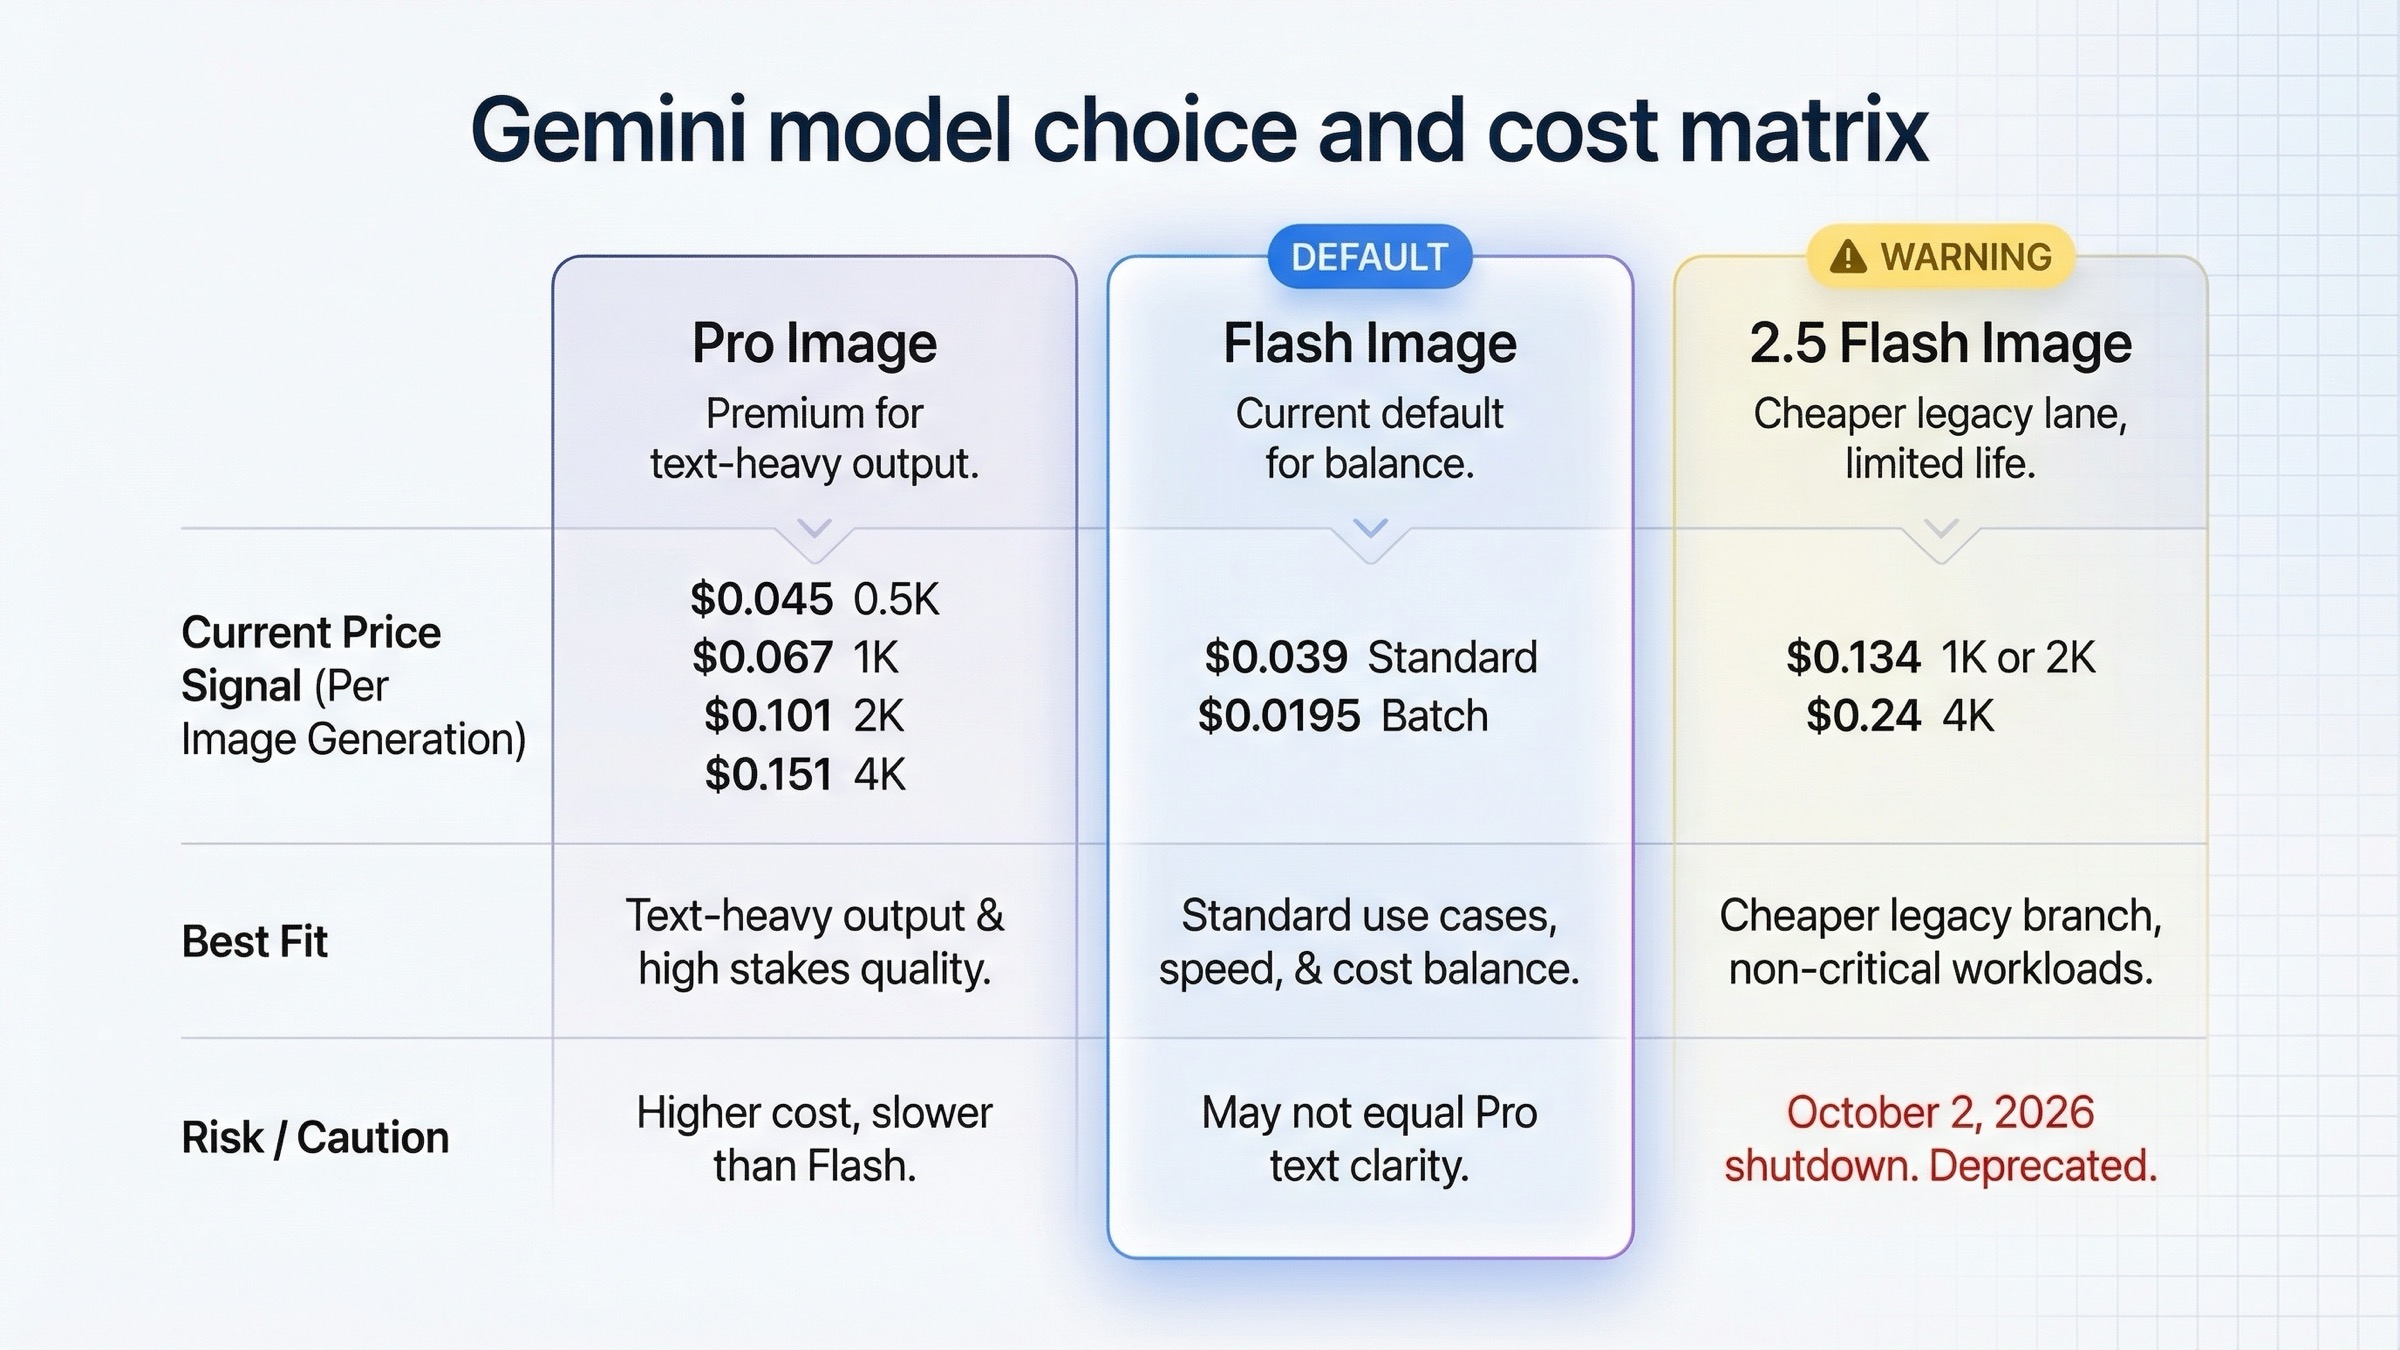
Google's pricing page currently lists Gemini 3.1 Flash Image Preview at about $0.045 for a 0.5K image, $0.067 at 1K, $0.101 at 2K, and $0.151 at 4K in standard mode. The same page lists Gemini 3 Pro Image Preview at about $0.134 for 1K or 2K output and $0.24 at 4K. For the legacy Gemini 2.5 Flash Image lane, the official page still lists about $0.039 per standard image and $0.0195 per batch image. Those are not just pricing details. They define the default examples you should teach.
| Model | Current status | Current official price signal | Best fit for code examples | What to warn about |
|---|---|---|---|---|
gemini-3.1-flash-image-preview | Current default lane, released February 26, 2026 | About $0.045 at 0.5K, $0.067 at 1K, $0.101 at 2K, $0.151 at 4K | Best starting point for most new examples and app features | Still preview-labeled, so expect stricter quotas than stable text models |
gemini-3-pro-image-preview | Current premium lane, released November 20, 2025 | About $0.134 at 1K or 2K, $0.24 at 4K | Text-heavy graphics, infographics, premium creative assets, grounded visual workflows | Cost jump is real, so do not make it the default unless the workload earns it |
gemini-2.5-flash-image | Legacy low-cost lane, shutdown scheduled for October 2, 2026 | About $0.039 standard, $0.0195 batch | Cost-sensitive legacy flows and batch-heavy jobs that can tolerate the retirement path | It is not the future-proof default anymore, even if it is still the cheapest row |
So when is Pro actually worth it? Use Pro when the output is expensive to revise, when image text quality is central to the task, when you are generating diagrams or infographic-style assets, or when search-grounded or premium-quality output is part of the product promise. Do not move to Pro just because it sounds better. If the job is quick ideation, asset variation, or mainstream image generation where cost and throughput matter, Flash Image is the stronger default.
Batch mode is the second decision that changes real architecture. Google's pricing page makes the economics clear enough that it deserves an implementation note. If you are generating a large number of images and your workflow tolerates delayed turnaround, batch pricing can cut cost materially, especially on the legacy 2.5 image lane and the Flash Image lane. That does not change the request semantics you teach first, but it does change what you should recommend once the reader moves from prototyping to scheduled or backlogged generation jobs.
This is also where you should be honest about the 2.5 image lane. It is still useful. It is still official. It is still cheaper. But if you are publishing a fresh code-example page, the page should say clearly that it is a cost-optimized legacy branch with a visible retirement clock, not the main recommended path for new integrations.
Troubleshooting: common mistakes with Gemini image code examples
The first mistake is copying an older 2.5 image tutorial and assuming it still describes the best starting point. That is no longer true. The current docs, pricing pages, and launch materials all point developers to the Gemini 3 image line first. If you are using gemini-2.5-flash-image, do it because you chose the legacy-cost lane, not because you accidentally fell into it from search.
The second mistake is treating app behavior, AI Studio behavior, and Gemini API behavior as if they are one product contract. They are not. The Gemini Apps help page is useful for understanding Nano Banana 2 and Nano Banana Pro behavior in the consumer surface. The AI Studio experience is useful for testing prompts. But the API contract is what your code actually runs under, and the official billing plus launch pages make clear that paid-key and tier behavior still matter.
The third mistake is skipping explicit image controls. If you care about output shape, set aspectRatio. If you care about output size, set imageSize. Do not assume the defaults match your product needs. Google's image docs say the model otherwise defaults to matching the input image size or generating square output. That is fine for experiments. It is weak for production.
The fourth mistake is treating image generation as a one-shot endpoint when the real workflow wants multi-turn editing. Gemini's current image stack is strongest when you preserve the context of a good partial result and iterate. If your first draft is close, keep the chat or conversation alive and ask for the delta. That is usually cheaper, faster, and more controllable than exploding the prompt and starting over.
The fifth mistake is ignoring project-level quotas. Google's rate-limits page says limits are applied per project, not per API key, and requests per day reset at midnight Pacific time. Community threads show why that matters in practice: developers still run into 429 confusion even when they think they are below usage, especially when the project, tier, or preview-model assumptions are not what they think they are. The fix is not to memorize one magic number from a screenshot. The fix is to treat quotas as live project state and confirm them in AI Studio.
The sixth mistake is assuming the cheapest model row is the same as the best default example. That was more defensible earlier in the Gemini image story. It is less defensible now. The right educational sequence is current default first, cheaper legacy branch second, premium Pro branch third. That order helps the reader make a good initial decision instead of a narrowly optimized one.
The seventh mistake is forgetting that all generated images include a SynthID watermark. That does not necessarily break your workflow, but it is a real product characteristic, and a serious implementation page should say it plainly rather than letting the reader discover it later.
If your real failure mode is not "which example should I use?" but "why did the workflow stop working after it used to work?", the better next pages are Gemini image generation limit reset and Gemini image API free tier. Those pages go deeper on quota behavior and free-versus-paid confusion than a code-example article should.
Bottom line
The best Gemini image generation code examples in 2026 are not the flashiest ones. They are the examples that make the next implementation decision obvious.
Start with the native Gemini API. Use gemini-3.1-flash-image-preview for most new work. Save one real image in JavaScript, Python, or cURL before you add anything else. Add explicit aspectRatio and imageSize controls as soon as output shape matters. Move to gemini-3-pro-image-preview only when text-heavy, infographic-heavy, or premium output changes the outcome enough to justify the cost. Treat gemini-2.5-flash-image as the cheaper legacy lane, not the default future path.
Once you make those route decisions early, the rest of the implementation becomes much cleaner. The hard part is usually not the code itself. It is trusting the right current example, on the right surface, with the right model, before old tutorials and mixed product signals send you down a slower path.