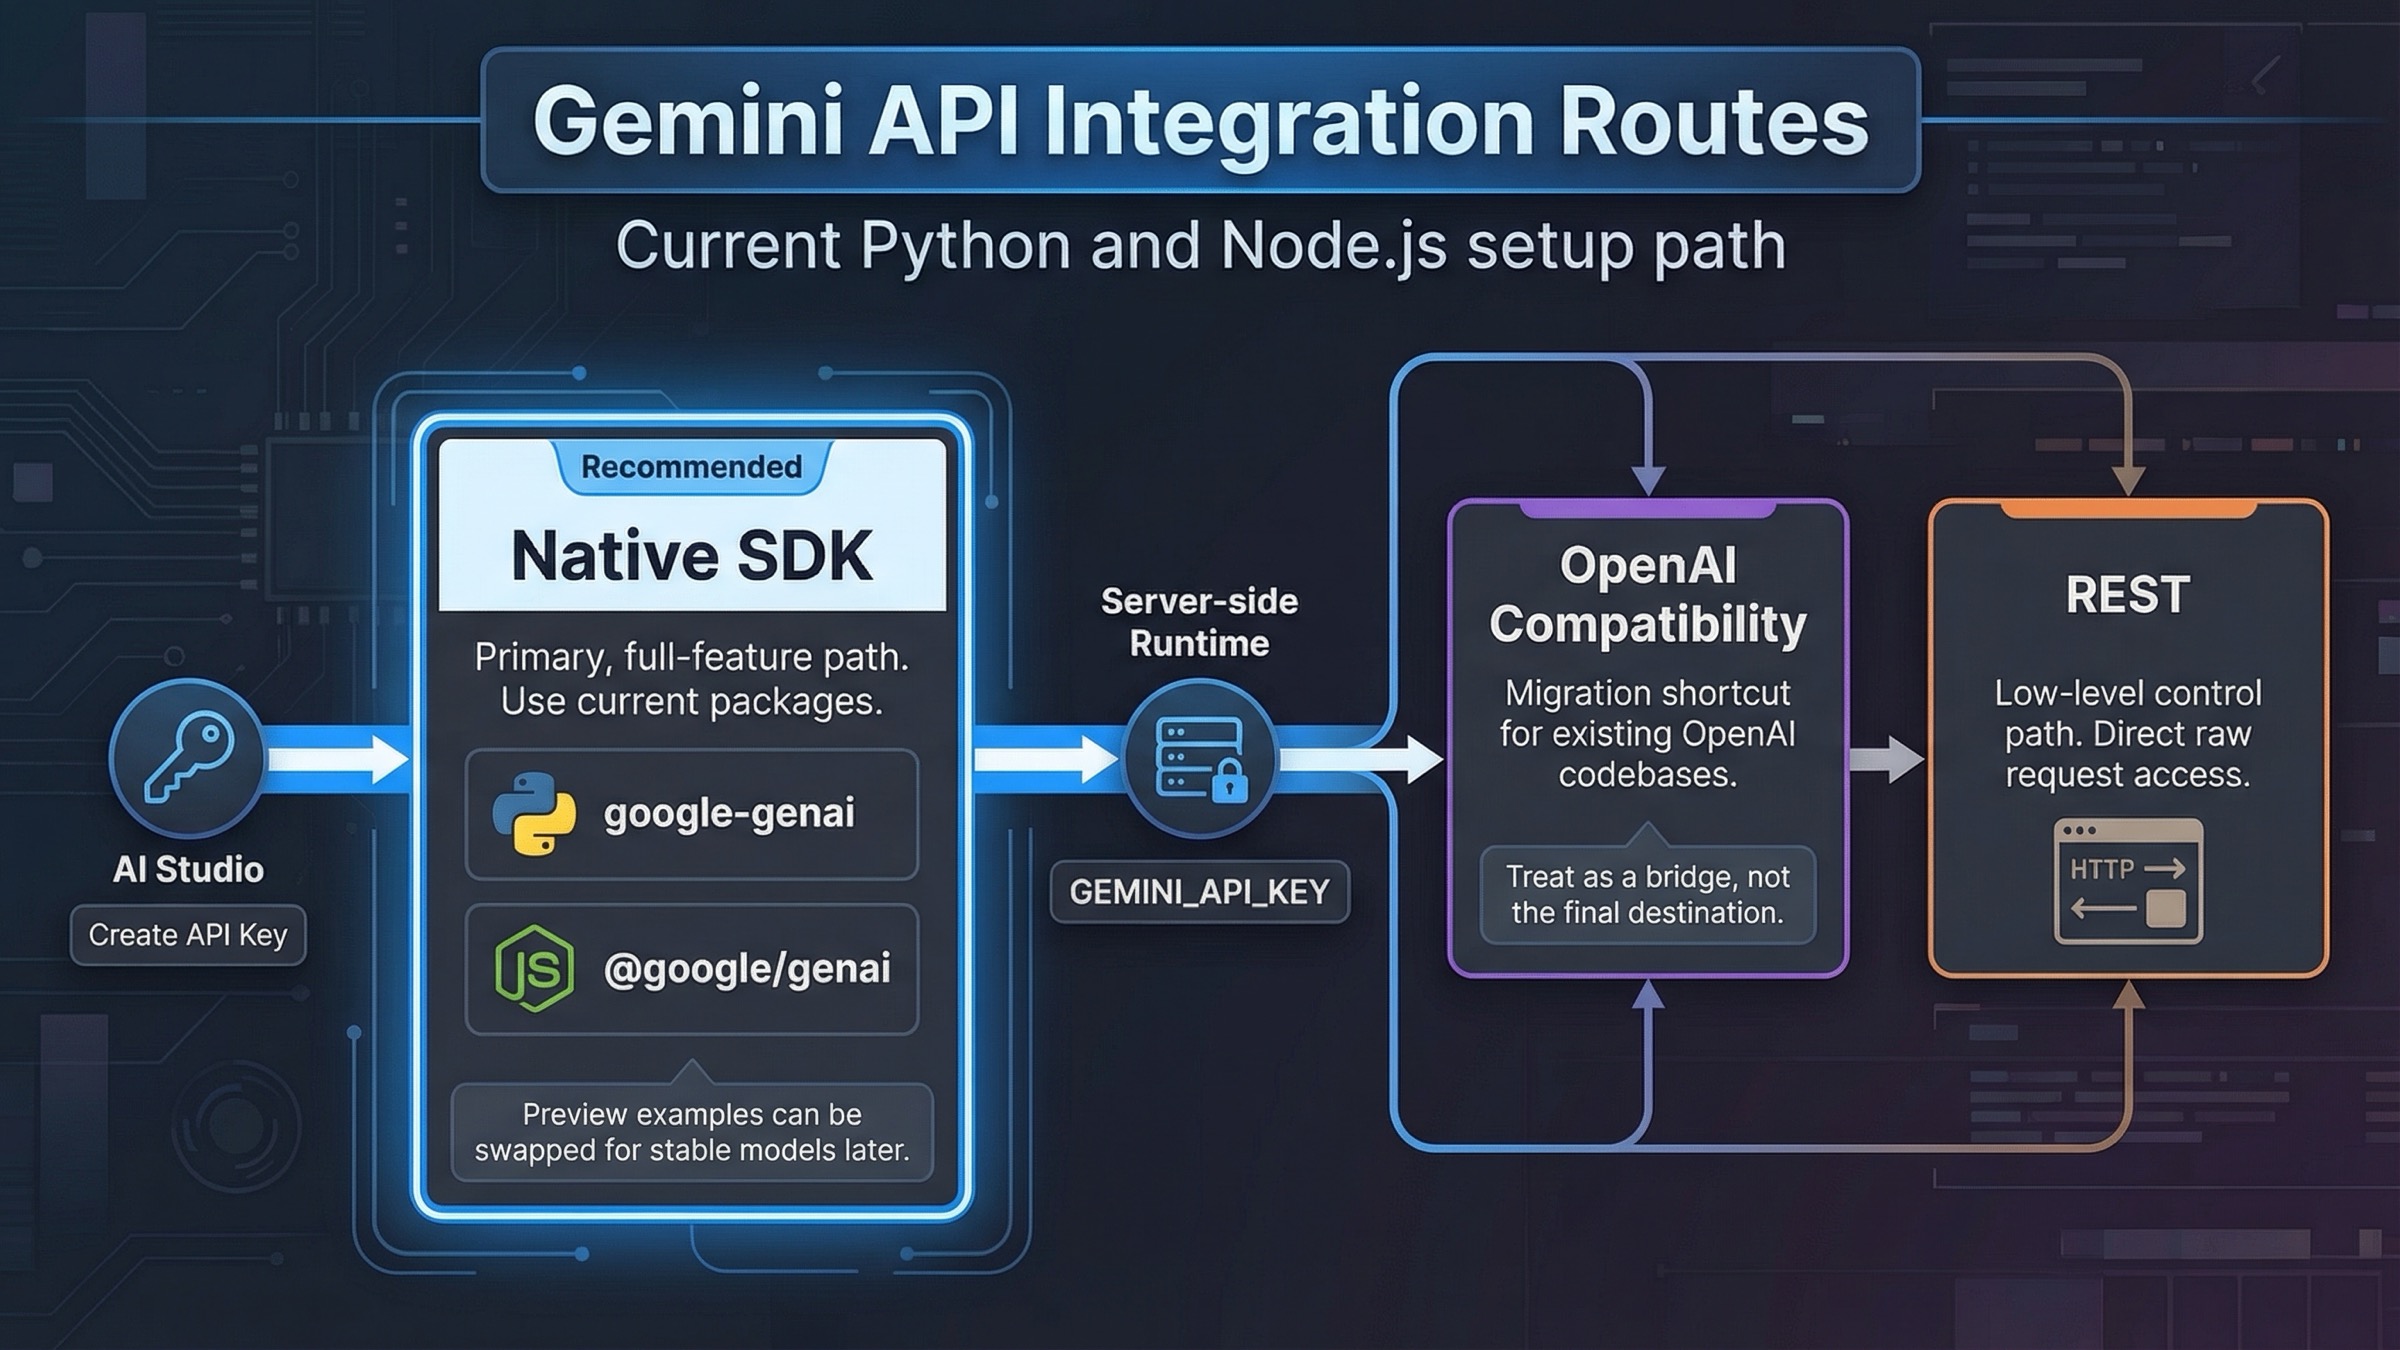
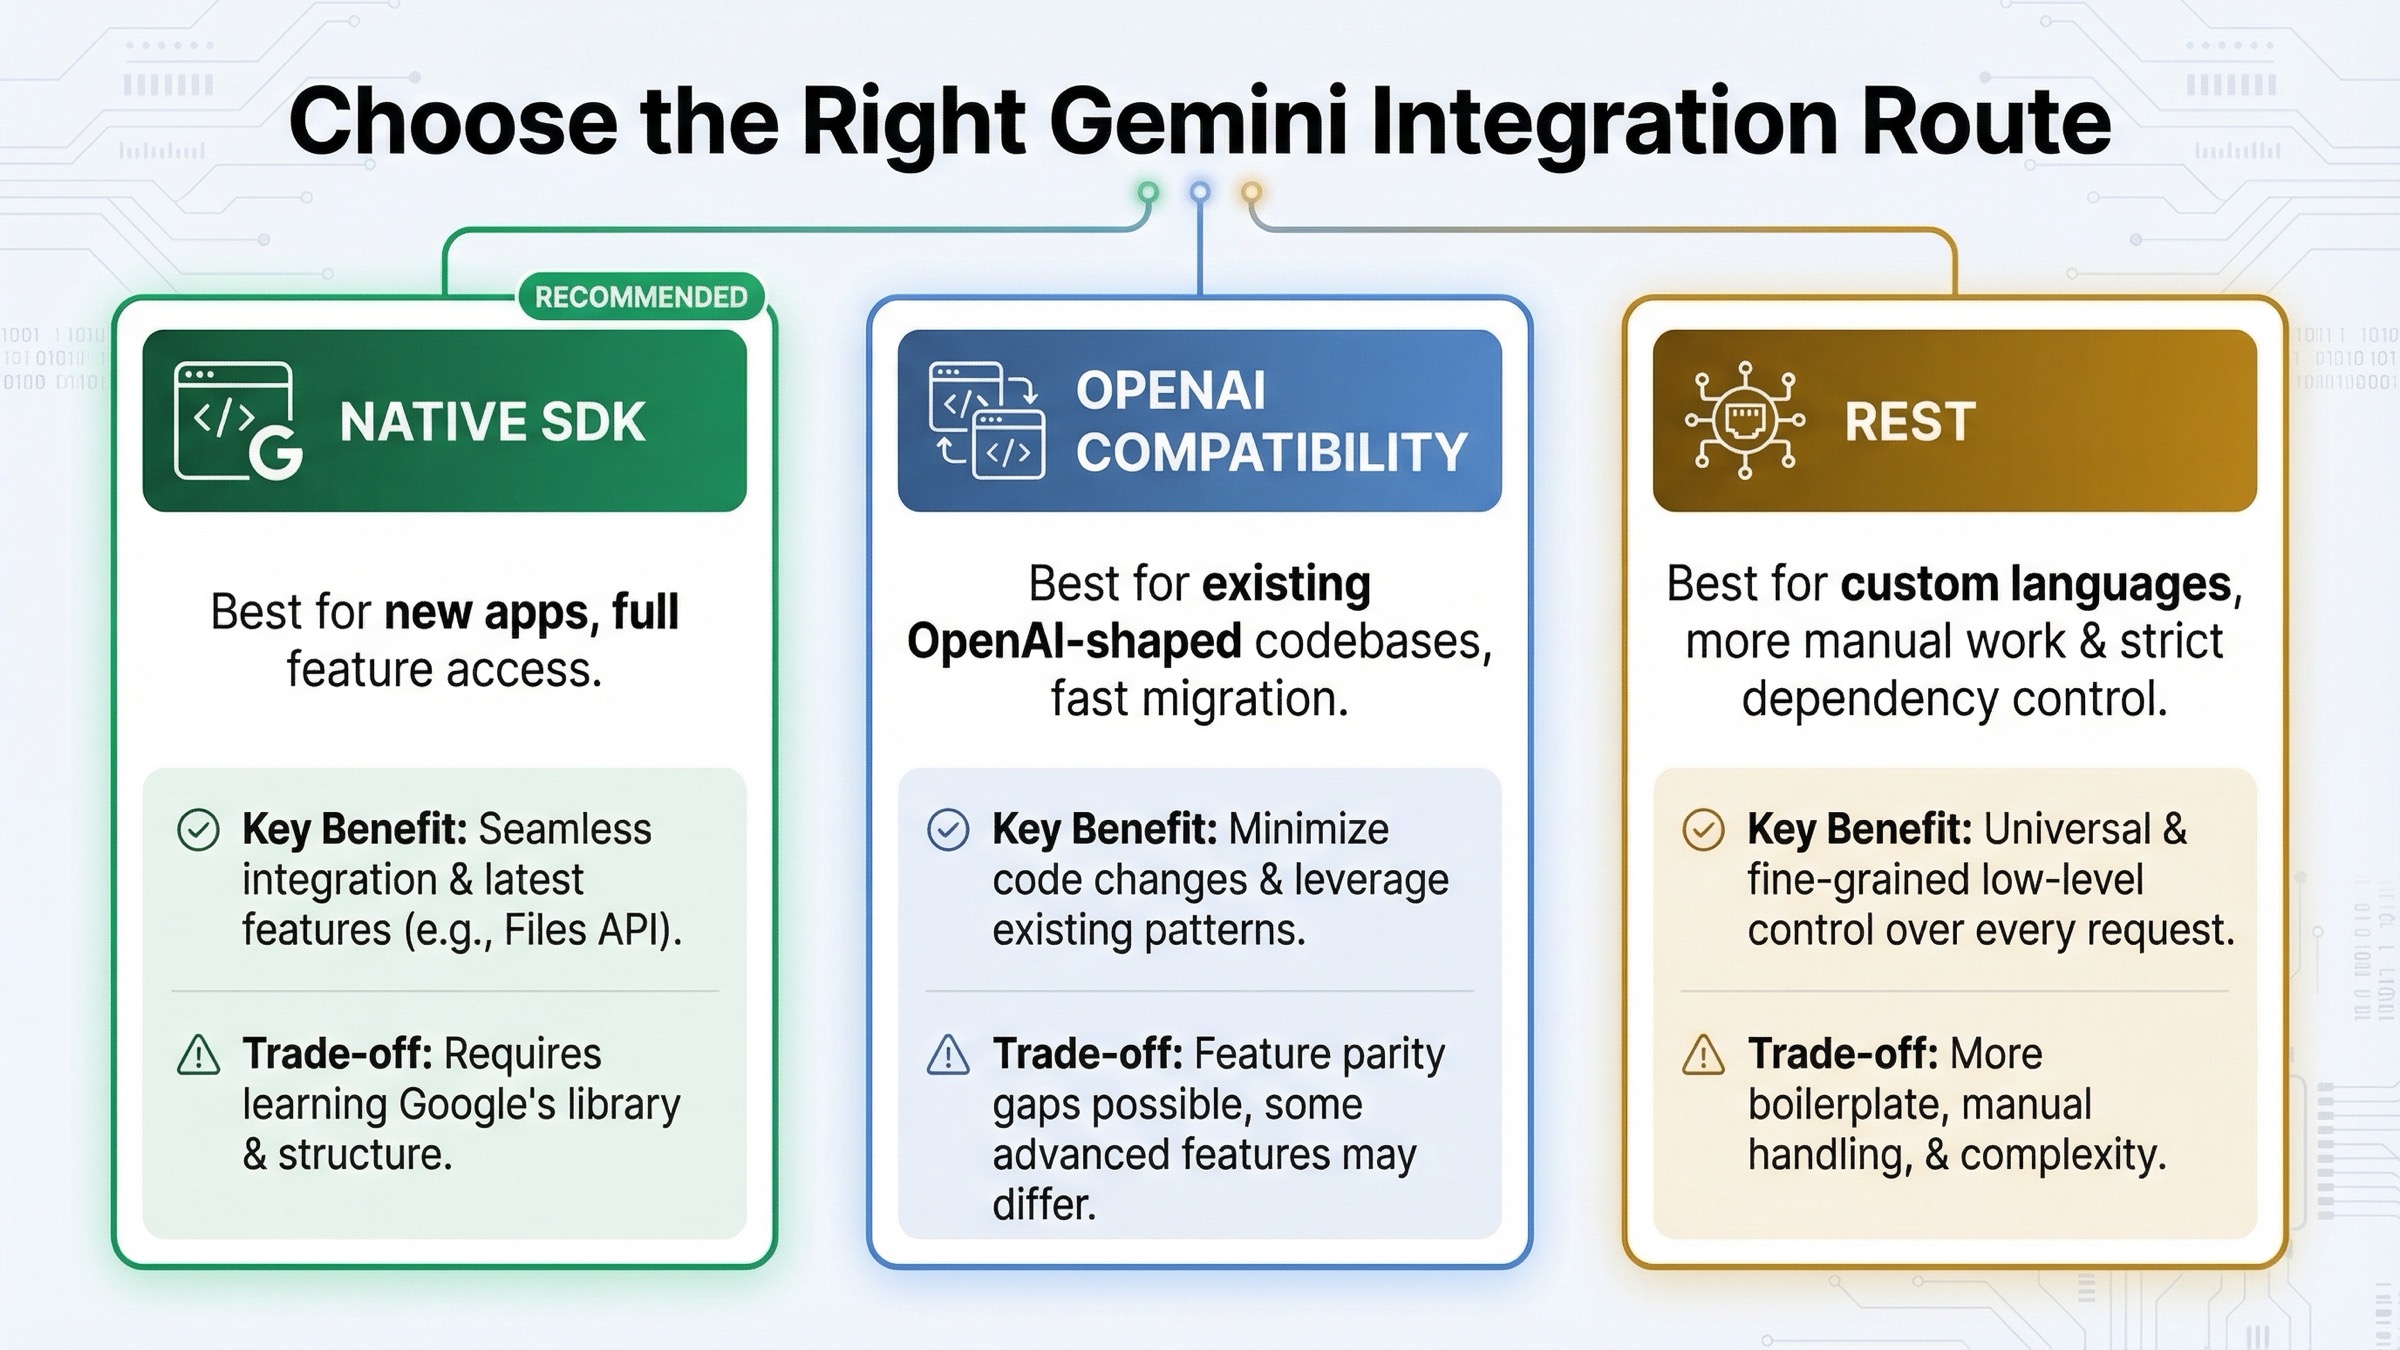
If you are starting a new Gemini API integration today, begin with the native Google GenAI SDK, keep GEMINI_API_KEY on the server, and get one working request running before you add streaming, tools, or file uploads. Reach for the OpenAI compatibility layer only when you already have an OpenAI-shaped codebase that has to be migrated quickly. That is the safest default because Google's current quickstarts, migration guide, and example repos are already centered on google-genai for Python and @google/genai for JavaScript.
On day one, get the implementation path right before you add complexity. After the first request succeeds, the next useful steps are predictable: add streaming, add structured output or tool calling, move large payloads to the Files API, and check billing plus rate limits before traffic shows up. That sequence is more valuable than another generic hello-world tutorial because it helps you avoid the wrong package, the wrong client shape, and the wrong production boundary before they become rework.
The current official docs still use preview model IDs in many examples, especially gemini-3-flash-preview, so this guide does too when it mirrors Google's own current examples. But the safer production rule is different: if a stable model fits your workload, prefer the stable model ID. Google's live models guide explicitly says most production apps should use a specific stable model when one exists. In practical terms, that means you can prototype with the same examples shown here, then switch the model string to a stable alternative such as gemini-2.5-flash if you want less churn.
TL;DR
- Use
google-genaiin Python and@google/genaiin JavaScript for new integrations. Those are the current Google GenAI SDK packages, and Google's migration guide recommends moving off the older Gemini libraries. - Create the key in Google AI Studio, keep it in
GEMINI_API_KEY, and call the API from your server or backend worker rather than the browser. - Start with one native SDK request first. Then add streaming. Then add one structured-output or tool-calling pattern. That sequence gives you the fastest reliable path from prototype to production feature.
- Use the OpenAI compatibility layer when you need the fastest migration for an existing OpenAI client, but do not treat it as the best long-term path if you need Gemini-native features like the Files API or richer tool flows.
- For larger multimodal requests, use the Files API once the total request size exceeds 100 MB, or 50 MB for PDFs. Uploaded files are stored for 48 hours, with up to 20 GB per project and 2 GB per file.
- Billing and quota deserve attention early. Google's official billing page says 400 and 500 errors are not billed, but the failed request still counts against quota. Google's rate-limit page also makes clear that limits vary by tier and should be checked in AI Studio.
| Route | Best for | Why it works | Main trade-off |
|---|---|---|---|
| Native Google GenAI SDK | New Python or Node.js apps | Current package names, current docs, direct access to streaming, structured output, files, chats, and tools | You have to learn Gemini's native client shape instead of reusing OpenAI abstractions |
| OpenAI compatibility | Existing OpenAI-style codebases | Fastest migration path because you mostly change the base URL, API key, and model name | Lower feature ceiling and more translation friction for Gemini-specific capabilities |
| Raw REST | Custom languages, strict dependency control, low-level debugging | Full control over requests and no SDK dependency weight | More manual schema handling, more boilerplate, and less help for complex features |
If you want a separate walkthrough focused only on key creation, use our Gemini API key guide. If your next problem is cost rather than integration shape, jump to our Gemini API token pricing guide. For quota-specific failures, our Gemini rate limit explainer is the better follow-up.
Build Your First Gemini API Request
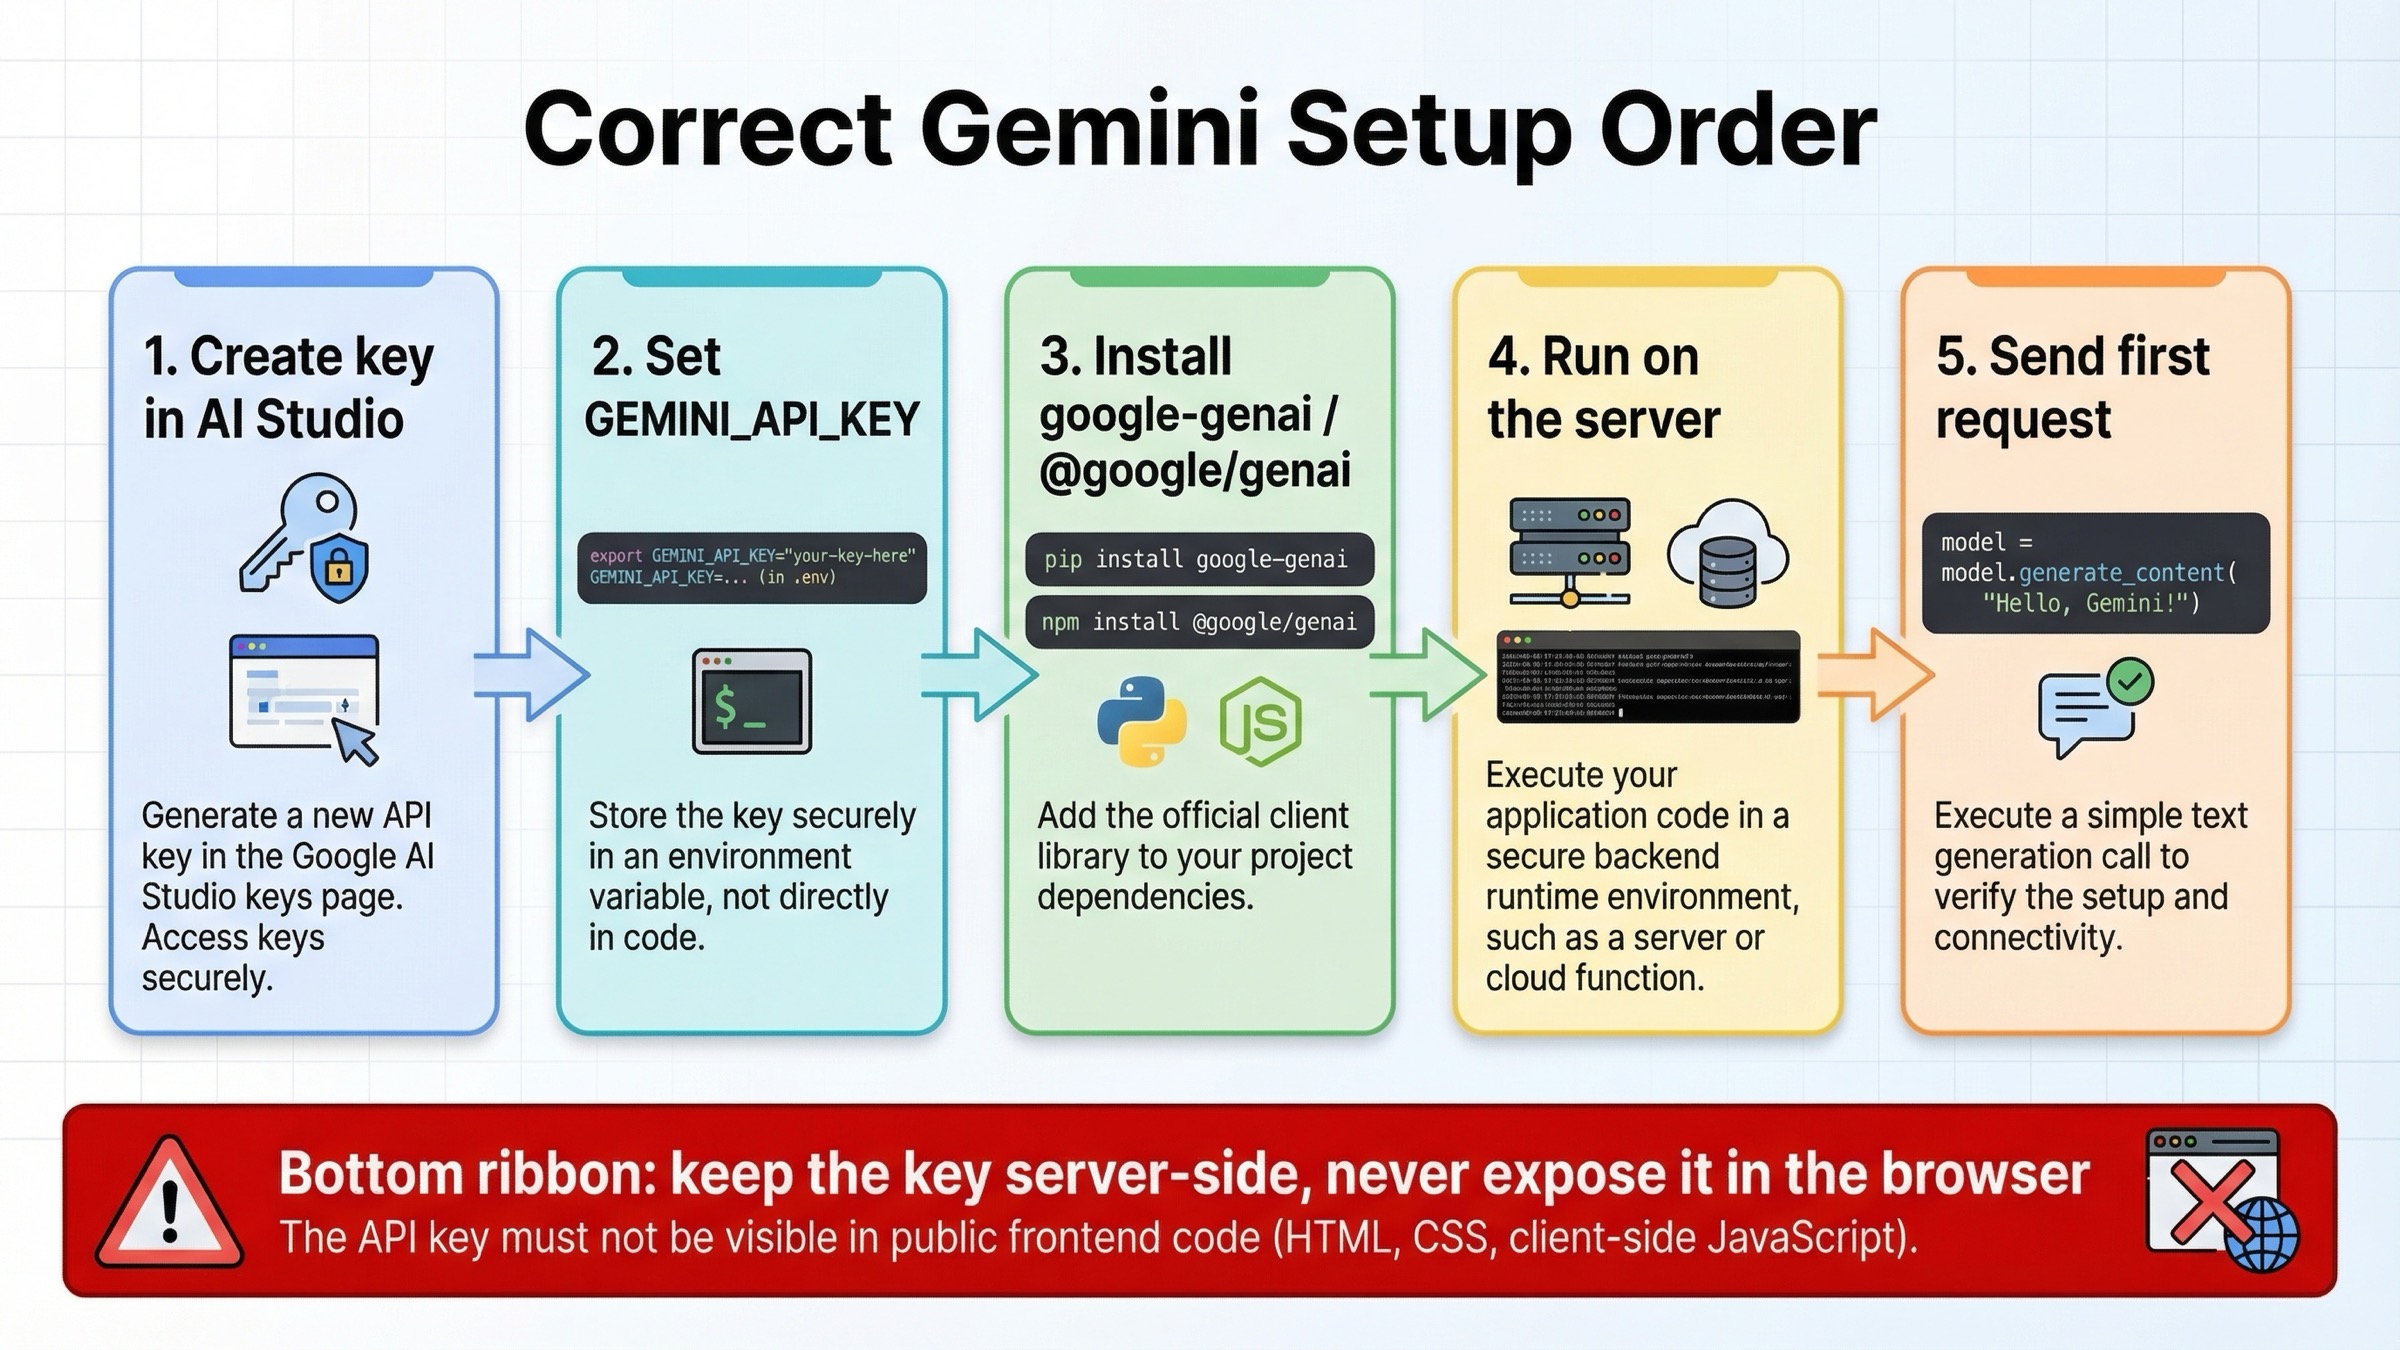
The fastest correct setup path starts in AI Studio, not in your IDE. Google's current API key docs say Gemini API keys are created and managed in Google AI Studio, and each key belongs to a Google Cloud project rather than behaving like a standalone credential. For new users, Google AI Studio usually creates a default project and API key automatically after terms acceptance. That is useful because it gets you to a working test quickly, but it also means you should think about project ownership and billing earlier than many "five-minute tutorial" pages suggest.
The first rule that matters is operational, not syntactic: keep GEMINI_API_KEY on the server. If you are building a backend service, set it as an environment variable and have your Python or Node process read it from there. If you are building a web app, call Gemini from a server route, API route, edge function, or backend worker rather than shipping the key to the browser. That is a better habit than asking end users to paste secrets into frontend code, and it avoids the most common beginner mistake with LLM API integrations.
Install the current packages exactly as Google's quickstart now shows:
bashpip install -U google-genai
npm install @google/genai
Then set your key:
bashexport GEMINI_API_KEY="your_real_key_here"
Once that is in place, your first request should stay boring. Do not start with function calling, grounding, or multimodal files until a plain text request works. The job of the first request is to prove that your key, environment, runtime, and network path are correct.
pythonfrom google import genai

client = genai.Client()

response = client.models.generate_content(
    model="gemini-3-flash-preview",
    contents="Explain the purpose of an API integration tutorial in one sentence."
)

print(response.text)
javascriptimport { GoogleGenAI } from "@google/genai";

const ai = new GoogleGenAI({});

const response = await ai.models.generateContent({
  model: "gemini-3-flash-preview",
  contents: "Explain the purpose of an API integration tutorial in one sentence.",
});

console.log(response.text);
At this stage, the main thing to notice is not the prompt. It is the client shape. Both SDKs now use one central client object, which is one of the biggest changes from older Gemini examples. Google's migration guide explicitly recommends the new Google GenAI SDK because it centralizes models, chats, files, and other services behind a single client. That is why many older blog posts feel confusing now: they teach a structure Google itself has already moved past.
Python Integration Examples That Still Hold Up in 2026
Python is currently the easiest Gemini path if you want one language that gets both simple examples and advanced helpers. The basic request is already concise, but the next useful upgrade is streaming. Google's text-generation guide shows generate_content_stream, which is the right first production-friendly step because it improves perceived latency without forcing you to redesign your whole app.
pythonfrom google import genai

client = genai.Client()

stream = client.models.generate_content_stream(
    model="gemini-3-flash-preview",
    contents="Write three short tips for migrating from a legacy LLM SDK."
)

for chunk in stream:
    print(chunk.text, end="")
That pattern matters because many Gemini use cases are interactive even when they are not full chat apps. A streaming endpoint makes CLI tools feel faster, gives web UIs partial output sooner, and reduces the pressure to over-engineer background jobs for simple tasks. If your app renders token-by-token or sentence-by-sentence output, streaming is the first advanced feature worth learning after the base request.
The second Python pattern worth learning is structured output. The structured-output guide says Gemini can be configured to follow a provided JSON Schema, and the Python SDK supports Pydantic models directly. That matters because many real integrations are not "write me a paragraph" workflows. They are "extract the fields I need so another system can act on them" workflows.
pythonfrom google import genai
from google.genai import types
from pydantic import BaseModel


class IntegrationTicket(BaseModel):
    language: str
    task: str
    priority: str


client = genai.Client()

response = client.models.generate_content(
    model="gemini-3-flash-preview",
    contents="Python app, needs JSON output, shipping next week.",
    config=types.GenerateContentConfig(
        response_mime_type="application/json",
        response_schema=IntegrationTicket,
    ),
)

print(response.text)
That approach is much safer than telling the model "reply in JSON" and hoping it behaves. It also changes how you should think about prompt design. Once you hand Gemini a schema, the prompt can focus on meaning rather than formatting discipline. That is one of the biggest practical differences between toy demos and production integrations.
Python also has the cleanest official path for automatic function calling. Google's function-calling guide says the Python SDK can take a real Python function with type hints and a docstring, convert it into a declaration, execute it, and return the final response for you. That is a real productivity advantage when you are building internal tools or small agents and want to move quickly.
pythonfrom google import genai
from google.genai import types


def get_current_temperature(location: str) -> dict:
    """Gets the current temperature for a given location."""
    return {"temperature": 25, "unit": "Celsius"}


client = genai.Client()

response = client.models.generate_content(
    model="gemini-3-flash-preview",
    contents="What's the temperature in Boston?",
    config=types.GenerateContentConfig(tools=[get_current_temperature]),
)

print(response.text)
Use that convenience deliberately. It is excellent for internal systems, prototypes, or service layers where Python owns the execution environment. It is less useful when you need strict cross-language parity or explicit tool orchestration that several services will share.
JavaScript and Node.js Integration Examples
Node.js follows the same basic route, but the practical advice is slightly different because JavaScript developers are more often building web products where credential boundaries are easy to get wrong. The current @google/genai package mirrors the same one-client pattern as Python, so the setup is simple. The part that deserves emphasis is that the code should run in Node, a server route, or another backend surface. Do not put a permanent Gemini API key into public frontend code and assume the SDK choice makes that safe.
Your first JavaScript call should look like this:
javascriptimport { GoogleGenAI } from "@google/genai";

const ai = new GoogleGenAI({});

const response = await ai.models.generateContent({
  model: "gemini-3-flash-preview",
  contents: "Give me a one-line summary of why current SDK names matter.",
});

console.log(response.text);
The next upgrade is again streaming:
javascriptimport { GoogleGenAI } from "@google/genai";

const ai = new GoogleGenAI({});

const stream = await ai.models.generateContentStream({
  model: "gemini-3-flash-preview",
  contents: "List three practical steps for hardening an API integration.",
});

for await (const chunk of stream) {
  process.stdout.write(chunk.text ?? "");
}
Streaming is where Node starts to feel strong for web backends. If you are building a Next.js app, Express service, or edge-compatible backend, you can forward those chunks to the client as server-sent events or a streamed HTTP response while still keeping the API key private on the server. That one design choice gets you better UX without sacrificing credential hygiene.
JavaScript also supports structured output and function-calling configuration, but the ergonomics are a little more explicit than Python's automatic helper path. Google's docs show structured output with Zod and tool configuration with functionCallingConfig, which is a good fit for teams that want transparent control over request shape. In practice, that means JavaScript is a strong choice when you want parity with the rest of your backend stack and do not mind being more explicit about tool wiring.
If you need to count cost before you scale traffic, do not wait until billing surprises you. Google's token guide recommends using the count-tokens methods and request usage metadata to measure real prompt size instead of guessing from character length. That matters even more in JavaScript-heavy web stacks, where prompts tend to grow over time as more product context is appended.
When to Use OpenAI Compatibility Instead
OpenAI compatibility is real, useful, and often misunderstood. Google's official compatibility guide shows that the fast path is basically three changes: set the Gemini base URL, use a Gemini API key, and switch the model name. If you already have an OpenAI client integrated into an internal tool or product backend, that is often the fastest way to validate whether Gemini fits your use case.
pythonfrom openai import OpenAI

client = OpenAI(
    api_key="YOUR_GEMINI_API_KEY",
    base_url="https://generativelanguage.googleapis.com/v1beta/openai/",
)

response = client.chat.completions.create(
    model="gemini-3-flash-preview",
    messages=[{"role": "user", "content": "Explain why compatibility layers are useful."}],
)

print(response.choices[0].message.content)
That route is attractive for two reasons. First, it lets an existing codebase adopt Gemini without retraining every engineer on a new client shape immediately. Second, it makes bring-your-own-key workflows and provider comparison easier when your application already normalizes around OpenAI-style messages. If speed of migration is your only goal, compatibility is often the right answer.
But it is not the best universal answer. Google's partner-integration guide is very explicit about the trade-off: OpenAI compatibility is the fastest route when you care about schema uniformity, but it is a poor long-term default if you need richer Gemini features such as the Files API or more advanced tool handling. The more Gemini-specific your workload becomes, the more the compatibility layer turns into translation overhead.
The practical decision rule is simple. If you are validating Gemini inside an existing OpenAI-oriented system, start with compatibility. If you are building a new Gemini-powered app, use the native SDK first. That keeps the architecture closer to the real Gemini feature surface and avoids paying future migration cost just to preserve a familiar abstraction today.
Production Features Worth Learning Right After Hello World
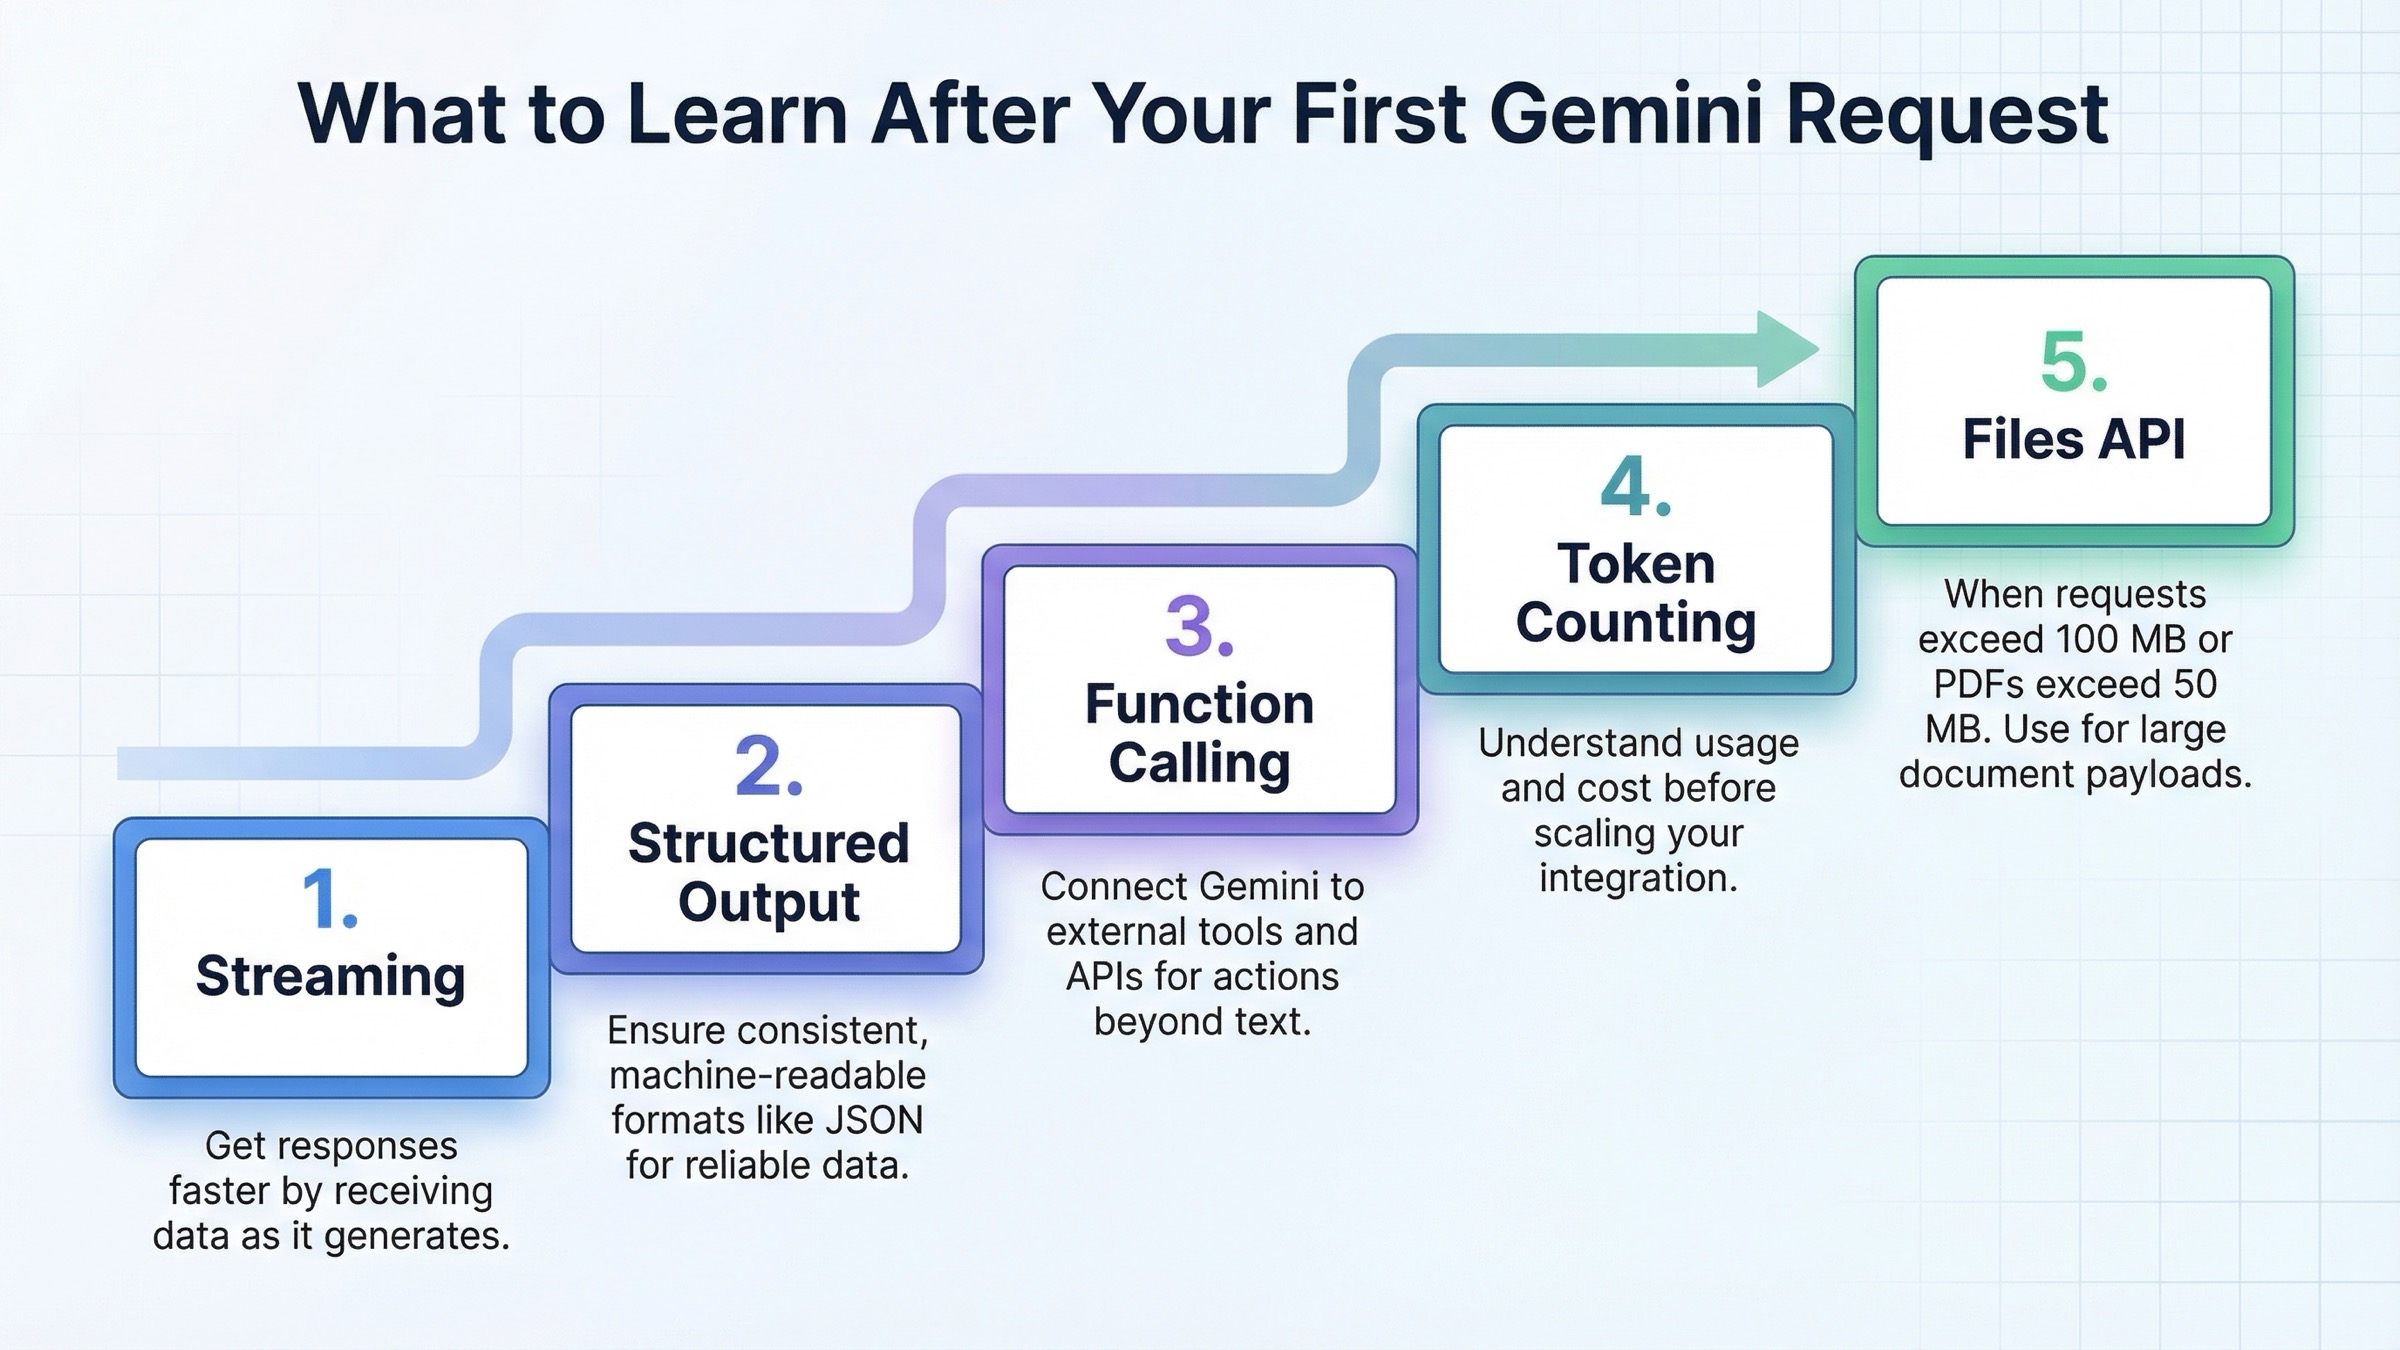
Once your first request works, the right next step is not "learn every Gemini feature." The right next step is to learn the small set of capabilities that change real app behavior. In order, those are usually streaming, structured output, function calling, token counting, and the Files API.
Streaming improves responsiveness. Structured output makes downstream automation safer. Function calling lets Gemini coordinate with your code and external systems. Token counting gives you a way to forecast cost and observe prompt growth. The Files API becomes necessary when your requests are large or genuinely multimodal. Google's Files guide says to switch to the Files API once the total request size exceeds 100 MB, or 50 MB for PDFs, and it also says uploaded files are stored for 48 hours, with up to 20 GB per project and 2 GB per file. Those are not just implementation details; they affect how you design ingestion workflows, retention assumptions, and cleanup jobs.
javascriptimport {
  GoogleGenAI,
  createPartFromUri,
  createUserContent,
} from "@google/genai";

const ai = new GoogleGenAI({});

const myfile = await ai.files.upload({
  file: "path/to/sample.mp3",
  config: { mimeType: "audio/mpeg" },
});

const response = await ai.models.generateContent({
  model: "gemini-3-flash-preview",
  contents: createUserContent([
    createPartFromUri(myfile.uri, myfile.mimeType),
    "Describe this audio clip",
  ]),
});

console.log(response.text);
Use Files when the workload truly needs it. Do not upload files just because the API supports them. For small text-only prompts, the simplest request is still the best request. The reason to learn Files early is not that every app needs it. It is that once you do need it, request-size limits and file lifecycle rules stop being optional knowledge.
| Feature | Learn it when | Why it matters | Official anchor |
|---|---|---|---|
| Streaming | Right after the first successful request | Better perceived latency and better UX for interactive apps | Text generation |
| Structured output | As soon as another service depends on Gemini output | Safer automation and fewer brittle JSON parsing hacks | Structured outputs |
| Function calling | When Gemini needs to trigger application logic or tool access | Makes agent-like workflows practical without prompt spaghetti | Function calling |
| Token counting | Before production traffic and before cost alarms | Lets you measure prompt growth and estimate spend early | Token counting |
| Files API | When total request size exceeds 100 MB, or 50 MB for PDFs | Enables large multimodal inputs and keeps large payload handling clean | Files API |
This ordering matters because many weak tutorials either stop at a text prompt or jump straight into every feature at once. Neither approach helps real teams much. The useful middle ground is to learn one reliable request, then the smallest features that change operational outcomes.
Troubleshooting and Common Gemini Integration Mistakes
The most common mistake is starting from the wrong tutorial. If you see google-generativeai or @google/generative-ai in an article and it is presented as the default current path, stop and cross-check it against Google's migration guide. Legacy examples are not automatically unusable, but they are no longer the cleanest baseline for a 2026 integration. The fastest way to reduce confusion is to standardize on the current package names and client shape from the beginning.
The second common mistake is treating preview model IDs as if they were stable contracts. Google's models guide says preview models can be used in production, but they usually come with more restrictive rate limits and more deprecation risk. That does not mean you should avoid them completely. It means you should know why you are using them and have a plan to pin or swap model IDs later. If your product does not need the newest preview-only surface, a stable model is the safer default.
The third mistake is misunderstanding quota and billing. Google's billing page says you are billed for input tokens, output tokens, cached token count, and cached token storage duration. It also says 400 and 500 errors are not billed, but still count against quota. That matters because a developer can see "not billed" and incorrectly assume the failure was free in every sense. It was not. The request still burned capacity. If you are hitting repeated failures, the right response is not just retrying harder. It is checking what kind of quota or request-shape problem you actually have.
That is especially true for 429 errors. Google's rate-limit page says limits depend on your tier and should be checked in AI Studio. Community threads show why this still confuses people: developers can stay well below visible RPM expectations and still run into batch enqueued-token or project-level quota issues. So when you hit 429, do not assume the fix is always exponential backoff alone. First verify whether the issue is free-tier exhaustion, paid-tier status, project mismatch, batch queue saturation, or a preview-model capacity limit. If you need a deeper error-by-error map, use our Gemini API error troubleshooting guide.
The fourth mistake is overcomplicating the first week of integration. You do not need streaming, tools, files, structured output, caches, and chat history on day one. You need one successful request, one server-side secret boundary, and one follow-up feature that matches the actual product need. Teams that force themselves to follow that sequence usually ship faster than teams that try to learn every capability before the first working endpoint exists.
The simplest production rule to keep is this: start natively, stay server-side, measure tokens early, and only add more Gemini features when the product case is clear. That rule will keep you out of more trouble than any massive code sample ever will.