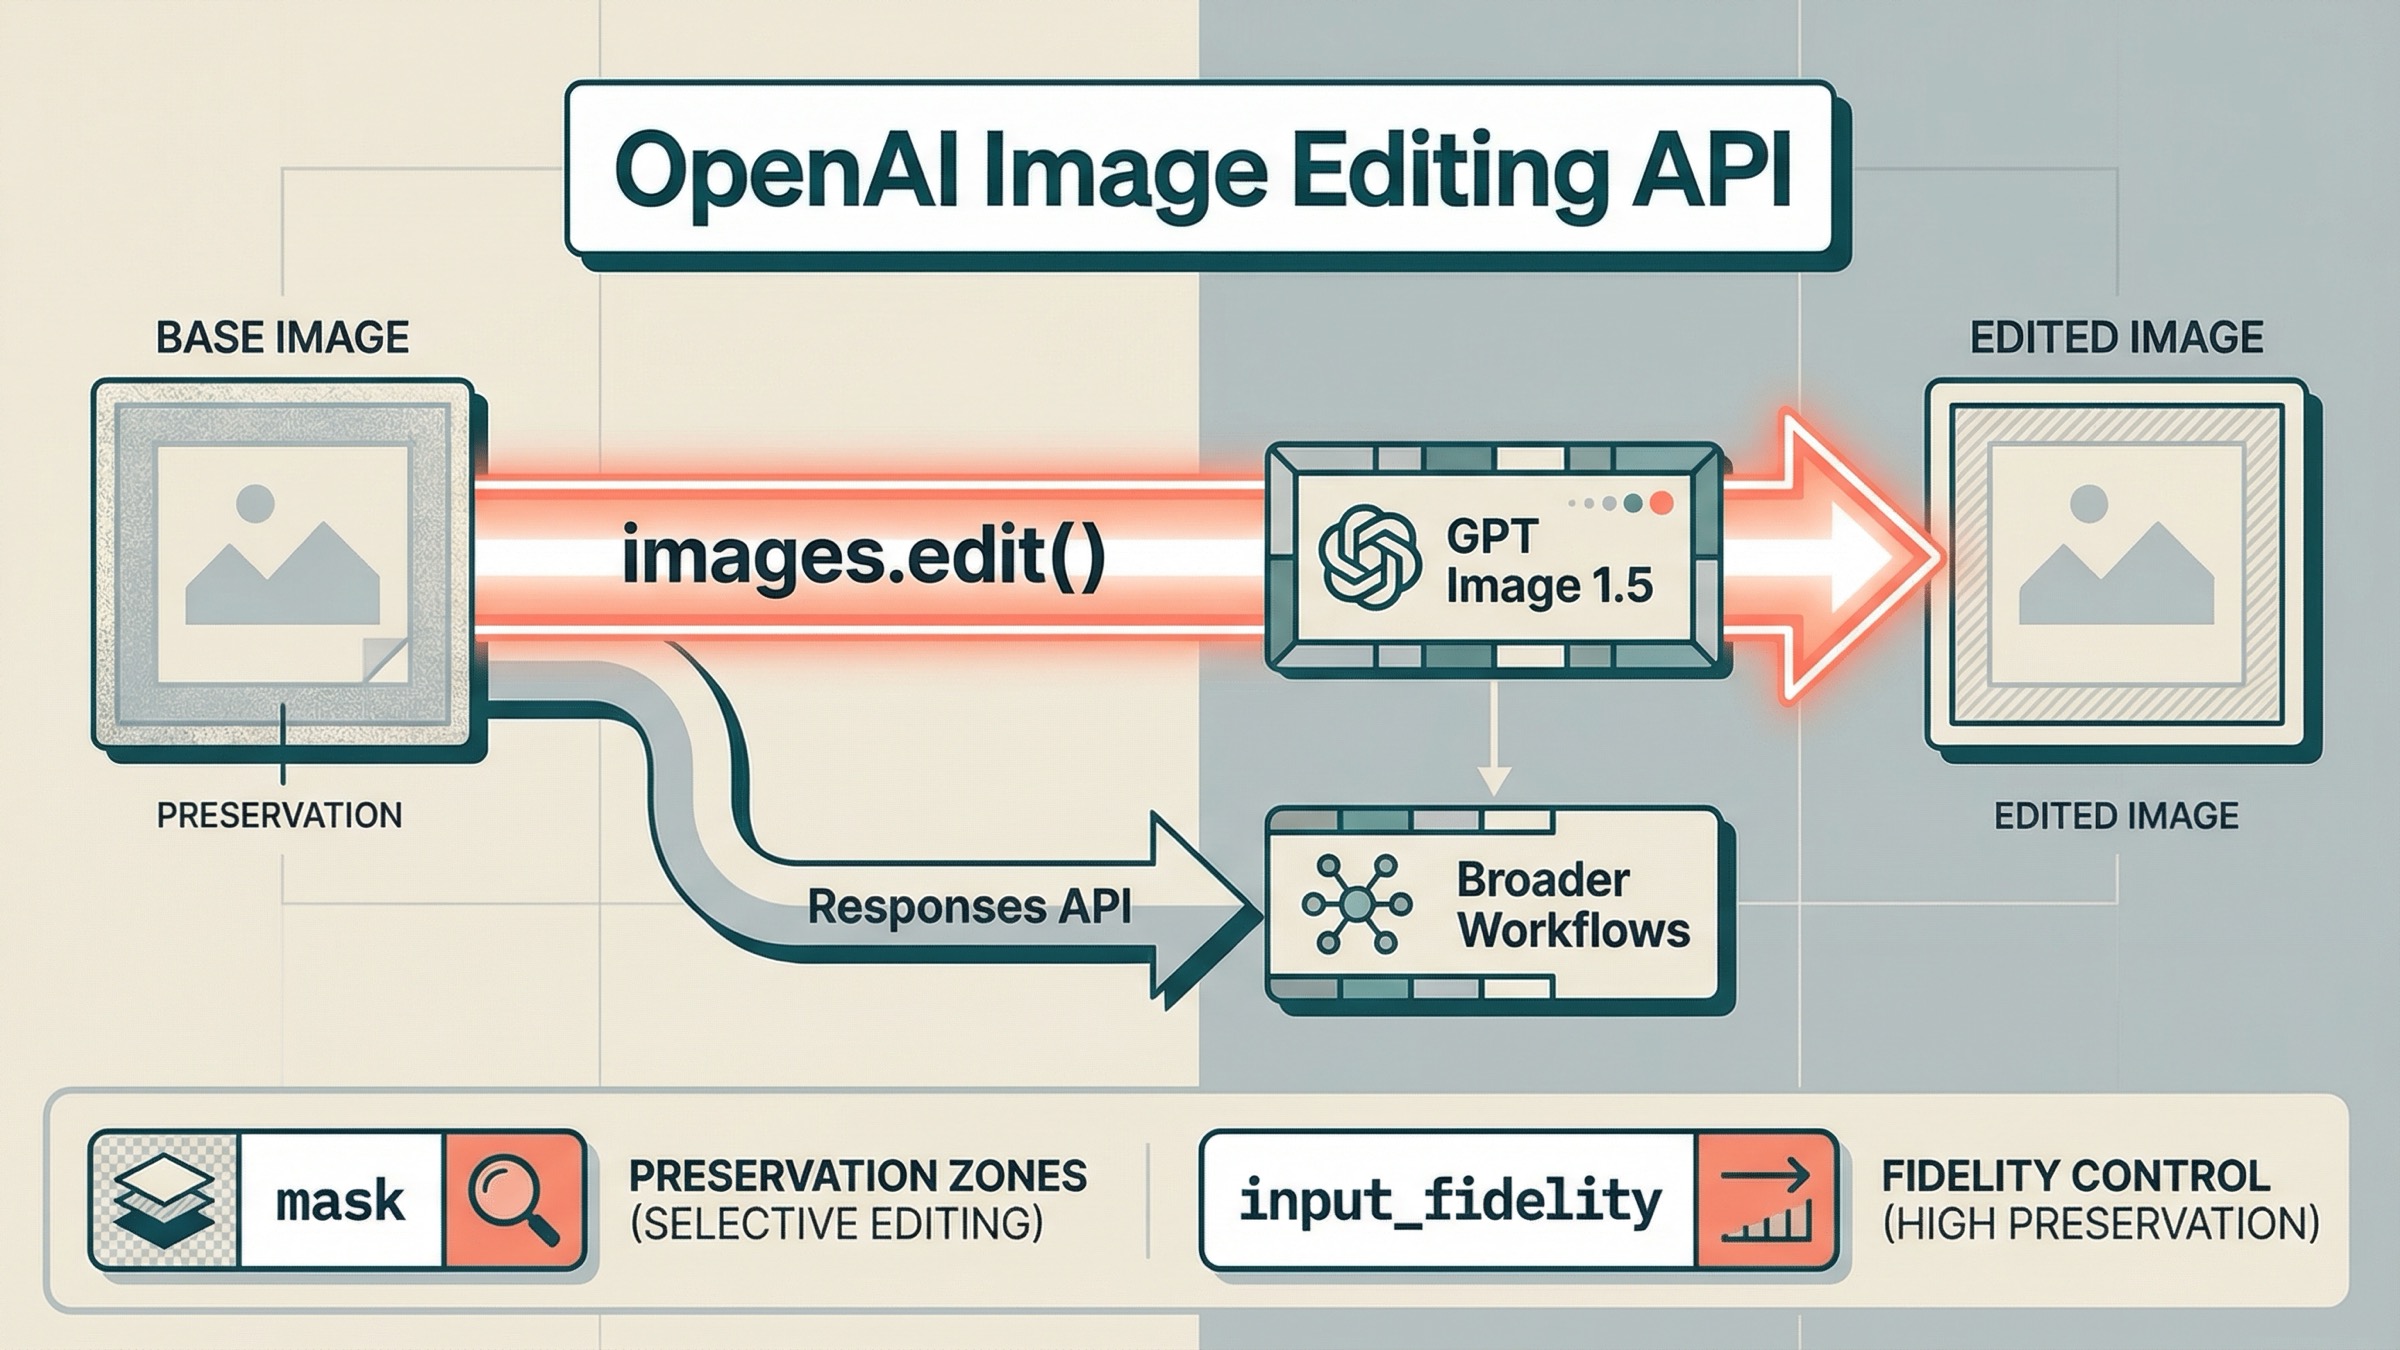
오늘 OpenAI API 로 이미지를 편집해야 한다면, 2026년 3월 23일 기준 가장 안전한 default 는 꽤 분명합니다. 먼저 Images API 와 gpt-image-1.5 로 시작하는 것입니다. 대부분의 edit-first 작업에서는 SDK 의 client.images.edit() 이나 raw HTTP 의 POST /v1/images/edits 가 가장 짧은 경로입니다. Responses API 는 이미지 편집이 더 큰 대화, assistant, agent workflow 안의 한 단계가 되었을 때로 미루는 편이 맞습니다.
이 판단이 중요한 이유는 OpenAI 의 image docs 가 아직 여러 페이지로 흩어져 있기 때문입니다. 메인 image generation guide는 direct edit examples 에서 gpt-image-1.5 를 사용합니다. 현재 GPT Image 1.5 page 역시 이것을 latest image generation model 로 정리합니다. 하지만 더 넓은 Images and vision guide 에는 latest image model 이 gpt-image-1 처럼 보이는 오래된 문맥이 남아 있습니다. 한 페이지만 읽으면 code 는 맞아도 routing 판단은 stale 해지기 쉽습니다.
더 비싼 착각도 있습니다. 많은 개발자는 “image editing API” 라는 말을 들으면 Photoshop 식의 strict local patching 을 떠올립니다. 그런데 current docs 는 훨씬 더 조심스럽습니다. OpenAI 는 prompt 에 최종 이미지 전체를 설명하라고 말합니다. 즉, 지운 부분만 쓰는 방식이 아닙니다. Community threads 를 보면 masked GPT Image edit 가 strict 한 pixel-only inpainting 보다는 broader semantic rewrite 처럼 느껴진다는 불만이 계속 나옵니다. 이 글의 목적은 바로 그 기대치를 먼저 바로잡는 것입니다.
핵심 요약
- OpenAI 의 direct image editing 은
images.edit()와gpt-image-1.5로 시작한다. - mask 는 모델에게 “어디를 중점적으로 보라”는 신호이지, strict pixel-boundary patch 보장이 아니다.
- 얼굴, logo, layout, brand visual preservation 이 중요할 때만
input_fidelity="high"를 추가한다. - edit 가 더 큰 multimodal / agent workflow 의 일부가 되었을 때만 Responses 로 이동한다.
먼저 기억할 current direct path
일반적인 edit workflow 에서 가장 짧고 안전한 mental model 은 다음과 같습니다.
- 하나 이상의 input image 를 보낸다
- 원하는 final result 를 설명한다
- preservation controls 는 필요할 때만 넣는다
- 돌아온 base64 image 를 저장한다
현재 direct JavaScript pattern 은 이렇게 생겼습니다.
jsimport fs from "fs";
import OpenAI from "openai";

const client = new OpenAI({
  apiKey: process.env.OPENAI_API_KEY,
});

const result = await client.images.edit({
  model: "gpt-image-1.5",
  image: [fs.createReadStream("room.jpg")],
  prompt:
    "Replace the empty wall art with a framed abstract poster. Preserve the room layout, lighting, shadows, and all furniture. Do not change the camera angle.",
  input_fidelity: "high",
  size: "1024x1024",
  quality: "medium",
  output_format: "jpeg",
  output_compression: 80,
});

const imageBase64 = result.data[0].b64_json;
const imageBuffer = Buffer.from(imageBase64, "base64");
fs.writeFileSync("room-edited.jpg", imageBuffer);
Python 도 거의 같습니다.
pythonfrom openai import OpenAI
import base64

client = OpenAI()

result = client.images.edit(
    model="gpt-image-1.5",
    image=[open("room.jpg", "rb")],
    prompt=(
        "Replace the empty wall art with a framed abstract poster. "
        "Preserve the room layout, lighting, shadows, and all furniture. "
        "Do not change the camera angle."
    ),
    input_fidelity="high",
    size="1024x1024",
    quality="medium",
    output_format="jpeg",
    output_compression=80,
)

image_base64 = result.data[0].b64_json
image_bytes = base64.b64decode(image_base64)

with open("room-edited.jpg", "wb") as f:
    f.write(image_bytes)
raw HTTP 로 보면 가장 중요한 포인트는 하나입니다. image edits 는 JSON 이 아니라 multipart form data 입니다.
bashcurl https://api.openai.com/v1/images/edits \
  -H "Authorization: Bearer $OPENAI_API_KEY" \
  -F "model=gpt-image-1.5" \
  -F "image[]=@room.jpg" \
  -F 'prompt=Replace the empty wall art with a framed abstract poster. Preserve the room layout, lighting, shadows, and all furniture. Do not change the camera angle.' \
  -F "input_fidelity=high" \
  -F "size=1024x1024" \
  -F "quality=medium"
이 경로가 좋은 이유는 workflow 자체가 명확하기 때문입니다. current edit-capable model 을 고르고, source image 를 넣고, final image 를 설명하고, base64 output 을 저장하면 됩니다. general reasoning layer 에 “edit 할지 generate 할지” 를 맡기지도 않고, 처음부터 conversation state 를 관리할 필요도 없습니다.
더 넓은 surface 설명이 필요하다면 한국어 OpenAI Image API 튜토리얼 이 다음 읽을 거리입니다. 이 글은 의도적으로 image editing route 에만 집중합니다.
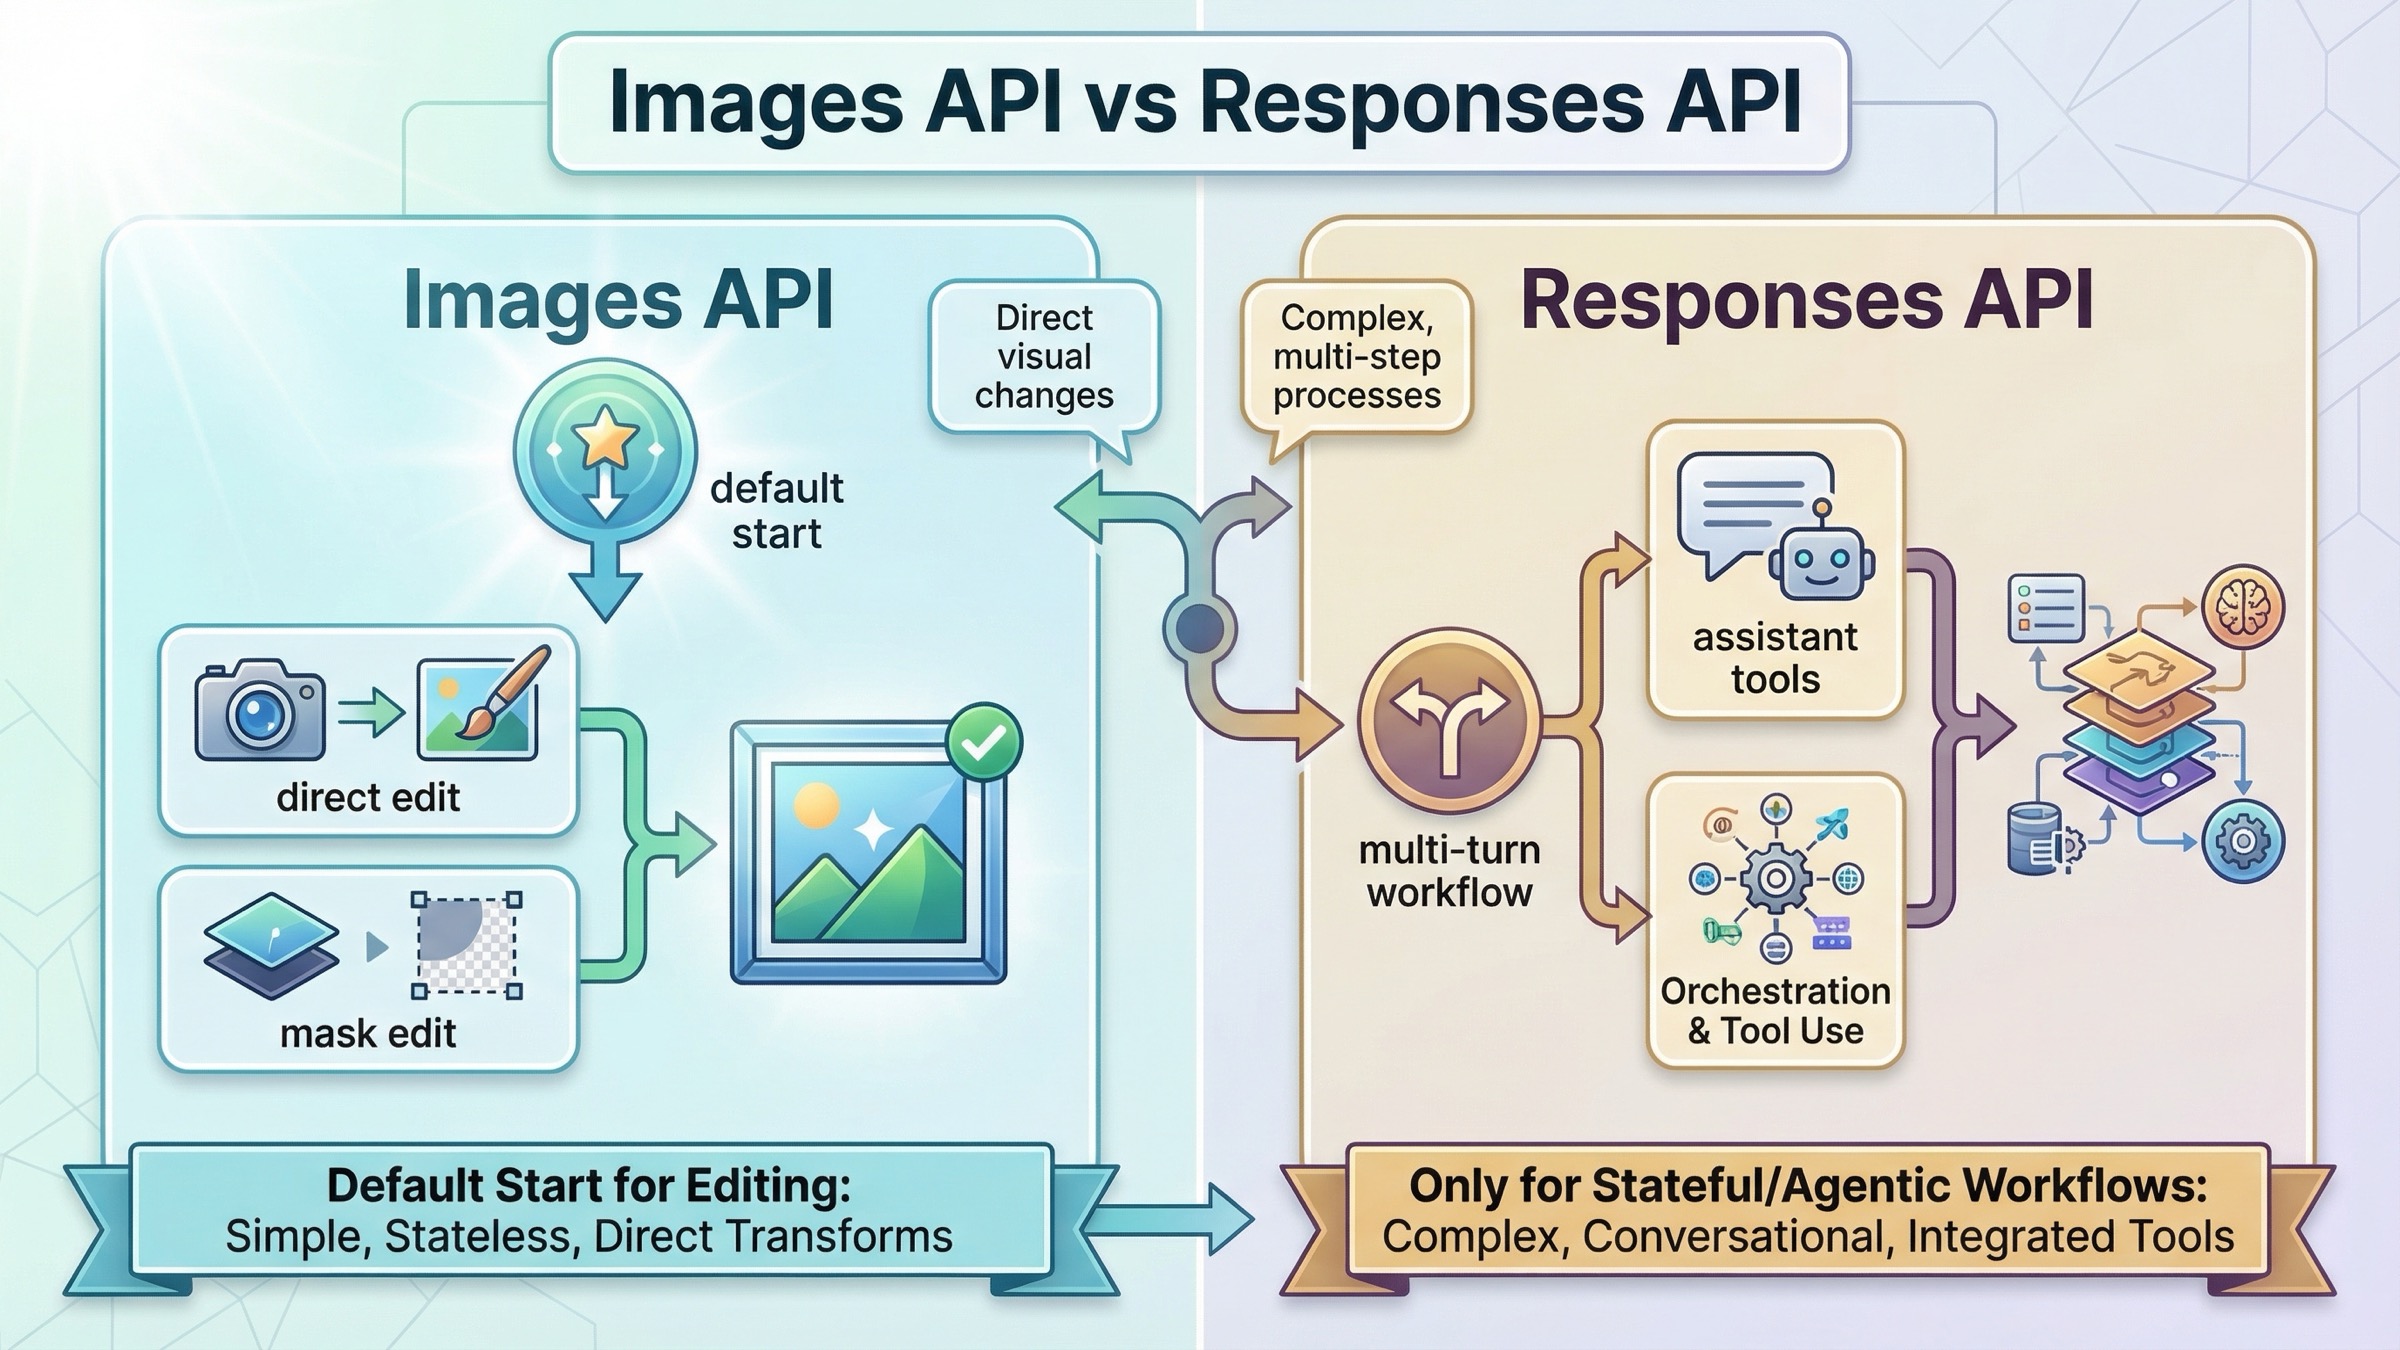
Images API 와 Responses 는 언제 갈라지나
이 지점이 아직도 page one 에서 충분히 분명하게 정리되지 않는 부분입니다.
| 상황 | 더 나은 default route | 이유 |
|---|---|---|
| 하나 또는 여러 장의 source image 를 편집해서 저장하고 싶다 | Images API | 가장 짧은 direct edit path 이고 request contract 도 디버그하기 쉽다 |
| 얼굴, logo, product shot 을 살리면서 요소를 교체하고 싶다 | Images API | input_fidelity=high 와 함께 쓰는 direct edit flow 가 preservation-first setup 으로 가장 명확하다 |
| mask 로 모델이 집중할 위치를 지정하고 싶다 | Images API | mask input, multipart upload, direct output handling 이 이미 잘 갖춰져 있다 |
| 이전 결과를 이어서 multi-turn conversation 안에서 계속 수정하고 싶다 | Responses API | stateful follow-up 편집을 다루기 더 자연스럽다 |
| reasoning, tools, image edits 를 함께 쓰는 assistant 를 만든다 | Responses API | image editing 이 larger workflow 안의 one tool 이 되기 때문 |
가장 중요한 규칙은 이것입니다. Responses 가 더 새로워 보인다는 이유만으로 처음부터 그쪽으로 가지 마세요. current tool guide 는 Responses 가 broader hosted image workflow 용이라는 점을 분명히 합니다. 게다가 GPT Image model IDs 는 Responses API 의 top-level model 에 넣을 수 없습니다. Responses 에서는 gpt-5 같은 text-capable main model 을 두고, image_generation / edit 는 hosted tool 이 맡습니다.
즉 Responses 는 powerful 하지만 abstraction 을 잘못 고르기 쉽습니다. 오늘 ship 하려는 기능이 “이미지를 받아 편집해서 반환하는 endpoint” 라면 먼저 direct Images API 를 안정화하세요. multi-turn editing, conversation memory, other tools 가 정말 필요해졌을 때 Responses 로 넘어가는 편이 맞습니다.
prompt 를 쓰기 전에 edit mode 를 먼저 고른다
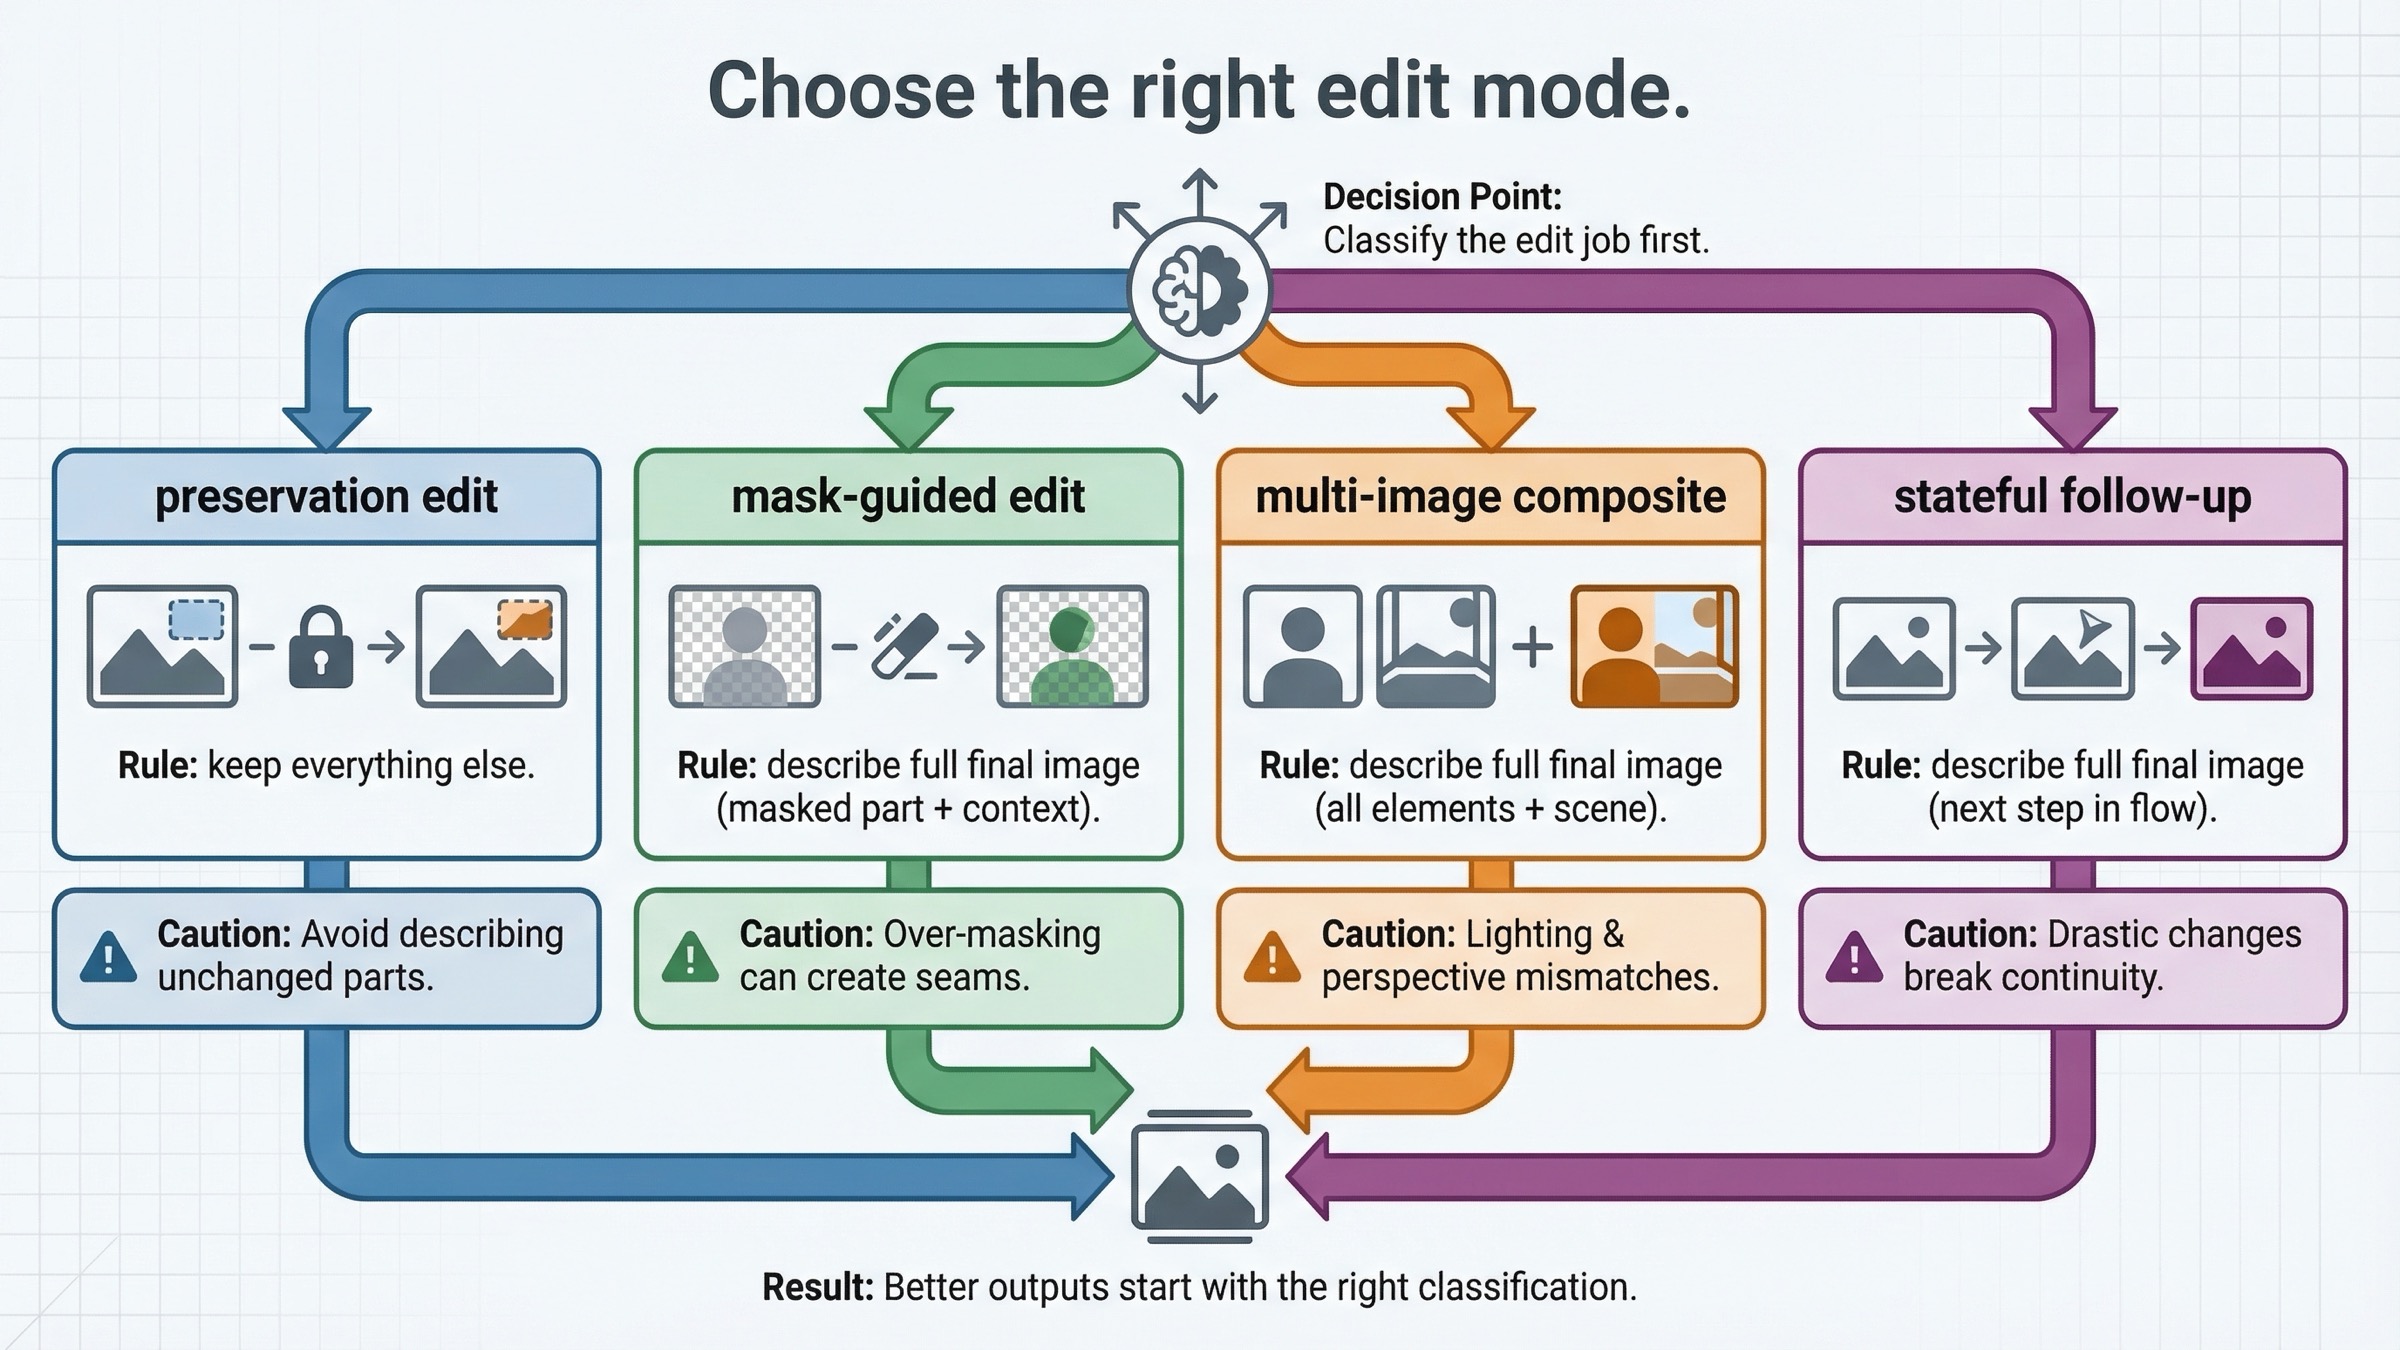
약한 tutorials 는 “image editing” 을 하나의 동작처럼 취급하지만 실제로는 그렇지 않습니다. 먼저 어떤 종류의 edit 인지 를 나눠야 prompt 도 짧고 강해집니다.
첫 번째는 preservation-heavy single-image edit 입니다. 이미 원하는 장면이 있고, 통제된 변경만 필요할 때입니다. 옷을 바꾸거나, 간판을 추가하거나, wall art 를 교체하거나, 방해 요소를 지우거나, object style 을 약간 바꾸거나, composition 을 유지한 채 mood 만 조정하는 작업이 여기에 들어갑니다. 이런 작업에서는 creativity 보다 preservation 이 중요하므로 input_fidelity="high" 가 자주 가치가 있습니다.
두 번째는 mask-guided edit 입니다. 여기서는 모델에게 무엇을 바꿀지뿐 아니라 어디를 중점적으로 볼지도 알려줍니다. 이건 도움이 되지만 GPT Image 를 deterministic local patch tool 로 바꿔주지는 않습니다. mask 는 steering device 이지, strict 하게 그 영역 밖은 untouched 라는 보장이 아닙니다.
세 번째는 multi-image reference / compositing edit 입니다. current guide 와 cookbook 은 여러 input image 를 주고 한 이미지의 요소를 다른 이미지에 가져오라고 요청하는 흐름을 보여줍니다. 예를 들면:
- image 2 의 logo 를 image 1 의 shirt 에 넣기
- image 2 의 dog 를 image 1 의 scene 으로 가져오기
- 같은 product 를 유지한 채 새 environment 로 재배치하기
네 번째는 iterative follow-up editing 입니다. 첫 결과가 꽤 가깝지만 대화 안에서 계속 밀어 붙이고 싶을 때입니다. 이 경우 one-off direct calls 보다 Responses 의 stateful flow 가 더 자연스러워집니다.
이 구분을 초반에 해야 하는 이유는 mode 마다 prompt style 이 다르기 때문입니다. preservation-heavy edit 에서는 “keep everything else” 같은 제약이 중요합니다. mask edit 는 final image 전체 설명과 위치 guidance 가 필요합니다. multi-image composite 는 어떤 input 에서 무엇을 가져오고 base image 의 무엇을 보존할지 명확해야 합니다.
mask 와 input_fidelity 는 실제로 어떻게 동작하나
많은 독자가 실제로 궁금한 부분은 여기입니다.
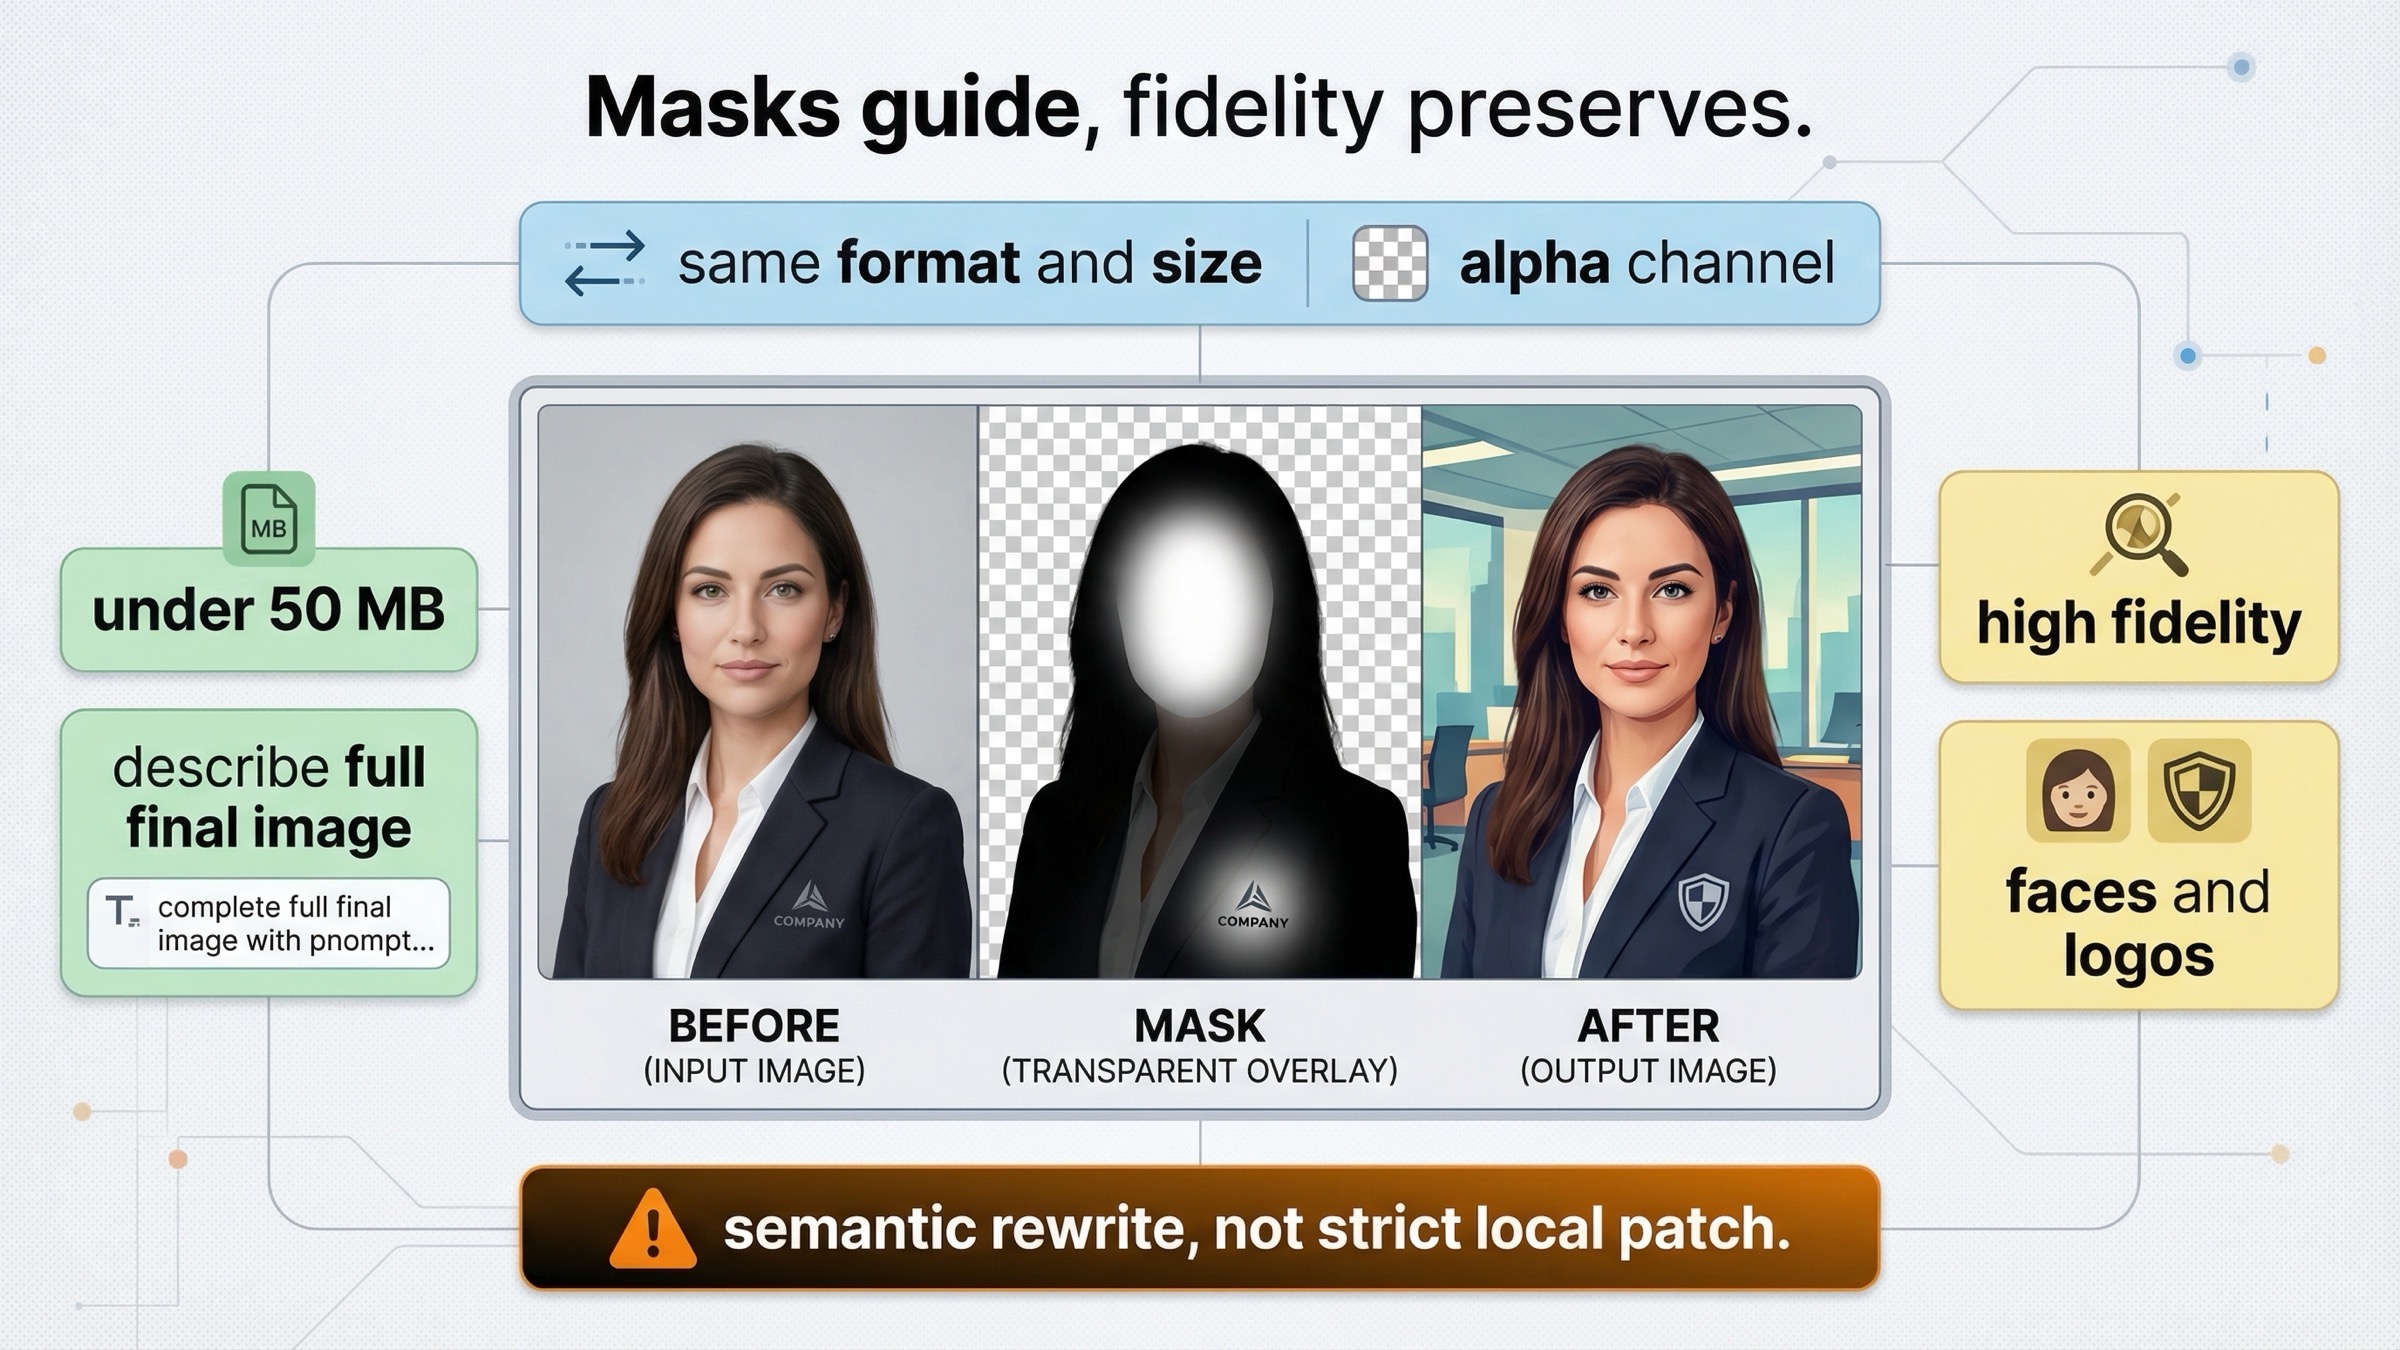
현재 image generation guide 는 image 와 mask 가 같은 format 과 size 여야 하고, payload 가 50 MB 이하 여야 하며, mask 에 alpha channel 이 필요하다고 설명합니다. 그리고 가장 중요한 한 줄은 지운 영역만이 아니라 원하는 final image 전체를 설명하라는 것입니다.
이 문장은 API 를 이해하는 방식을 바꿉니다. 모델은 단순히 구멍을 메우는 것이 아니라 source image, mask, prompt 를 함께 해석해 semantic 하게 일관된 final output 을 만듭니다.
그래서 community complaints 도 근거가 있습니다. OpenAI Developer Community 의 2025년 4월 27일 스레드에서는 masked edits 가 whole image regeneration 처럼 느껴진다는 얘기가 나왔습니다. 후속 답변에서는 당시 gpt-image-1 에 대해 precise inpainting 가 known limitation 이라는 OpenAI Support 설명이 인용되기도 했습니다. GPT Image 1.5 가 preservation-heavy edits 에서 더 강해진 것은 맞지만, 운영상의 교훈은 같습니다. masked workflow 는 semantic edit system 으로 테스트하고, strict local surgery 를 전제하지 말아야 한다는 점입니다.
input_fidelity="high" 는 style 과 features 를 더 조심스럽게 유지해야 할 때 의미가 있습니다. OpenAI 는 direct guide 의 logo placement 예시에서 이 값을 쓰고, Azure OpenAI 의 current edit guide 역시 subtle edits 에서 facial features 같은 입력 특성을 지키는 데 high input fidelity 가 도움이 된다고 설명합니다. 특히 이런 경우에 잘 맞습니다.
- 배경만 바꾸고 product 는 그대로 두고 싶을 때
- 옷만 바꾸고 얼굴 identity 는 유지해야 할 때
- branded logo 를 object 나 garment 위에 올릴 때
- camera angle 과 composition 을 유지하며 작은 scene adjustment 를 할 때
tradeoff 는 꽤 명확합니다. stronger preservation effort 는 보통 더 높은 cost 와 더 보수적인 edit behavior 를 의미합니다. task 자체가 그렇게까지 preservation 을 요구하지 않는다면, 모든 request 에 high fidelity 를 강제로 넣을 이유는 크지 않습니다.
더 좋은 습관은 다음과 같습니다.
- 먼저 가장 단순한 direct edit 를 한 번
- preservation 이 중요할 때만
input_fidelity=high - 위치 guidance 가 중요할 때만 mask
- prompt 는 final image, preserved elements, 실제로 바꿀 1~2가지에 집중
첫 결과가 꽤 근접했다면 giant prompt 로 바로 가지 마세요. 더 좁은 follow-up correction 이 대개 더 잘 통합니다.
Preservation-heavy edits 는 작은 단계로 나누는 편이 낫다
현재 GPT Image 1.5 prompting guide 가 좋은 이유는 parameter dump 보다는 production advice 에 가깝기 때문입니다. translation, compositing, style preservation, scene changes 전반에서 반복되는 패턴은 explicit constraints + small iterative changes 입니다.
실제 제품에서도 prompt 는 그렇게 짜는 편이 좋습니다.
나쁜 edit prompt:
textMake this look better, more modern, cleaner, more premium, maybe add some flowers, maybe change the colors, and make it suitable for a landing page.
더 좋은 preservation-first prompt:
textReplace only the poster on the wall with a framed abstract print.
Preserve the room layout, furniture, lighting, floor shadows, and camera angle.
Do not move or redesign any other object.
Photorealistic interior photography.
더 좋은 compositing prompt:
textPlace the logo from image 2 onto the front of the tote bag in image 1.
Match the bag's fabric texture and lighting.
Keep the model, pose, background, and camera framing unchanged.
더 좋은 follow-up prompt:
textKeep the edited image exactly the same, but make the poster slightly larger and reduce glare on the frame.
Do not change anything else.
마지막 한 줄이 중요합니다. 원본 이미지의 business value 가 클수록, style chasing prompt writer 보다는 state 를 보호하는 operator 처럼 생각해야 합니다.
그래서 OpenAI 의 2025년 12월 16일 release post 도 의미가 있습니다. OpenAI 는 GPT Image 1.5 를 branded logos, key visuals, facial consistency 를 더 잘 보존하는 edit-capable model 로 포지셔닝했습니다. 그렇다고 every preservation-heavy prompt 가 완벽해진다는 뜻은 아닙니다. 이제는 모델의 기본 역량보다 prompt discipline 과 sequencing 이 결과 품질에 더 크게 작용한다는 신호에 가깝습니다.
다음으로 더 넓은 model-routing 판단이 필요하다면 한국어 OpenAI image generation API models guide 가 자연스러운 다음 단계입니다.
Troubleshooting: page one 이 아직 충분히 말하지 않는 실패 지점
첫 번째 실패는 처음부터 wrong API surface 를 고르는 것입니다. 단순 image edit 만 필요하다면 Responses workflow 를 만들 필요가 없고, top-level model 에 gpt-image-1.5 를 넣는 것도 틀린 계약입니다. 먼저 direct Images API, 더 큰 workflow 가 실제로 필요해질 때 Responses 입니다.
두 번째 실패는 freshness 기준이 되는 official page 를 잘못 고르는 것입니다. 2026년 3월 23일 기준 GPT Image 1.5 page 는 latest image generation model 이라고 하지만, Images and vision guide 에는 gpt-image-1 이 latest 처럼 읽히는 오래된 문맥이 남아 있습니다. 내부 문서나 블로그가 잘못된 페이지를 anchor 로 삼으면 code 가 살아 있어도 전략 판단은 낡아 보입니다.
세 번째 실패는 raw edit endpoint 에 JSON 을 보내는 것입니다. direct image edits 는 multipart form data 입니다. curl 이나 custom HTTP client 로 작업할 때 이 detail 은 필수입니다.
네 번째 실패는 mask 를 hard promise 로 받아들이는 것입니다. workflow 가 작은 local patch 와 zero collateral changes 를 절대적으로 요구한다면, 그 가정은 초반에 실제 샘플로 검증해야 합니다. docs 에 mask 가 있다는 이유만으로 보장으로 읽으면 안 됩니다.
다섯 번째 실패는 changed object 만 설명하는 prompt 입니다. OpenAI current guide 는 desired final image 전체를 설명하라고 말합니다. “add a beach ball” 처럼만 쓰면 모델에게 나머지 장면을 재해석할 자유를 너무 많이 줍니다.
여섯 번째 실패는 access 문제와 syntax 문제를 섞는 것입니다. GPT Image 1.5 는 current tier limits 가 있고, model page 에서도 Free not supported 를 명시합니다. usable image 가 오기 전에 request 가 실패한다면 prompt 를 바꾸기 전에 access 부터 확인하세요. 이 branch 가 실제 blocker 라면 한국어 OpenAI image generation API verification guide 가 더 적절한 다음 글입니다.
일곱 번째 실패는 한 request 에 너무 많은 변화를 넣는 것입니다. preservation-heavy task 에서는 거대한 compound prompt 가 실패 원인을 흐립니다. composition 인지, preservation 인지, wording 인지, mask 인지 읽기 어려워지기 때문입니다. 하나의 edit, 그다음 하나의 follow-up correction 이 여전히 더 깨끗한 production habit 입니다.
FAQ
지금 edits 에는 gpt-image-1 과 gpt-image-1.5 중 무엇을 써야 하나요?
새로운 direct edit work 라면 gpt-image-1.5 입니다. 2026년 3월 23일 기준 current GPT Image 1.5 page 는 이것을 latest image generation model 로 둡니다. gpt-image-1 은 오래된 workflow 유지나 비교용으로 남겨두면 됩니다.
왜 mask edit 가 masked area 보다 더 넓게 바뀌나요?
GPT Image edits 가 guided semantic rewrites 이기 때문입니다. OpenAI current guide 는 final image 전체를 설명하라고 말하고, community threads 도 hard-boundary inpainting 를 기대한 사용자가 broader rerenders 를 겪는다는 점을 보여줍니다.
모든 edit 에 input_fidelity=high 가 필요한가요?
아닙니다. 얼굴, logo, product geometry, camera angle 같은 중요한 visual identity 를 보존해야 할 때만 필요합니다. task 가 더 generative 하다면 매번 high 로 둘 이유는 없습니다.
언제 Images API 에서 Responses 로 옮겨야 하나요?
edit 가 multi-turn conversation, assistant workflow, broader tool-using product 안의 일부가 되었을 때입니다. ship 하려는 feature 자체가 image edit 라면 direct Images API 에 남는 편이 더 자연스럽습니다.
최종 권장안
지금 가장 깔끔한 규칙은 이렇습니다. OpenAI API 로 이미지를 편집하려면 먼저 images.edit() + gpt-image-1.5 로 시작하세요. mask 는 모델의 주의를 유도하는 데 쓰되, prompt 는 항상 final image 전체를 지정한다는 생각으로 작성해야 합니다. input_fidelity=high 는 preservation 이 일 자체일 때만 추가하고, 모든 request 의 default 로 만들지는 마세요.
page one 이 아직 충분히 풀지 못하는 포인트도 바로 이것입니다. 좋은 답은 “OpenAI 가 이미지 편집을 지원한다”가 아니라, “direct edit path 는 무엇이고, alternate route 로 넘어갈 순간은 언제이며, mask 가 무엇을 보장하지 않는지” 입니다.
더 넓은 API surface 설명이 필요하면 OpenAI Image API 튜토리얼 로 이어가면 됩니다. 다음으로 working generation examples 가 필요하다면 OpenAI image generation API example 가 자연스러운 다음 단계입니다.