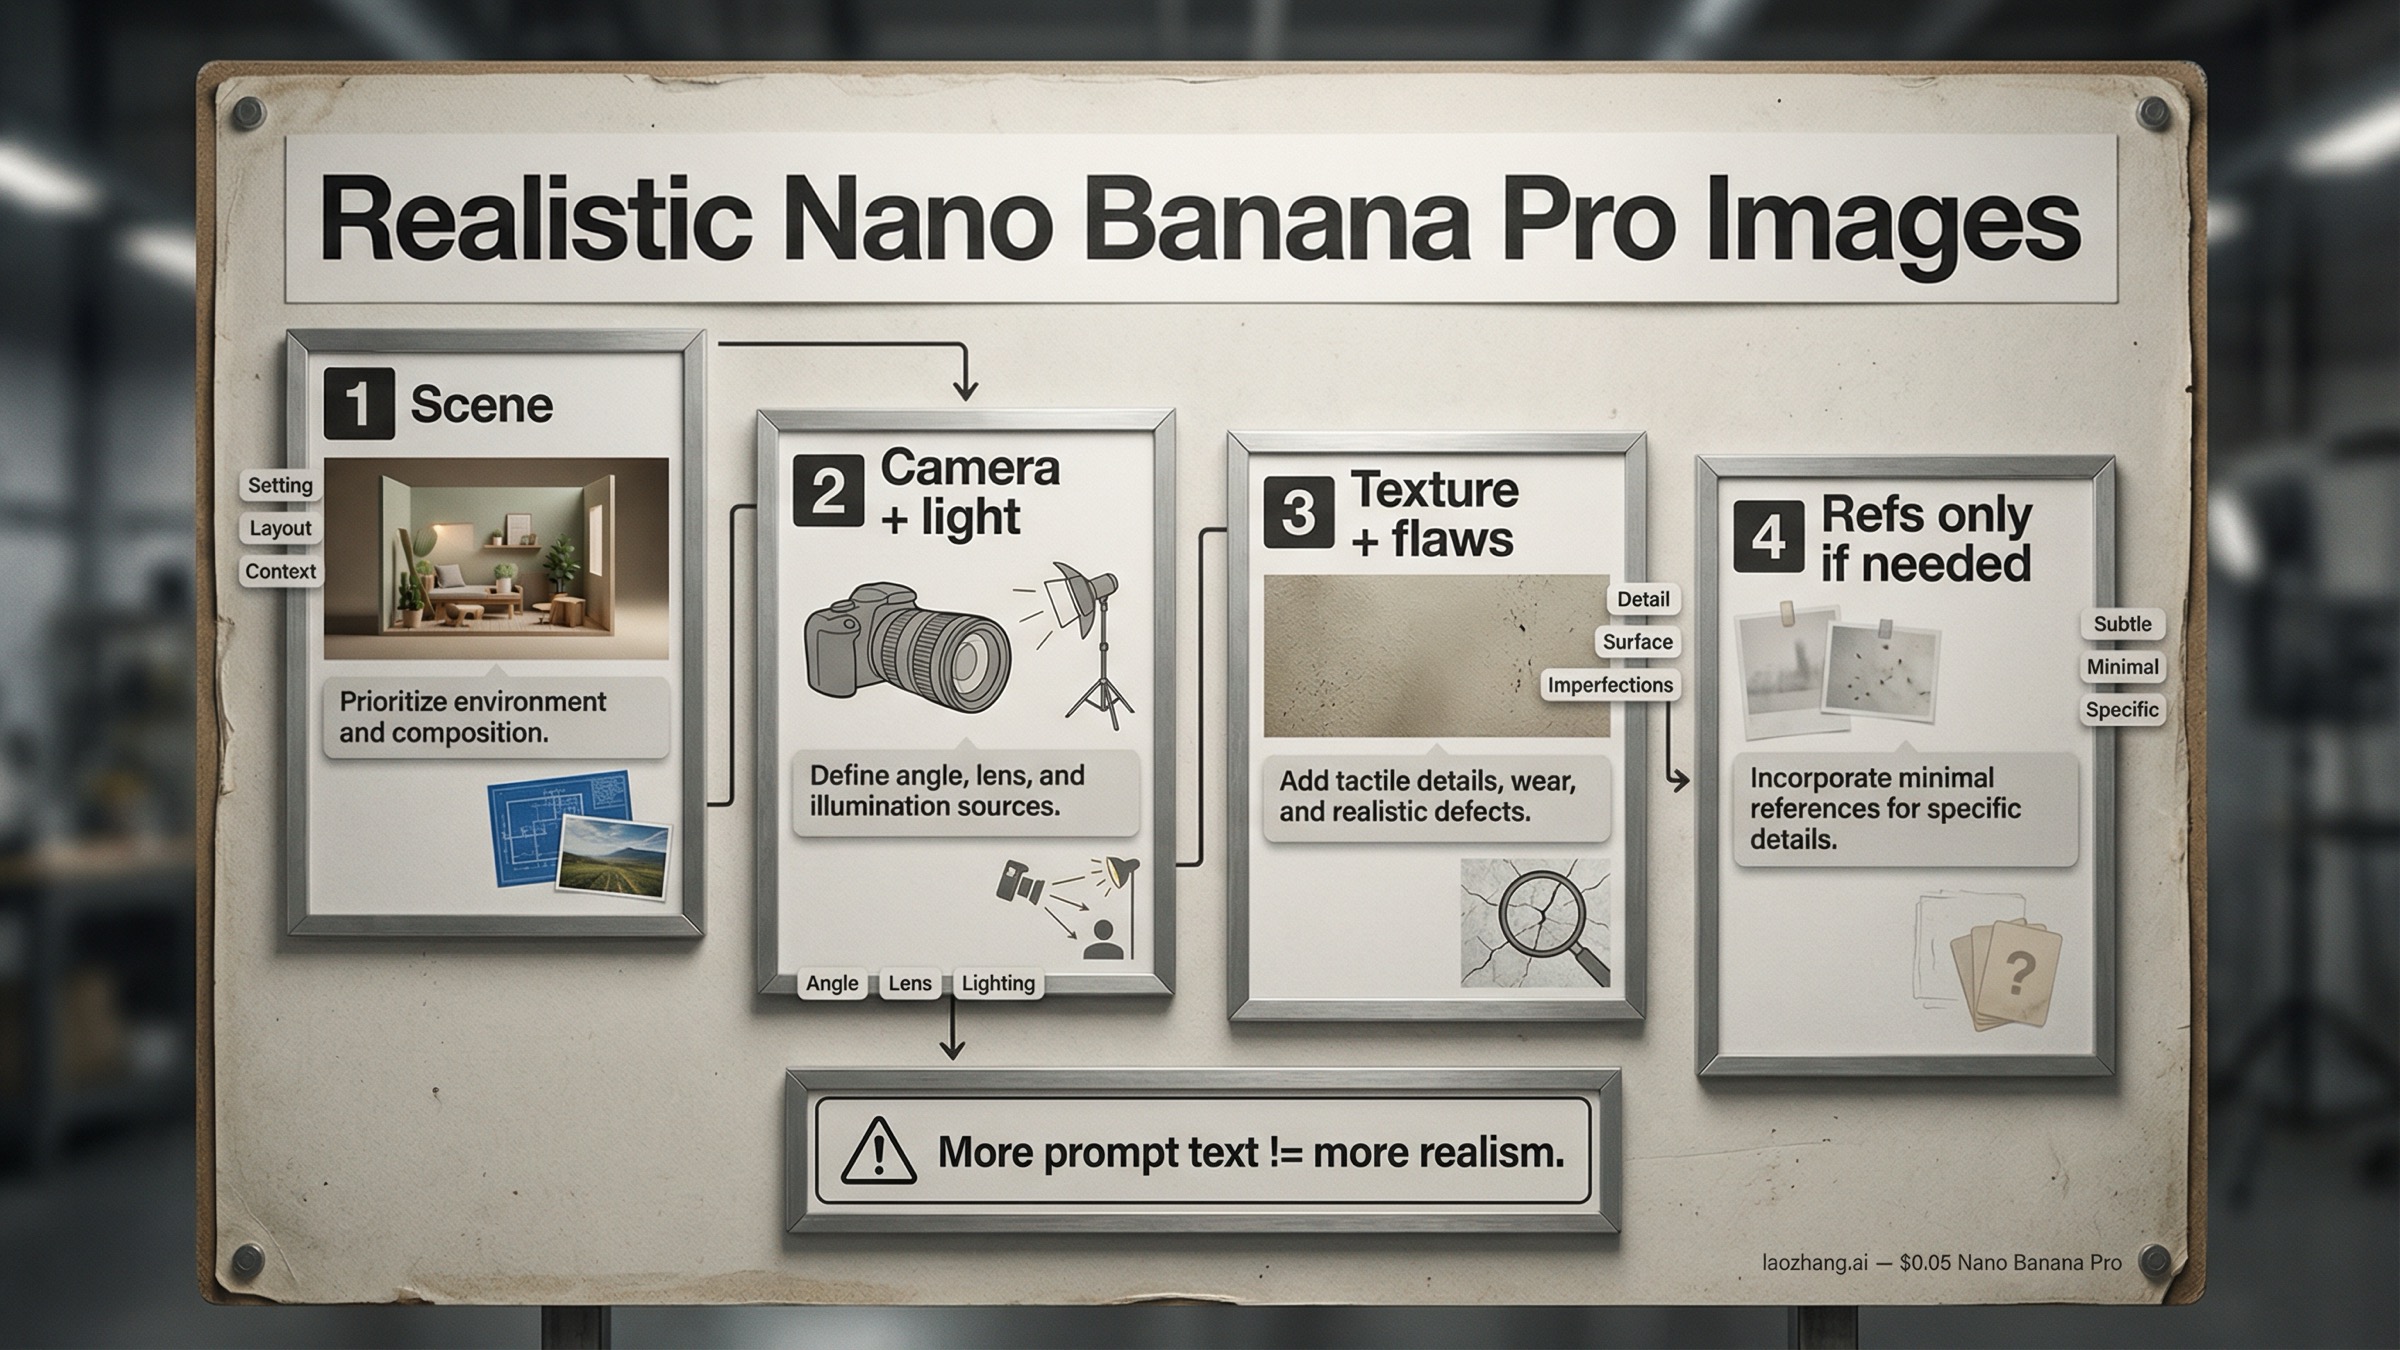
短い答え: nano banana pro realistic images を本当に写真っぽくしたいなら、最初に増やすべきものは style words ではありません。先に believable な scene を作り、そのあとで camera と light を決め、最後に texture と imperfections を足し、それでも固定が必要なときだけ reference images を使う方がうまくいきます。最初の scene がもう fake に見えているなら、references を増やしても大体は改善ではなく混乱になります。
Nano Banana Pro は Google's gemini-3-pro-image-preview です。Google の公式 prompt tips は今でも prompt を subject、composition、action、location、style、edit instructions の 6 パートで考えるよう勧めています。ただし、realism ではこれを 1 文に詰め込むより、順番に積み上げる方が強いです。最初に physical scene、次に camera と lighting、次に texture と scene entropy、最後に必要な reference を足す。この順番にすると、出力の quality だけでなく troubleshooting もしやすくなります。
この順番が重要なのは、nano banana pro realistic images の query family で同じ失敗が何度も出てくるからです。ひとつは、全部を制御しようとして pore、lens、background、lighting を 1 つの巨大 prompt に詰めるパターン。もうひとつは、いったん良い frame が出たあとに angle change や edits を重ねすぎて、画像が soft で clean で AI っぽい方向に戻ってしまうパターンです。先に 1 枚 believable な shot を作ってから守る方が安定します。もし後で reference の使い分けを深掘りしたいなら、次は Nano Banana Pro reference images ガイド を読むのが自然です。
要点まとめ
- 最も安定する default は、scene first、camera and light second、texture third、references last の staged workflow。
- Google の公式 prompt anatomy は今でも有効。subject、composition、action、location、style、edit instructions を順番に整理すると強い。
- camera language は実在しそうな撮り方を説明すると効く。spec を並べるだけだと逆に弱い。
- AI look の原因は detail 不足よりも、光が均一すぎる、scene が抽象的すぎる、surface がきれいすぎる、の方が多い。
- reference images は 0 枚か 1 枚から始め、identity や product fidelity を固定したいときだけ増やす。
- angle change や edit chain で realism が落ちたら、最後に良かった frame に戻って clean branch でやり直す。
- 2026年3月28日 時点で、Google は Nano Banana Pro を preview として扱い、Gemini 3 image family に最大 14 references、価格は 1K/2K image が $0.134、4K image が $0.24 と案内しています。
まず style ではなく physical scene を書く
弱い realism prompt はだいたい似ています。"photorealistic cinematic portrait, ultra detailed, realistic lighting, masterpiece" のように、quality を感じる単語は多いのに、何が起きている scene なのかが分からない形です。これだとモデルは「きれいな画像」は作れても、「観察された瞬間」に見える画像を作る理由を持てません。
realism は style の前に scene があります。誰がいるのか。何をしているのか。どこで起きているのか。立っているのか、座っているのか。camera を見ているのか、見ていないのか。店を閉める直前の少し慌ただしい scene なのか、雑然とした kitchen なのか、静かな office なのか。ここが曖昧だと、いくら cinematic と書いても reality は立ちません。
だから Google の prompt anatomy は page one の多くの generic guide より役に立ちます。重要なのは「詳しく書け」ではなく、「実際の shot を先に説明しろ」ということです。subject、composition、action、location、style、edit instructions の順は、decorative adjective を並べる前に現実の shot を組み立てるための骨組みです。
例えば、こんな骨格で考えると分かりやすいです。
textSubject: frame にいる人物や物、その中で本当に重要な情報
Composition: camera がどこから何を見ているか
Action: その瞬間に起きている動き
Location: scene が起きる場所と周辺の物理情報
Style: photo realism を支える表現
Edit instructions: 変えるべき点があるときだけ
それを自然文にすると、次のような形になります。
text閉店前の花屋で、疲れた florist が最後の花束を包んでいる。
少し広めの phone photo、4:5 の縦、目線の高さ、数歩離れた距離。
本人は camera ではなく花を見ている。
狭いカウンター、手書きの値札、奥の冷蔵ケース、床に数本の茎が落ちている。
夕方の street の冷たい光と店内の暖かい光が混ざる realistic storefront scene、studio の polished look なし。
この書き方の利点は、生成結果が悪かったときに何を直すべきか見えることです。scene が抽象的なのか、camera が合っていないのか、light が弱いのか、texture が足りないのか。単に "make it more realistic" と頼んだ場合、その問い分け自体ができません。
要するに、読んだ人が actual shot を頭の中に置けない prompt は、モデルにも actual shot を渡せていません。
camera、light、framing を写真の言葉で足す
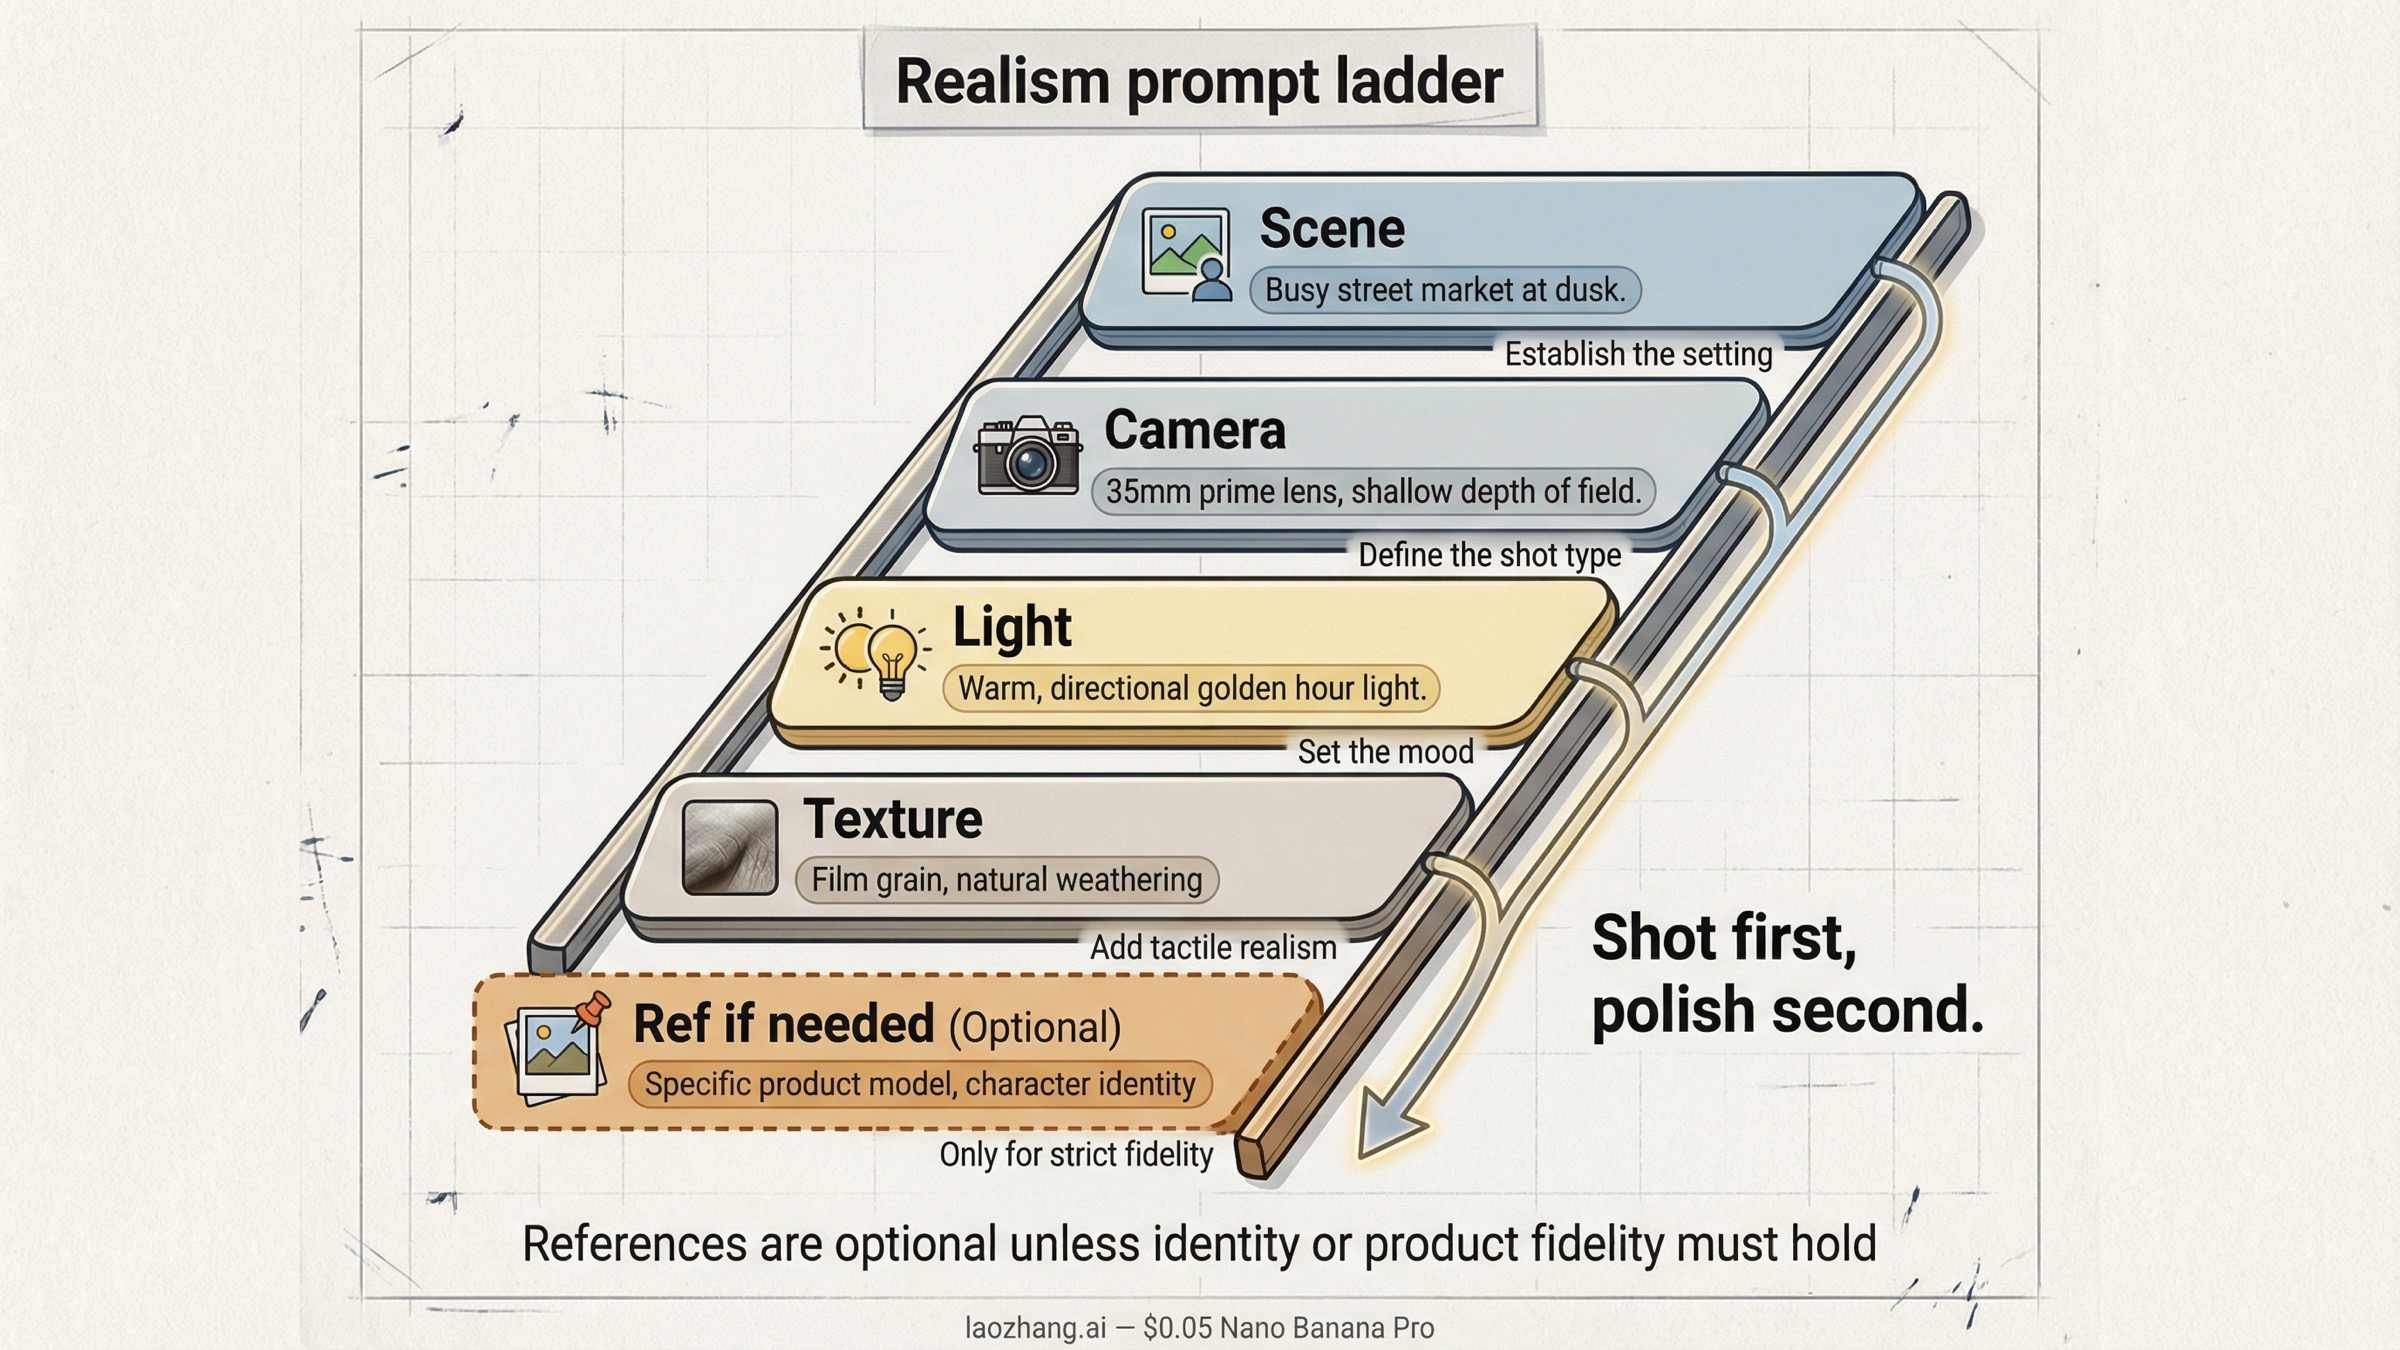
scene が見えたら、次の大きな差は camera と lighting の言い方で出ます。ここで prompt は real に近づくか、ただの spec list に崩れるかが決まります。
有効な camera language は、現実にその scene をどう撮るかを説明します。phone snapshot なのか、longer portrait lens なのか。close-up なのか、waist-up なのか。eye level なのか、low angle なのか。depth of field は浅いのか、日常写真のように深いのか。窓光なのか、室内 flash なのか、practical light が混ざっているのか。こうした情報は style より先に reality を支えます。
逆に弱いのは、数値だけが増えている prompt です。24mm、f/1.2、ISO 80、1/4000、deep focus、night street、cinematic bokeh のように、互いに競合する spec を並べても、モデルは "写真っぽさの雰囲気" は返せても coherent な撮影状況は返しにくいです。
Nano Banana Pro では、次の 3 パターンがとくに使いやすいです。
- Casual phone photo。social や documentary っぽい scene に向く。少し wide な見え方、自然光や混合光、軽く awkward な framing、日常の mess を一緒に入れる。
- Portrait or editorial realism。face が重要なときに向く。subject との距離、light の方向、背景がどこまでボケるかを明確にする。
- Product or lifestyle shot。material fidelity が必要なときに向く。surface が光にどう反応するか、room context、handheld か controlled かを入れる。
lighting も同じです。real light は常に directional で imperfect です。夜の kitchen、会議室、雨の street、beauty portrait は同じ "soft light" では表現できません。"soft light" は曖昧ですが、"camera-left の窓光で顔は明るく、背後の room は少し暗い" と書けば、モデルは scene の logic を持てます。
aspect ratio も軽く見ない方がいいです。縦の social crop、横の editorial frame、square の product layout は、同じ subject でも believable さの出方が変わります。realism を欲しいなら framing も early decision に入れます。
texture、imperfections、scene entropy を足して AI look を消す
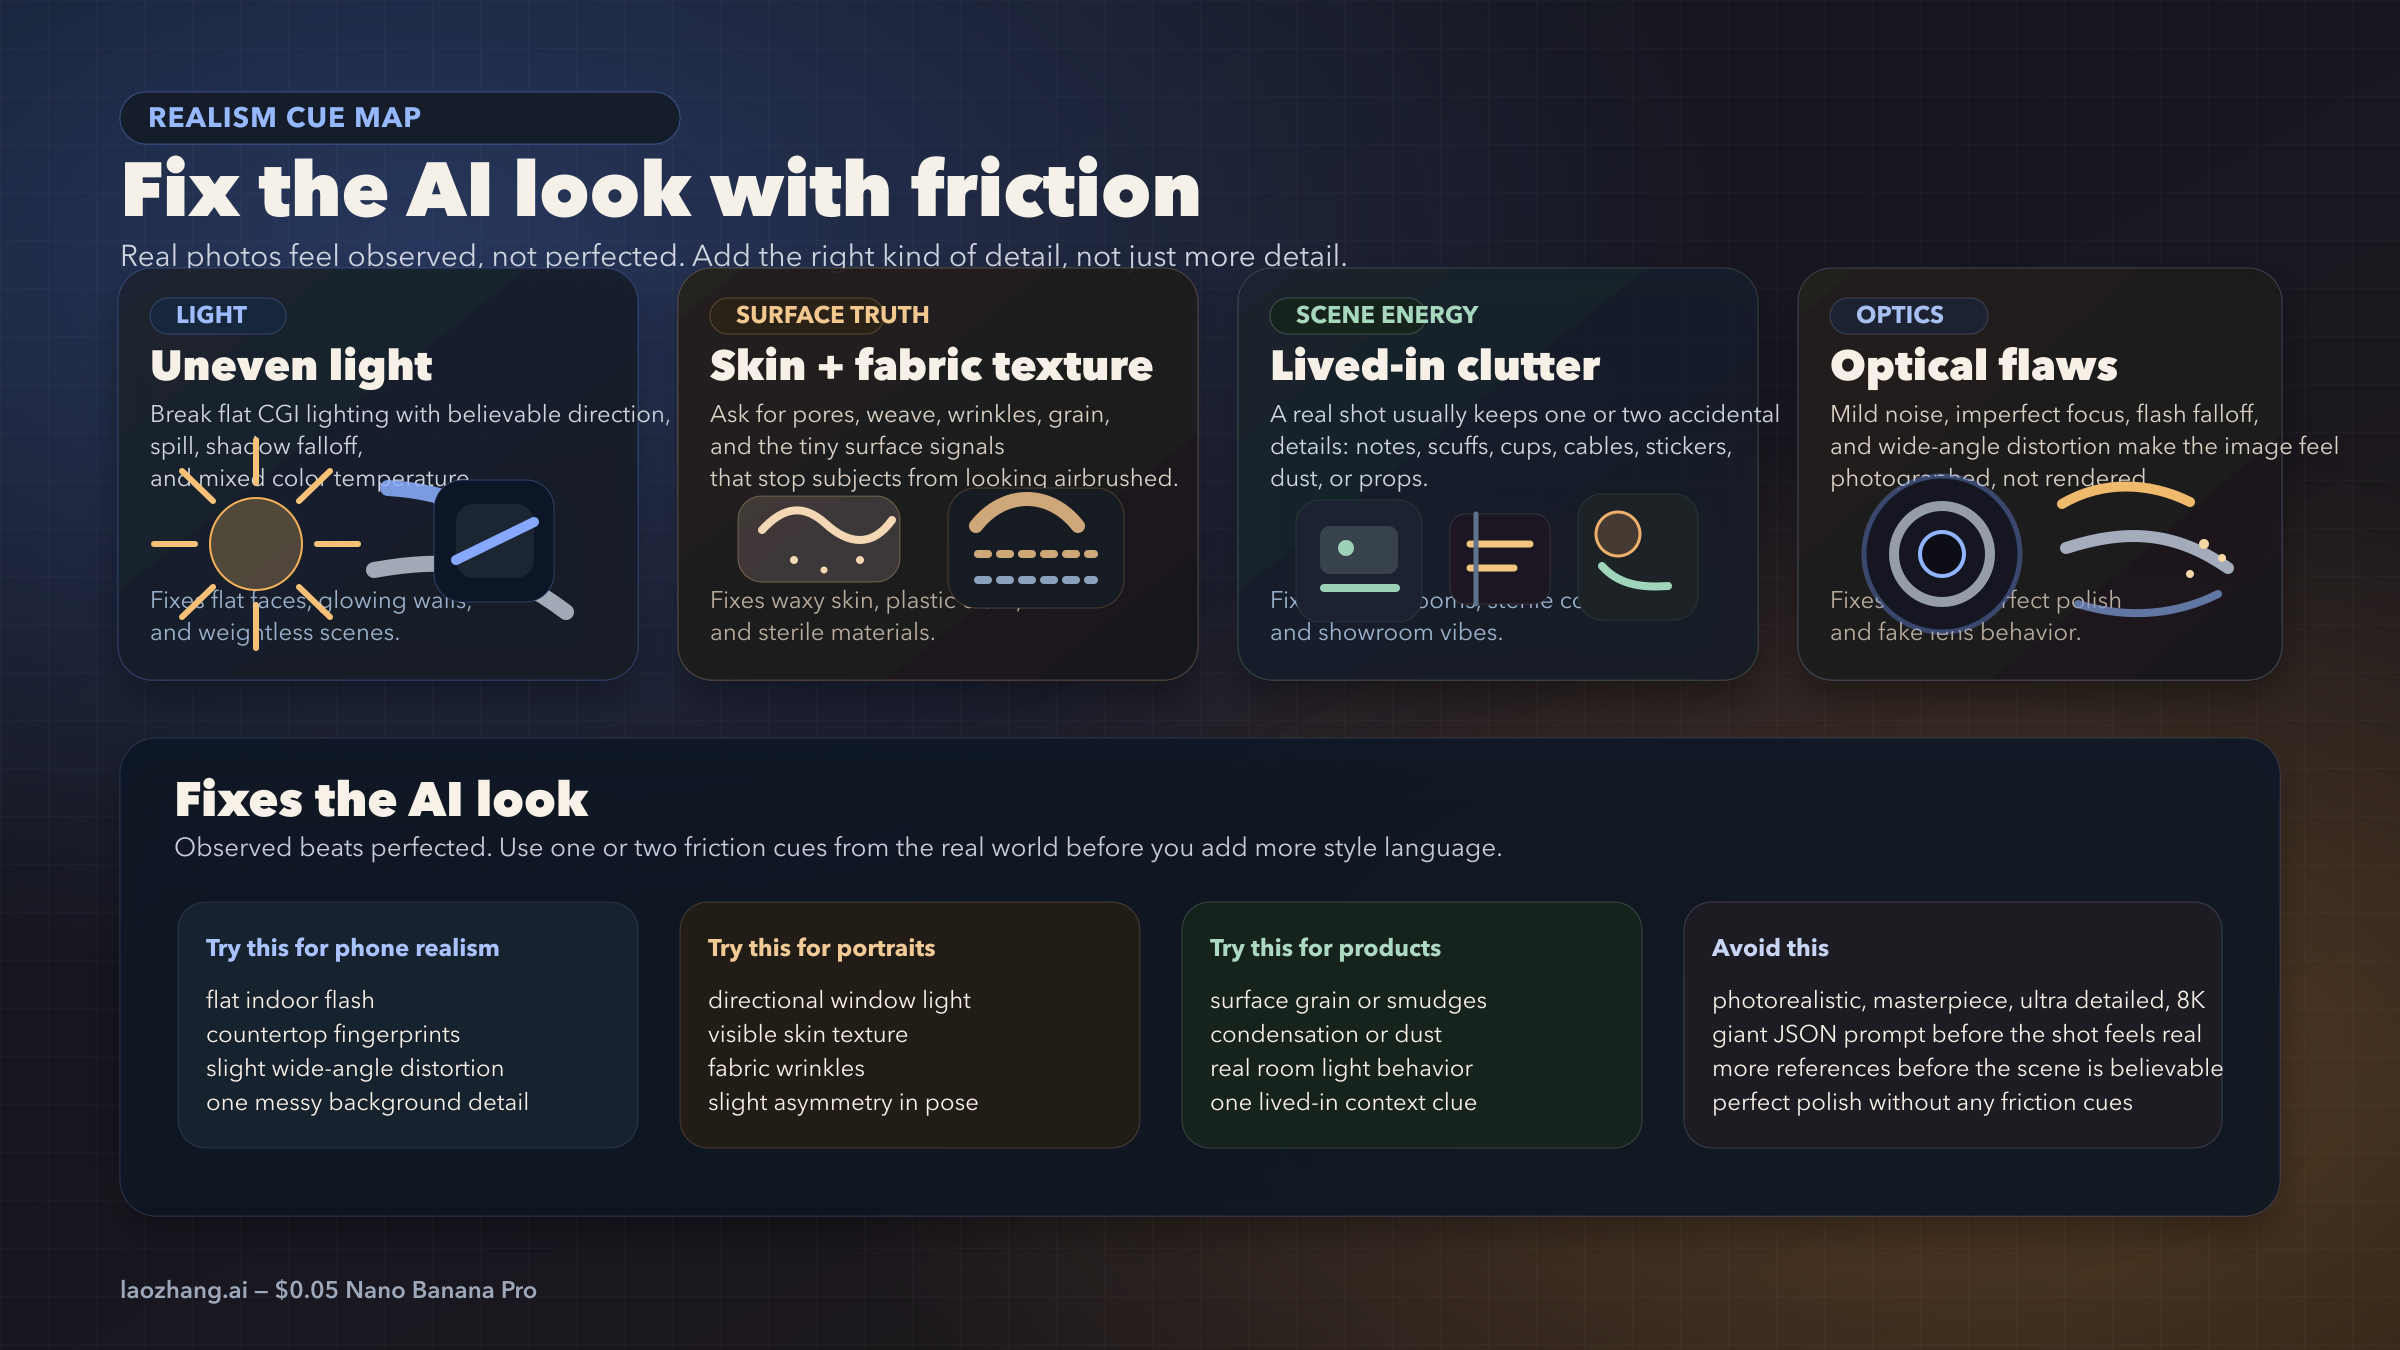
AI look は anatomy だけの問題ではありません。むしろ多くのケースでは、表面が smooth すぎる、部屋が clean すぎる、reflections が整いすぎる、background が空きすぎる、といった "きれいすぎること" の方が原因です。
実際の写真には小さな friction があります。shirt に crease がある。glass に smudge がある。skin に texture がある。棚の物が少しずれている。cheap light が ugly に spill している。countertop に fingerprint がある。こうした普通の imperfection があるだけで、画像は render から observation に近づきます。
ここでありがちな誤解は、high detail と realism を同じものだと考えることです。detail だけを増やすと、モデルは sharpness、symmetry、shine、polish を強めやすいです。でも、それは often realistic ではなく "well-rendered" なだけです。必要なのは、どの detail がその scene を現実らしくするのかを指定することです。
次の table は quick check に使えます。
| realism cue | 直したい問題 | 向いている scene |
|---|---|---|
| skin、fabric、material の texture | plastic っぽい surface | portrait、fashion、product close-up |
| uneven または directional light | flat で CGI っぽい light | interior、event、street |
| 生活感のある clutter、wear、fingerprint | vacuum-sealed に見える background | mobile photo、kitchen、office、lifestyle |
| noise、flash falloff、distortion などの optical flaws | perfect render に見える画 | selfie、documentary、casual |
| imperfect reflection、wrinkle、condensation | generic object surface | food、cosmetics、electronics、glass |
| slight asymmetry in pose or frame | mannequin っぽさ | portrait、social、lifestyle |
ポイントは、汚くすることではなく、scene に合う friction を入れることです。夜の kitchen なら mixed color temperature や countertop の跡が合うかもしれない。product shot なら tiny scuff や condensation ring が合うかもしれない。event photo なら badge の傾きや banner の wrinkle が効くかもしれません。
page one の many guides が弱いのはここです。より長い prompt template はあっても、なぜ still synthetic に見えるのかを説明していません。抜けているのは entropy layer です。現実の scene は beauty のためだけに最適化されていません。
reference images は顔、商品、layout を固定したいときだけ使う
reference images は useful ですが、最初に出すカードではありません。lock にはなるけれど、bad base scene の rescue にはなりにくいです。
scene 自体が fake なら、reference image を増やしても根本原因は残ります。face を寄せたり、product shape を守ったり、layout を保ったりはできますが、light logic、surface truth、environment の弱さはそのままです。だから realism workflow の良い default は、identity か product fidelity が最初から重要でない限り、references なしで始めることです。
次のケースでは reference image を使う意味があります。
- 同じ person に見え続けてほしい
- product shape、label、material finish を守りたい
- 既存 layout や composition を変えずに style だけ変えたい
逆に、generic mood board として使うのは避けた方がいいです。Google の image generation docs は Gemini 3 image models が最大 14 references、Pro が最大 6 high-fidelity object references と最大 5 character-consistency references を扱えると説明しています。ただし、これは ceiling であって recommended start ではありません。realistic image なら、0 枚、1 枚、多くても 2 枚から始めるのが普通です。
理由は hierarchy です。face reference、style reference、pose reference、environment reference を最初から全部入れると、モデルは "何を一番守るべきか" を自分で推測しないといけなくなります。realism はそういう曖昧さに弱いです。
使い分けの目安はこうです。
- No references: scene 自体を believable にするのが最優先のとき
- One reference: identity か product を anchor したいとき
- Two references: identity に加えて pose、style、scene のどれか 1 つを足したいとき
もしより大きい reference system が必要になったら、次に読むべきは reference images ガイド です。ただし、それは basic realism workflow が already working になってからで十分です。
同じ考え方は、good image のあとに angle change をかけて realism が落ちる問題にも当てはまります。最後に良かった frame を新しい reference image として扱い、変えたい angle を短く明確に書き、Pro で clean rerender をした方が安全です。
edits、角度変更、積み上げ prompt のあとで realism が壊れる理由
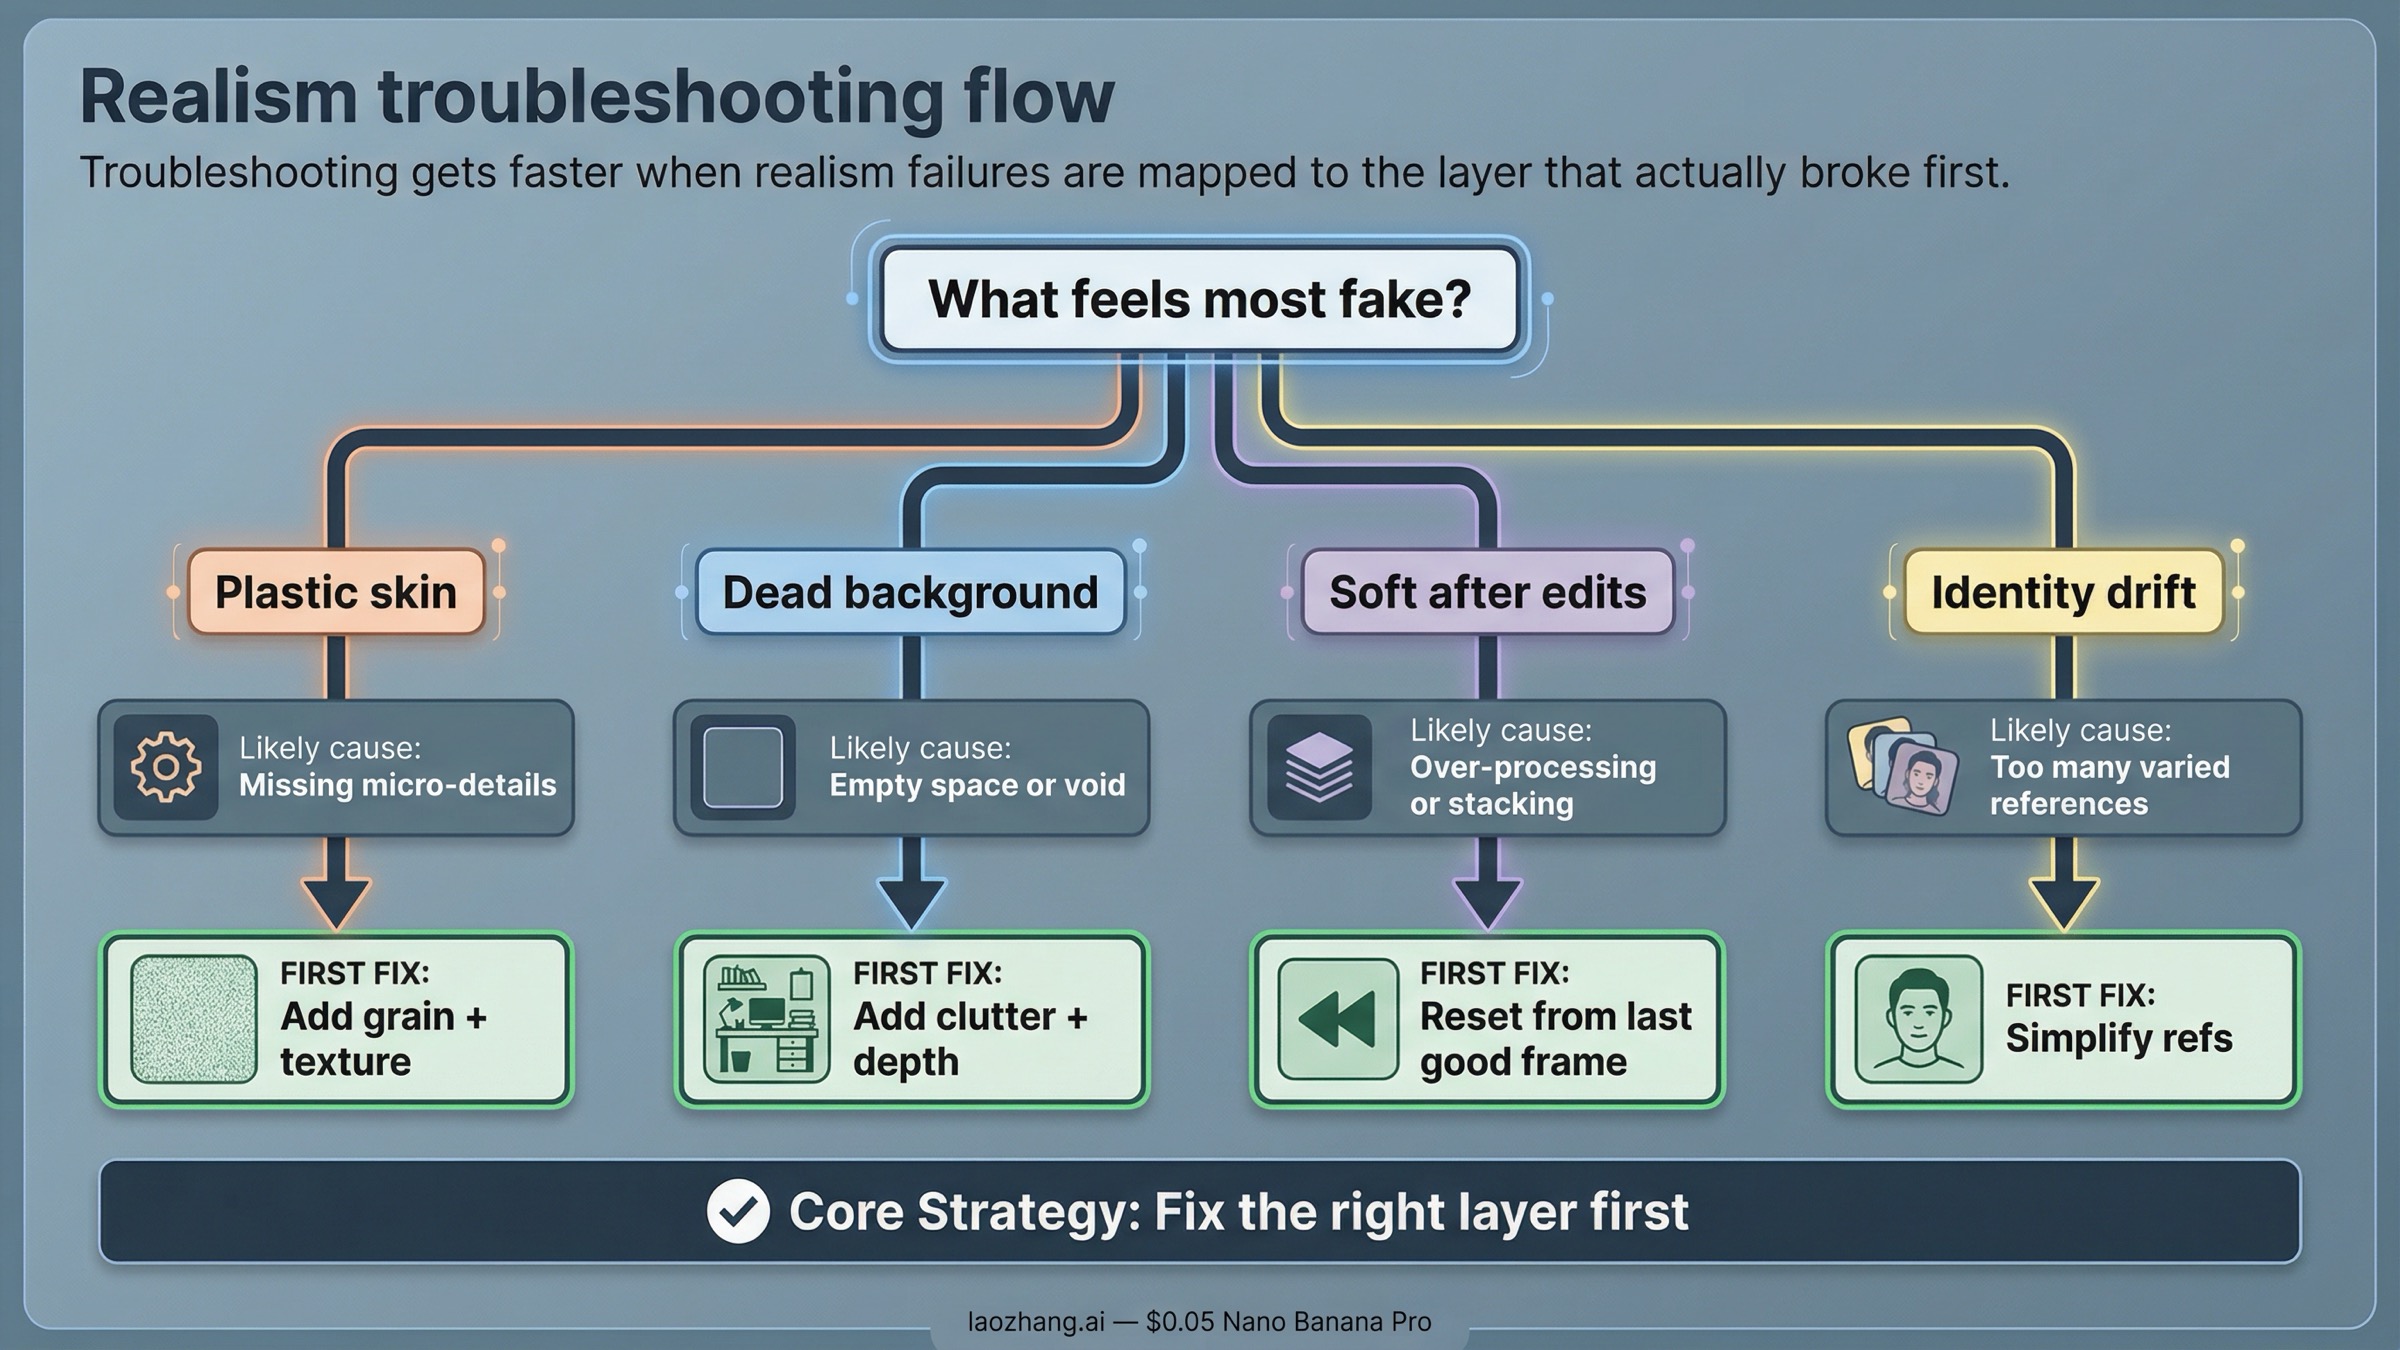
realism failure は見た目こそ違っても、だいたい原因は同じです。scene が抽象的すぎる、camera や light の logic が弱い、画像が polished すぎる、または同時に守るべき条件が多すぎる。このどれかに当たることが多いです。
全部を書き直す前に、次の diagnosis table を使うと整理しやすいです。
| 症状 | よくある原因 | 最初に変えること |
|---|---|---|
| skin が waxy、plastic に見える | beauty language が強すぎて texture cue が弱い | extra style words を減らし、natural skin texture と uneven light を足す |
| background が空っぽで fake | scene の説明が薄く、最適化されすぎている | location に属する real objects や small clutter を足す |
| きれいだが believable ではない | style が physical shot を上書きしている | 先に scene と camera を作り直し、そのあとで style を戻す |
| angle を変えたら detail が落ちた | follow-up transform が texture を保持せず再解釈した | 最後の good frame を reference にして Pro で angle を再生成する |
| edits を重ねると soft になる | 同じ branch で turns が多すぎる | best previous frame に戻って shorter prompt で次の change だけ行う |
| face や product が drift する | references が多すぎるか competing している | minimum identity lock まで reference set を減らす |
| material texture が消える | texture cue が explicit でない | material の texture を直接書き、decorative style を減らす |
一番大事なのは、一度に 1 layer だけ変えることです。fake に見えたら、すぐ another reference を足すのではなく、scene を確認する。scene が十分なら light を直す。light が十分なら texture を直す。identity が崩れたら references を減らす。angle change で soft になったら long edit chain を切る。こういう順番の方が速いです。
giant prompt が disappointing なのは、全部の layer を 1 か所に埋めて troubleshooting を難しくするからです。layered workflow は strong result を出しやすいだけでなく、壊れたときに原因も見つけやすいです。
運用上の caveat もあります。2026年3月28日 時点で、Google の pricing page は Nano Banana Pro を preview model として扱い、preview models には stricter rate limits があり得ると明記しています。rate-limits page も、実際の limits は usage tier と AI Studio で確認すべきだとしています。つまり、ある日の output quality のぶれは prompt だけでなく preview surface 側の事情も混ざる可能性があります。理由が見えない degrade が出たら、workflow 全体を作り直す前に clean retry を試す価値があります。
もし問題が quality drop ではなく refusal や safety block なら、見るべきページは別です。その場合は image generation refused と image safety error の方が近いです。
Pro にお金を払うべきときと Nano Banana 2 で十分なとき
この keyword の本当の論点は specs ではありません。Nano Banana Pro が、realistic image を作るうえで wasted attempts をどれだけ減らしてくれるか、です。
Nano Banana Pro を使う価値が高いのは次のようなケースです。
- identity が重要な realistic portrait
- material fidelity が重要な product や lifestyle image
- poster、ad、editorial visual のように output 自体が deliverable の仕事
- composition や instruction が複雑で、cheap model だと崩れやすい case
Nano Banana 2 で足りることが多いのは次のようなケースです。
- まだ scene を探っている ideation phase
- light、layout、mood の quick test
- 高回転で大量に捨てる前提の iteration
- final shot を決める前の early draft
公式の pricing page では、2026年3月28日 時点で Nano Banana Pro の価格は 1K/2K image が $0.134、4K image が $0.24 とされています。これは final asset を作るなら妥当ですが、scene を guess し続ける用途には高いです。
簡単な decision rule はこうです。
- まだ shot を探しているなら、まず cheap か fast な route を使う。
- もう shot は決まっていて realism 自体が目的なら、Pro に移って workflow をきれいに保つ。
結局、nano banana pro realistic images の quality は magical prompt より sequence に左右されます。scene を現実に起こったことのように書き、camera と light を写真の logic で足し、texture と imperfections を scene に合わせて入れ、最後に必要な reference だけを使う。この順番の方が、長い 1 文よりずっと再現性があります。
次の一歩は、何がまだ詰まっているかで変わります。
- prompt の作り方全般を詰めたいなら Nano Banana Pro prompt mastery
- references を本格的に使い分けたいなら Nano Banana Pro reference images
- style transfer を詰めたいなら Nano Banana Pro clone image style
- 出力サイズを考えたいなら Nano Banana Pro 4K image generation guide
- 実装側を進めたいなら Nano Banana Pro API setup
覚えておくべきなのは順番です。最初の render が fake に見えたら、多くの場合は "もっと足す" ではなく "一度減らして scene を作り直す" 方が正解です。