Google's Nano Banana 2 represents a breakthrough in AI image generation that's now available directly within ComfyUI workflows. Whether you're looking to generate images from text prompts, edit existing images with natural language, or maintain character consistency across multiple generations, this guide will walk you through everything you need to know to get started and master these powerful capabilities.
What is Nano Banana 2?
The name "Nano Banana" originated as an internal code name at Google that stuck with the community. Specifically, "Nano Banana" refers to Google's Gemini 2.5 Flash Image model, while "Nano Banana Pro" (sometimes called Nano Banana 2) refers to the more advanced Gemini 3 Pro Image model. Both models have been integrated into ComfyUI through official Partner Nodes, making them accessible to the node-based workflow community.
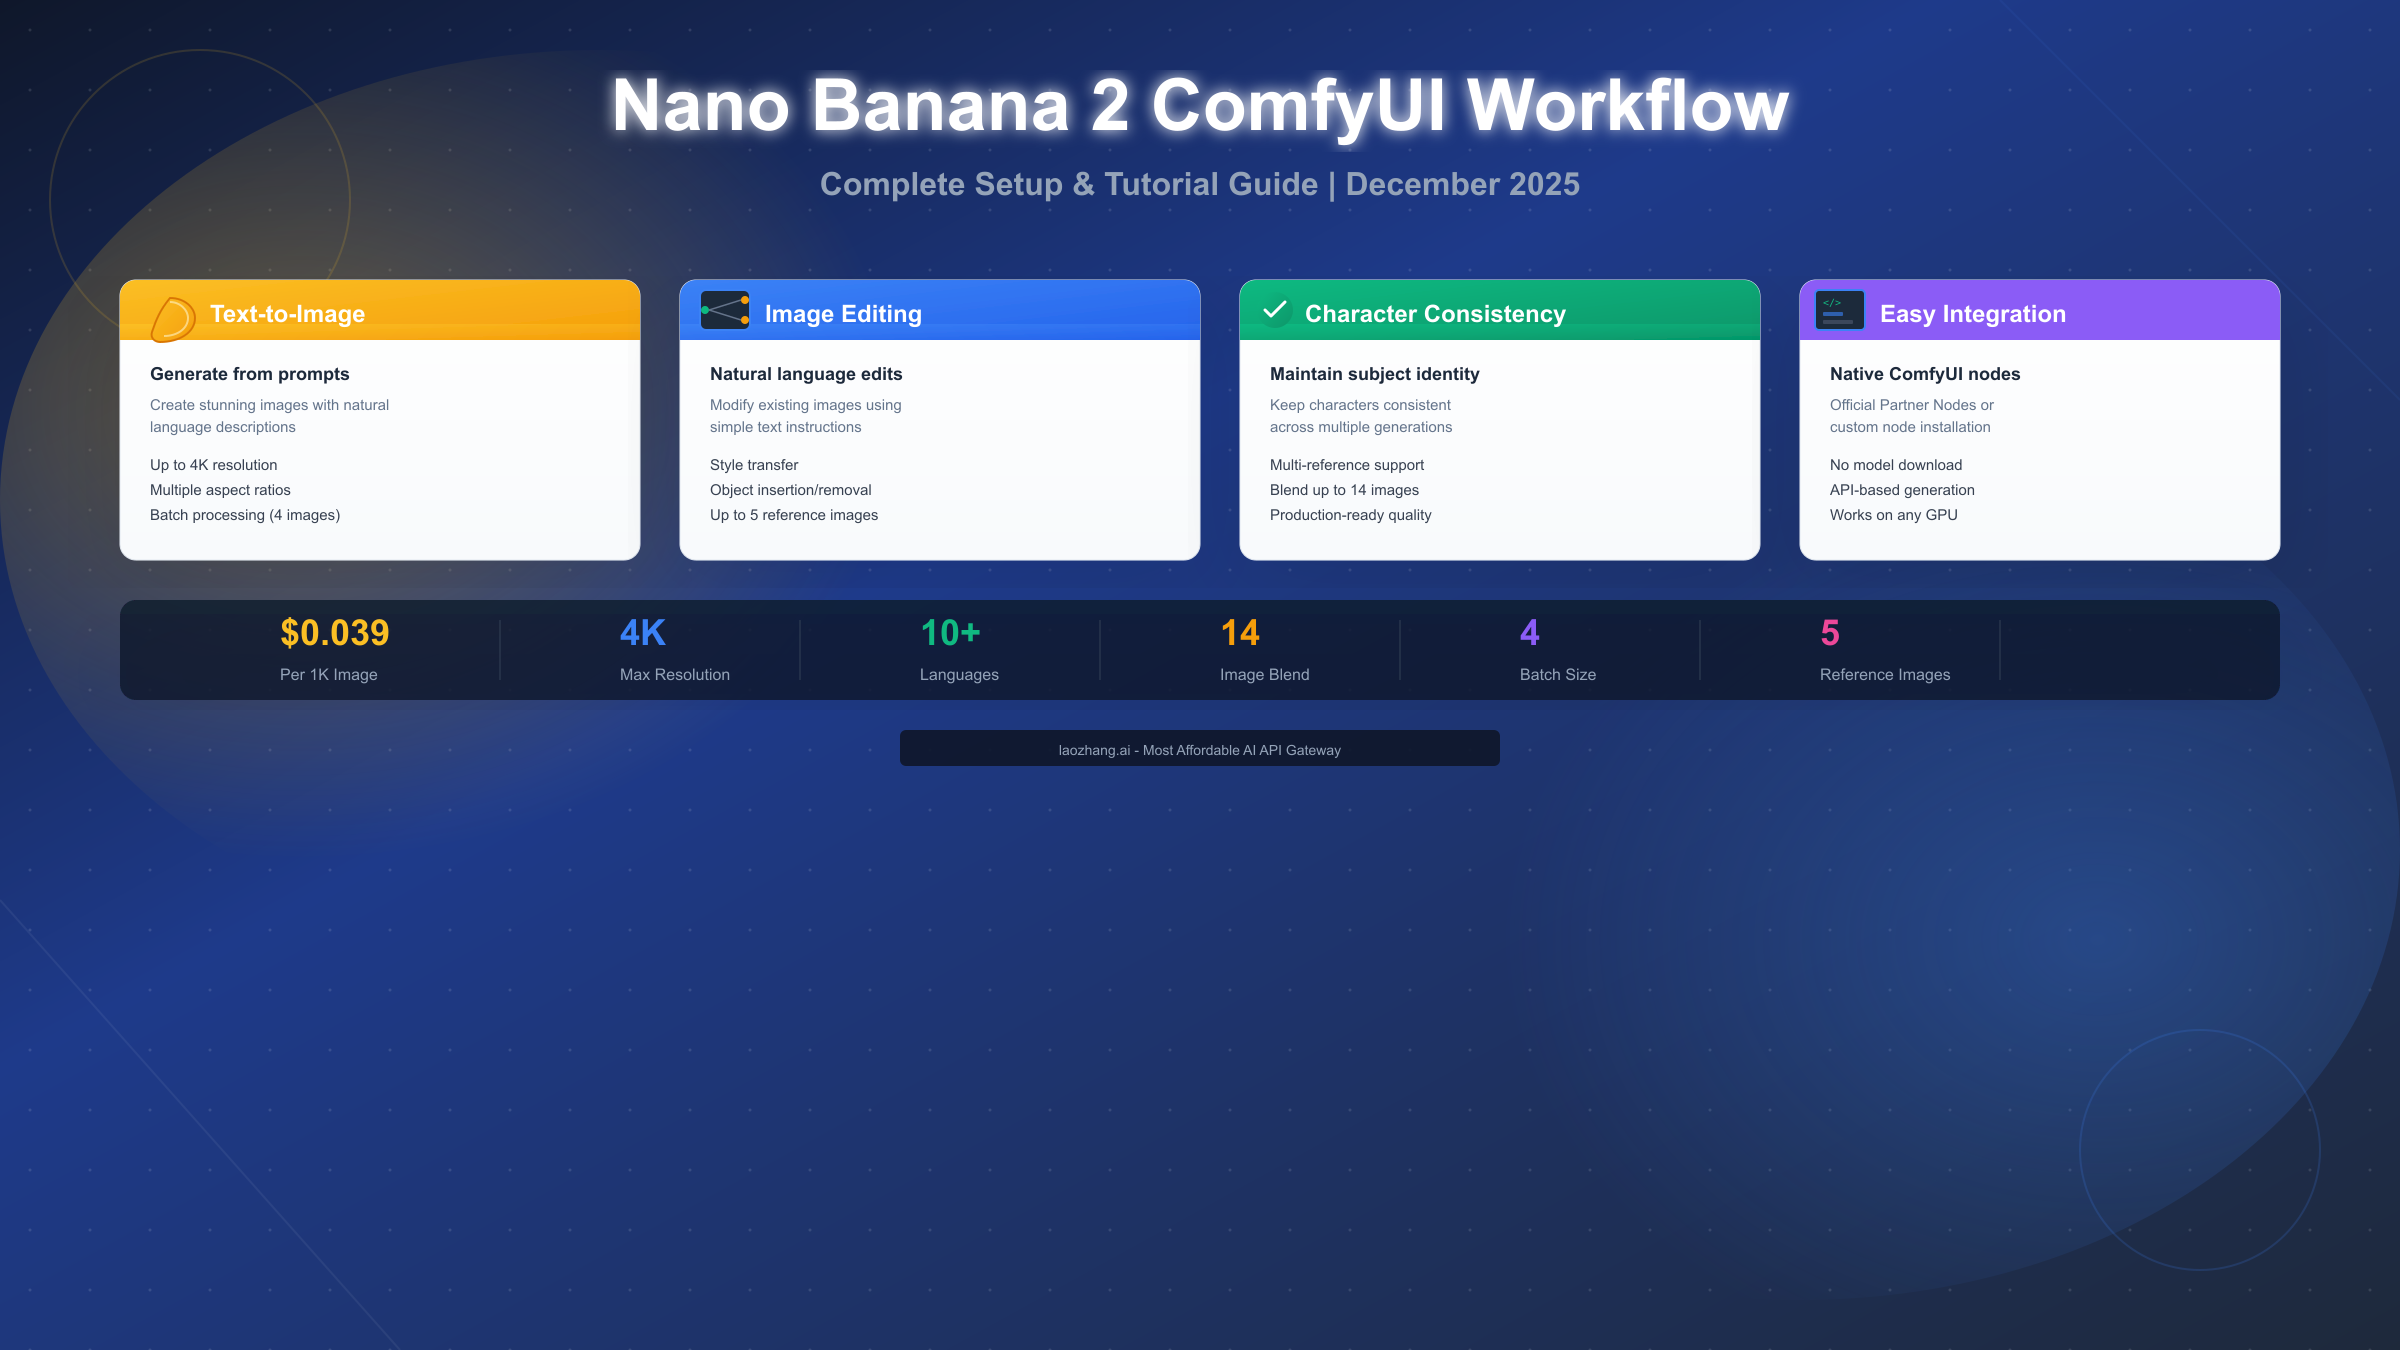
According to Google's official developer documentation (developers.googleblog.com/en/introducing-gemini-2-5-flash-image/), Gemini 2.5 Flash Image offers state-of-the-art image generation with several distinctive capabilities. The model can generate images from text descriptions, edit existing images using natural language instructions, perform style transfer between images, and maintain character consistency across multiple generations. This makes it particularly valuable for creative workflows where you need coherent visual storytelling.
The key difference between Nano Banana and Nano Banana Pro lies in their output quality and pricing. The standard version outputs images up to approximately 1024 pixels in the longest dimension at $0.039 per image. Nano Banana Pro, built on Gemini 3 Pro, offers native 4K resolution, superior text rendering across 10 languages, and the ability to blend up to 14 reference images. These enhanced capabilities come at a higher price point of $0.13-$0.24 per image depending on resolution.
For ComfyUI users specifically, the integration is significant because it enables API-based image generation without downloading large model files. Unlike running Stable Diffusion or Flux locally, Nano Banana operates entirely through Google's API. This means you can generate high-quality images on any hardware capable of running ComfyUI itself, as the actual image generation happens on Google's servers. If you're interested in other AI image generation models, you might also want to explore our free Gemini image generation API options.
Prerequisites and Setup
Before you can start generating images with Nano Banana 2 in ComfyUI, you need to ensure your environment is properly configured. This section covers all the prerequisites and the initial setup process.
System Requirements Check
Start by verifying that your ComfyUI installation is up to date. Nano Banana integration through Partner Nodes requires the nightly version of ComfyUI. If you're using the Desktop version, the stable release with Partner Node support should be available by the time you read this. Open ComfyUI and check your version in the settings or about section. If you need to update, the ComfyUI Manager extension provides the easiest path—open the Manager, click "Update All," and restart ComfyUI after the update completes.
Python version matters for the custom node installation path. Ensure you have Python 3.10 or higher installed on your system. You can verify this by opening a terminal and running python --version or python3 --version. The ComfyUI Manager should also be installed, as it simplifies the process of installing missing nodes and dependencies.
Getting Your Google Gemini API Key
The most critical prerequisite is obtaining a paid Google Gemini API key. It's important to understand that the free tier of Gemini API does not support image generation—you must have a paid account. Here's how to get your API key:
Navigate to Google AI Studio at aistudio.google.com. Sign in with your Google account. If this is your first time, you may need to accept the terms of service. Once logged in, look for the "Get API Key" button, typically found in the left sidebar or dashboard area. Click it and follow the prompts to create a new API key.
When your key is generated, copy it immediately and store it securely. You'll need this key every time you use Nano Banana nodes in ComfyUI. Never share your API key publicly or commit it to version control systems. For detailed guidance on API key management, check our Gemini API key guide.
Environment Configuration
For security best practices, consider setting your API key as an environment variable rather than entering it directly into nodes. On macOS or Linux, add this to your shell profile:
bashexport GEMINI_API_KEY="your-api-key-here"
On Windows, use the System Properties to add it as an environment variable. Some ComfyUI nodes can read from environment variables automatically, reducing the risk of accidentally exposing your key in shared workflows.
Choosing the Right ComfyUI Node
One common source of confusion for newcomers is the variety of options available for using Nano Banana in ComfyUI. Let me break down the main choices and help you decide which is best for your needs.
Official Partner Nodes
The ComfyUI Partner Nodes represent the official integration, developed in collaboration between the ComfyUI team and Google. This is the recommended starting point for most users. To access them, update ComfyUI to the latest version, then double-click on your canvas and search for "Google Gemini Image." The node should appear in the search results if your installation is current.
The Partner Nodes offer several advantages: they're officially supported, receive updates alongside ComfyUI itself, and provide access to both Nano Banana (Gemini 2.5 Flash Image) and Nano Banana Pro (Gemini 3 Pro Image). You can also access pre-built workflow templates by going to Template → Nano Banana Pro in the ComfyUI interface.
ComfyUI-NanoBanano Custom Node
For users who want more configuration options, the ComfyUI-NanoBanano custom node by ShmuelRonen offers an alternative approach. According to the GitHub repository (github.com/ShmuelRonen/ComfyUI-NanoBanano), this node provides built-in cost tracking, support for up to 5 reference images, batch processing up to 4 images per request, and detailed parameter control.
Installation requires cloning the repository into your custom_nodes folder:
bashcd ComfyUI/custom_nodes/
git clone https://github.com/ShmuelRonen/ComfyUI-NanoBanano.git
cd ComfyUI-NanoBanano
pip install -r requirements.txt
After installation, restart ComfyUI and the Nano Banana node should appear in your node search.
Nano Banana vs Nano Banana Pro
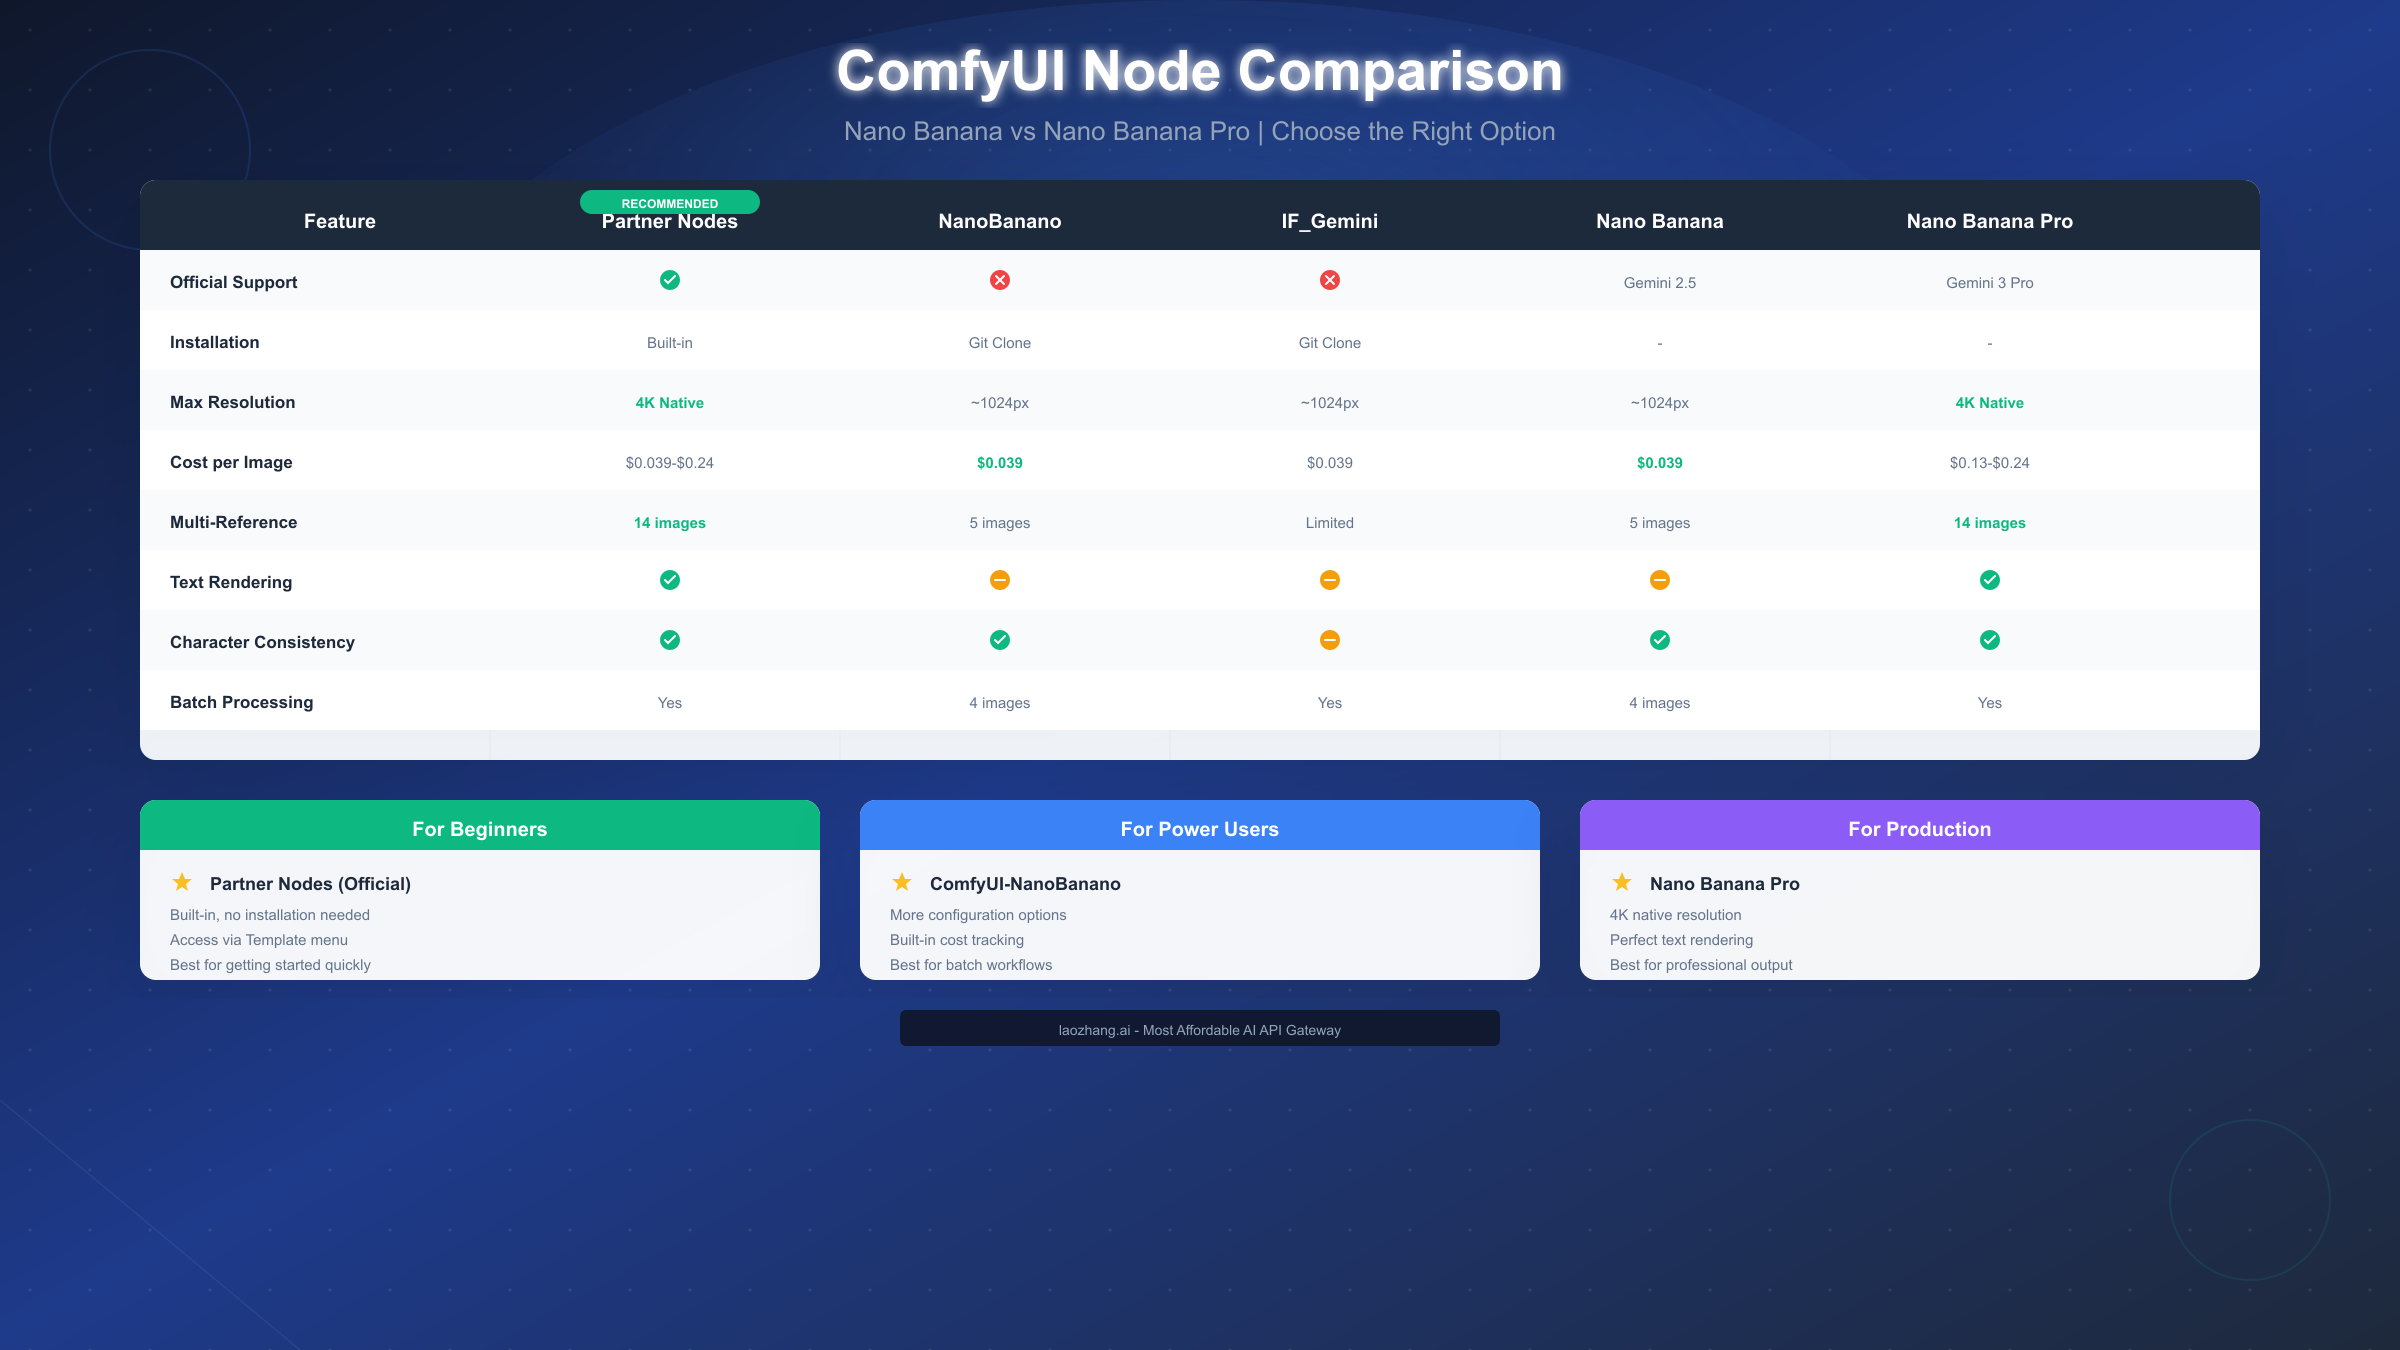
The choice between Nano Banana (Gemini 2.5 Flash Image) and Nano Banana Pro (Gemini 3 Pro Image) depends on your specific needs. Standard Nano Banana costs $0.039 per image, outputs up to approximately 1024px resolution, and provides excellent character consistency. It's ideal for rapid prototyping, concept exploration, and workflows where resolution isn't critical.
Nano Banana Pro costs $0.13-$0.24 per image depending on resolution but offers native 4K output, perfect text rendering across 10 languages, and the ability to blend up to 14 reference images. Choose this option when you need production-quality output, text-heavy images, or complex multi-reference compositions.
For users experiencing regional restrictions or seeking cost optimization, services like laozhang.ai provide API relay access to Gemini models with competitive pricing and reliable connectivity.
Your First Nano Banana Workflow
Now that you understand the options, let's create your first working workflow. I'll walk you through a basic text-to-image generation, then expand into image editing.
Basic Text-to-Image Generation
If you're using the official Partner Nodes, the fastest way to start is loading a template. In ComfyUI, go to Template → Nano Banana Pro (or search for Nano Banana in templates). This loads a pre-configured workflow with all necessary nodes connected.
The core workflow consists of a few essential nodes. The Google Gemini Image node is the heart of the workflow—this is where you'll enter your prompt and configure generation settings. Connect a Preview Image or Save Image node to see your output. You'll also need to configure your API key in the node settings.
Enter your API key in the designated field. Then write your prompt. Nano Banana excels at natural language prompts—you don't need complex prompt engineering like with some other models. For example: "A cozy coffee shop interior with morning light streaming through large windows, watercolor painting style" works well.
Set your aspect ratio based on your intended use. Options typically include 1:1 (square), 16:9 (landscape), 9:16 (portrait), 4:3, and 3:4. The default resolution varies by model version, with Pro supporting up to 4K.
Click "Queue Prompt" or press the shortcut key to generate. Within seconds, your first Nano Banana image should appear. The actual generation time depends on Google's servers, but typically ranges from 3-15 seconds.
Image Editing Workflow
Nano Banana truly shines in image editing scenarios. Unlike traditional inpainting workflows that require masks, Nano Banana uses natural language to understand what you want to change.
To set up an editing workflow, add a Load Image node and connect it to the reference input of your Gemini Image node. Then write an editing prompt that describes what you want to change. For example: "Change the wall color to deep blue" or "Add a cat sitting on the windowsill" or "Make it look like sunset lighting."
The model interprets your instructions contextually, understanding what to preserve and what to modify. This makes it particularly powerful for iterative creative work where you want to explore variations without starting from scratch.
For those familiar with ComfyUI image-to-image techniques, you'll find Nano Banana's approach complementary—it handles conceptual changes while traditional image-to-image methods excel at stylistic transfers.
Understanding Costs and Optimization
Cost management is crucial when working with API-based image generation. Let me break down the pricing structure and share strategies for optimizing your spending.
Pricing Breakdown
Google's Gemini image generation is priced per output token, with each image representing approximately 1,290 output tokens. In practical terms, this translates to the following per-image costs:
Nano Banana (Gemini 2.5 Flash Image):
- Standard output: $0.039 per image
Nano Banana Pro (Gemini 3 Pro Image):
- 1K resolution: $0.134 per image
- 2K resolution: $0.134 per image
- 4K resolution: $0.24 per image
Budget Planning Examples
Let me put these numbers in context with real-world scenarios:
For a freelance designer exploring concepts, generating 50 variations at standard resolution costs approximately $2.00 with Nano Banana or $6.70 with Nano Banana Pro. A small project requiring 200 production-quality images at 4K would cost roughly $48.00 with Nano Banana Pro.
If you're on a tight budget, consider using standard Nano Banana for exploration and iteration, then switching to Pro only for final production outputs. This hybrid approach can reduce costs by 60-70% while maintaining quality where it matters most.
Cost Optimization Strategies
Several strategies can help minimize your API spending. First, batch your prompts when possible. Instead of generating one image at a time, use batch processing (supported by custom nodes like NanoBanano) to generate up to 4 images per request. This doesn't reduce the per-image cost but improves workflow efficiency.
Second, use the appropriate model for each task. Character exploration and rough concepts work fine at lower resolutions. Reserve 4K Pro generation for final outputs. Third, refine your prompts before generating. Each generation costs money, so spending extra time on prompt crafting pays off.
API relay services like laozhang.ai can offer competitive rates for high-volume users, sometimes providing significant savings over direct Google API access while maintaining reliability and speed.
Advanced Workflows and Techniques
Once you've mastered the basics, several advanced techniques can elevate your Nano Banana workflows.
Multi-Reference Image Composition
One of Nano Banana's most powerful features is multi-reference support. You can provide up to 5 reference images (14 with Pro) to guide generation. This enables sophisticated workflows like consistent character design across scenes, style transfer from multiple sources, or product visualization with specific materials and environments.
To set this up, add multiple Load Image nodes to your workflow and connect them to the reference inputs. Your prompt should then describe how to combine these references: "Generate a character with the face from reference 1, wearing the clothing from reference 2, in the environment from reference 3."
Style Transfer Techniques
For style transfer, load a style reference image and prompt the model to apply that style to your generation or editing target. The natural language interface makes this intuitive: "Apply the art style from the reference image to create a portrait of a young woman."
Unlike traditional neural style transfer, Nano Banana's approach preserves semantic meaning while transferring stylistic elements. This means a "watercolor style" transfer actually mimics watercolor techniques rather than just blurring and shifting colors.
Chaining with Other Models
Advanced users can chain Nano Banana with other ComfyUI nodes for hybrid workflows. For instance, you might use Nano Banana for initial composition, then apply local model refinement for specific details. Or use it for rapid iteration before sending selected concepts to Flux for high-fidelity rendering.
The API-based nature of Nano Banana means it doesn't consume local GPU resources during generation. This allows you to queue Nano Banana generations while running local models simultaneously, potentially doubling your effective throughput.
For users interested in comparing with other AI image generation APIs, our guide on GPT Image 1 in ComfyUI provides another perspective on API-based image generation workflows.
Troubleshooting Common Issues
Even with proper setup, you may encounter issues. This section covers the most common problems and their solutions.
API Key Errors
If you see "Invalid API Key" or authentication errors, first verify your key is correct by testing it directly at Google AI Studio. Ensure there are no extra spaces before or after the key when pasting. If you're using environment variables, confirm they're set correctly by printing them in a terminal.
Remember that free-tier Gemini API keys do not support image generation. You must have a paid account. If you recently created your account, there may be a short delay before image generation is enabled.
Rate Limiting
"Rate limit exceeded" errors occur when you've hit Google's API quotas. These limits vary by account tier. Solutions include waiting a few minutes before retrying, implementing exponential backoff in automated workflows, or upgrading your API tier for higher limits.
Using API relay services can help distribute load and avoid single-point rate limiting. Services like laozhang.ai maintain multiple API endpoints, potentially providing more consistent availability.
Generation Failures
If images fail to generate without clear errors, check your prompt for content that might trigger safety filters. Gemini has content policies that restrict certain types of generations. Try simplifying your prompt or removing potentially problematic elements.
Also verify your network connection is stable. API-based generation requires consistent connectivity throughout the request. VPN connections can sometimes cause issues—try disconnecting your VPN if you're using one.
Node Not Found
If you can't find the Nano Banana nodes after installation, first ensure you've restarted ComfyUI completely. Check the console output for any error messages during startup that might indicate failed node loading.
For custom nodes, verify all dependencies installed correctly by running pip install -r requirements.txt again in the node directory. For Partner Nodes, confirm you're running a sufficiently recent version of ComfyUI—these nodes require the nightly build or later stable releases.
Summary and Next Steps
Nano Banana 2 integration brings Google's cutting-edge Gemini image generation directly into ComfyUI's powerful node-based workflow system. Whether you choose the official Partner Nodes for simplicity or custom nodes for advanced control, you now have access to state-of-the-art AI image generation and editing capabilities.
Quick Start Checklist
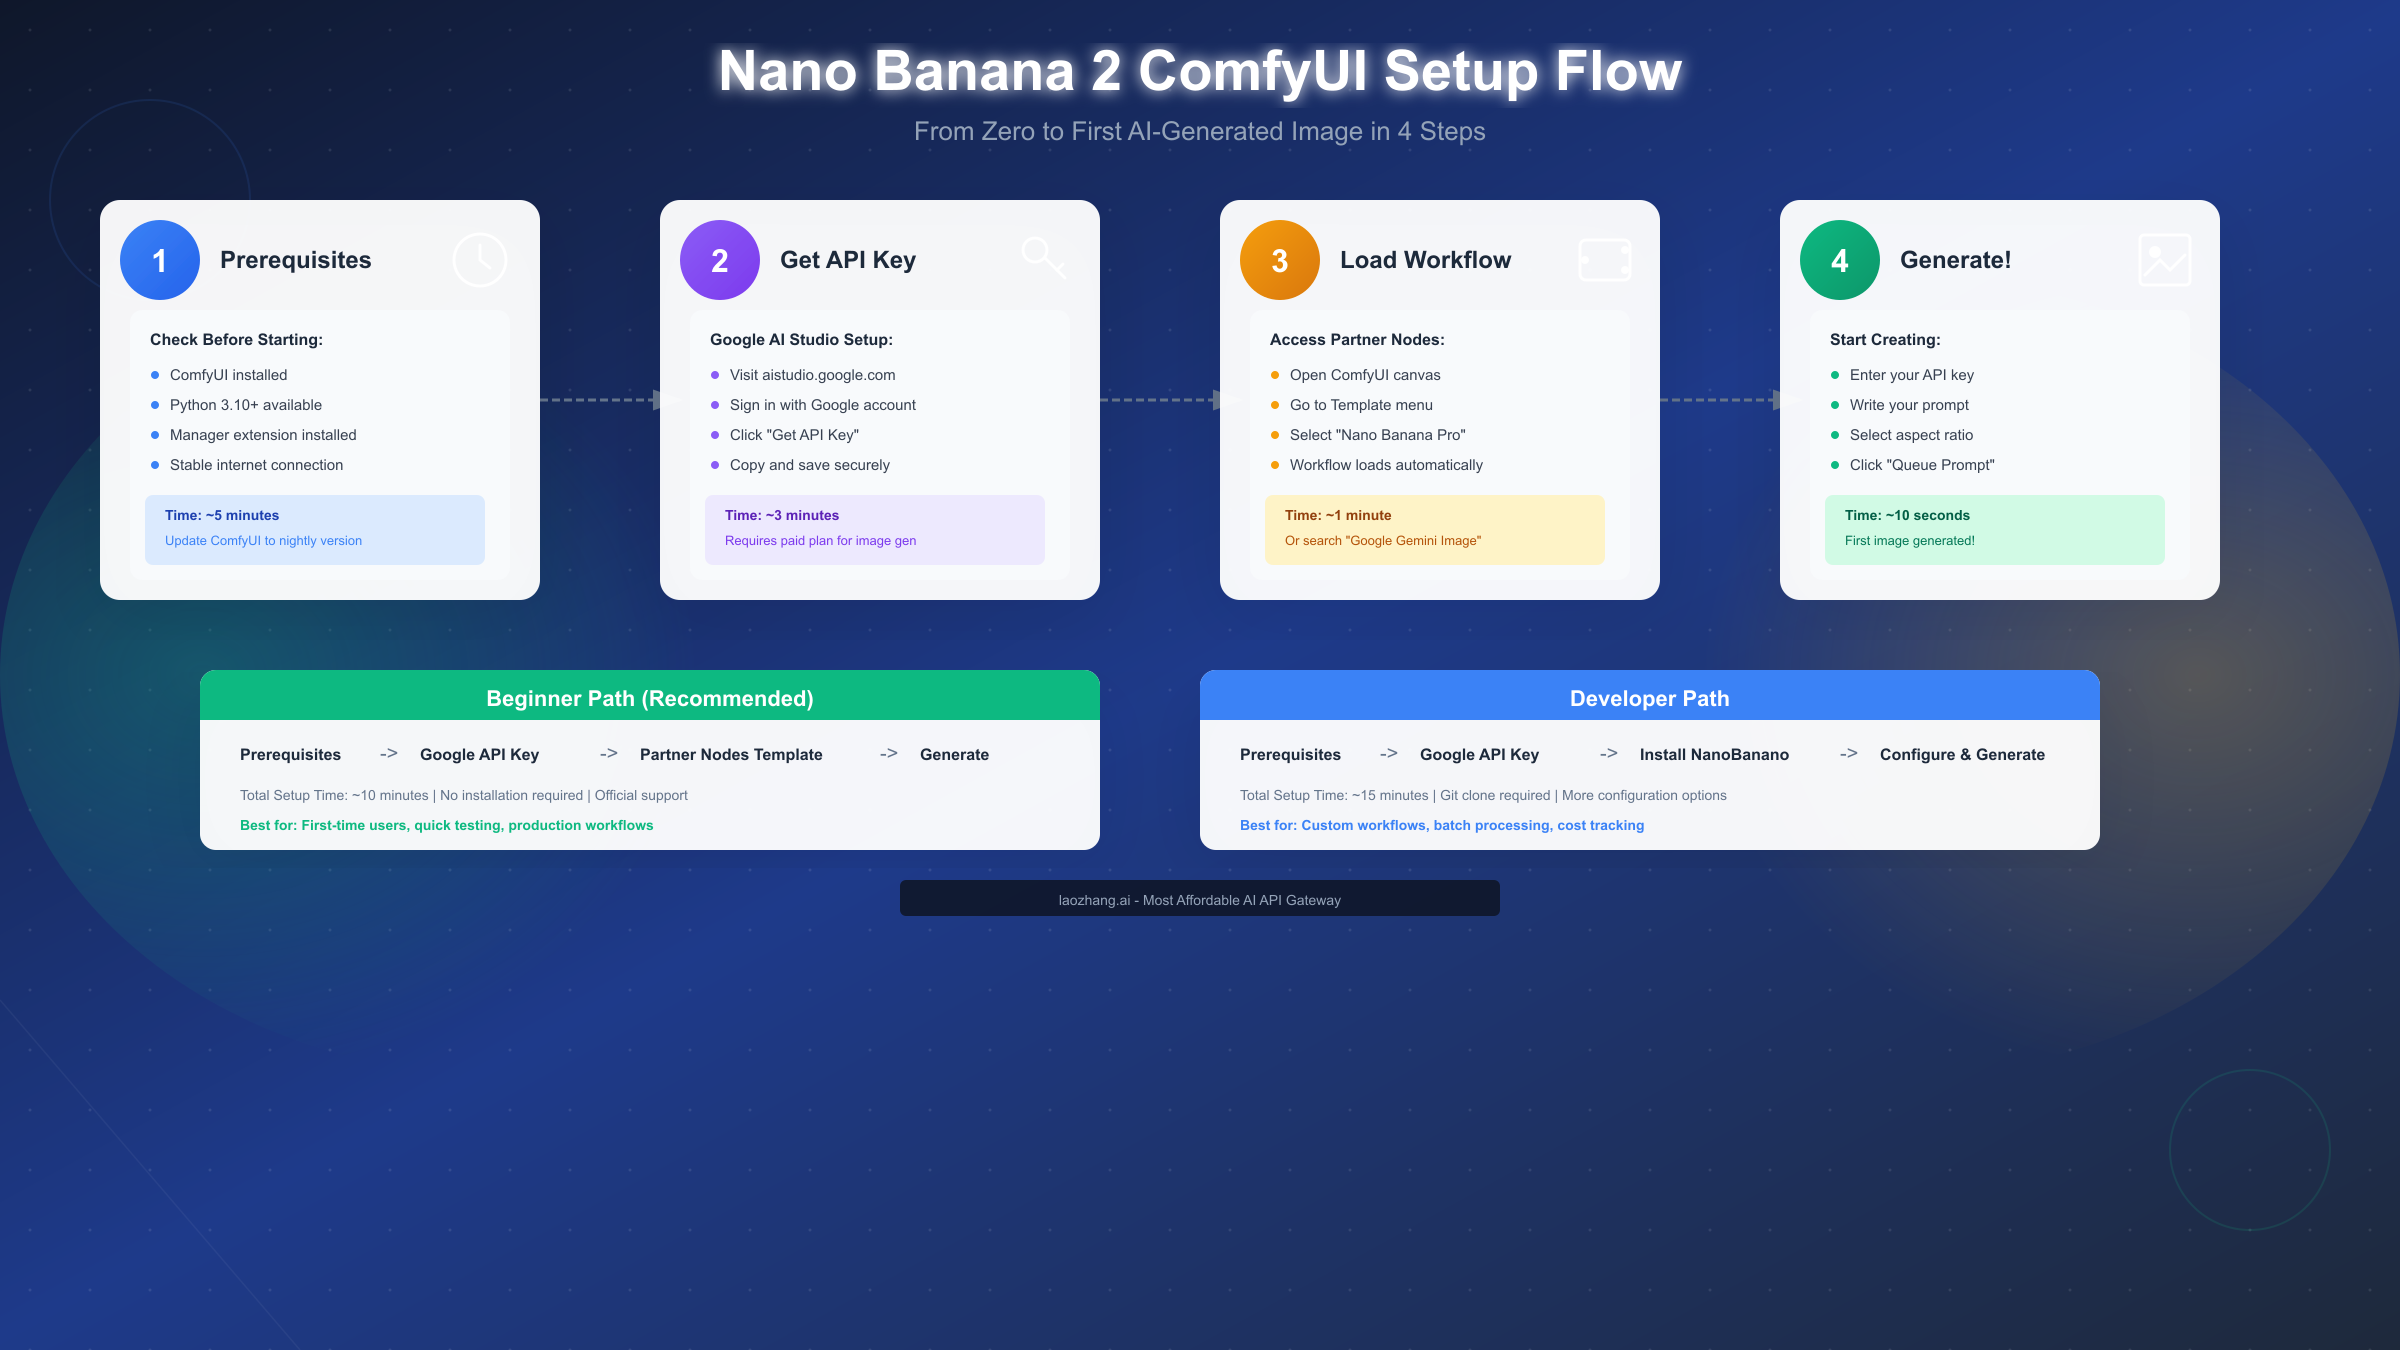
To get generating as quickly as possible, follow these steps in order:
- Update ComfyUI to the latest version
- Obtain a paid Google Gemini API key from aistudio.google.com
- Access Partner Nodes via Template → Nano Banana Pro, or install ComfyUI-NanoBanano
- Enter your API key and write your first prompt
- Click Queue Prompt and watch the magic happen
Choosing Your Path
For beginners and those wanting official support, start with Partner Nodes. The built-in templates provide immediate functionality with minimal setup. For power users needing batch processing, cost tracking, and advanced configuration, ComfyUI-NanoBanano offers more control.
For production work requiring 4K resolution and perfect text rendering, invest in Nano Banana Pro. For exploration and iteration, standard Nano Banana provides excellent quality at a fraction of the cost.
Continuing Your Learning
As you become comfortable with basic workflows, explore multi-reference compositions, style transfer techniques, and hybrid workflows combining Nano Banana with local models. The ComfyUI ecosystem offers endless possibilities for creative experimentation.
For comprehensive coverage of other AI image generation approaches, explore our guide on AI video model comparison to see how image generation fits into the broader creative AI landscape.
The combination of ComfyUI's flexible node system and Nano Banana's powerful API creates a workflow environment where the only limit is your imagination. Start with the basics covered in this guide, and you'll soon be creating AI-generated imagery that rivals professional results—all from your own ComfyUI installation.