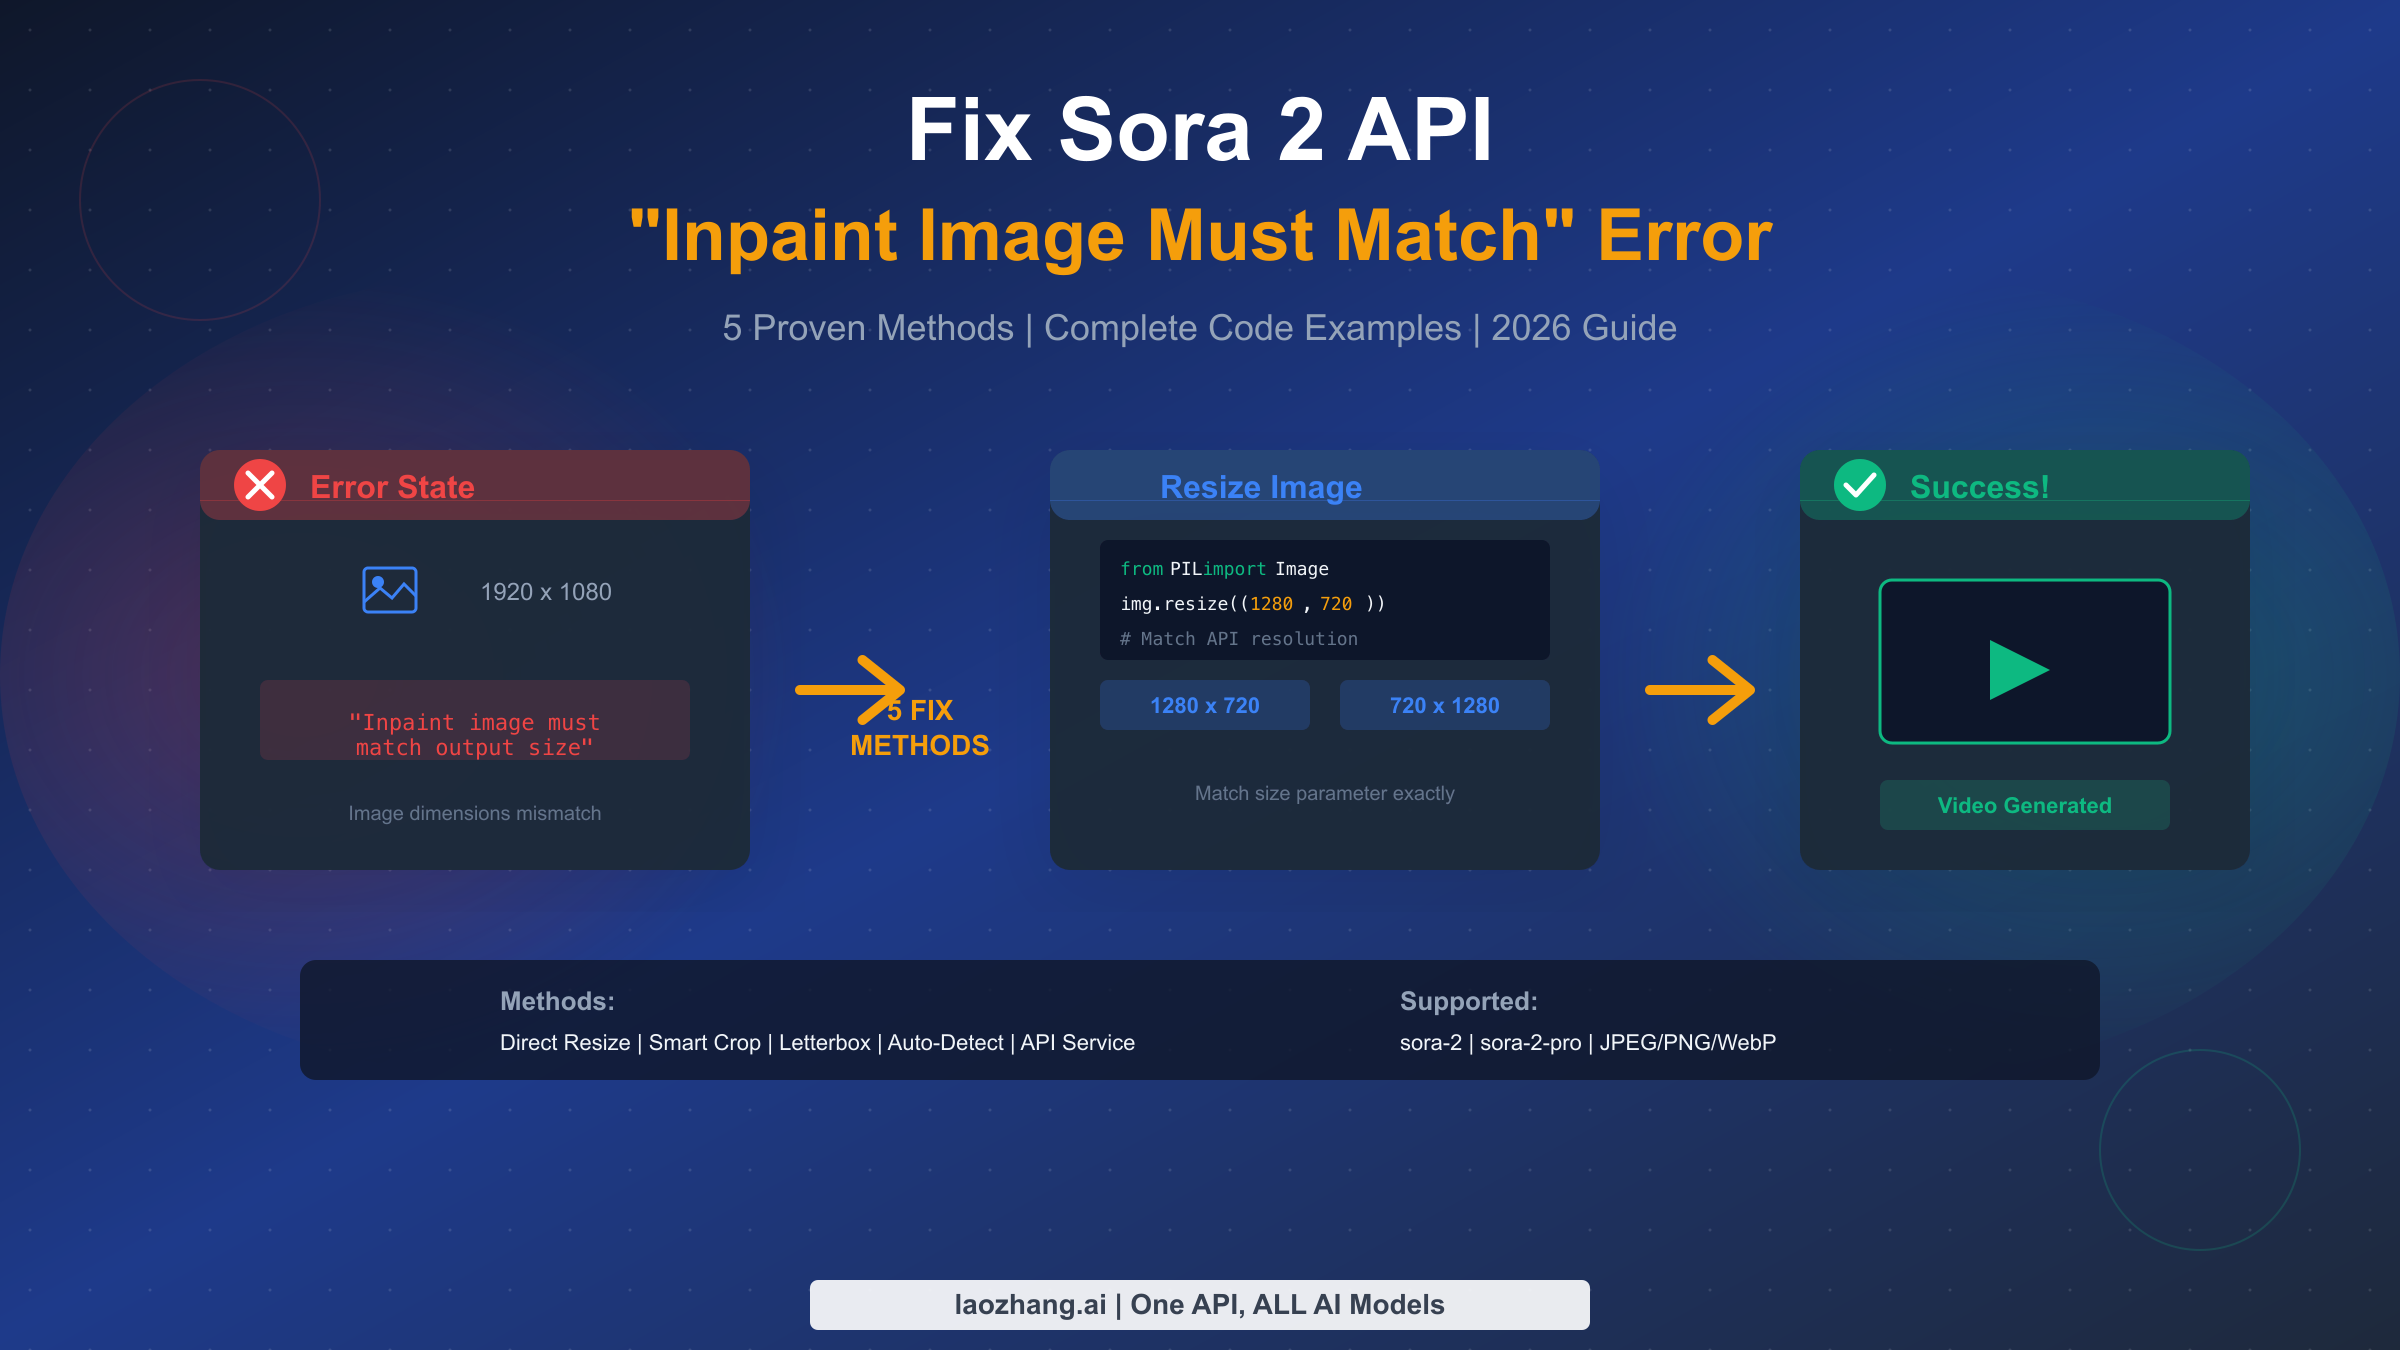
The "Inpaint image must match" error in Sora 2 API occurs when your input image dimensions don't match the specified video resolution. This is one of the most common errors developers encounter when using OpenAI's video generation API, but fortunately, it's also one of the easiest to fix. In this comprehensive guide, we'll cover five proven methods to resolve this error, from simple resizing to intelligent auto-detection, with complete Python code you can use immediately in your projects.
TL;DR
If you're in a hurry, here's the quick fix: the Sora 2 API requires your input image dimensions to exactly match the size parameter in your API request. For landscape videos, resize your image to 1280×720 pixels; for portrait videos, use 720×1280 pixels. The sora-2-pro model additionally supports 1792×1024 and 1024×1792 for higher resolution output. The most common cause of this error is uploading images with different dimensions than what you've specified in the API call, so always verify both values match before submitting your request.
Understanding the "Inpaint Image Must Match" Error
Before diving into solutions, it's essential to understand why this error occurs and what the Sora 2 API actually expects from your input images. This understanding will help you prevent the error from happening in the first place and troubleshoot more effectively when it does occur.
The Sora 2 API's image-to-video functionality uses a process similar to inpainting in image generation models. When you provide an input image via the input_reference parameter, the API uses this image as an anchor for the first frame of your video. The model then generates subsequent frames based on your text prompt while maintaining visual consistency with the reference image. This process requires the input image to have specific dimensions that align with the output video resolution.
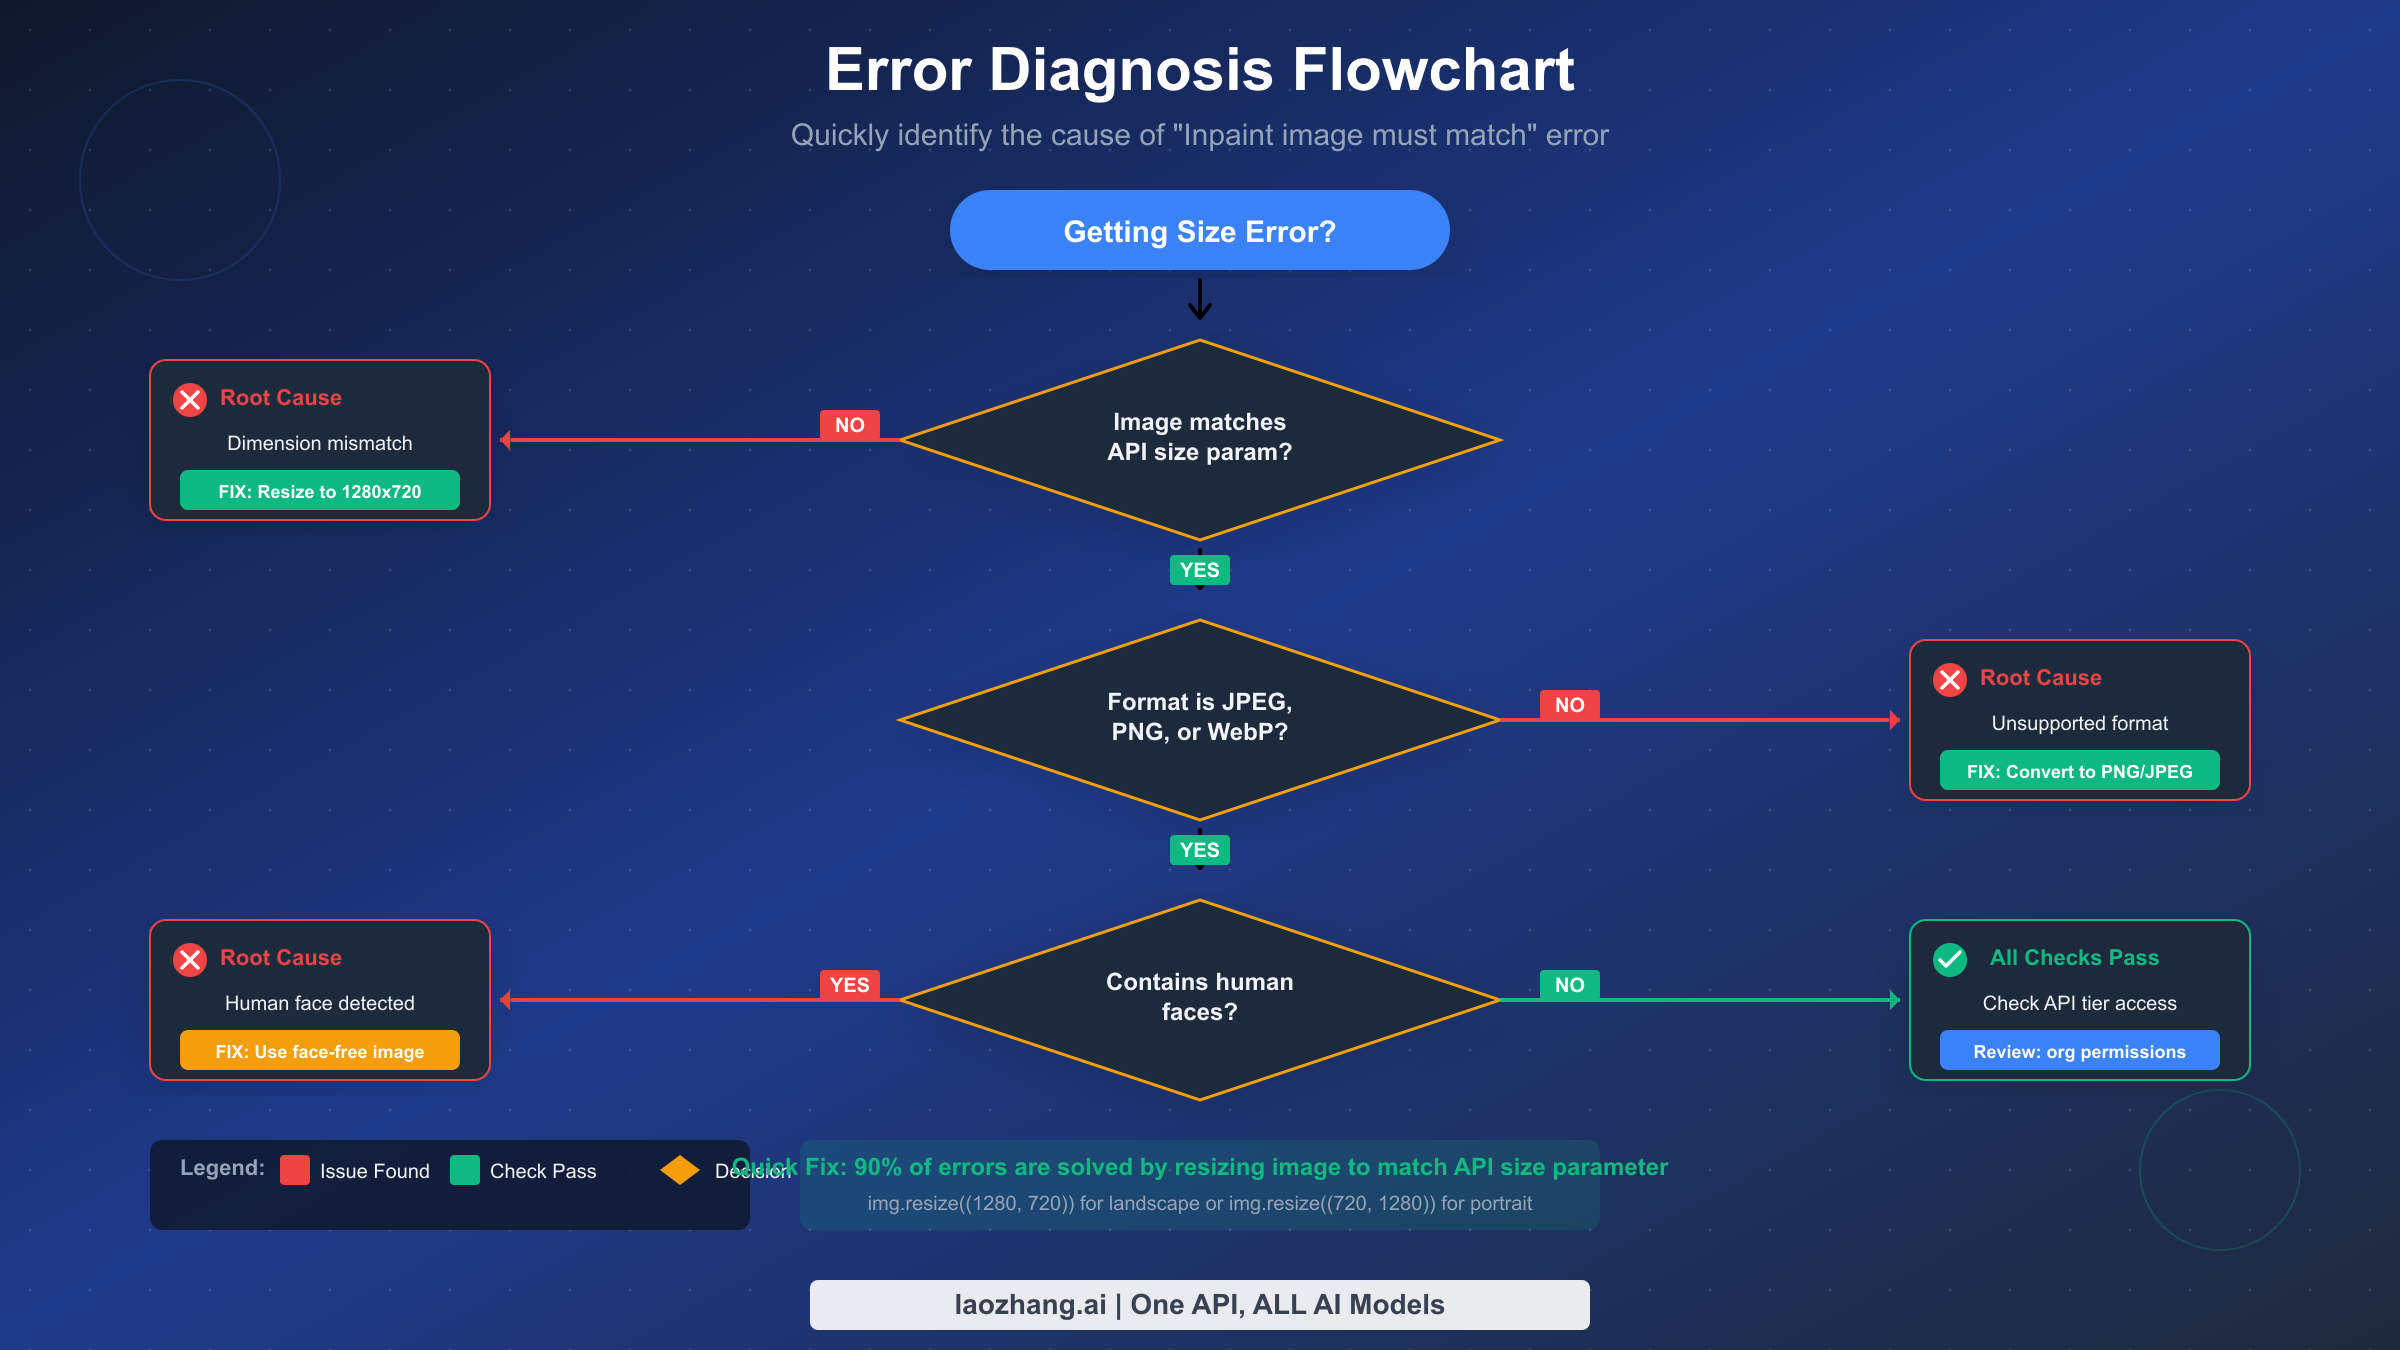
When you submit an API request with an image that doesn't match the expected dimensions, you'll typically see one of these error messages:
Common Error Messages:
| Error Message | Cause |
|---|---|
| "Inpaint image must match output size" | Image dimensions differ from size parameter |
| "Input must match the output size" | Same as above (Azure variant) |
| "The image must match the target video's resolution" | Documentation-style description |
| 400 Bad Request with validation error | Generic dimension mismatch |
The error occurs because the underlying video generation model has been trained to work with specific aspect ratios and resolutions. Unlike some image generation models that can adapt to various input sizes, Sora 2's architecture requires precise dimension matching to maintain video quality and temporal consistency across frames.
Understanding this technical constraint helps explain why the fix is straightforward: you simply need to ensure your input image has the exact same pixel dimensions as the resolution you're requesting in your API call. If you're working on building a complete image-to-video pipeline, consider reading our complete Sora 2 image-to-video tutorial for a comprehensive overview of the entire workflow.
Complete Sora 2 API Resolution Reference
Before implementing any fix, you need to know exactly which resolutions are supported by each Sora 2 model variant. The following table provides a complete reference of all supported resolutions, helping you choose the right dimensions for your use case.
Sora 2 (Standard) Supported Resolutions:
| Resolution | Aspect Ratio | Orientation | Best Use Case | Price |
|---|---|---|---|---|
| 1280 × 720 | 16:9 | Landscape | YouTube, Desktop | $0.10/sec |
| 720 × 1280 | 9:16 | Portrait | TikTok, Reels, Stories | $0.10/sec |
Sora 2 Pro Supported Resolutions:
| Resolution | Aspect Ratio | Orientation | Best Use Case | Price |
|---|---|---|---|---|
| 1280 × 720 | 16:9 | Landscape | HD Marketing | $0.30/sec |
| 720 × 1280 | 9:16 | Portrait | Social Media | $0.30/sec |
| 1792 × 1024 | ~16:9 | Landscape | Cinematic, Ads | $0.50/sec |
| 1024 × 1792 | ~9:16 | Portrait | Premium Vertical | $0.50/sec |
The critical rule to remember is that your input image must have exactly the same pixel dimensions as the resolution you specify in the API's size parameter. There's no tolerance for "close enough"—an image that's 1280×719 will be rejected just as surely as one that's 1920×1080.
Supported Image Formats:
The API accepts three image formats: JPEG, PNG, and WebP. Each has its advantages for different scenarios. JPEG offers the best balance of quality and file size for photographs, PNG preserves transparency and is lossless, while WebP provides modern compression. Regardless of format, the maximum file size is 20MB, though keeping files under 2MB typically results in faster processing without noticeable quality loss.
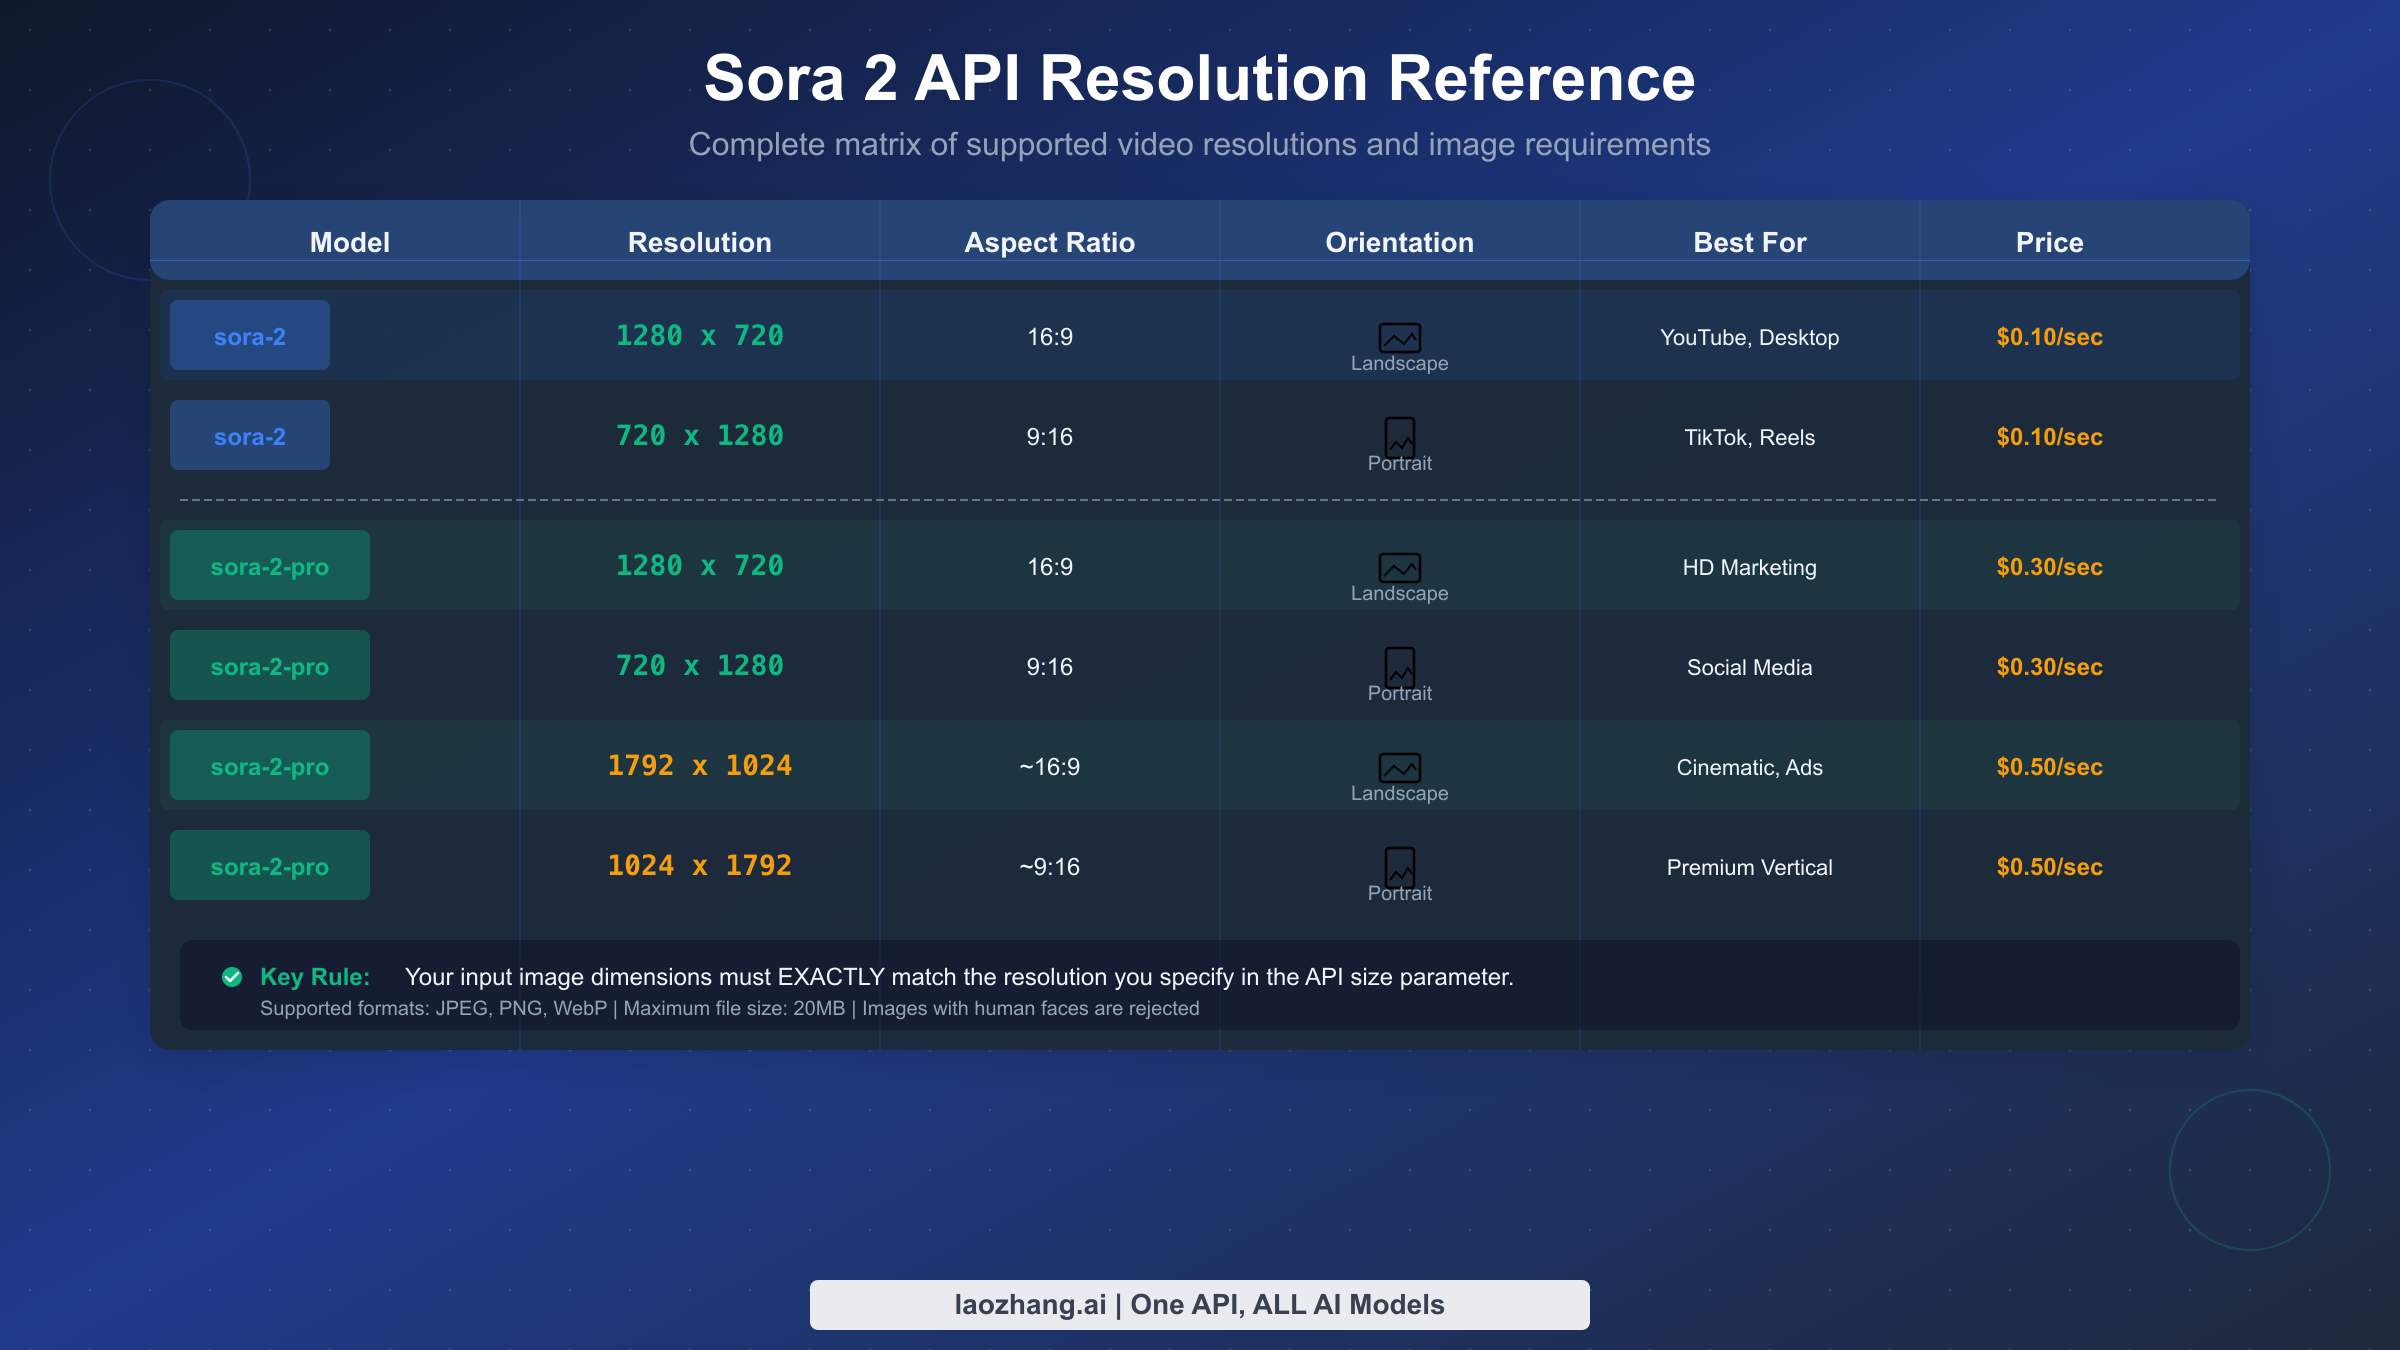
One important restriction to note: input images containing identifiable human faces are currently rejected by the API. This is a content policy limitation, not a technical one, so you'll need to use images without human faces or apply face detection and removal before submission.
Method 1: Direct Image Resize with Pillow
The most straightforward solution to the size mismatch error is to resize your image to match the target resolution exactly. This method works for the vast majority of cases and should be your first approach when encountering this error.
Using Python's Pillow library, you can create a robust resize function that handles various edge cases and ensures your images are properly formatted for the Sora 2 API. The following code provides a production-ready implementation that you can integrate directly into your workflow.
pythonfrom PIL import Image
import io

def resize_image_for_sora(
    image_path: str,
    target_resolution: str = "1280x720",
    output_path: str = None,
    resample: int = Image.LANCZOS
) -> bytes:
    """
    Resize an image to match Sora 2 API resolution requirements.

    Args:
        image_path: Path to the input image file
        target_resolution: Target resolution as "WIDTHxHEIGHT" string
                          Supported: "1280x720", "720x1280", "1792x1024", "1024x1792"
        output_path: Optional path to save the resized image
        resample: PIL resampling filter (LANCZOS recommended for quality)

    Returns:
        Bytes of the resized image in PNG format

    Raises:
        ValueError: If target_resolution is not supported
    """
    # Parse target dimensions
    supported_resolutions = {
        "1280x720": (1280, 720),
        "720x1280": (720, 1280),
        "1792x1024": (1792, 1024),
        "1024x1792": (1024, 1792)
    }

    if target_resolution not in supported_resolutions:
        raise ValueError(
            f"Unsupported resolution: {target_resolution}. "
            f"Supported: {list(supported_resolutions.keys())}"
        )

    target_size = supported_resolutions[target_resolution]

    # Open and process image
    with Image.open(image_path) as img:
        # Convert RGBA to RGB if necessary (Sora doesn't support transparency)
        if img.mode == 'RGBA':
            background = Image.new('RGB', img.size, (255, 255, 255))
            background.paste(img, mask=img.split()[3])
            img = background
        elif img.mode != 'RGB':
            img = img.convert('RGB')

        # Check if resize is actually needed
        if img.size == target_size:
            print(f"Image already at target resolution {target_resolution}")
        else:
            print(f"Resizing from {img.size} to {target_size}")
            img = img.resize(target_size, resample=resample)

        # Save to file if output path provided
        if output_path:
            img.save(output_path, 'PNG', optimize=True)
            print(f"Saved resized image to {output_path}")

        # Return as bytes
        buffer = io.BytesIO()
        img.save(buffer, format='PNG', optimize=True)
        return buffer.getvalue()


if __name__ == "__main__":
    # Resize for landscape video
    image_bytes = resize_image_for_sora(
        "my_photo.jpg",
        target_resolution="1280x720",
        output_path="resized_landscape.png"
    )

    # Resize for portrait video (TikTok, Reels)
    image_bytes = resize_image_for_sora(
        "my_photo.jpg",
        target_resolution="720x1280",
        output_path="resized_portrait.png"
    )
This function handles several important edge cases that could otherwise cause issues. The RGBA to RGB conversion ensures that images with transparency are properly handled, as the Sora API doesn't support alpha channels. The LANCZOS resampling algorithm provides the best quality for both upscaling and downscaling operations, preserving detail better than simpler algorithms like NEAREST or BILINEAR.
Why This Method Works:
The resize operation transforms your input image to have exactly the dimensions expected by the API. When you specify size="1280x720" in your API request and provide an image that's been resized to 1280×720 pixels, the dimensions match perfectly, and the error disappears. The API can then use your image as the anchor frame for video generation.
Potential Drawback:
Direct resizing can distort images if the original aspect ratio differs significantly from the target. An image that's originally 1:1 (square) will appear stretched when resized to 16:9 without cropping. For situations where preserving the original aspect ratio is important, consider the smart cropping method described in the next section.
Method 2: Smart Center Cropping
When your original image has a different aspect ratio than the target resolution, direct resizing will distort the image. Smart center cropping provides an alternative that preserves the original aspect ratio by extracting the center portion of your image at the correct dimensions. This method is particularly useful when your subject matter is centered and you can afford to lose some content from the edges.
The following implementation first scales the image to the minimum size needed, then crops from the center to achieve exact target dimensions without any distortion.
pythonfrom PIL import Image
import io

def smart_crop_for_sora(
    image_path: str,
    target_resolution: str = "1280x720",
    output_path: str = None,
    focus_point: tuple = (0.5, 0.5)
) -> bytes:
    """
    Crop an image to match Sora 2 API resolution while preserving aspect ratio.

    This method scales the image to cover the target area, then crops
    from the specified focus point (default: center).

    Args:
        image_path: Path to the input image file
        target_resolution: Target resolution as "WIDTHxHEIGHT" string
        output_path: Optional path to save the cropped image
        focus_point: Tuple (x, y) from 0.0 to 1.0 indicating crop focus
                    (0.5, 0.5) = center, (0, 0) = top-left

    Returns:
        Bytes of the cropped image in PNG format
    """
    # Parse target dimensions
    supported_resolutions = {
        "1280x720": (1280, 720),
        "720x1280": (720, 1280),
        "1792x1024": (1792, 1024),
        "1024x1792": (1024, 1792)
    }

    if target_resolution not in supported_resolutions:
        raise ValueError(f"Unsupported resolution: {target_resolution}")

    target_width, target_height = supported_resolutions[target_resolution]
    target_ratio = target_width / target_height

    with Image.open(image_path) as img:
        # Handle RGBA images
        if img.mode == 'RGBA':
            background = Image.new('RGB', img.size, (255, 255, 255))
            background.paste(img, mask=img.split()[3])
            img = background
        elif img.mode != 'RGB':
            img = img.convert('RGB')

        original_width, original_height = img.size
        original_ratio = original_width / original_height

        # Determine scaling to cover target area
        if original_ratio > target_ratio:
            # Image is wider than target - scale by height
            scale_factor = target_height / original_height
            scaled_width = int(original_width * scale_factor)
            scaled_height = target_height
        else:
            # Image is taller than target - scale by width
            scale_factor = target_width / original_width
            scaled_width = target_width
            scaled_height = int(original_height * scale_factor)

        # Scale image
        img = img.resize((scaled_width, scaled_height), Image.LANCZOS)

        # Calculate crop box based on focus point
        focus_x, focus_y = focus_point

        # Calculate ideal center position
        ideal_left = int((scaled_width - target_width) * focus_x)
        ideal_top = int((scaled_height - target_height) * focus_y)

        # Ensure we don't go out of bounds
        left = max(0, min(ideal_left, scaled_width - target_width))
        top = max(0, min(ideal_top, scaled_height - target_height))
        right = left + target_width
        bottom = top + target_height

        # Crop to target size
        img = img.crop((left, top, right, bottom))

        print(f"Cropped from {original_width}x{original_height} to {target_width}x{target_height}")
        print(f"Content removed: {original_width - target_width/scale_factor:.0f}px width, "
              f"{original_height - target_height/scale_factor:.0f}px height")

        # Save if output path provided
        if output_path:
            img.save(output_path, 'PNG', optimize=True)

        # Return as bytes
        buffer = io.BytesIO()
        img.save(buffer, format='PNG', optimize=True)
        return buffer.getvalue()

# Example: Crop a square image for landscape video
image_bytes = smart_crop_for_sora(
    "square_image.png",
    target_resolution="1280x720",
    output_path="cropped_landscape.png",
    focus_point=(0.5, 0.3)  # Focus slightly above center
)
The focus_point parameter allows you to control where the crop occurs. By default, it crops from the center (0.5, 0.5), but you can adjust this if your subject is positioned elsewhere in the frame. For example, if you have a portrait photo with the subject's face in the upper third, using focus_point=(0.5, 0.3) would prioritize keeping the face in frame.
When to Use This Method:
Smart cropping is ideal when your original image is larger than the target resolution and has a different aspect ratio, but you want to preserve natural proportions. It's particularly effective for landscape photographs being converted to 16:9 video or portrait shots being prepared for 9:16 social media formats.
Method 3: Letterboxing Without Distortion
Sometimes you can't afford to lose any content from your image through cropping. Letterboxing (also called padding) provides a way to match the target dimensions while preserving your entire image by adding colored bars around the edges. This technique is commonly used in video production when fitting content from one aspect ratio into another format.
The following implementation adds padding to your image to achieve the target dimensions without any cropping or distortion, giving you complete control over the padding color.
pythonfrom PIL import Image
import io

def letterbox_for_sora(
    image_path: str,
    target_resolution: str = "1280x720",
    output_path: str = None,
    background_color: tuple = (0, 0, 0),
    position: str = "center"
) -> bytes:
    """
    Add letterbox padding to an image to match Sora 2 API resolution.

    This method preserves the entire original image by adding colored
    padding bars (letterbox or pillarbox) as needed.

    Args:
        image_path: Path to the input image file
        target_resolution: Target resolution as "WIDTHxHEIGHT" string
        output_path: Optional path to save the padded image
        background_color: RGB tuple for padding color (default: black)
        position: Where to place the original image ("center", "top", "bottom")

    Returns:
        Bytes of the letterboxed image in PNG format
    """
    supported_resolutions = {
        "1280x720": (1280, 720),
        "720x1280": (720, 1280),
        "1792x1024": (1792, 1024),
        "1024x1792": (1024, 1792)
    }

    if target_resolution not in supported_resolutions:
        raise ValueError(f"Unsupported resolution: {target_resolution}")

    target_width, target_height = supported_resolutions[target_resolution]
    target_ratio = target_width / target_height

    with Image.open(image_path) as img:
        # Handle RGBA
        if img.mode == 'RGBA':
            background = Image.new('RGB', img.size, background_color)
            background.paste(img, mask=img.split()[3])
            img = background
        elif img.mode != 'RGB':
            img = img.convert('RGB')

        original_width, original_height = img.size
        original_ratio = original_width / original_height

        # Calculate scaled dimensions to fit within target
        if original_ratio > target_ratio:
            # Image is wider - fit to width, add vertical bars (letterbox)
            new_width = target_width
            new_height = int(target_width / original_ratio)
        else:
            # Image is taller - fit to height, add horizontal bars (pillarbox)
            new_height = target_height
            new_width = int(target_height * original_ratio)

        # Resize image to fit
        img = img.resize((new_width, new_height), Image.LANCZOS)

        # Create new image with padding
        result = Image.new('RGB', (target_width, target_height), background_color)

        # Calculate paste position
        if position == "center":
            paste_x = (target_width - new_width) // 2
            paste_y = (target_height - new_height) // 2
        elif position == "top":
            paste_x = (target_width - new_width) // 2
            paste_y = 0
        elif position == "bottom":
            paste_x = (target_width - new_width) // 2
            paste_y = target_height - new_height
        else:
            paste_x = (target_width - new_width) // 2
            paste_y = (target_height - new_height) // 2

        # Paste scaled image onto background
        result.paste(img, (paste_x, paste_y))

        print(f"Letterboxed {original_width}x{original_height} to {target_width}x{target_height}")
        print(f"Padding: {paste_x}px horizontal, {paste_y}px vertical")

        if output_path:
            result.save(output_path, 'PNG', optimize=True)

        buffer = io.BytesIO()
        result.save(buffer, format='PNG', optimize=True)
        return buffer.getvalue()

# Example: Letterbox a 1:1 image for landscape video
image_bytes = letterbox_for_sora(
    "square_logo.png",
    target_resolution="1280x720",
    output_path="letterboxed_landscape.png",
    background_color=(18, 18, 18),  # Dark gray instead of pure black
    position="center"
)
The background_color parameter accepts any RGB tuple, allowing you to match your brand colors or choose a neutral tone that complements your image content. Pure black (0, 0, 0) is common for cinematic content, while dark gray or brand colors might work better for marketing materials.
Considerations for Letterboxing:
While letterboxing preserves all your original content, be aware that the resulting video will have visible bars during playback. Depending on how viewers consume your content, this may or may not be acceptable. For professional productions or when preserving exact framing is critical, letterboxing is often preferred over cropping.
Method 4: Auto-Detect Optimal Resolution
Rather than manually specifying the target resolution for each image, you can create an intelligent function that analyzes your input image and automatically selects the most appropriate Sora 2 resolution. This approach reduces errors and streamlines batch processing workflows.
The following implementation examines the image's dimensions and aspect ratio to determine whether it's better suited for landscape or portrait output, and whether it warrants the higher-resolution Pro model options.
pythonfrom PIL import Image
import io
from typing import Tuple, Optional

def auto_prepare_for_sora(
    image_path: str,
    model: str = "sora-2",
    prefer_quality: bool = False,
    output_path: str = None
) -> Tuple[bytes, str]:
    """
    Automatically prepare an image for Sora 2 API by detecting optimal resolution.

    This function analyzes the input image and selects the best matching
    Sora 2 resolution based on aspect ratio and dimensions.

    Args:
        image_path: Path to the input image file
        model: "sora-2" or "sora-2-pro" (affects available resolutions)
        prefer_quality: If True and using Pro, prefer higher resolutions
        output_path: Optional path to save the processed image

    Returns:
        Tuple of (image_bytes, selected_resolution_string)

    Example:
        image_bytes, resolution = auto_prepare_for_sora("photo.jpg", model="sora-2-pro")
        # Use resolution value in API size parameter
    """
    # Define available resolutions by model
    resolutions = {
        "sora-2": {
            "landscape": [(1280, 720)],
            "portrait": [(720, 1280)]
        },
        "sora-2-pro": {
            "landscape": [(1792, 1024), (1280, 720)],
            "portrait": [(1024, 1792), (720, 1280)]
        }
    }

    if model not in resolutions:
        raise ValueError(f"Unknown model: {model}. Use 'sora-2' or 'sora-2-pro'")

    with Image.open(image_path) as img:
        # Handle RGBA
        if img.mode == 'RGBA':
            background = Image.new('RGB', img.size, (255, 255, 255))
            background.paste(img, mask=img.split()[3])
            img = background
        elif img.mode != 'RGB':
            img = img.convert('RGB')

        original_width, original_height = img.size
        original_ratio = original_width / original_height

        # Determine orientation
        if original_ratio >= 1.0:
            orientation = "landscape"
        else:
            orientation = "portrait"

        # Get available resolutions for this orientation
        available = resolutions[model][orientation]

        # Select resolution based on preference and image size
        if prefer_quality and len(available) > 1:
            # Prefer higher resolution if image is large enough
            target_width, target_height = available[0]  # Highest res first
            if original_width >= target_width * 0.8 and original_height >= target_height * 0.8:
                selected = available[0]
            else:
                selected = available[-1]  # Fall back to standard
        else:
            # Use standard resolution
            selected = available[-1] if len(available) > 1 else available[0]

        target_width, target_height = selected
        target_ratio = target_width / target_height

        # Decide: resize or smart crop?
        # If aspect ratios are similar (within 10%), just resize
        # Otherwise, use smart crop to avoid distortion
        ratio_diff = abs(original_ratio - target_ratio) / target_ratio

        if ratio_diff < 0.1:
            # Simple resize - aspect ratios are close enough
            img = img.resize((target_width, target_height), Image.LANCZOS)
            method = "resize"
        else:
            # Smart crop - significant aspect ratio difference
            if original_ratio > target_ratio:
                scale_factor = target_height / original_height
            else:
                scale_factor = target_width / original_width

            scaled_width = int(original_width * scale_factor)
            scaled_height = int(original_height * scale_factor)
            img = img.resize((scaled_width, scaled_height), Image.LANCZOS)

            # Center crop
            left = (scaled_width - target_width) // 2
            top = (scaled_height - target_height) // 2
            img = img.crop((left, top, left + target_width, top + target_height))
            method = "smart_crop"

        resolution_string = f"{target_width}x{target_height}"

        print(f"Auto-detected: {orientation} orientation")
        print(f"Selected resolution: {resolution_string} (using {method})")
        print(f"Original: {original_width}x{original_height} -> Final: {target_width}x{target_height}")

        if output_path:
            img.save(output_path, 'PNG', optimize=True)

        buffer = io.BytesIO()
        img.save(buffer, format='PNG', optimize=True)

        return buffer.getvalue(), resolution_string

# Example usage
image_bytes, resolution = auto_prepare_for_sora(
    "any_image.jpg",
    model="sora-2-pro",
    prefer_quality=True
)

# Use in API call
# client.videos.create(
#     model="sora-2-pro",
#     size=resolution,  # Auto-detected: "1792x1024" or "1280x720"
#     input_reference=image_bytes,
#     prompt="..."
# )
This automatic approach is particularly valuable for batch processing scenarios where you're handling many images with varying dimensions and aspect ratios. The function returns both the processed image bytes and the resolution string, which you can pass directly to the API's size parameter.
Method 5: Using Third-Party Preprocessing Services
For developers who prefer not to handle image preprocessing locally, or who need a simplified workflow, using a third-party API service that handles preprocessing automatically can be an effective solution. This approach offloads the complexity of image handling and ensures compatibility without requiring local image processing code.
Several API providers offer Sora 2 access with built-in image preprocessing, which automatically resizes or adjusts your input images before passing them to the video generation model. This can be particularly useful in production environments where you want to minimize local dependencies or when building applications that need to handle image uploads from end users.
For stable Sora 2 API access with automatic preprocessing, laozhang.ai offers async endpoints with no charge on failures, starting at $0.15/request. The service handles image validation and resizing automatically, which means you can submit images in various sizes and formats without preprocessing them yourself. This is especially valuable when building user-facing applications where you can't control what images users upload.
pythonimport requests
import time

API_KEY = "your_laozhang_api_key"
BASE_URL = "https://api.laozhang.ai/v1"

def generate_video_with_preprocessing(
    image_path: str,
    prompt: str,
    target_resolution: str = "1280x720"
):
    """
    Generate video using a service that handles preprocessing.
    Image will be automatically resized if needed.
    """
    with open(image_path, "rb") as f:
        response = requests.post(
            f"{BASE_URL}/videos",
            headers={"Authorization": f"Bearer {API_KEY}"},
            files={"input_reference": (image_path.split("/")[-1], f, "image/jpeg")},
            data={
                "model": "sora-2",
                "prompt": prompt,
                "size": target_resolution,
                "seconds": "10"
            }
        )

    task = response.json()
    print(f"Task created: {task['id']}")

    # Poll for completion
    while True:
        status_response = requests.get(
            f"{BASE_URL}/videos/{task['id']}",
            headers={"Authorization": f"Bearer {API_KEY}"}
        )
        status = status_response.json()
        print(f"Status: {status['status']}")

        if status["status"] == "completed":
            return status
        elif status["status"] == "failed":
            raise Exception(f"Generation failed: {status.get('error')}")

        time.sleep(5)
For more information about API pricing and optimizing your costs, see our guide on Sora 2 API pricing and quotas or explore cost-effective API access options.
Pre-Submission Quality Checklist
Before submitting your image to the Sora 2 API, run through this comprehensive checklist to ensure everything is configured correctly. Systematically checking each item can save significant debugging time and API credits.
Dimension Verification:
First, confirm your image dimensions match the API size parameter exactly. Use the following Python snippet to verify dimensions before submission:
pythonfrom PIL import Image

def verify_image_for_sora(image_path: str, expected_size: str) -> bool:
    """
    Verify an image meets Sora 2 API requirements.
    Returns True if the image passes all checks.
    """
    size_map = {
        "1280x720": (1280, 720),
        "720x1280": (720, 1280),
        "1792x1024": (1792, 1024),
        "1024x1792": (1024, 1792)
    }

    expected_dims = size_map.get(expected_size)
    if not expected_dims:
        print(f"Error: Unknown size parameter '{expected_size}'")
        return False

    with Image.open(image_path) as img:
        # Check dimensions
        if img.size != expected_dims:
            print(f"Dimension mismatch: {img.size} != {expected_dims}")
            return False

        # Check format
        if img.format not in ['JPEG', 'PNG', 'WEBP']:
            print(f"Warning: Format {img.format} may not be supported")

        # Check mode
        if img.mode == 'RGBA':
            print("Warning: Image has alpha channel, will be flattened")

        # Check file size (rough estimate)
        import os
        file_size = os.path.getsize(image_path) / (1024 * 1024)
        if file_size > 20:
            print(f"Error: File size {file_size:.1f}MB exceeds 20MB limit")
            return False

        print(f"Image verified: {img.size}, {img.format}, {file_size:.2f}MB")
        return True

# Verify before API call
if verify_image_for_sora("processed_image.png", "1280x720"):
    # Proceed with API call
    pass
Complete Pre-Submission Checklist:
Run through these items before every API submission to prevent errors and failed requests:
- Verify image dimensions match the
sizeparameter exactly (no tolerance for 1-2 pixel differences) - Confirm image format is JPEG, PNG, or WebP (convert from HEIC, TIFF, or other formats)
- Check file size is under 20MB (compress if necessary while maintaining quality)
- Ensure image contains no identifiable human faces (use face detection if uncertain)
- Validate API key is active and account has sufficient credits
- Confirm account tier supports image-to-video features (requires Tier 2+)
- Test with a simple prompt first to isolate image issues from prompt issues
If you're still encountering errors after verifying all these items, the issue may be related to other API limitations such as content moderation or organizational permissions. For other common Sora 2 API errors, including content policy violations, check our guide on troubleshooting Sora 2 API errors.
FAQ: Sora 2 Image Requirements
This section addresses frequently asked questions about image requirements and common issues developers encounter when working with the Sora 2 API's image-to-video functionality.
Can I use any aspect ratio if I resize to the exact pixel dimensions?
No. While the pixel dimensions must match exactly, the supported aspect ratios are limited to those in the resolution reference table (16:9 and 9:16 variants). You cannot request arbitrary resolutions like 1000×1000 or 1920×1080, even if you resize your image to those exact dimensions. The API will only accept the specific resolutions listed in the documentation.
What happens to image quality when resizing a small image to a larger resolution?
Upscaling a small image will result in quality loss, appearing blurry or pixelated in the generated video. For best results, start with source images that are at least as large as your target resolution. If you must upscale, consider using AI upscaling tools first to enhance the image before passing it to Sora. The LANCZOS resampling algorithm in PIL provides better upscaling quality than simpler algorithms, but it cannot create detail that isn't present in the original.
Does the image color space matter?
The API expects RGB color space images. CMYK images (common in print workflows) should be converted to RGB before submission. The code examples in this guide handle this conversion automatically, but if you're preprocessing images separately, ensure you're saving in RGB mode.
How do I handle images with transparency?
The Sora 2 API doesn't support transparency in input images. Images with alpha channels (RGBA) should be flattened onto a solid background before submission. The code examples provided flatten transparent images onto a white background by default, but you can specify any color that works better for your content.
Why does my image work in the playground but fail via API?
The web playground may apply automatic preprocessing that the raw API does not. When using the API directly, you must ensure your images meet all requirements. The playground might automatically resize or convert images, while the API expects properly formatted input.
What's the maximum video duration I can generate from a single image?
With the standard sora-2 model, you can generate videos up to 12 seconds using the async API (4, 8, or 12 second options). The sora-2-pro model supports the same duration options. Longer videos require generating multiple clips and stitching them together, or using the remix feature to extend existing generations.
Can I use the same image multiple times with different prompts?
Yes. Once your image is properly sized, you can reuse it with different prompts to create various video outputs. The image serves as the visual anchor for the first frame, while your prompt controls the motion and action that follows.
Is there a batch API for processing multiple images?
The Sora 2 API processes one video generation request at a time, but you can submit multiple async requests simultaneously (up to your account's concurrency limit, typically 2-5 depending on tier). For high-volume batch processing, consider implementing a queue system that manages submissions and tracks completions across multiple concurrent jobs.
Conclusion
The "Inpaint image must match" error, while initially frustrating, has a straightforward solution: ensure your input image dimensions exactly match the resolution you specify in the API's size parameter. This guide has covered five methods to achieve this, from direct resizing for simple cases to intelligent auto-detection for complex workflows.
For most developers, Method 1 (direct resize with Pillow) or Method 4 (auto-detection) will handle the majority of use cases. If preserving specific content or aspect ratios is critical, Methods 2 and 3 provide alternatives that give you more control over the final output.
Remember to always verify your images before submission using the pre-submission checklist, and consider implementing the verification function in your production code to catch errors before they waste API credits.
The key takeaways from this guide are straightforward but essential for reliable Sora 2 API integration. Always resize images to exactly match supported resolutions, with no tolerance for even single-pixel differences. Use LANCZOS resampling for best quality when resizing, as it provides superior results for both upscaling and downscaling operations. Choose between cropping and letterboxing based on whether content preservation or full-frame filling is more important for your use case. Consider auto-detection for batch workflows where images have varying dimensions and aspect ratios. Finally, implement verification before submission to catch errors early and avoid wasting credits on failed requests.
With these methods in your toolkit, you should be able to resolve the image size mismatch error and build reliable image-to-video generation pipelines using the Sora 2 API.