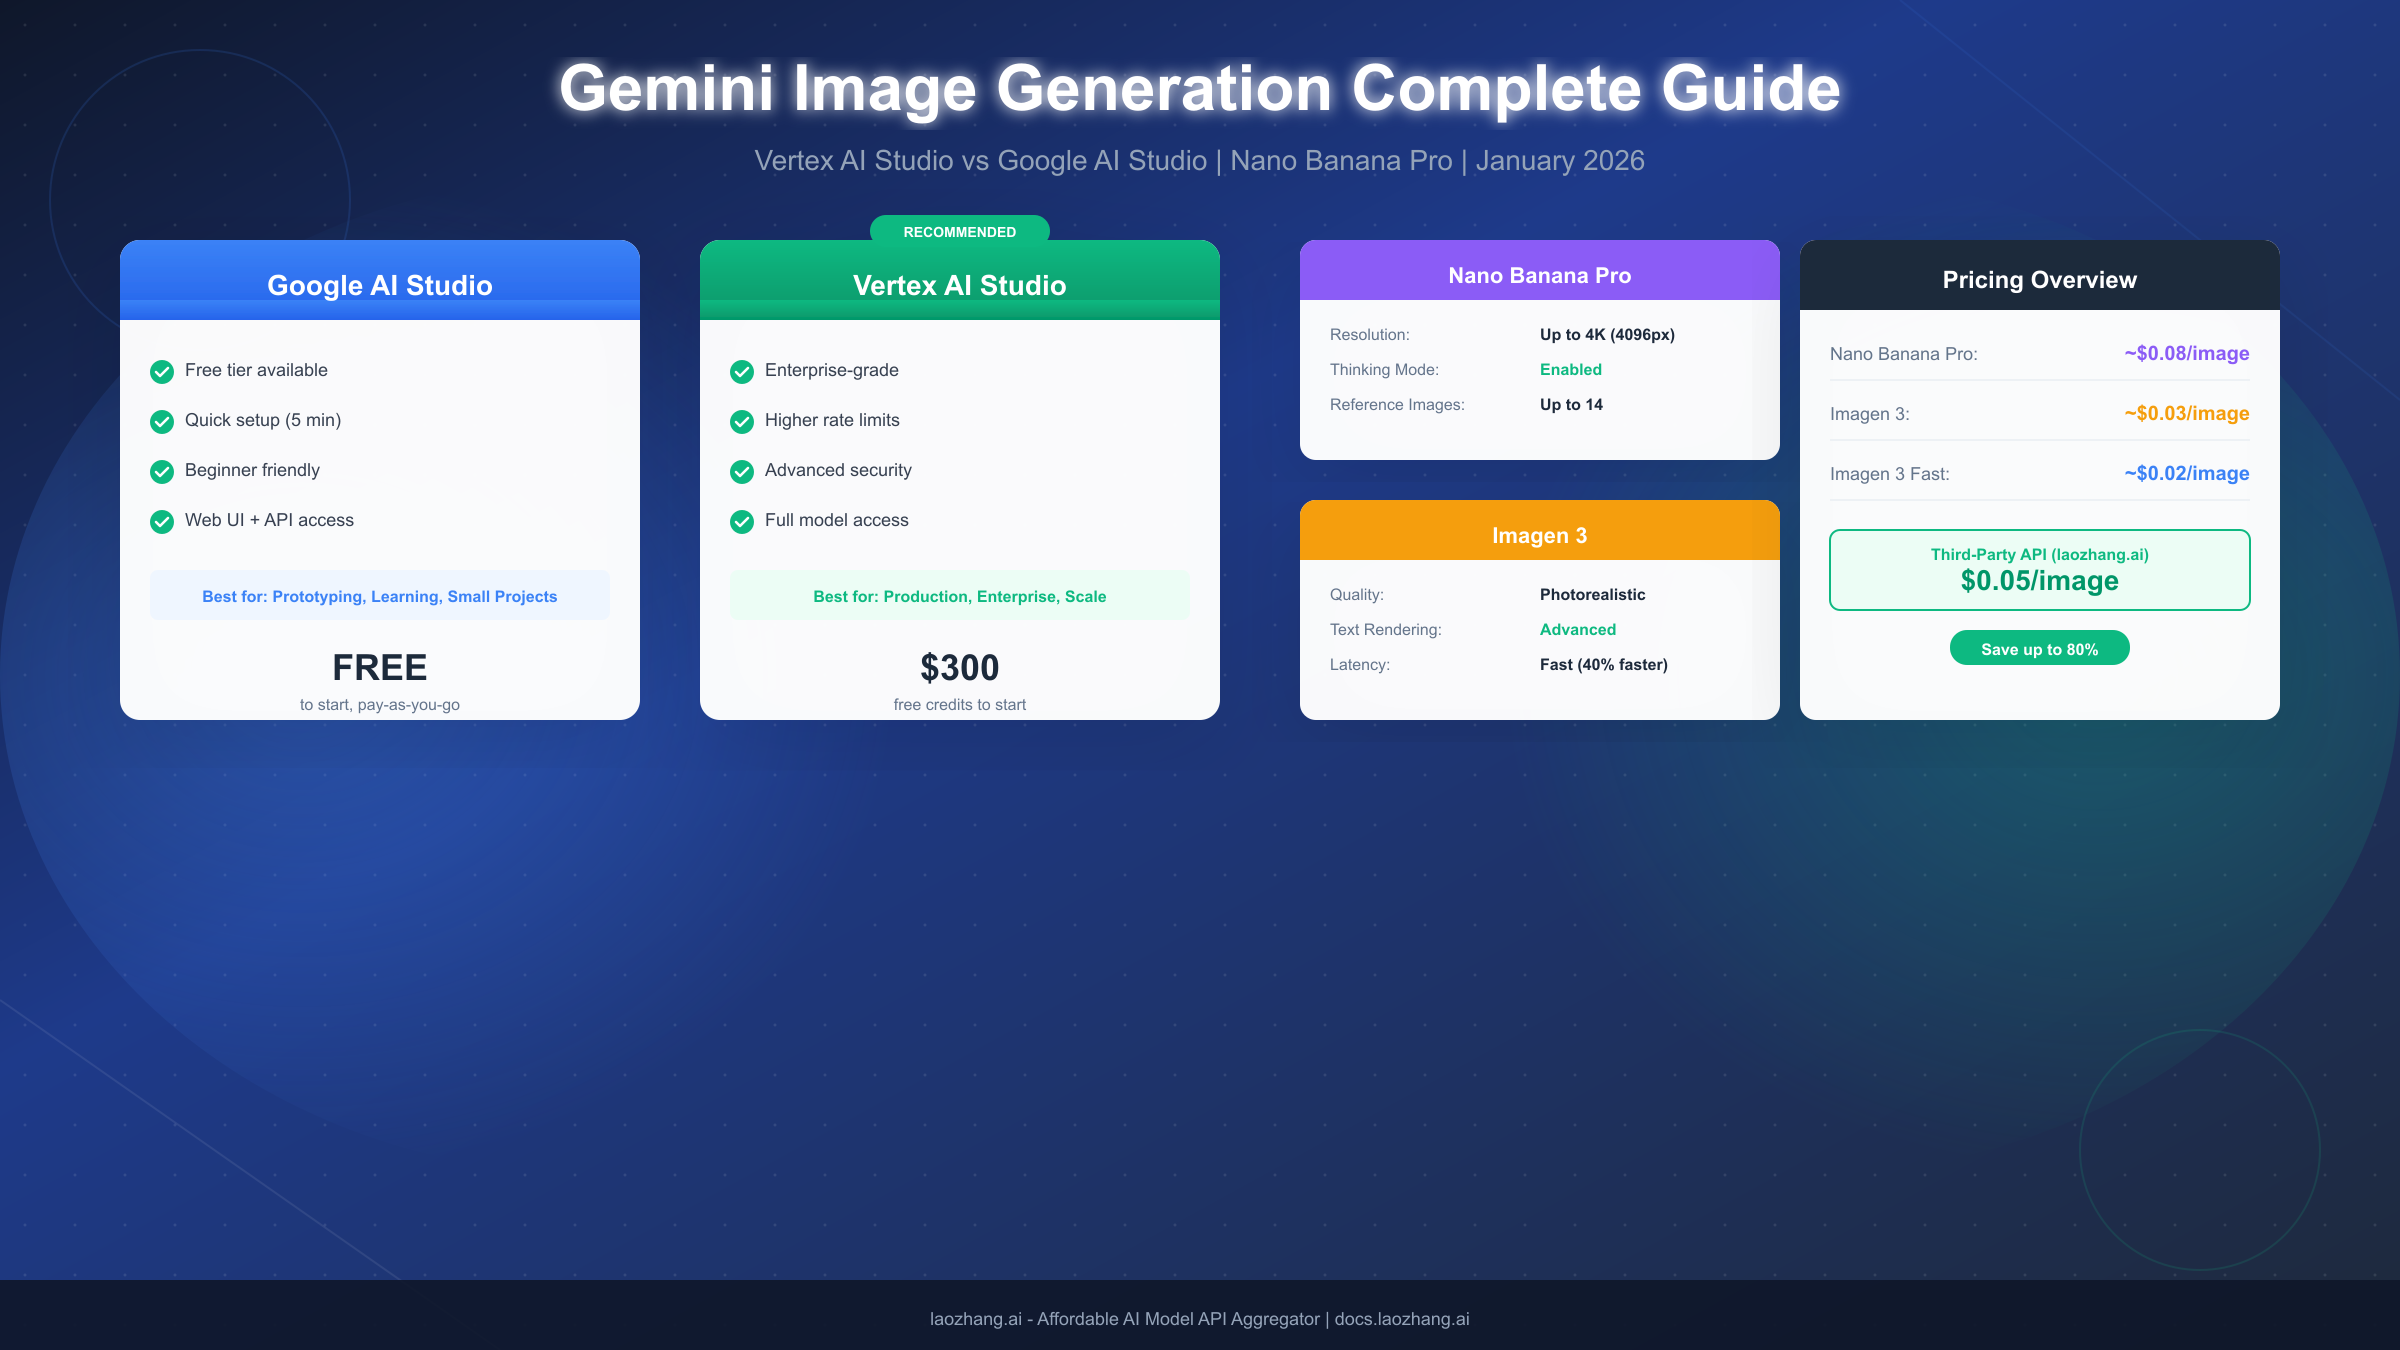
Google's Gemini 3 Pro Image—also known as Nano Banana Pro—represents a significant leap in AI image generation, offering up to 4K resolution output with advanced text rendering capabilities. As of January 2026, you have two primary platforms to access this technology: Google AI Studio for quick prototyping and free experimentation, or Vertex AI Studio for enterprise-grade production deployments. This comprehensive guide walks you through both platforms, helping you generate your first image in under 5 minutes while understanding the nuances that will help you scale effectively.
The image generation landscape within Google's ecosystem can feel confusing at first. You'll encounter terms like Nano Banana, Nano Banana Pro, Gemini 2.5 Flash Image, Gemini 3 Pro Image Preview, and Imagen 3—all referring to related but distinct models. Understanding these distinctions is crucial for choosing the right tool for your specific use case, whether you're a hobbyist exploring AI art or an enterprise architect building production image pipelines.
What Is Nano Banana Pro and How Does Gemini Image Generation Work?
Nano Banana is Google's marketing term for Gemini's native image generation capabilities, designed to make the technology more approachable. The name might seem whimsical, but the underlying technology is remarkably sophisticated, combining large language model reasoning with diffusion-based image synthesis.
Nano Banana (Gemini 2.5 Flash Image) represents the speed-optimized variant, using the model identifier gemini-2.5-flash-image. This model generates images at 1024px resolution and is optimized for high-volume, low-latency tasks. It works well for rapid prototyping, social media content, and applications where speed matters more than maximum resolution.
Nano Banana Pro (Gemini 3 Pro Image Preview) elevates the capabilities significantly with the gemini-3-pro-image-preview model. The "Pro" designation reflects its professional-grade features: up to 4K (4096px) resolution output, a "thinking mode" that enables the model to reason through complex prompts before generating, support for up to 14 reference images for style consistency, and dramatically improved text rendering within images. The thinking mode is particularly valuable for complex compositions where the model needs to understand spatial relationships, text placement, and multi-element scenes.
Imagen 3 (imagen-3.0-generate-002) operates as a specialized image generation model separate from the Gemini multimodal family. It excels at photorealistic outputs and has received updates that reduce generation artifacts while improving lighting accuracy. For developers who need the absolute highest photorealistic quality—particularly for product photography, architectural visualization, or realistic portraits—Imagen 3 often delivers superior results compared to the Gemini-based models.
The technical architecture differs between these models in meaningful ways. Gemini-based image generation (Nano Banana variants) can process both text and image inputs together, enabling sophisticated editing workflows and multi-turn conversations where you iteratively refine generated images. Imagen 3, while specialized for generation quality, operates as a more traditional text-to-image pipeline without the conversational refinement capabilities.
Vertex AI Studio vs Google AI Studio: Which Platform Should You Choose?
The choice between these platforms significantly impacts your development experience, scaling capabilities, and costs. Understanding their differences helps you avoid the frustration of building on the wrong foundation.
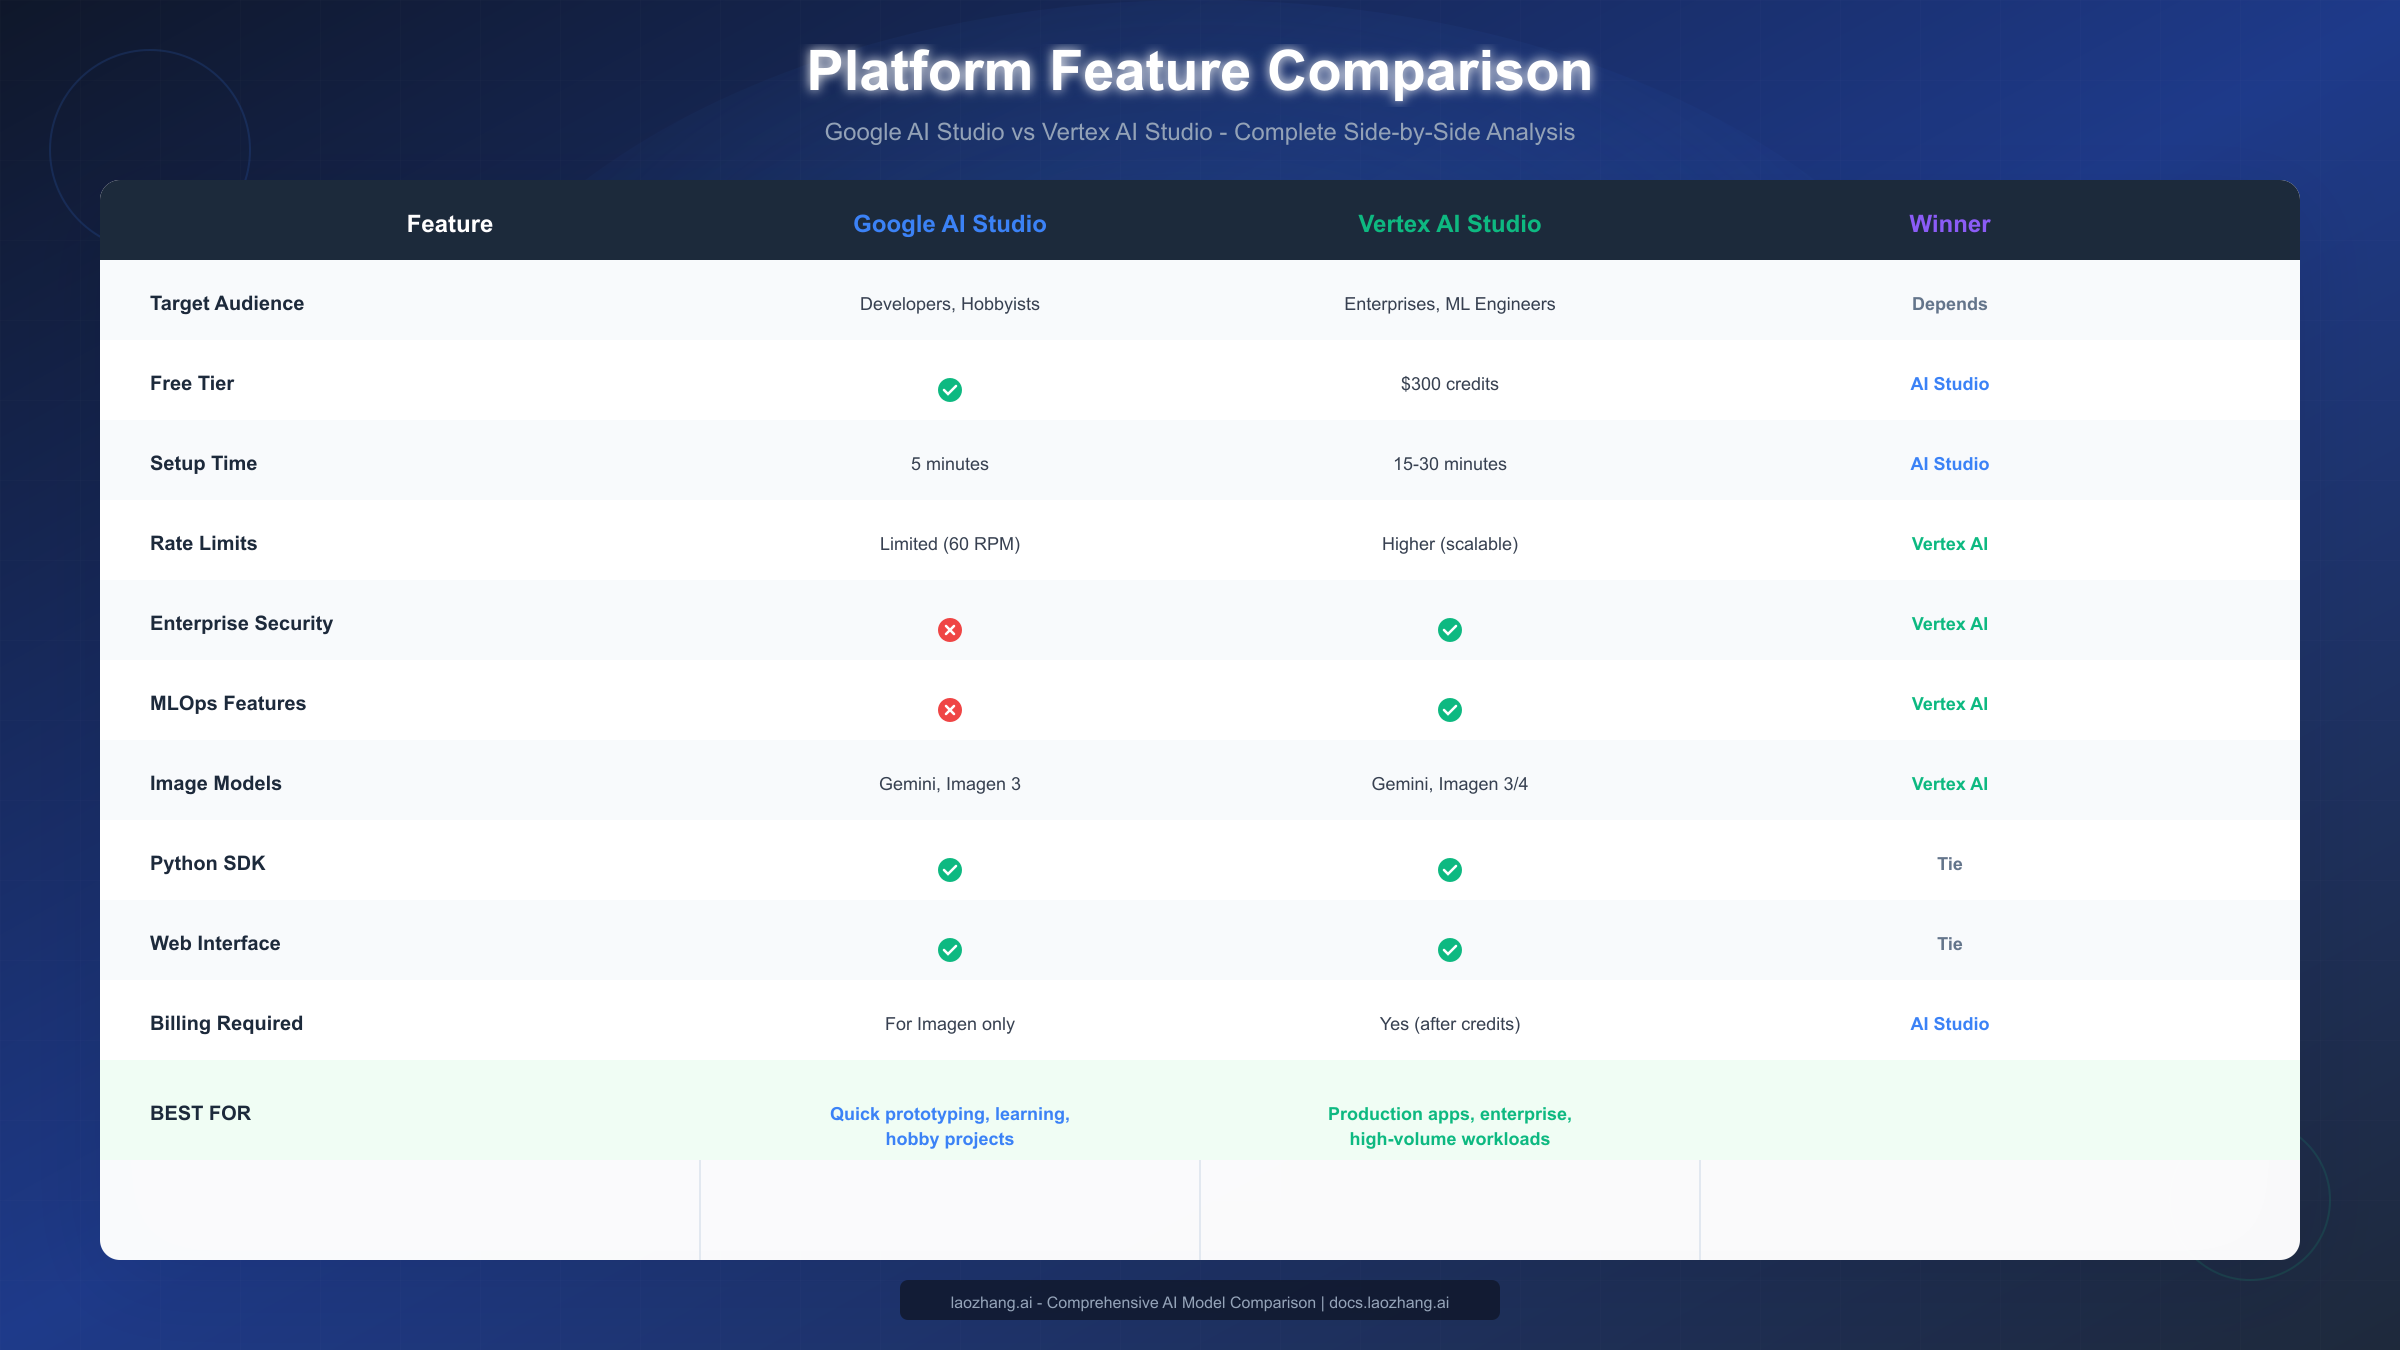
Google AI Studio (accessible at ai.google.dev) serves as the fast-track option for developers, students, and researchers exploring Gemini capabilities. The platform offers a generous free tier with immediate API access after signing in with your Google account. Setup takes approximately 5 minutes, and you can generate your first image without providing billing information for most text-to-image operations. The interface includes a prompt engineering playground where you can experiment with different prompts and settings before writing any code.
The limitations of Google AI Studio become apparent at scale. Rate limits are relatively constrained (around 60 requests per minute for image generation), there's no enterprise security controls, and you won't find MLOps features for managing production deployments. The platform also lacks the advanced model customization options available in Vertex AI. For teams building internal tools, learning projects, or prototypes, these limitations rarely matter. For production applications serving thousands of users, they become blocking issues.
Vertex AI Studio operates within Google Cloud Platform's broader ecosystem, providing enterprise-grade infrastructure for AI development. New Google Cloud accounts receive $300 in free credits, which provides substantial runway for experimentation. The platform offers higher rate limits that can scale with your needs, regional deployment options for data residency compliance, integration with Google Cloud's security and identity management, and comprehensive MLOps capabilities including model versioning, A/B testing, and automated pipelines.
The tradeoff is complexity. Vertex AI requires Google Cloud project setup, IAM configuration, billing account attachment, and API enablement. First-time setup typically takes 15-30 minutes. The learning curve is steeper, though the documentation is comprehensive. For production applications, the initial setup investment pays dividends through reduced operational complexity at scale.
| Consideration | Choose Google AI Studio | Choose Vertex AI |
|---|---|---|
| Getting started | Quick prototyping | Production deployment |
| Team size | Individual/small team | Enterprise teams |
| Budget | Free tier sufficient | Scaling needs |
| Compliance | No requirements | SOC 2, HIPAA needs |
| Rate limits | Low volume acceptable | High volume required |
For most developers reading this guide, the recommendation is straightforward: start with Google AI Studio to learn the APIs and validate your use case, then migrate to Vertex AI when you need production capabilities. The APIs are largely compatible, so migration involves configuration changes rather than code rewrites. For a detailed Google AI Studio walkthrough, check out our dedicated tutorial.
Google AI Studio Tutorial: Generate Your First Image in 5 Minutes
This section provides a complete walkthrough for generating images using Google AI Studio. Follow these steps sequentially, and you'll have a working image generation pipeline in minutes.
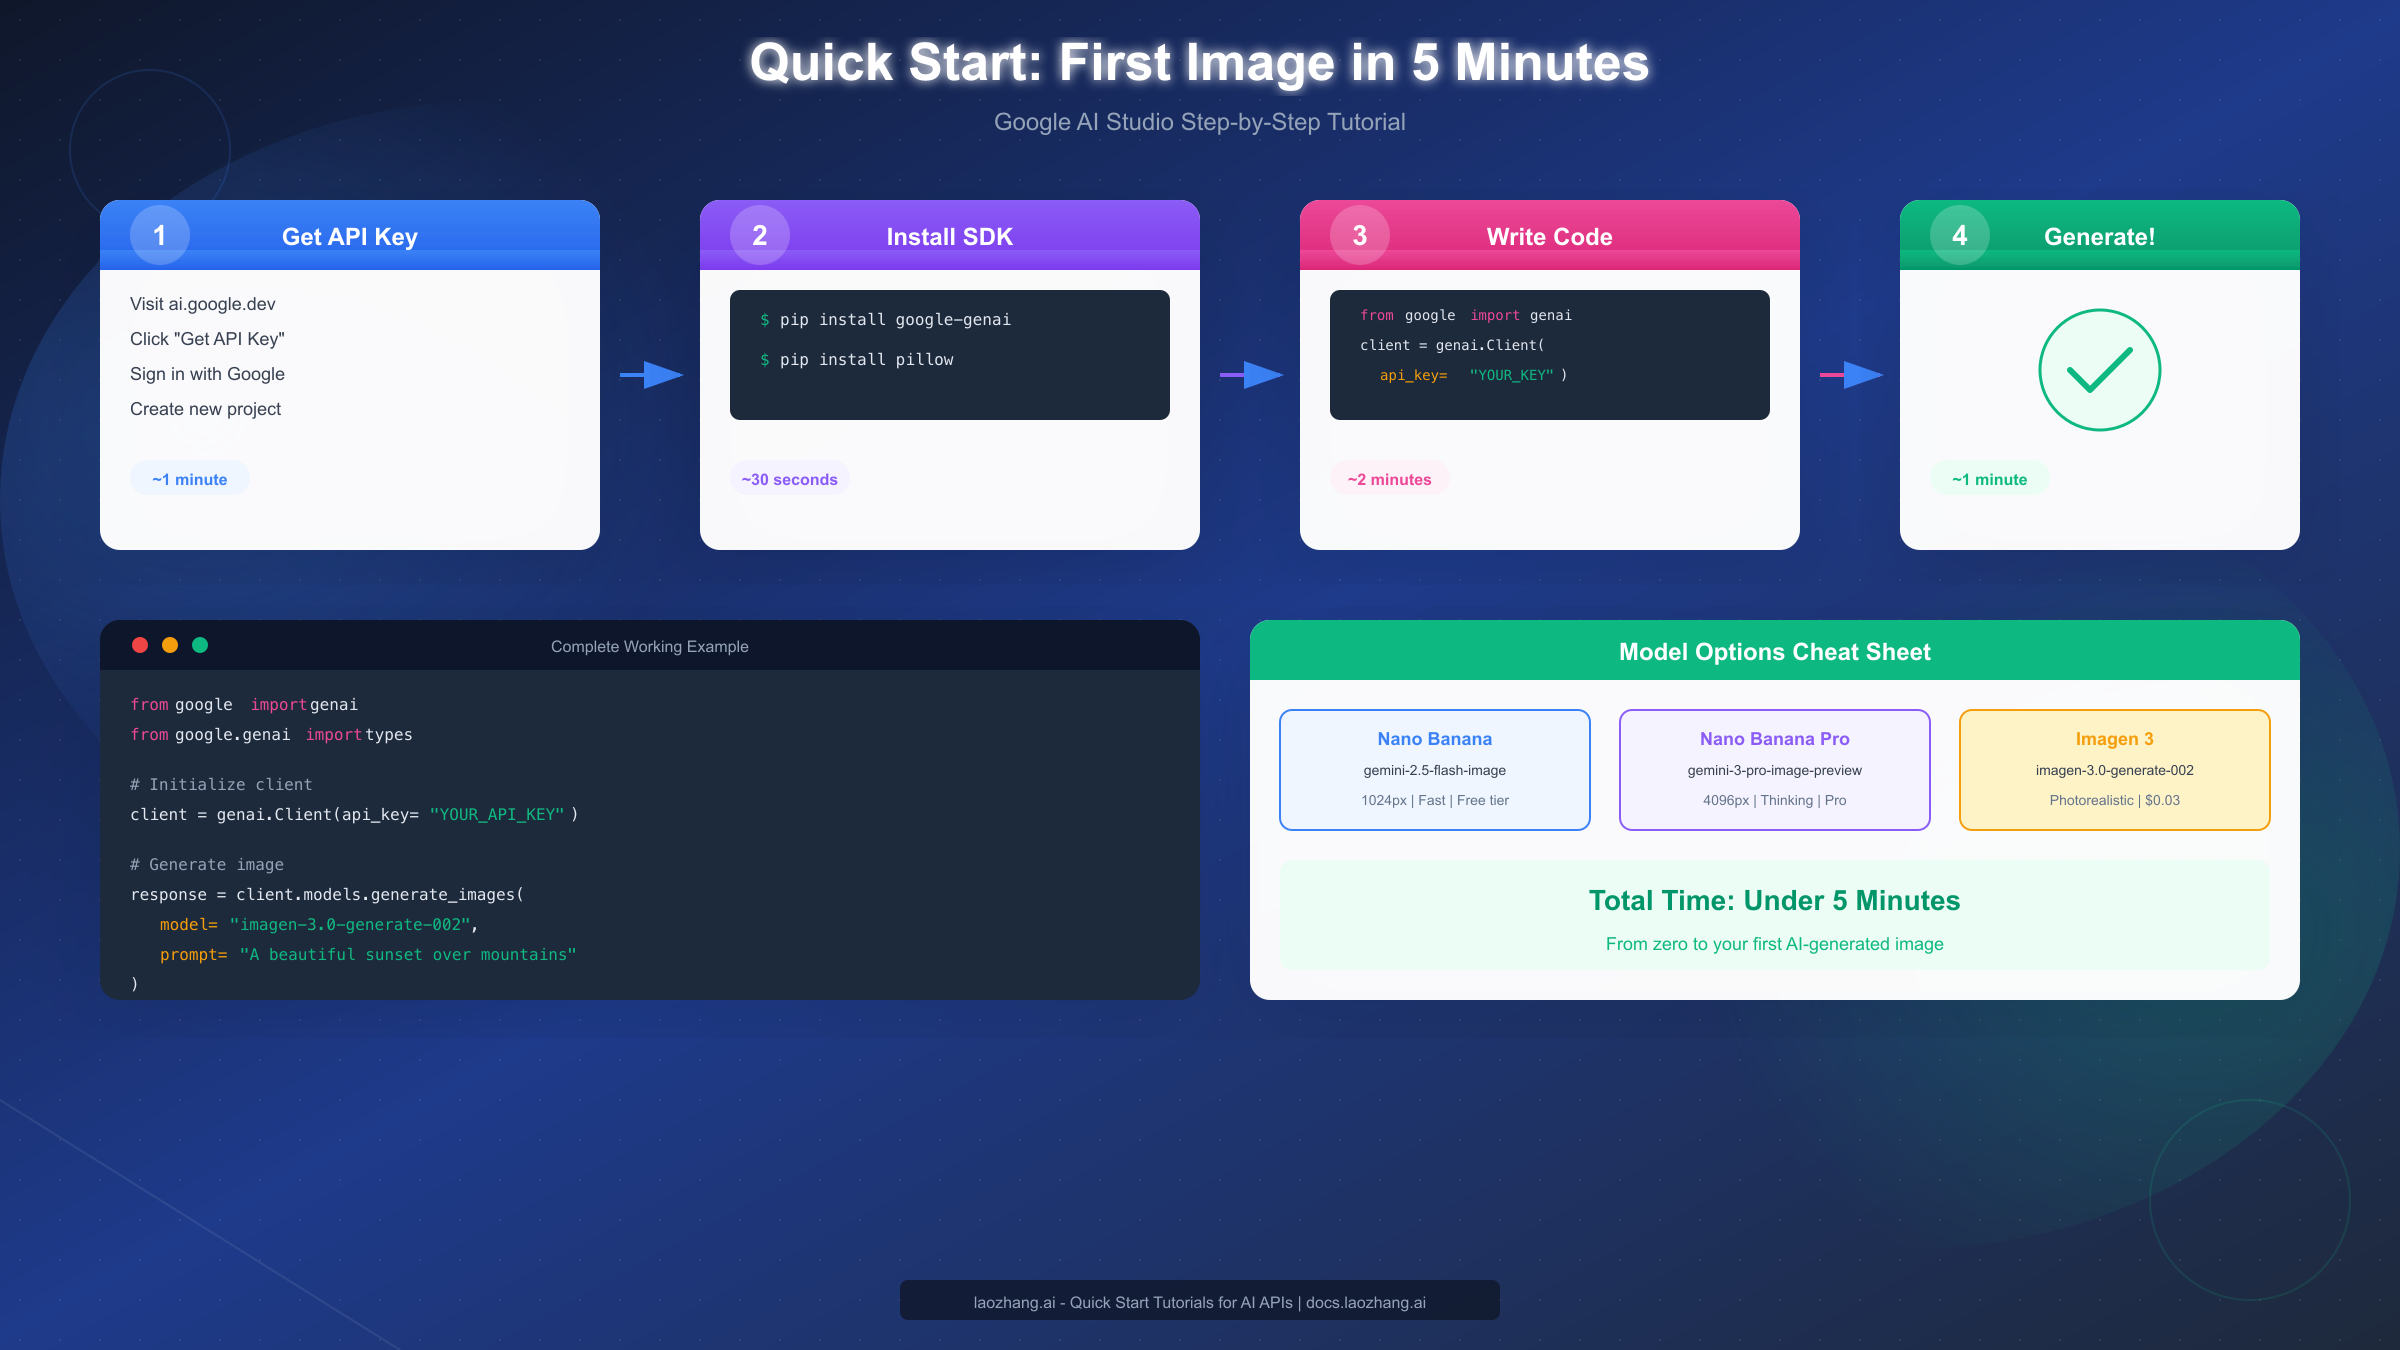
Step 1: Obtain Your API Key (1 minute)
Navigate to ai.google.dev and sign in with your Google account. Click "Get API Key" in the navigation menu. If you don't have an existing Google Cloud project, the interface will create one for you automatically. Click "Create API Key in new project" and copy the generated key immediately—you won't be able to view it again after leaving the page.
Store your API key securely. The recommended approach is using environment variables rather than hardcoding keys in your source code. On macOS or Linux, add this to your shell profile: export GEMINI_API_KEY="your-key-here". On Windows, use the System Properties > Environment Variables interface.
Step 2: Install the Required SDK (30 seconds)
Google provides an official Python SDK that simplifies API interactions. Install it along with Pillow for image handling:
bashpip install google-genai pillow
For production applications, pin these dependencies to specific versions in your requirements file to ensure reproducible builds. The SDK receives regular updates with new model support and bug fixes.
Step 3: Write Your First Generation Script (2 minutes)
Create a new Python file and add the following complete working example:
pythonimport os
from google import genai
from google.genai import types
from PIL import Image
from io import BytesIO


client = genai.Client(api_key=os.environ.get("GEMINI_API_KEY"))

# Generate an image with Imagen 3
response = client.models.generate_images(
    model="imagen-3.0-generate-002",
    prompt="A serene mountain landscape at golden hour, with a crystal clear lake reflecting snow-capped peaks, photorealistic style",
    config=types.GenerateImagesConfig(
        number_of_images=1,
        aspect_ratio="16:9",
        safety_filter_level="BLOCK_MEDIUM_AND_ABOVE",
    )
)

# Save the generated image
for idx, generated_image in enumerate(response.generated_images):
    image = Image.open(BytesIO(generated_image.image.image_bytes))
    image.save(f"generated_image_{idx}.png")
    print(f"Image saved: generated_image_{idx}.png")
Step 4: Run and Verify (1 minute)
Execute your script: python your_script.py. The first generation typically takes 5-15 seconds depending on server load. Check your working directory for the generated PNG file. Open it to verify the output matches your prompt expectations.
If you encounter rate limit errors, wait 60 seconds before retrying. For billing-related errors with Imagen, you'll need to add a payment method to your Google Cloud project—Imagen requires billing even for small usage, unlike some Gemini endpoints.
Vertex AI Studio Tutorial: Professional Production Setup
Vertex AI provides the infrastructure necessary for production image generation at scale. This tutorial assumes you're building applications that require enterprise features like higher rate limits, compliance certifications, or integration with existing Google Cloud infrastructure.
Prerequisites Configuration
Before accessing Vertex AI's image generation capabilities, complete these foundational steps. In the Google Cloud Console, create a new project or select an existing one. Note your project ID—you'll need it for SDK initialization. Navigate to "Billing" and link a billing account to your project. Even with $300 in free credits, billing must be configured.
Enable the Vertex AI API by navigating to "APIs & Services" > "Enable APIs and Services", searching for "Vertex AI API", and clicking Enable. This process takes approximately 30 seconds. While there, also enable the "Cloud Resource Manager API" if you haven't already, as it's required for programmatic resource management.
Install the Vertex AI SDK
The Vertex AI Python SDK differs from the Google AI Studio SDK:
bashpip install google-cloud-aiplatform
You'll also need to configure authentication. For local development, install the Google Cloud CLI and run:
bashgcloud auth application-default login
This command opens a browser for OAuth authentication and stores credentials locally. For production deployments, use service accounts with appropriate IAM roles instead.
Initialize and Generate Images
Here's a complete Vertex AI example using Imagen 3:
pythonimport vertexai
from vertexai.preview.vision_models import ImageGenerationModel

# Initialize Vertex AI with your project
PROJECT_ID = "your-project-id"
LOCATION = "us-central1"  # Region where Imagen is available

vertexai.init(project=PROJECT_ID, location=LOCATION)

# Load the Imagen 3 model
model = ImageGenerationModel.from_pretrained("imagen-3.0-generate-001")

# Generate with comprehensive parameters
images = model.generate_images(
    prompt="A professional product photograph of a luxury watch on a marble surface, studio lighting, 8K quality",
    number_of_images=4,
    aspect_ratio="1:1",
    safety_filter_level="block_some",
    person_generation="allow_adult",
    add_watermark=True,  # SynthID digital watermark
)

# Save all generated variations
for idx, image in enumerate(images):
    image.save(f"vertex_output_{idx}.png")
    print(f"Saved: vertex_output_{idx}.png")
The Vertex AI SDK provides additional parameters not available in the Google AI Studio version. The add_watermark parameter controls SynthID embedding—an invisible digital watermark that helps identify AI-generated content. The person_generation parameter offers granular control over generating images containing people, with options including "allow_all", "allow_adult", or "dont_allow".
Regional Availability Note
Imagen models are currently available in limited regions. If you encounter availability errors, try these locations: us-central1, europe-west4, or asia-northeast1. Check the official documentation for current regional availability, as Google regularly expands coverage.
Understanding Pricing: Real Costs for Every Use Case
Pricing for Google's image generation services follows a consumption-based model, but the specific costs vary significantly between models and platforms. Understanding these nuances helps you budget accurately and choose cost-effective options for your use case.
Google AI Studio / Gemini API Pricing
For Gemini-based image generation (Nano Banana variants), pricing is calculated in tokens rather than per-image. Gemini 2.5 Flash Image consumes approximately 1,290 tokens per generated image at standard resolution. Gemini 3 Pro Image ranges from 1,120 tokens (1K resolution) to 2,000 tokens (4K resolution). At current rates of roughly $0.075 per million tokens for output, this translates to approximately $0.08-0.15 per image depending on resolution and model choice.
Imagen 3 Pricing
Imagen 3 follows a simpler per-image pricing model at approximately $0.03 per generated image. Imagen 3 Fast, the low-latency variant, costs around $0.02 per image with a 40% reduction in generation time. For applications requiring high volume generation at moderate quality, Imagen 3 Fast offers excellent value.
| Model | Cost/Image | Resolution | Best For |
|---|---|---|---|
| Gemini 2.5 Flash Image | ~$0.08 | 1024px | Quick iterations |
| Gemini 3 Pro Image | ~$0.15 | Up to 4096px | Professional assets |
| Imagen 3 | ~$0.03 | High quality | Production volume |
| Imagen 3 Fast | ~$0.02 | Standard | High throughput |
Monthly Budget Scenarios
Understanding costs in practical terms helps with budgeting. A content creator generating 100 images per month for social media might spend $3-8 using Imagen 3 or Gemini Flash. A marketing agency producing 1,000 product variations monthly would budget $30-150 depending on resolution requirements. An enterprise application generating 50,000 images monthly for user-generated content features should expect costs of $1,000-2,500 before any negotiated volume discounts.
For cost-sensitive high-volume applications, consider third-party API aggregators. Platforms like laozhang.ai offer Nano Banana Pro access at approximately $0.05 per image—roughly 20% of direct API pricing—by aggregating demand across multiple customers. This approach works well for production workloads where you've validated the API but want to optimize operational costs. You can find more details in our complete Gemini API pricing breakdown.
Model Selection Guide: Nano Banana vs Nano Banana Pro vs Imagen 3
Choosing the right model requires understanding the tradeoffs between speed, quality, features, and cost. This decision matrix helps you match model capabilities to your specific requirements.
When to Use Nano Banana (Gemini 2.5 Flash Image)
Select this model when generation speed matters more than maximum resolution. Ideal use cases include: real-time content generation where users wait for results, high-volume batch processing where per-image cost optimization is critical, social media content at standard resolutions (1080x1080 or similar), and prototype/development environments where you're iterating on prompts.
The 1024px maximum resolution limits print applications but is perfectly adequate for digital-first workflows. The model handles text rendering adequately but not at the professional level of Nano Banana Pro.
When to Use Nano Banana Pro (Gemini 3 Pro Image Preview)
Choose Nano Banana Pro for professional asset production requiring any of these features: 4K resolution output for print or large-format displays, legible text rendering within images (perfect for infographics, social media quotes, or marketing materials), complex multi-element compositions where spatial reasoning improves results, or character consistency across multiple generations using reference images.
The "thinking mode" particularly shines with complex prompts. When you describe intricate scenes with specific spatial relationships ("A chef in the foreground with a medieval castle visible through the window behind them, with mountains in the far distance"), the reasoning step helps the model plan the composition before generating.
When to Use Imagen 3
Imagen 3 remains the optimal choice for photorealistic outputs and specific technical scenarios. Use it when your application requires: maximum photorealistic quality for product photography, architectural visualization, or realistic portraits; batch generation at the lowest per-image cost; scenarios where you don't need multi-turn editing or conversational refinement; or integration with existing Vertex AI pipelines.
For those interested in understanding free tier limitations, our Nano Banana Pro free guide provides detailed quota information.
| Decision Factor | Nano Banana | Nano Banana Pro | Imagen 3 |
|---|---|---|---|
| Max Resolution | 1024px | 4096px | Varies |
| Text Rendering | Basic | Advanced | Limited |
| Generation Speed | Fastest | Moderate | Fast |
| Cost per Image | ~$0.08 | ~$0.15 | ~$0.03 |
| Multi-turn Editing | Yes | Yes | No |
| Reference Images | 3 max | 14 max | N/A |
| Thinking Mode | No | Yes | N/A |
Advanced Features: Reference Images, Text Rendering, and 4K Output
Moving beyond basic text-to-image generation, these advanced features unlock professional-grade workflows that differentiate AI-assisted creative processes from simple prompt engineering.
Reference Image Workflows
Both Nano Banana variants support image inputs alongside text prompts, enabling sophisticated editing and style transfer workflows. Gemini 2.5 Flash Image handles up to 3 input images effectively, while Gemini 3 Pro Image can work with up to 14 references—though practical limits depend on complexity.
A common workflow for character consistency uses reference images to maintain a character's appearance across multiple generations. You might generate an initial character, then use that image as a reference for subsequent scenes: "Using the character from the reference image, show them walking through a rainy city street at night." This approach works well for illustration series, storyboarding, or consistent mascot generation.
pythonfrom google import genai
from google.genai import types
import base64

client = genai.Client(api_key=os.environ.get("GEMINI_API_KEY"))

# Load reference image
with open("reference_character.png", "rb") as f:
    reference_data = base64.standard_b64encode(f.read()).decode("utf-8")

# Generate with reference
response = client.models.generate_content(
    model="gemini-3-pro-image-preview",
    contents=[
        types.Content(
            parts=[
                types.Part(
                    inline_data=types.Blob(
                        mime_type="image/png",
                        data=reference_data
                    )
                ),
                types.Part(text="Using this character, create an image of them reading a book in a cozy library")
            ]
        )
    ],
    config=types.GenerateContentConfig(
        response_modalities=["IMAGE"],
    )
)
Text Rendering Best Practices
Nano Banana Pro's text rendering capabilities make it particularly valuable for creating marketing materials, social media graphics, and informational images. Effective text rendering requires specific prompting techniques: always specify the exact text in quotes, describe font characteristics (bold, serif, handwritten), indicate color and size relationships, and specify placement within the composition.
A prompt like "A greeting card with the text 'Happy Birthday!' in elegant gold script lettering centered on a navy blue background with subtle confetti elements" will typically produce legible, well-placed text. Avoid prompts that don't specify text styling, as the model may choose inappropriate fonts or sizes.
For more details on output resolution options, see our guide on Nano Banana Pro model comparison.
4K Output Configuration
Generating at 4K resolution (4096x4096 maximum) requires explicit configuration and consumes more tokens per generation. The quality improvement is most noticeable for: detailed textures that benefit from higher pixel density, compositions intended for print at larger sizes, professional photography workflows where post-processing benefits from additional detail, and zoom-and-crop workflows where portions of the image will be extracted.
python# 4K generation example
response = client.models.generate_content(
    model="gemini-3-pro-image-preview",
    contents=["Ultra-detailed macro photograph of a butterfly wing, showing individual scales, iridescent colors, 4K resolution"],
    config=types.GenerateContentConfig(
        response_modalities=["IMAGE"],
        image_resolution="4096",  # Request maximum resolution
    )
)
Saving Money: Third-Party API Alternatives
Direct API access from Google provides maximum control and feature availability, but cost optimization often becomes important as applications scale. Third-party API aggregators offer legitimate alternatives for production workloads.
How API Aggregators Work
Services like laozhang.ai function as API proxies that aggregate demand across multiple customers, negotiate volume pricing with providers, and pass savings to users. These platforms maintain compatibility with official API specifications, meaning your existing code works with minimal modification—typically just changing the base URL and API key.
The tradeoffs are worth understanding. Aggregators introduce an additional dependency in your stack, may have different uptime guarantees than direct access, and occasionally lag behind on supporting newest model versions. For production applications where cost matters more than having day-one access to new features, these tradeoffs are often acceptable.
Cost Comparison
At current pricing, laozhang.ai offers Nano Banana Pro at approximately $0.05 per image—roughly 33% of direct Gemini API pricing or about 60% savings. For Imagen 3, similar proportional savings apply. A application generating 10,000 images monthly would see costs drop from approximately $300-1,500 (direct) to $500-600 (aggregated).
The platform provides additional benefits beyond cost savings: aggregated rate limits that may exceed individual API quotas, unified billing across multiple AI model providers, and dedicated support for integration issues. Full documentation is available at docs.laozhang.ai.
When to Use Direct vs. Aggregated Access
Use direct Google API access when: you need latest model versions immediately upon release, your organization requires direct vendor relationships for compliance, you're in early development and may need official support, or you have negotiated enterprise pricing with Google directly.
Use aggregated access when: cost optimization is a primary concern, you've validated your use case and need production scalability, you want simplified multi-model billing, or you're building applications in regions with limited direct API availability.
For detailed rate limit information that affects both direct and aggregated access, see our Nano Banana Pro rate limits guide.
FAQ: Your Questions Answered
What's the difference between Nano Banana and Gemini image generation?
Nano Banana is the consumer-friendly brand name for Gemini's native image generation capabilities. Technically, "Nano Banana" refers to Gemini 2.5 Flash Image (the speed-optimized variant) and "Nano Banana Pro" refers to Gemini 3 Pro Image Preview (the quality-optimized variant). When accessing via API, you use the technical model names like gemini-2.5-flash-image or gemini-3-pro-image-preview.
Do generated images have watermarks?
All images generated through Google's APIs include SynthID, an invisible digital watermark embedded at the pixel level. This watermark doesn't visually affect images but allows verification that content was AI-generated. The watermark cannot be removed through editing or format conversion. For commercial use, this is generally not problematic as the watermark is imperceptible to viewers.
Can I use generated images commercially?
Yes, images generated through Google's Gemini and Imagen APIs can be used for commercial purposes, subject to the terms of service. You retain rights to use, modify, and distribute generated images. However, you cannot claim copyright over AI-generated images in most jurisdictions, and you're responsible for ensuring generated content doesn't infringe on existing copyrights or trademarks.
Why am I getting "billing required" errors in Google AI Studio?
Certain image generation features, particularly Imagen 3, require billing configuration even for small usage. Navigate to the Google Cloud Console, ensure billing is enabled for your project, and link a payment method. You won't be charged if you stay within free tier limits, but billing must be configured.
How do I handle rate limit errors?
Rate limits reset on a per-minute basis for most quotas. When encountering 429 errors: implement exponential backoff in your code (wait 1 second, then 2, then 4, etc.), consider spreading requests across multiple API keys for different projects, or upgrade to Vertex AI for higher limits. For high-volume production, pre-request rate limit checking helps avoid errors.
Which region should I use for Vertex AI?
Start with us-central1, which has the broadest model availability. If you need data residency in Europe, try europe-west4. For Asia-Pacific, asia-northeast1 (Tokyo) typically has good availability. Regional availability changes regularly, so check official documentation for current status.
How do I reduce image generation costs at scale?
Several strategies help optimize costs: use Imagen 3 Fast instead of standard Imagen 3 when maximum quality isn't essential (40% cost reduction), generate at 1K resolution unless you specifically need higher (token savings with Gemini models), batch similar requests to maximize cache efficiency, and consider aggregated API providers like laozhang.ai for 50-80% cost reductions on validated production workloads.
Mastering Gemini image generation opens creative possibilities that were science fiction just a few years ago. Whether you're building a simple prototype in Google AI Studio or architecting an enterprise image pipeline in Vertex AI, the tools are now accessible and increasingly affordable. Start with the quick-start tutorial in this guide, validate your use case, and scale confidently knowing you understand both the capabilities and the cost structures involved.