Upgrading your Gemini API quota unlocks dramatically higher rate limits: from 5-15 RPM on Free Tier to 1,000+ RPM on Tier 2 and 4,000+ RPM on Tier 3. The upgrade requires $250 cumulative Google Cloud spending (Tier 2) or $1,000 (Tier 3), plus 30 days since your first payment. This guide covers the complete upgrade process, cost planning strategies, troubleshooting tips, and alternative solutions for developers who need higher quotas immediately.
TL;DR
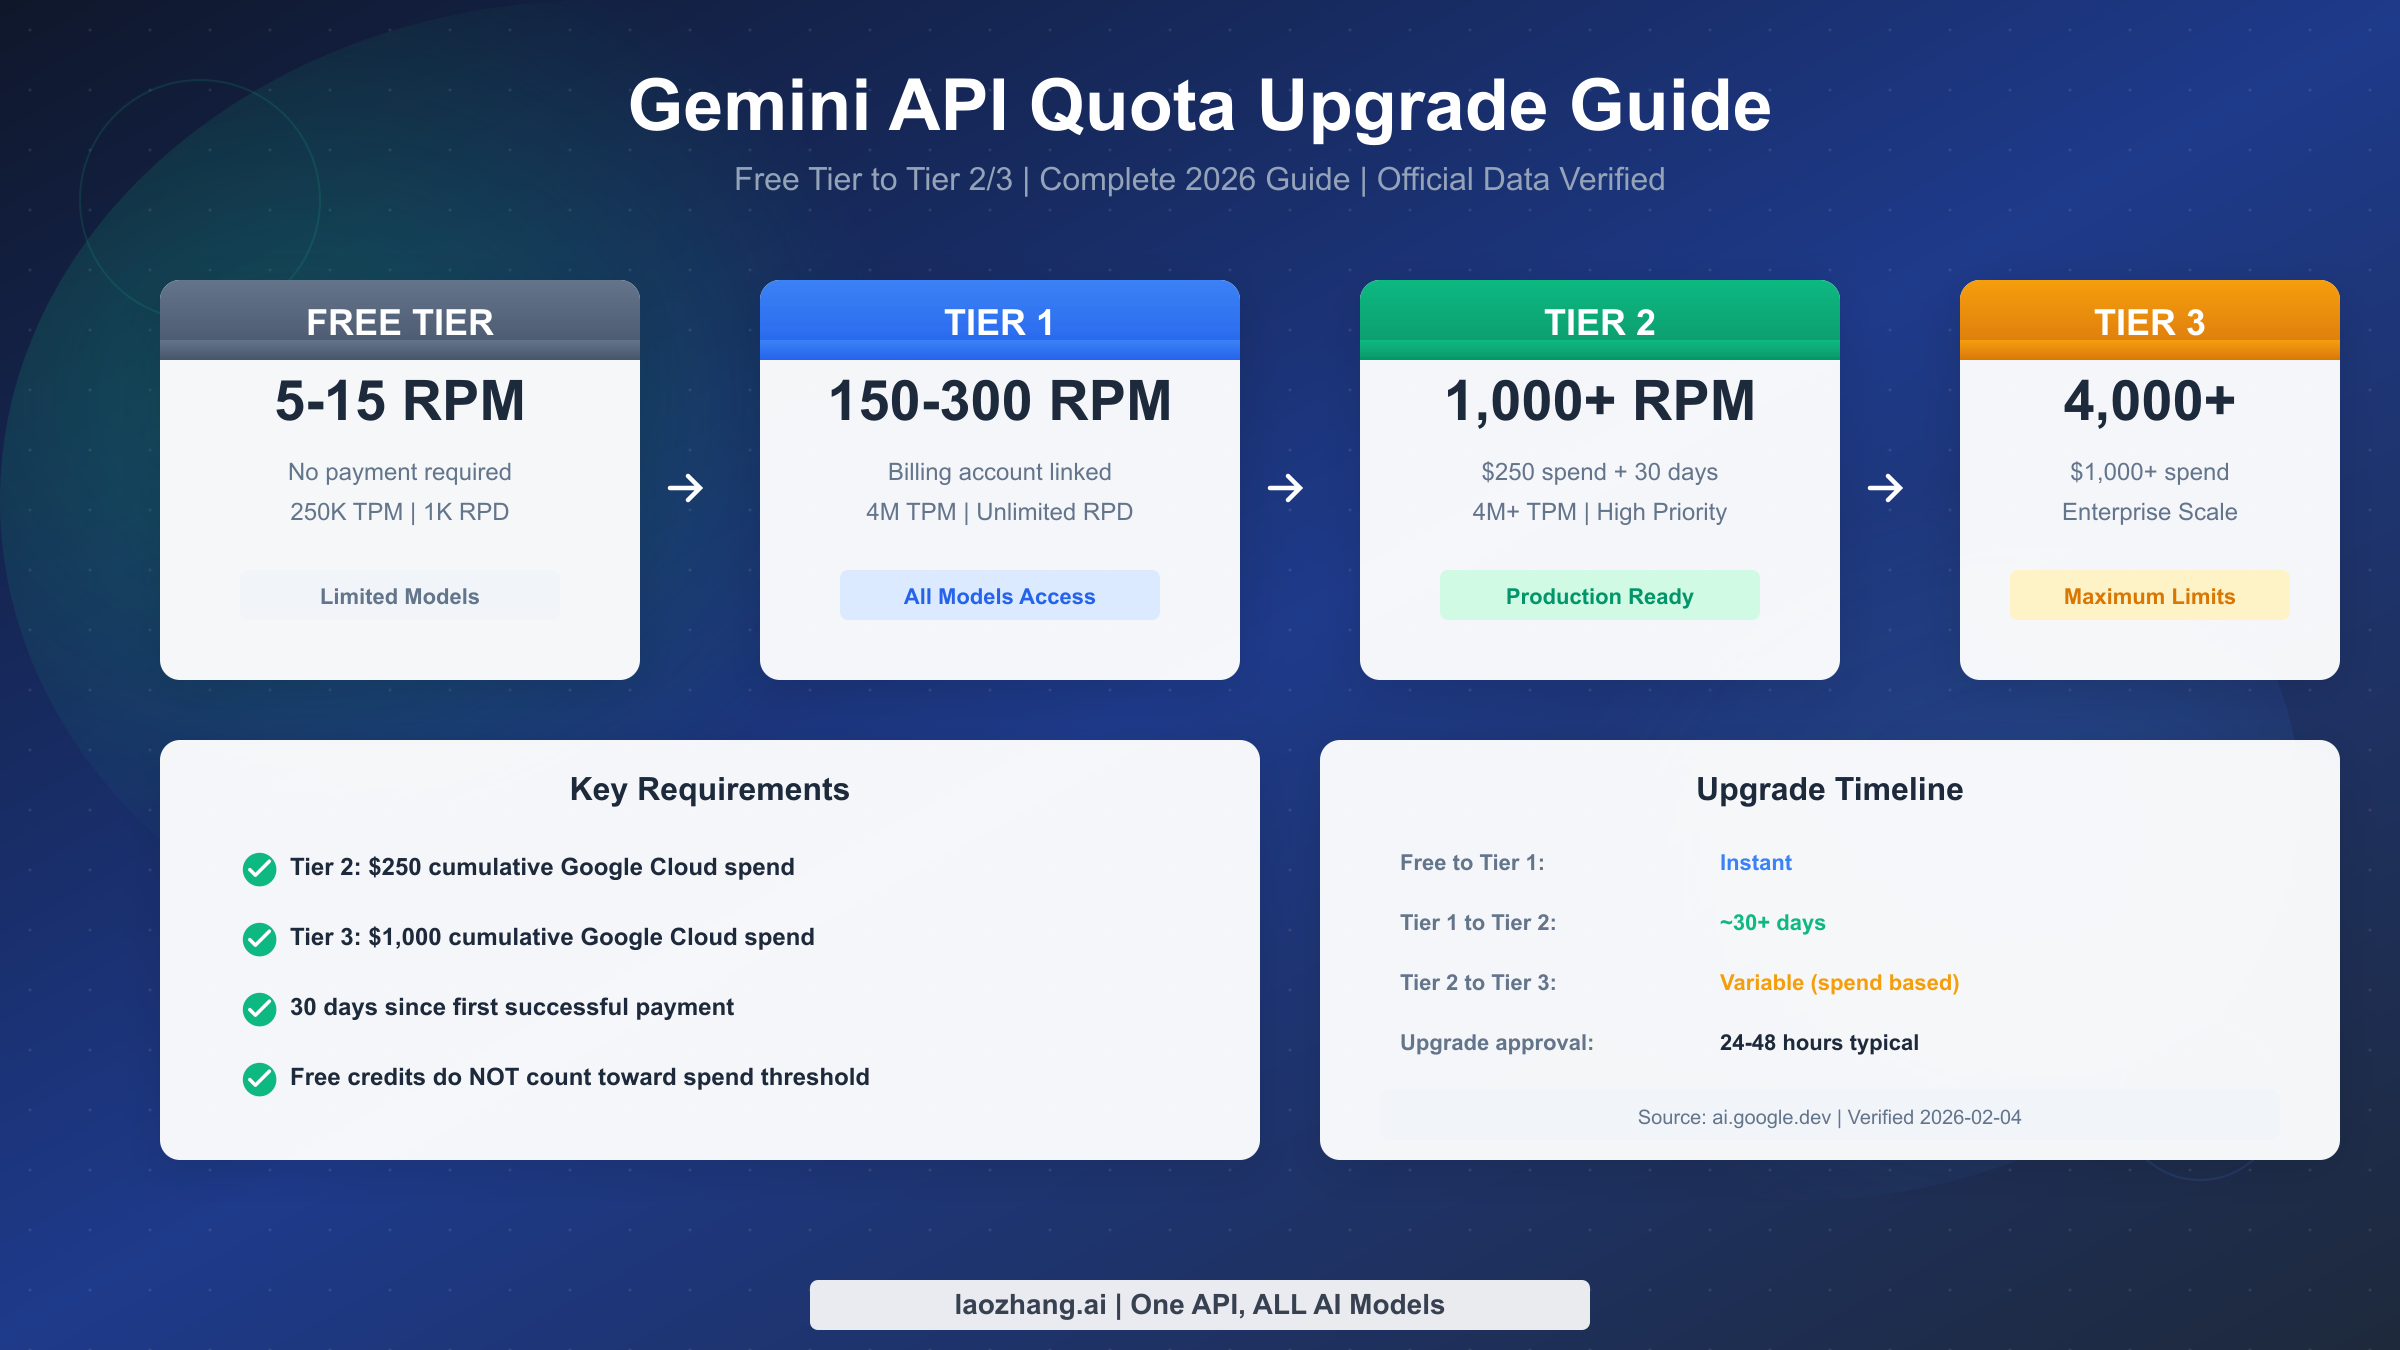
The Gemini API tier system has four levels: Free Tier (5-15 RPM, no billing required), Tier 1 (150-300 RPM, billing account linked), Tier 2 (1,000-2,000 RPM, $250 cumulative spend + 30 days), and Tier 3 (4,000+ RPM, $1,000 cumulative spend + 30 days). The most important thing to understand is that free credits from Google Cloud do NOT count toward the spending thresholds—only actual paid usage qualifies. If you need higher quotas immediately without waiting, API proxy services like laozhang.ai provide an alternative path with pre-established high limits.
Quick Start: Understanding the Tier System in 60 Seconds
Google's Gemini API uses a four-tier quota system that determines how many requests you can make per minute, how many tokens you can process, and which features you can access. Understanding this system is crucial for planning your API usage strategy, whether you're building a small prototype or scaling a production application that handles thousands of concurrent users.
The tier system works as a progressive unlock mechanism based on your relationship with Google Cloud billing. When you first start using the Gemini API, you're automatically placed in the Free Tier, which offers enough capacity for experimentation and small projects but quickly becomes limiting for anything serious. As you demonstrate commitment through billing setup and actual spending, Google grants you access to higher tiers with proportionally higher limits.
The Four Tiers at a Glance
The Free Tier is where everyone starts. You get 5-15 requests per minute depending on the model, 250,000 tokens per minute, and 1,000-1,500 requests per day. This is sufficient for testing the API, building proof-of-concept applications, or running personal projects with light usage. The key limitation here isn't just the rate limit itself—it's that you're restricted from using certain premium features and models that require a billing account.
Tier 1 becomes available the moment you link a valid billing account to your Google Cloud project. The upgrade is instant, requiring no minimum spending. Your rate limits jump to 150-300 RPM depending on the model, with 4 million tokens per minute and unlimited daily requests. This tier is suitable for development environments and applications with moderate traffic, but production workloads often need more headroom.
Tier 2 requires both a spending threshold and a time requirement: $250 in cumulative Google Cloud spending plus 30 days since your first successful payment. Once you meet both conditions, you can request an upgrade through AI Studio to unlock 1,000-2,000 RPM, higher Batch API quotas, and priority processing. This is typically the sweet spot for production applications serving real users.
Tier 3 follows the same pattern but with higher thresholds: $1,000 cumulative spending plus 30 days since first payment. This tier provides 4,000+ RPM and enterprise-scale Batch API access, designed for high-volume applications, large-scale data processing, or services with significant concurrent user bases.
Complete Tier Comparison: Quotas, Limits, and Benefits
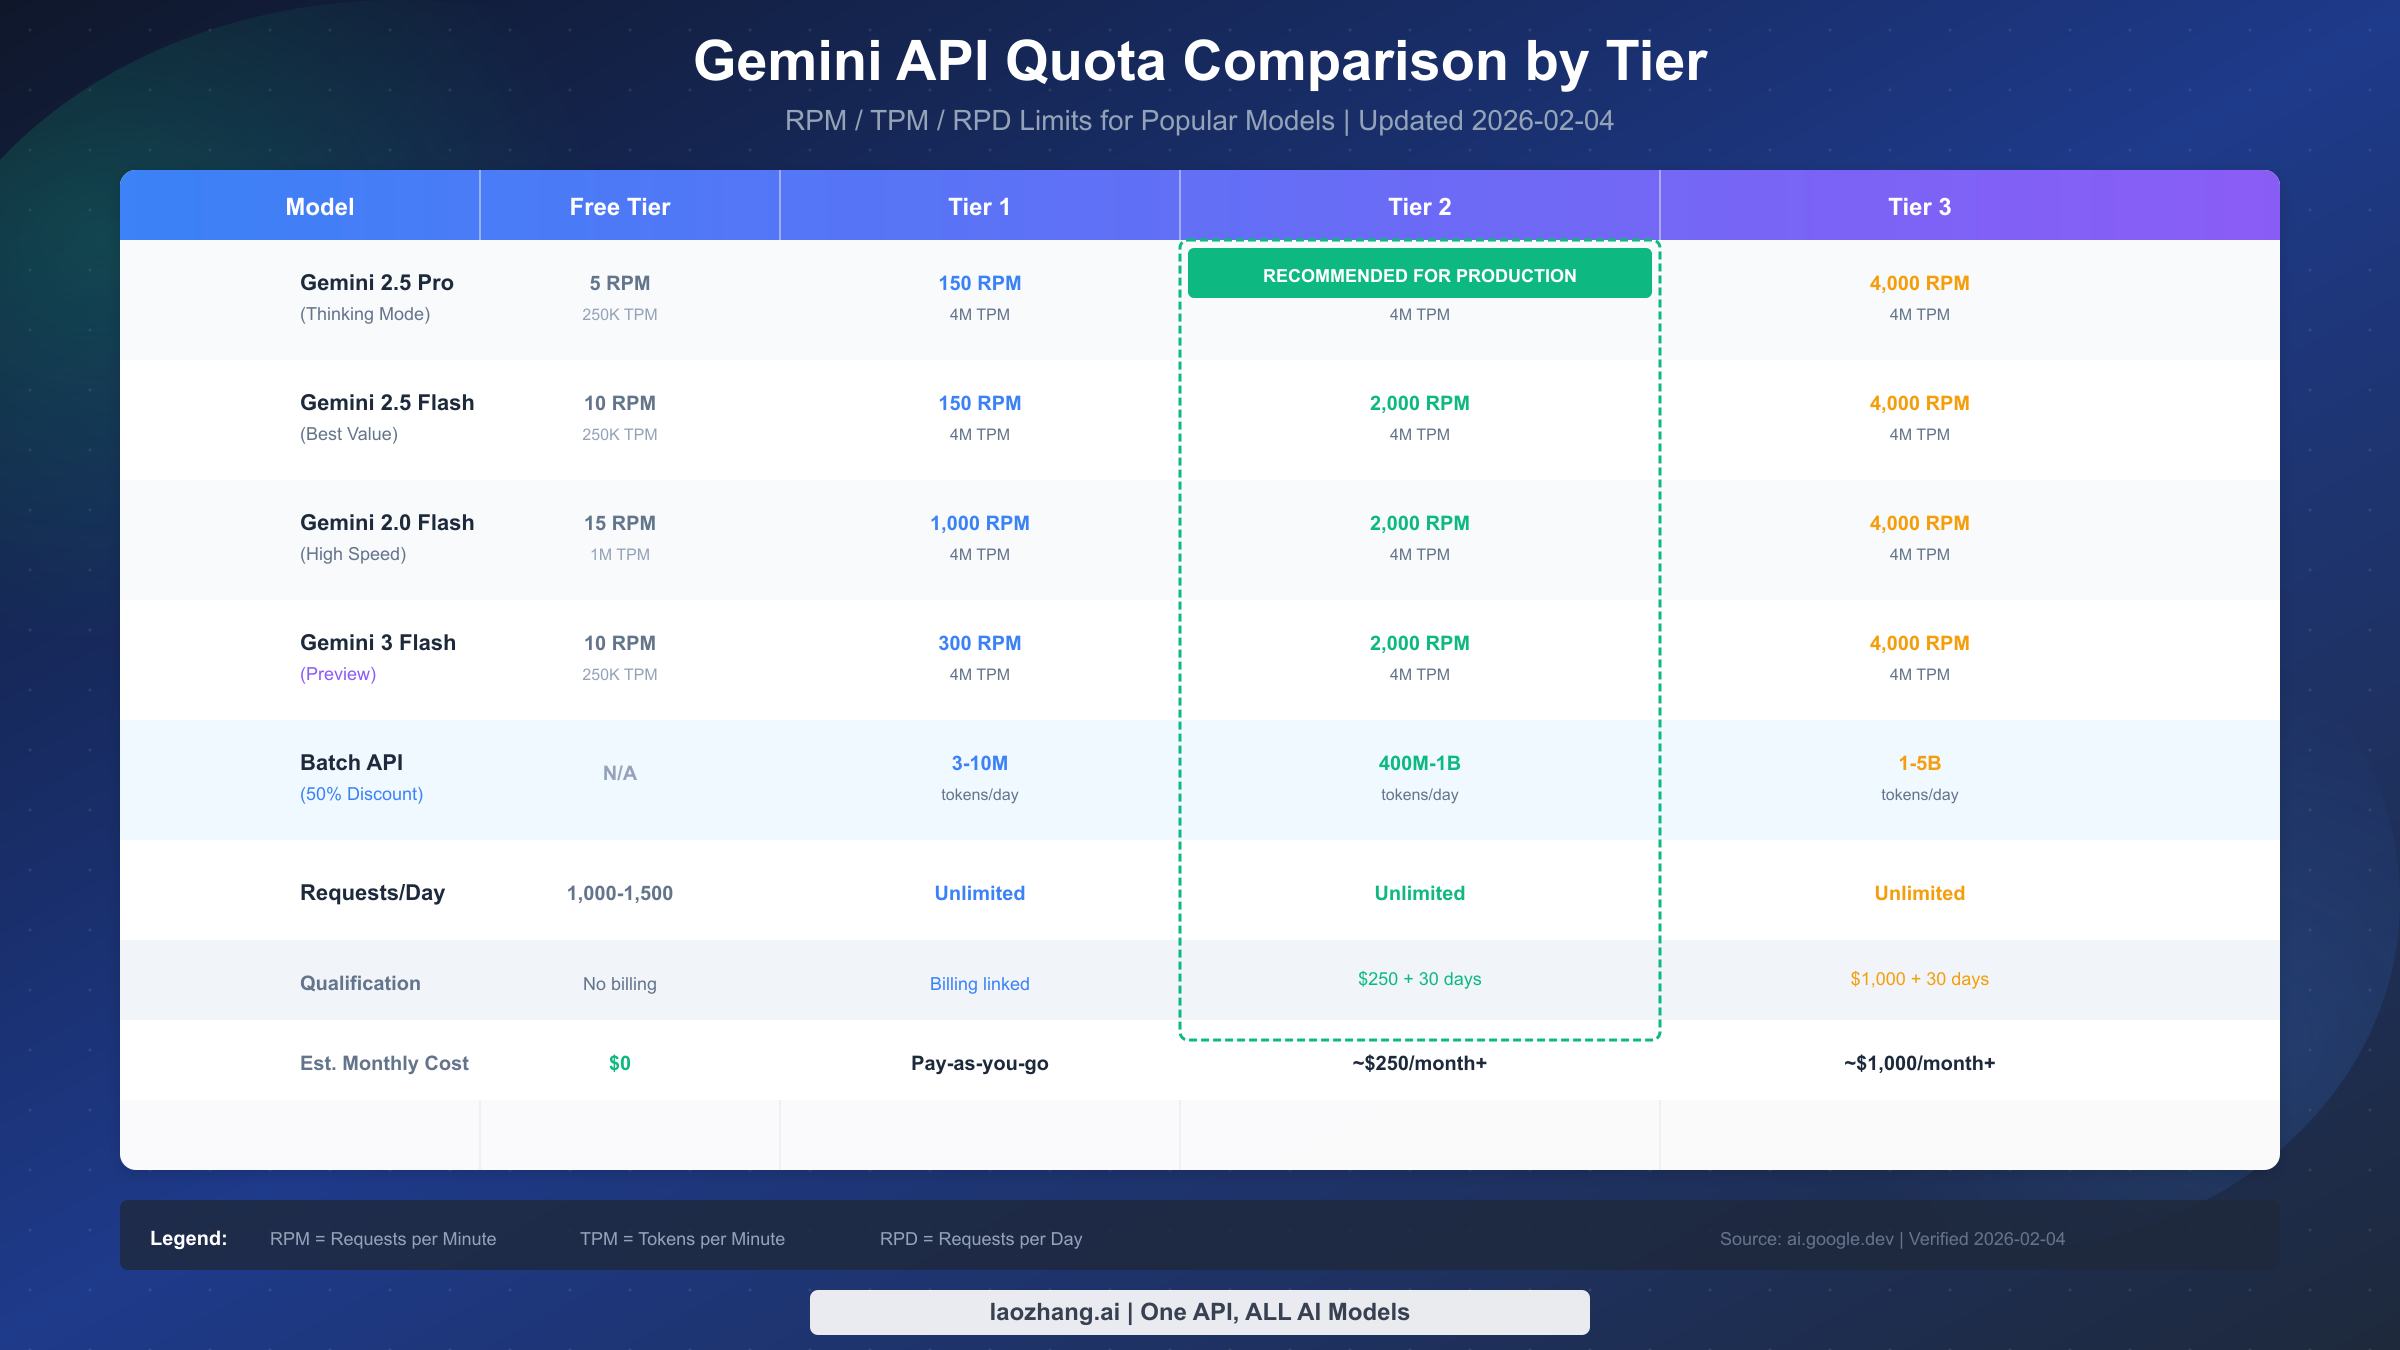
Understanding the exact quota differences between tiers helps you plan when to upgrade and what performance improvements to expect. The official Google documentation spreads this information across multiple pages, so this comprehensive comparison consolidates everything in one place. All data has been verified against the official ai.google.dev documentation as of February 2026.
Qualification Requirements by Tier
Each tier has specific eligibility criteria that must be fully met before you can access its quotas. The Free Tier simply requires that you're in a supported country or region—no billing setup necessary. Tier 1 requires a complete, valid billing account linked to your project; importantly, you don't need to spend anything yet—just having the billing configured is enough. Tier 2 adds two requirements: cumulative spending exceeding $250 across all Google Cloud services and at least 30 days having passed since your first successful payment was processed. Tier 3 raises the spending threshold to $1,000 while maintaining the same 30-day requirement.
Rate Limits by Model and Tier
The rate limits vary significantly between models, with more powerful models generally having lower free-tier limits. Gemini 2.5 Pro with Thinking Mode, Google's most capable model for complex reasoning tasks, starts at just 5 RPM on the Free Tier but scales to 150 RPM at Tier 1, 1,000 RPM at Tier 2, and 4,000 RPM at Tier 3. Gemini 2.5 Flash, optimized for speed and cost efficiency, offers slightly higher limits: 10 RPM free, 150 RPM at Tier 1, 2,000 RPM at Tier 2, and 4,000 RPM at Tier 3.
Gemini 2.0 Flash provides the most generous free-tier allocation at 15 RPM, climbing to 1,000 RPM at Tier 1 and 2,000-4,000 RPM at higher tiers. The newer Gemini 3 series models follow similar patterns, with Gemini 3 Flash Preview offering 10 RPM free and scaling to 300 RPM at Tier 1, while Gemini 3 Pro Preview mirrors the 2.5 Pro limits. For a more detailed breakdown of each model's specific limits, see our comprehensive free tier limits guide.
Batch API Token Quotas
The Batch API, which offers 50% cost savings for non-time-sensitive workloads, has dramatically different quotas between tiers. Free Tier users cannot access the Batch API at all. Tier 1 provides modest allocations: 3-10 million tokens per day depending on the model. The jump to Tier 2 is substantial, with quotas ranging from 400 million to 1 billion tokens per day. Tier 3 pushes this further to 1-5 billion tokens daily, making it viable for large-scale batch processing operations like document analysis, content generation pipelines, or research data processing.
Requests Per Day Limits
While RPM controls burst capacity, daily request limits determine total throughput. The Free Tier caps you at 1,000-1,500 requests per day, which can be exhausted quickly with consistent usage. All paid tiers (Tier 1 and above) remove this daily cap entirely, providing unlimited requests per day—the only constraint becomes your per-minute rate limit. This unlimited daily capacity is often underappreciated but becomes critical for applications with uneven traffic patterns or batch processing needs spread across the day.
Cost Planning: How to Reach $250 and $1,000 Thresholds
Planning your path to Tier 2 or Tier 3 requires understanding both the pricing structure and realistic usage scenarios. The spending threshold is cumulative across all Google Cloud services linked to your billing account, not just Gemini API usage—though for most developers, AI API calls will be the primary expense. For detailed pricing information, check our complete pricing and quotas guide.
Model Pricing Overview
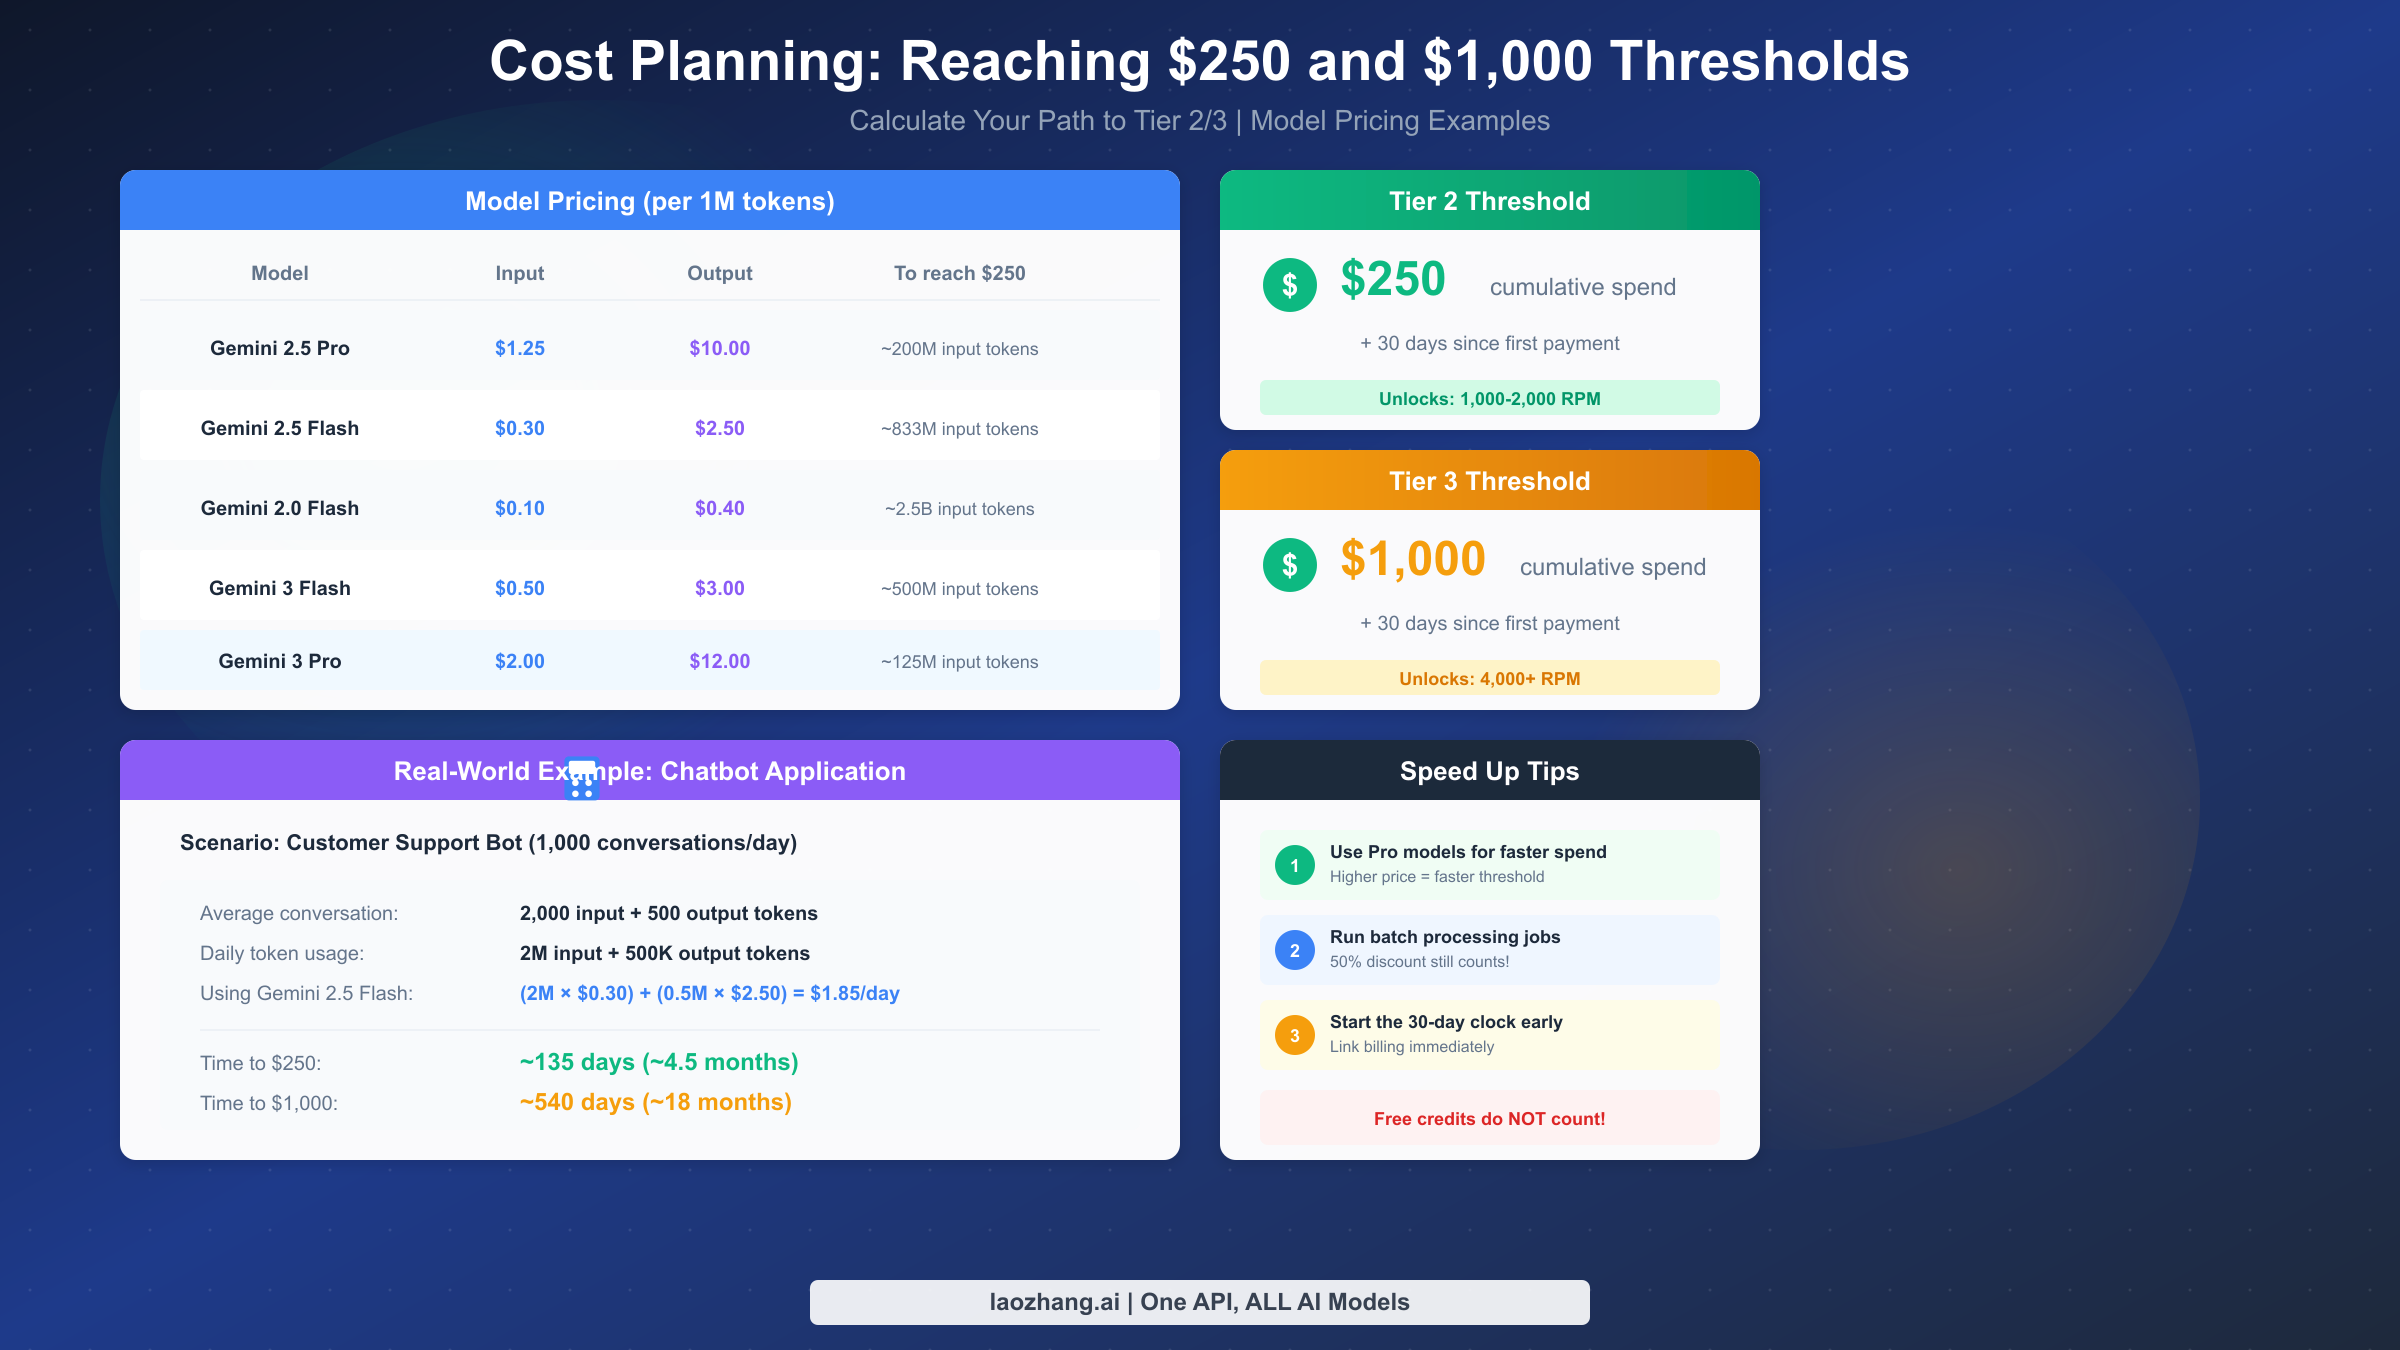
Gemini API pricing follows a token-based model with separate rates for input and output tokens. Gemini 2.5 Pro, the flagship model, costs $1.25 per million input tokens for prompts up to 200K tokens, increasing to $2.50 for longer contexts. Output tokens are significantly more expensive at $10.00 per million (up to 200K context) or $15.00 for extended contexts. The Thinking Mode variant uses the same pricing but may generate more internal reasoning tokens.
Gemini 2.5 Flash offers dramatic cost savings at $0.30 per million input tokens and $2.50 per million output tokens. Gemini 2.0 Flash is even cheaper at $0.10 input and $0.40 output per million tokens, making it the most economical choice for high-volume applications where the latest model capabilities aren't essential. The newer Gemini 3 Flash Preview sits between these at $0.50 input and $3.00 output, while Gemini 3 Pro Preview commands premium pricing at $2.00 input and $12.00 output.
Calculating Your Path to $250
The amount of API usage needed to reach $250 varies dramatically by model choice and input/output ratio. Using Gemini 2.5 Flash with typical chatbot usage patterns (higher input than output), you'd need approximately 833 million input tokens to reach the threshold—equivalent to processing roughly 600,000 average-length conversations. With Gemini 2.0 Flash, this stretches to about 2.5 billion input tokens due to its lower pricing.
Consider a realistic scenario: a customer support bot handling 1,000 conversations daily with an average of 2,000 input tokens and 500 output tokens per conversation. Using Gemini 2.5 Flash, daily spending would be approximately $1.85 (2M input tokens × $0.30/M + 0.5M output tokens × $2.50/M). At this rate, reaching $250 would take about 135 days—roughly 4.5 months of consistent usage.
Accelerating Your Path to Higher Tiers
Several strategies can help you reach spending thresholds faster without wasting money on unnecessary API calls. First, consider using Pro-tier models for workloads where quality matters—their higher pricing accelerates threshold attainment while delivering better results. Second, batch processing jobs count toward your spending even with the 50% discount, so running legitimate batch workloads contributes to your cumulative total.
Most importantly, start your billing account immediately even if you're not ready to spend significantly. The 30-day clock requirement runs independently of the spending requirement, so you can work toward both conditions simultaneously. Many developers make the mistake of waiting until they need higher limits to set up billing, only to discover they must then wait an additional month after reaching the spending threshold.
A Note on Cost Optimization
While focusing on tier upgrades, don't overlook opportunities to optimize your API spending. Services like laozhang.ai offer aggregated access to multiple AI models including Gemini, often at competitive rates with built-in rate limiting that can help manage costs while you're still on lower tiers. The platform documentation at docs.laozhang.ai provides detailed pricing comparisons for various models.
Step-by-Step Upgrade Guide: From Free to Paid Tiers
The upgrade process from Free Tier to Tier 1 is straightforward and instant, while progressing to Tier 2 and Tier 3 requires meeting specific conditions and then requesting the upgrade through Google AI Studio. This section walks through each step with practical guidance on avoiding common pitfalls.
Step 1: Setting Up Google Cloud Billing
Before you can upgrade to any paid tier, you need a Google Cloud billing account properly configured. Navigate to the Google Cloud Console at console.cloud.google.com and access the Billing section from the navigation menu. If you don't have a billing account, click "Create Account" and follow the prompts to add a valid payment method. Google accepts most major credit cards and debit cards, though prepaid cards may require additional verification.
When creating the billing account, pay attention to the account type selection—individual accounts are fine for most developers, but business accounts may be required if you're operating under a company. The billing account must be in good standing, meaning any payment method issues or account suspensions will block your tier upgrades until resolved.
Step 2: Linking Billing to Your Project
Having a billing account isn't enough—it must be explicitly linked to the Google Cloud project that uses the Gemini API. In the Cloud Console, navigate to your project (or create one if you haven't), then go to Billing > Link a billing account. Select your billing account from the dropdown and confirm the linkage. This action immediately upgrades you to Tier 1 for all Gemini API usage within that project.
Verify the linkage was successful by visiting AI Studio (aistudio.google.com), selecting your project from the project picker, and checking the settings or quota section. Your tier status should now show as Tier 1 rather than Free. If it still shows Free after a few minutes, try refreshing the page or clearing your browser cache.
Step 3: Meeting Tier 2/3 Requirements
Reaching Tier 2 requires both conditions to be met: $250 cumulative spending and 30 days since your first successful payment. These conditions are tracked separately, and you can monitor your spending through the Cloud Console's Billing > Reports section. The 30-day clock starts from the date of your first successfully processed payment, not from when you created the billing account.
For Tier 3, the same logic applies with a $1,000 spending threshold. Note that spending accumulates across all Google Cloud services on the billing account, not just Gemini API. If you also use Cloud Functions, Cloud Storage, or other services, that spending counts toward your cumulative total. However, promotional credits and free trial credits explicitly do NOT count—only actual charged spending qualifies.
Step 4: Requesting the Upgrade in AI Studio
Once you meet both conditions for Tier 2 (or Tier 3), the upgrade isn't automatic—you must request it. Visit AI Studio at aistudio.google.com, go to your project settings or quota management section, and look for the upgrade request option. The interface shows your current tier and, if eligible, displays an "Upgrade" or "Request Tier Upgrade" button.
Submit the request and wait for approval. Google typically processes tier upgrade requests within 24-48 hours, though it can occasionally take longer during high-demand periods. You'll receive notification of the approval via email, and your new limits will apply immediately across all API endpoints.
Upgrade Timeline: What to Expect and When
Planning your upgrade timeline helps set realistic expectations for when you'll have access to higher quotas. The timeline varies based on your usage patterns and how quickly you can meet the spending requirements, but understanding the typical progression helps with project planning.
Free to Tier 1: Instant
The moment you link a valid billing account to your project, you're upgraded to Tier 1. There's no waiting period, no minimum spending, and no approval process. This means you can go from 5-15 RPM to 150-300 RPM within minutes of setting up billing. For many developers, Tier 1 provides sufficient capacity for extended development, testing, and even moderate production loads.
Tier 1 to Tier 2: 30+ Days Minimum
The path to Tier 2 has a hard minimum of 30 days due to the "time since first payment" requirement. Even if you could somehow spend $250 in the first day, you'd still need to wait the full 30-day period. For most developers with normal usage patterns, reaching $250 in spending takes several months, making the 30-day requirement less relevant—your spending will be the bottleneck rather than the time.
If you're actively working toward Tier 2, the most efficient strategy is starting both clocks simultaneously: set up billing immediately and begin real API usage. By the time you've accumulated $250 in spending through normal development and early production use, the 30-day period will likely have already passed.
Tier 2 to Tier 3: Variable Based on Spending
Progressing from Tier 2 to Tier 3 follows the same pattern but with the $1,000 threshold. If you're already at Tier 2, you've already met the 30-day requirement, so only the spending threshold matters. The time to reach Tier 3 depends entirely on your API consumption—a high-volume production application might reach $1,000 in weeks, while a moderate-traffic service could take months.
Upgrade Approval: 24-48 Hours Typical
Once you meet all requirements and submit an upgrade request, expect 24-48 hours for approval. This isn't an automated process—Google reviews requests to prevent abuse. In practice, legitimate upgrade requests are almost always approved without issues. If your request is denied or takes unusually long, it may indicate billing account problems, unusual usage patterns, or account standing issues that need resolution.
Best Practices for Quota Management
Successfully upgrading your tier is just the first step—effectively managing your quotas ensures you get maximum value from your API investment while avoiding service disruptions. These practices apply whether you're on Tier 1 or Tier 3.
Monitoring Your Quota Usage
Google Cloud Console provides quota monitoring dashboards that show your current usage against limits. Navigate to APIs & Services > Quotas to see real-time and historical usage patterns. Set up alerts to notify you when usage approaches thresholds—triggering at 80% capacity gives you time to react before hitting hard limits.
Programmatically, you can check remaining quota through response headers that accompany API calls. The x-ratelimit-remaining headers indicate how many requests you have left in the current window, enabling your application to implement intelligent backoff or request queuing when approaching limits.
Preventing 429 Errors
The HTTP 429 "Resource Exhausted" error occurs when you exceed your rate limits. Preventing these errors requires a multi-layered approach: client-side rate limiting to stay within known bounds, exponential backoff with jitter when errors occur, and request queuing for bursty workloads. For detailed strategies on handling these errors, see our guide on 429 resource exhausted error troubleshooting.
Implement token bucket or leaky bucket algorithms in your client code to smooth out request patterns. Rather than firing requests as fast as possible and hitting limits, pace your requests to stay just under the limit. This provides more predictable performance and eliminates the latency spikes caused by retry loops after 429 errors.
Leveraging Batch API Effectively
The Batch API offers 50% cost savings for workloads that don't require real-time responses. Beyond the cost benefit, batch requests don't count against your real-time rate limits, enabling you to maximize throughput by running batch jobs alongside interactive traffic. Use batch processing for background tasks like content moderation, document summarization, or bulk data analysis.
Batch API quotas scale dramatically with tiers—from 3-10 million tokens at Tier 1 to potentially billions at Tier 3. If you have legitimate batch processing needs, reaching higher tiers unlocks substantial batch capacity that can transform your data processing capabilities.
Cost Optimization Strategies
Choose the right model for each task. Not every request needs Gemini 2.5 Pro—many tasks work equally well with Flash models at a fraction of the cost. Implement model routing that sends simple requests to cheaper models while reserving expensive models for complex tasks requiring their full capabilities.
Cache responses where appropriate. If multiple users ask similar questions, caching can dramatically reduce API calls. Implement semantic caching that recognizes similar (not just identical) requests and serves cached responses when the similarity threshold is met.
Troubleshooting: When Upgrade Doesn't Work
Despite meeting all apparent requirements, some users encounter issues where the upgrade button doesn't appear or upgrade requests fail. This troubleshooting guide addresses the most common issues and their solutions.
Issue 1: Upgrade Button Not Showing
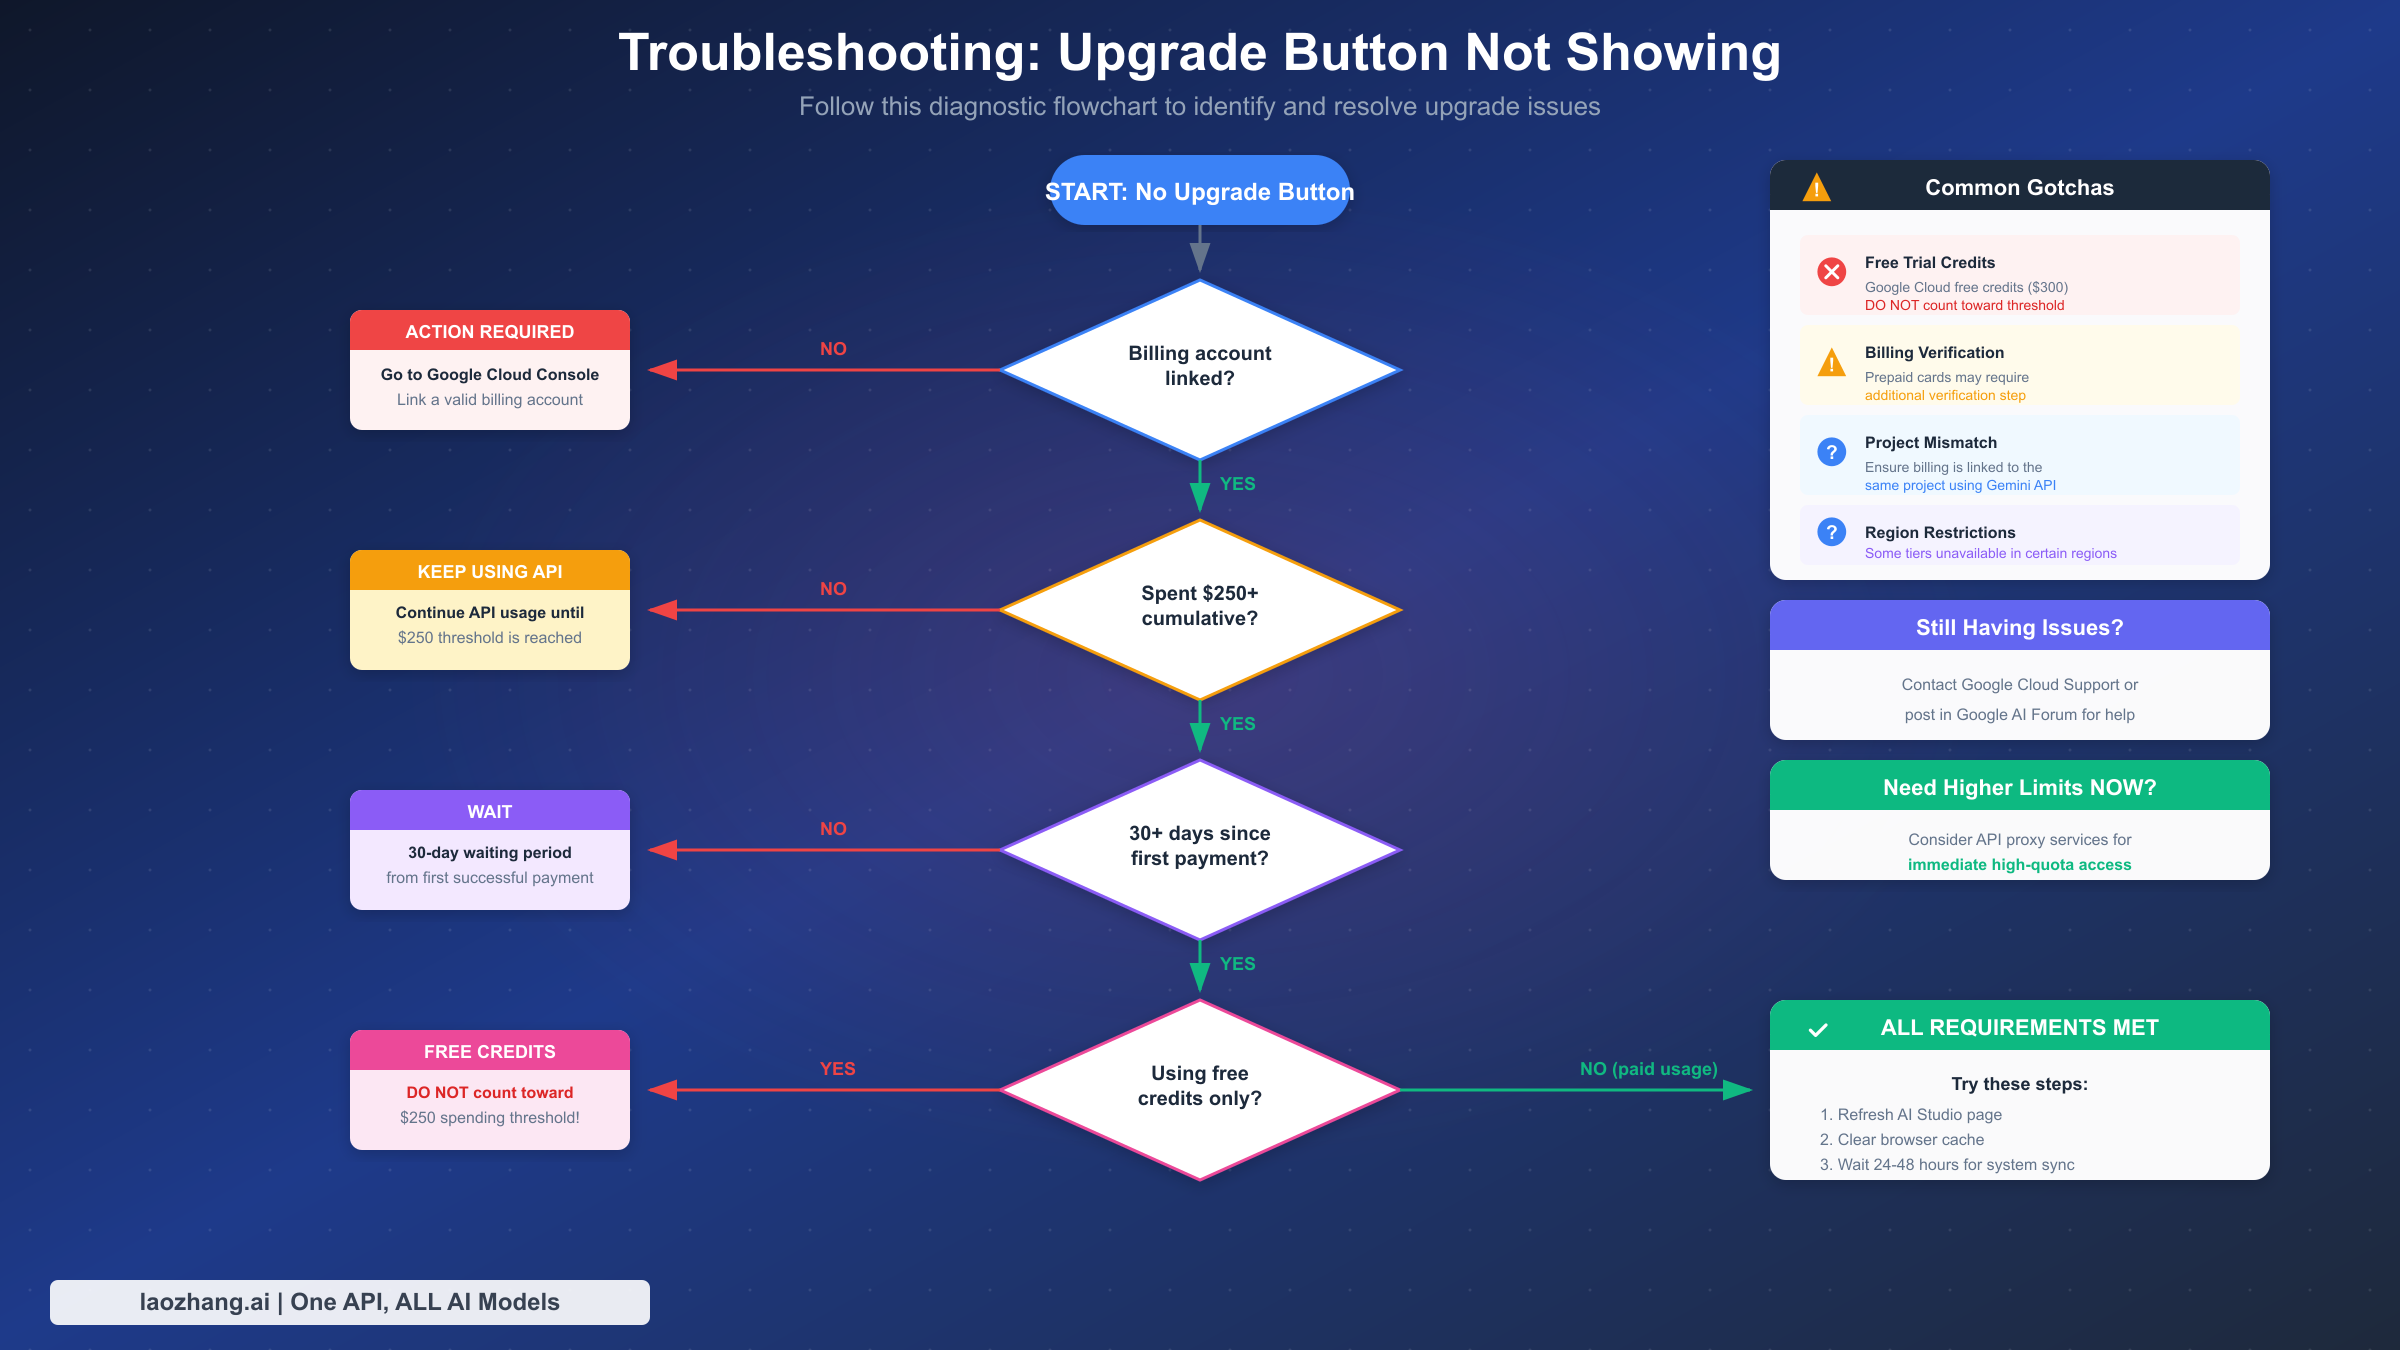
The most common complaint is that the upgrade button simply doesn't appear in AI Studio even when requirements seem met. Start by verifying each requirement systematically: Is the billing account properly linked to the specific project you're viewing in AI Studio? Has the cumulative spending actually exceeded the threshold (check Billing > Reports for exact figures)? Have 30 days passed since the first successful payment (check Billing > Transactions for the exact date)?
If all conditions appear met, the issue often lies in browser caching or session state. Clear your browser cache completely, log out and back in to your Google account, and try accessing AI Studio in an incognito window. The upgrade button relies on real-time checks that can sometimes get cached incorrectly.
Issue 2: Free Credits Don't Count
This catches many users off guard: Google Cloud free trial credits ($300 for new accounts) and promotional credits from programs or events do NOT count toward the spending threshold. Only actual charged spending—payments processed against your credit card—qualifies. You can verify this by checking your Billing > Transactions page; credits appear separately from charged amounts.
If you've been operating primarily on free credits, you'll need to continue using the API after the credits expire and accumulate $250 in actual charges before becoming eligible for Tier 2. Plan accordingly and monitor your credit balance to know when real charges will begin.
Issue 3: Billing Verification Problems
Certain payment methods require additional verification before they're considered "valid" for tier upgrades. Prepaid credit cards, virtual cards, and cards from certain regions may trigger verification requirements. Google might place a small authorization charge (typically $1) that's immediately refunded to verify the card works.
If your billing account shows a pending verification status, complete any required verification steps through the Cloud Console. This might involve confirming the authorization charge, providing additional identity documentation, or simply waiting for Google's automated verification to complete.
Issue 4: Project-Billing Mismatch
A subtle but common issue occurs when you have multiple Google Cloud projects and the billing account is linked to a different project than the one you're using for Gemini API. Each project can only have one billing account, and the tier status applies per-project based on that linked account's spending history.
Double-check that you're viewing the correct project in both the Cloud Console and AI Studio. The project picker dropdown should show the same project in both interfaces. If you recently reorganized projects or billing accounts, the spending history might not have transferred as expected.
Issue 5: Upgrade Request Rejected
Upgrade rejections are rare for users who legitimately meet the requirements, but they can happen due to billing account issues (past-due payments, failed charges), suspicious usage patterns (potential ToS violations), or technical errors in the request processing.
If rejected, first resolve any billing account issues visible in the Cloud Console. If your account is in good standing and usage is legitimate, wait 24 hours and try the upgrade request again. Persistent rejections may require contacting Google Cloud support for manual review—they can investigate your specific account situation and identify any blocking issues.
Alternative Solutions: API Proxy Services
Sometimes you need higher API quotas immediately—whether for a time-sensitive project, unexpected traffic spikes, or while waiting for tier upgrades to process. API proxy services provide an alternative path that doesn't depend on Google's tier system.
When to Consider Alternatives
Several scenarios make API proxies attractive: You're in the 30-day waiting period for Tier 2 but need higher limits now. Your usage is bursty and unpredictable, making it hard to stay within rate limits. You want access to multiple AI providers through a single integration point. Or you're exploring different models before committing to a specific vendor.
API proxy services maintain their own high-quota relationships with AI providers, effectively sharing their tier allocation across customers. This means you can access Tier 2 or Tier 3 equivalent limits without personally meeting Google's spending or time requirements.
Evaluating Proxy Services
When evaluating API proxy options, consider several factors. Pricing structure: do they charge a markup over base API costs, a flat fee, or usage-based pricing? Rate limits: what actual limits does the proxy provide, and are they guaranteed or best-effort? Reliability: what's their uptime history and how do they handle provider outages? Compliance: for enterprise use, do they meet your security and data handling requirements?
Services like laozhang.ai specialize in aggregating access to multiple AI models including Gemini, OpenAI, Claude, and others through a unified API. Their documentation at docs.laozhang.ai details specific quotas, pricing, and integration guides. The platform can be particularly useful during the transition period while building up your direct Google Cloud spending history.
Hybrid Approach Strategy
Rather than choosing exclusively between direct API access and proxy services, consider a hybrid approach. Use your direct Gemini API quota for predictable baseline traffic while routing overflow or burst traffic through a proxy service. This maximizes value from your direct quota while ensuring you never face service disruptions due to rate limiting.
As your usage grows and you upgrade to higher tiers, you can gradually shift more traffic to direct API access. The proxy service serves as insurance and overflow capacity rather than your primary path. This strategy also provides resilience—if Google experiences service issues, you can route all traffic through the proxy temporarily.
FAQ: Your Questions Answered
Do Google Cloud free credits count toward the $250 requirement?
No, they do not. The $250 (or $1,000 for Tier 3) must come from actual charged spending—payments processed against your payment method. Free trial credits, promotional credits, and any other credit-based spending are tracked separately and don't count toward tier upgrade thresholds. This is one of the most common misconceptions that delays upgrades. Check your Billing > Transactions page to see the breakdown between credit usage and actual charges.
Can I skip Tier 1 and go directly to Tier 2?
No, the tier progression is sequential. You must first establish Tier 1 status by linking a billing account before you can begin accumulating spending toward Tier 2. However, the good news is that Tier 1 is instant once billing is linked—there's no waiting period. So practically speaking, you move through Tier 1 immediately on your way to Tier 2; you just can't bypass the billing linkage step entirely.
How long does the upgrade approval take?
Tier 1 upgrades are instant—the moment you link billing, your new limits apply. For Tier 2 and Tier 3, after meeting the requirements and submitting the upgrade request, approval typically takes 24-48 hours. In some cases, it may take longer during high-demand periods or if your account requires additional review. If you've been waiting more than 72 hours, check your account for any issues or contact Google Cloud support.
Will my upgrade work across all models?
Yes, tier upgrades apply to your entire project and affect all Gemini models within that project. When you upgrade to Tier 2, the new RPM, TPM, and RPD limits apply whether you're using Gemini 2.5 Pro, Flash variants, or newer models. However, the exact limits vary by model—some models have higher limits at the same tier than others. Your upgrade status is project-wide, but the specific numbers depend on which model you're calling.
What happens if my spending drops below the threshold?
Once you've achieved a tier, you don't lose it if your spending decreases. The $250 and $1,000 thresholds are based on cumulative lifetime spending, not ongoing monthly spending. You could technically reach Tier 3, then use the API minimally afterward, and you'd retain Tier 3 status. However, Google reserves the right to review accounts for abuse, so maintaining reasonable usage aligned with your tier is advisable.
Can I request a custom rate limit increase beyond Tier 3?
Yes, for enterprise-scale needs exceeding Tier 3 limits, Google offers the ability to request custom rate limit increases. This typically requires working with Google Cloud sales, demonstrating legitimate business need, and potentially signing enterprise agreements. The process involves human review and negotiation rather than the self-service tier upgrades. Contact Google Cloud sales or your account representative to initiate this discussion.
Is Tier 3 the highest available tier?
Tier 3 is the highest self-service tier available through the standard upgrade process. Beyond Tier 3, enterprise customers can negotiate custom limits through Google Cloud sales relationships. These enterprise arrangements can provide significantly higher limits, dedicated capacity, committed use discounts, and other benefits not available through standard tiers. For most developers and businesses, Tier 3 provides ample capacity; enterprise arrangements are primarily relevant for very large-scale deployments.
This guide is based on official Google AI documentation verified on February 4, 2026. API quotas and pricing may change over time—always verify current limits through the official documentation at ai.google.dev.