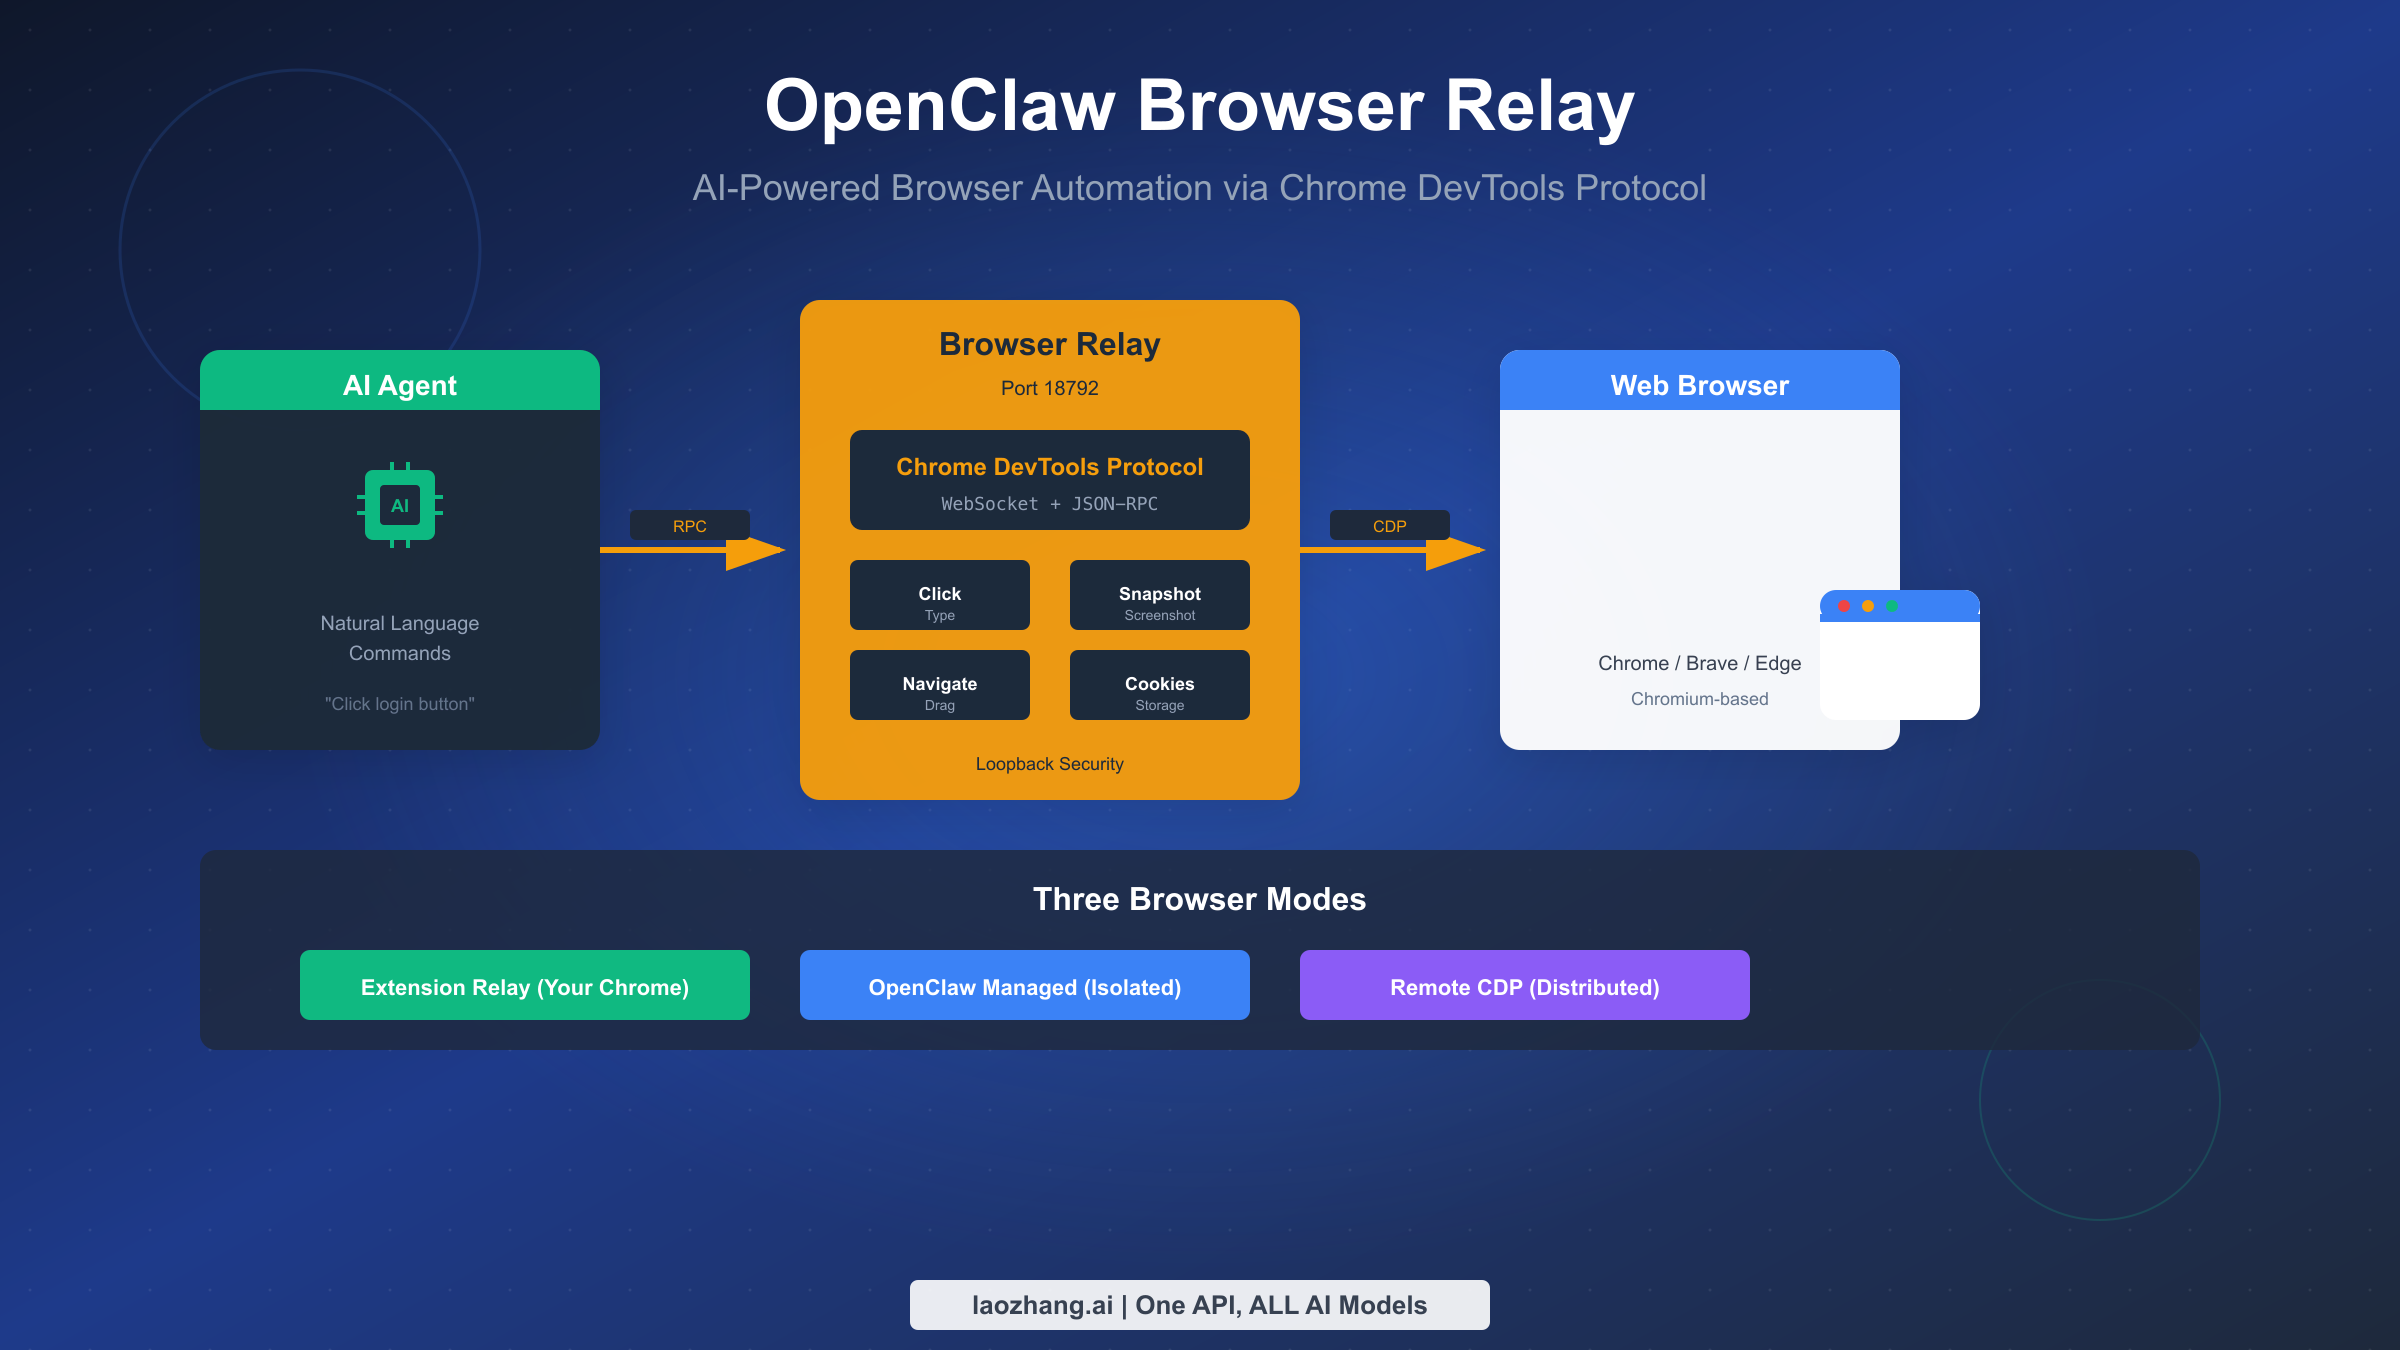
OpenClaw Browser Relay enables AI agents to control real web browsers through the Chrome DevTools Protocol (CDP). Operating on port 18792, it offers three distinct browser control modes: Extension Relay for controlling your existing Chrome tabs with logged-in sessions, OpenClaw-managed for isolated automation in a dedicated browser instance, and Remote CDP for distributed cloud deployments. Whether you're automating form submissions, extracting data from web applications, or building sophisticated AI-driven web workflows, understanding Browser Relay's architecture and configuration options is essential for successful implementation (OpenClaw official documentation, 2026-02-04 verified).
TL;DR
Browser Relay connects AI agents to Chrome-based browsers via CDP. Choose OpenClaw Managed (port 18800) for safe, isolated automation; Extension Relay (port 18792) for accessing logged-in sessions; or Remote CDP for cloud deployments. Key commands: openclaw browser start, snapshot --interactive, click e12, type e15 "text". Always take a fresh snapshot before actions since element refs change after navigation.
Understanding Browser Relay Architecture
Browser automation has evolved significantly over the past decade. Traditional tools like Selenium relied on WebDriver protocol, which operates through a standardized but relatively slow HTTP-based interface. Modern AI agents demand faster, more direct browser control, and this is where the Chrome DevTools Protocol enters the picture. CDP provides a low-level, bidirectional communication channel that exposes approximately 300 commands across various domains including Page, Network, DOM, and Runtime (Chrome DevTools Protocol specification, 2026).
The fundamental difference between CDP and older protocols lies in the communication model. WebDriver sends commands and waits for responses in a synchronous manner, while CDP establishes a persistent WebSocket connection that enables real-time event streaming and asynchronous command execution. This architectural difference translates to measurably faster automation, with performance testing showing Puppeteer (which uses CDP) running 15-20% faster than Playwright when both target Chromium (Lightpanda benchmark analysis, January 2026).
OpenClaw Browser Relay builds on this CDP foundation, adding a critical abstraction layer that makes browser automation accessible to AI agents. Rather than requiring agents to manage raw WebSocket connections and parse complex CDP responses, Browser Relay exposes a clean HTTP and CLI interface that translates high-level commands like "click element 12" into the appropriate CDP operations. This design philosophy aligns with how successful browser automation frameworks have evolved—Playwright and Puppeteer both wrap CDP in more ergonomic APIs, and Browser Relay extends this pattern specifically for AI agent integration.
The relay architecture also addresses a fundamental security concern in browser automation. Direct CDP access to a browser exposes powerful capabilities including JavaScript evaluation, cookie manipulation, and network interception. Browser Relay implements authentication tokens and loopback-only bindings to ensure that only authorized agents can control browser instances. If you're coming from a background with the complete OpenClaw installation guide, you'll recognize this security-first approach as consistent with OpenClaw's broader architectural principles.
How Browser Relay Works Under the Hood
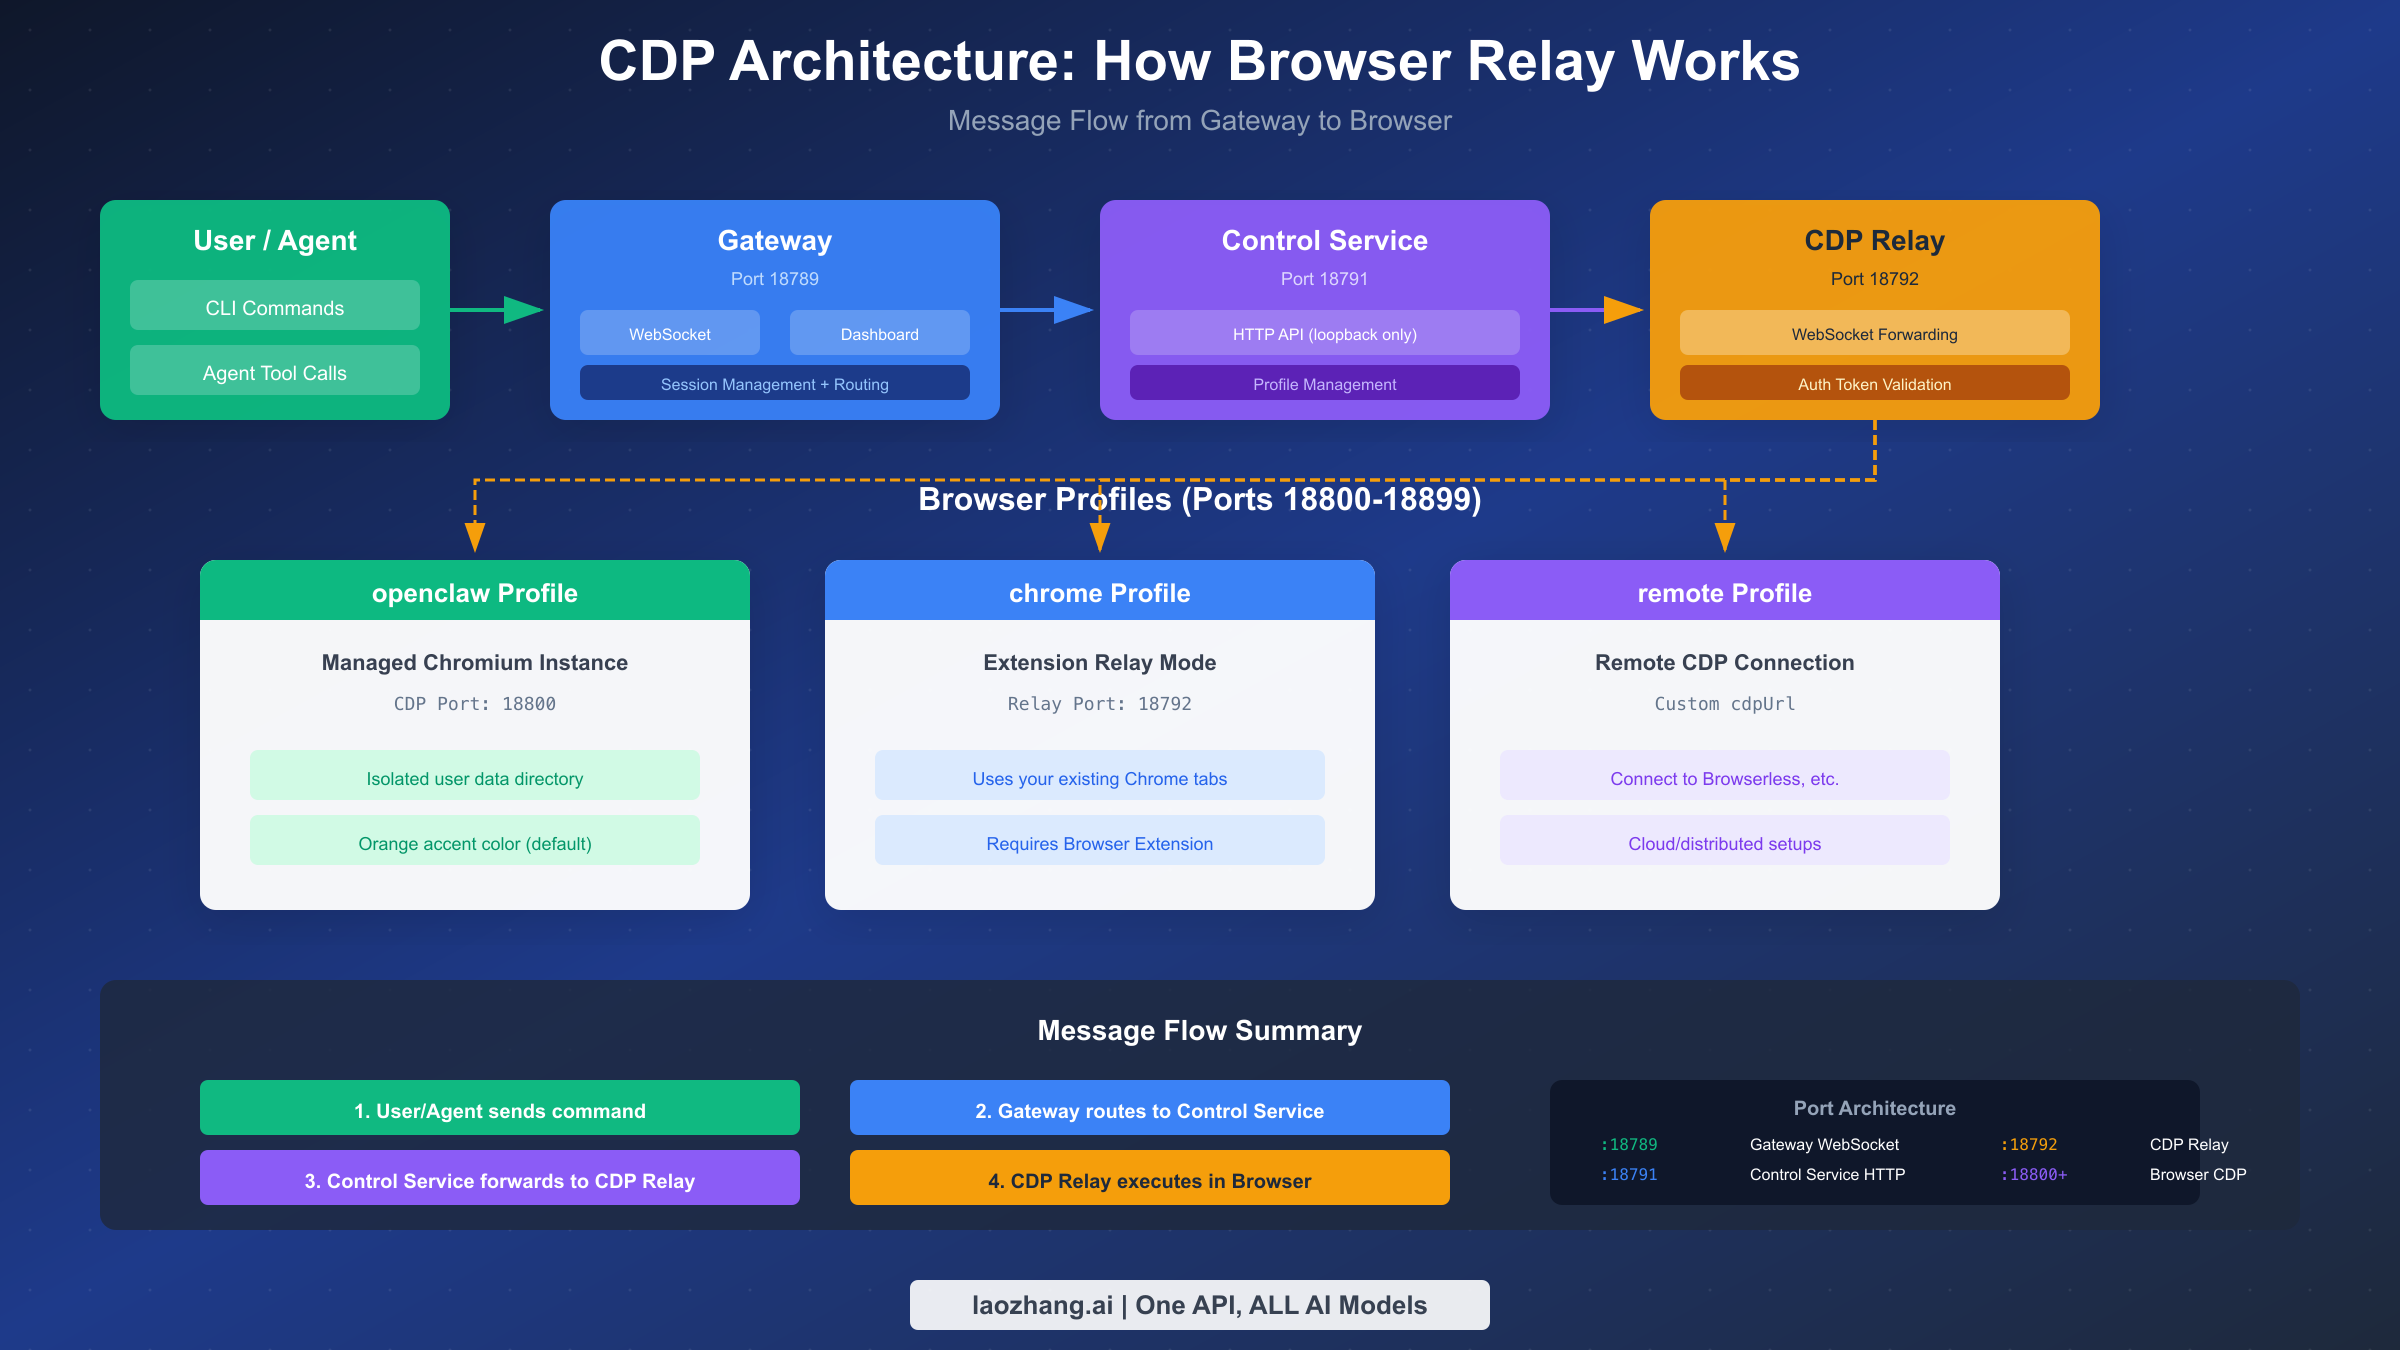
The message flow through Browser Relay involves four distinct components working in concert. When an AI agent or user issues a browser command, that request first reaches the OpenClaw Gateway on port 18789. The Gateway serves as the central coordination point for all OpenClaw operations, managing WebSocket connections from agents and routing requests to appropriate services. From the Gateway, browser-related commands flow to the Control Service on port 18791.
The Control Service handles profile management and serves as the HTTP API endpoint for browser operations. This component determines which browser profile should receive the command and manages the lifecycle of browser instances. When you run openclaw browser start, the Control Service checks whether a managed browser is already running, and if not, launches a new Chromium instance with the appropriate configuration.
The CDP Relay on port 18792 forms the actual bridge to browsers. For Extension Relay mode, it receives WebSocket connections from the Chrome extension and forwards CDP commands to the attached tab. For managed browsers, it connects directly to the browser's CDP endpoint. The relay implements authentication to prevent unauthorized access—malicious local code cannot easily abuse the CDP endpoint because it requires a valid internal auth token.
Understanding the port architecture helps with troubleshooting and firewall configuration. The default Gateway port is 18789, with derived ports calculated as offsets: Control Service at gateway+2 (18791) and CDP Relay at gateway+3 (18792). Managed browser instances receive dedicated CDP ports starting from 18800, allowing multiple isolated profiles to run simultaneously. If you customize the Gateway port using gateway.port configuration or the OPENCLAW_GATEWAY_PORT environment variable, all derived ports shift accordingly to maintain the same family relationship.
The practical implication of this architecture is that all browser control flows through authenticated, loopback-only endpoints. The relay blocks non-extension origins and uses internal authentication tokens. This design means you should never expose these ports to the public internet—keep the Gateway and browser services on localhost or behind a private network like Tailscale.
Choosing the Right Browser Mode
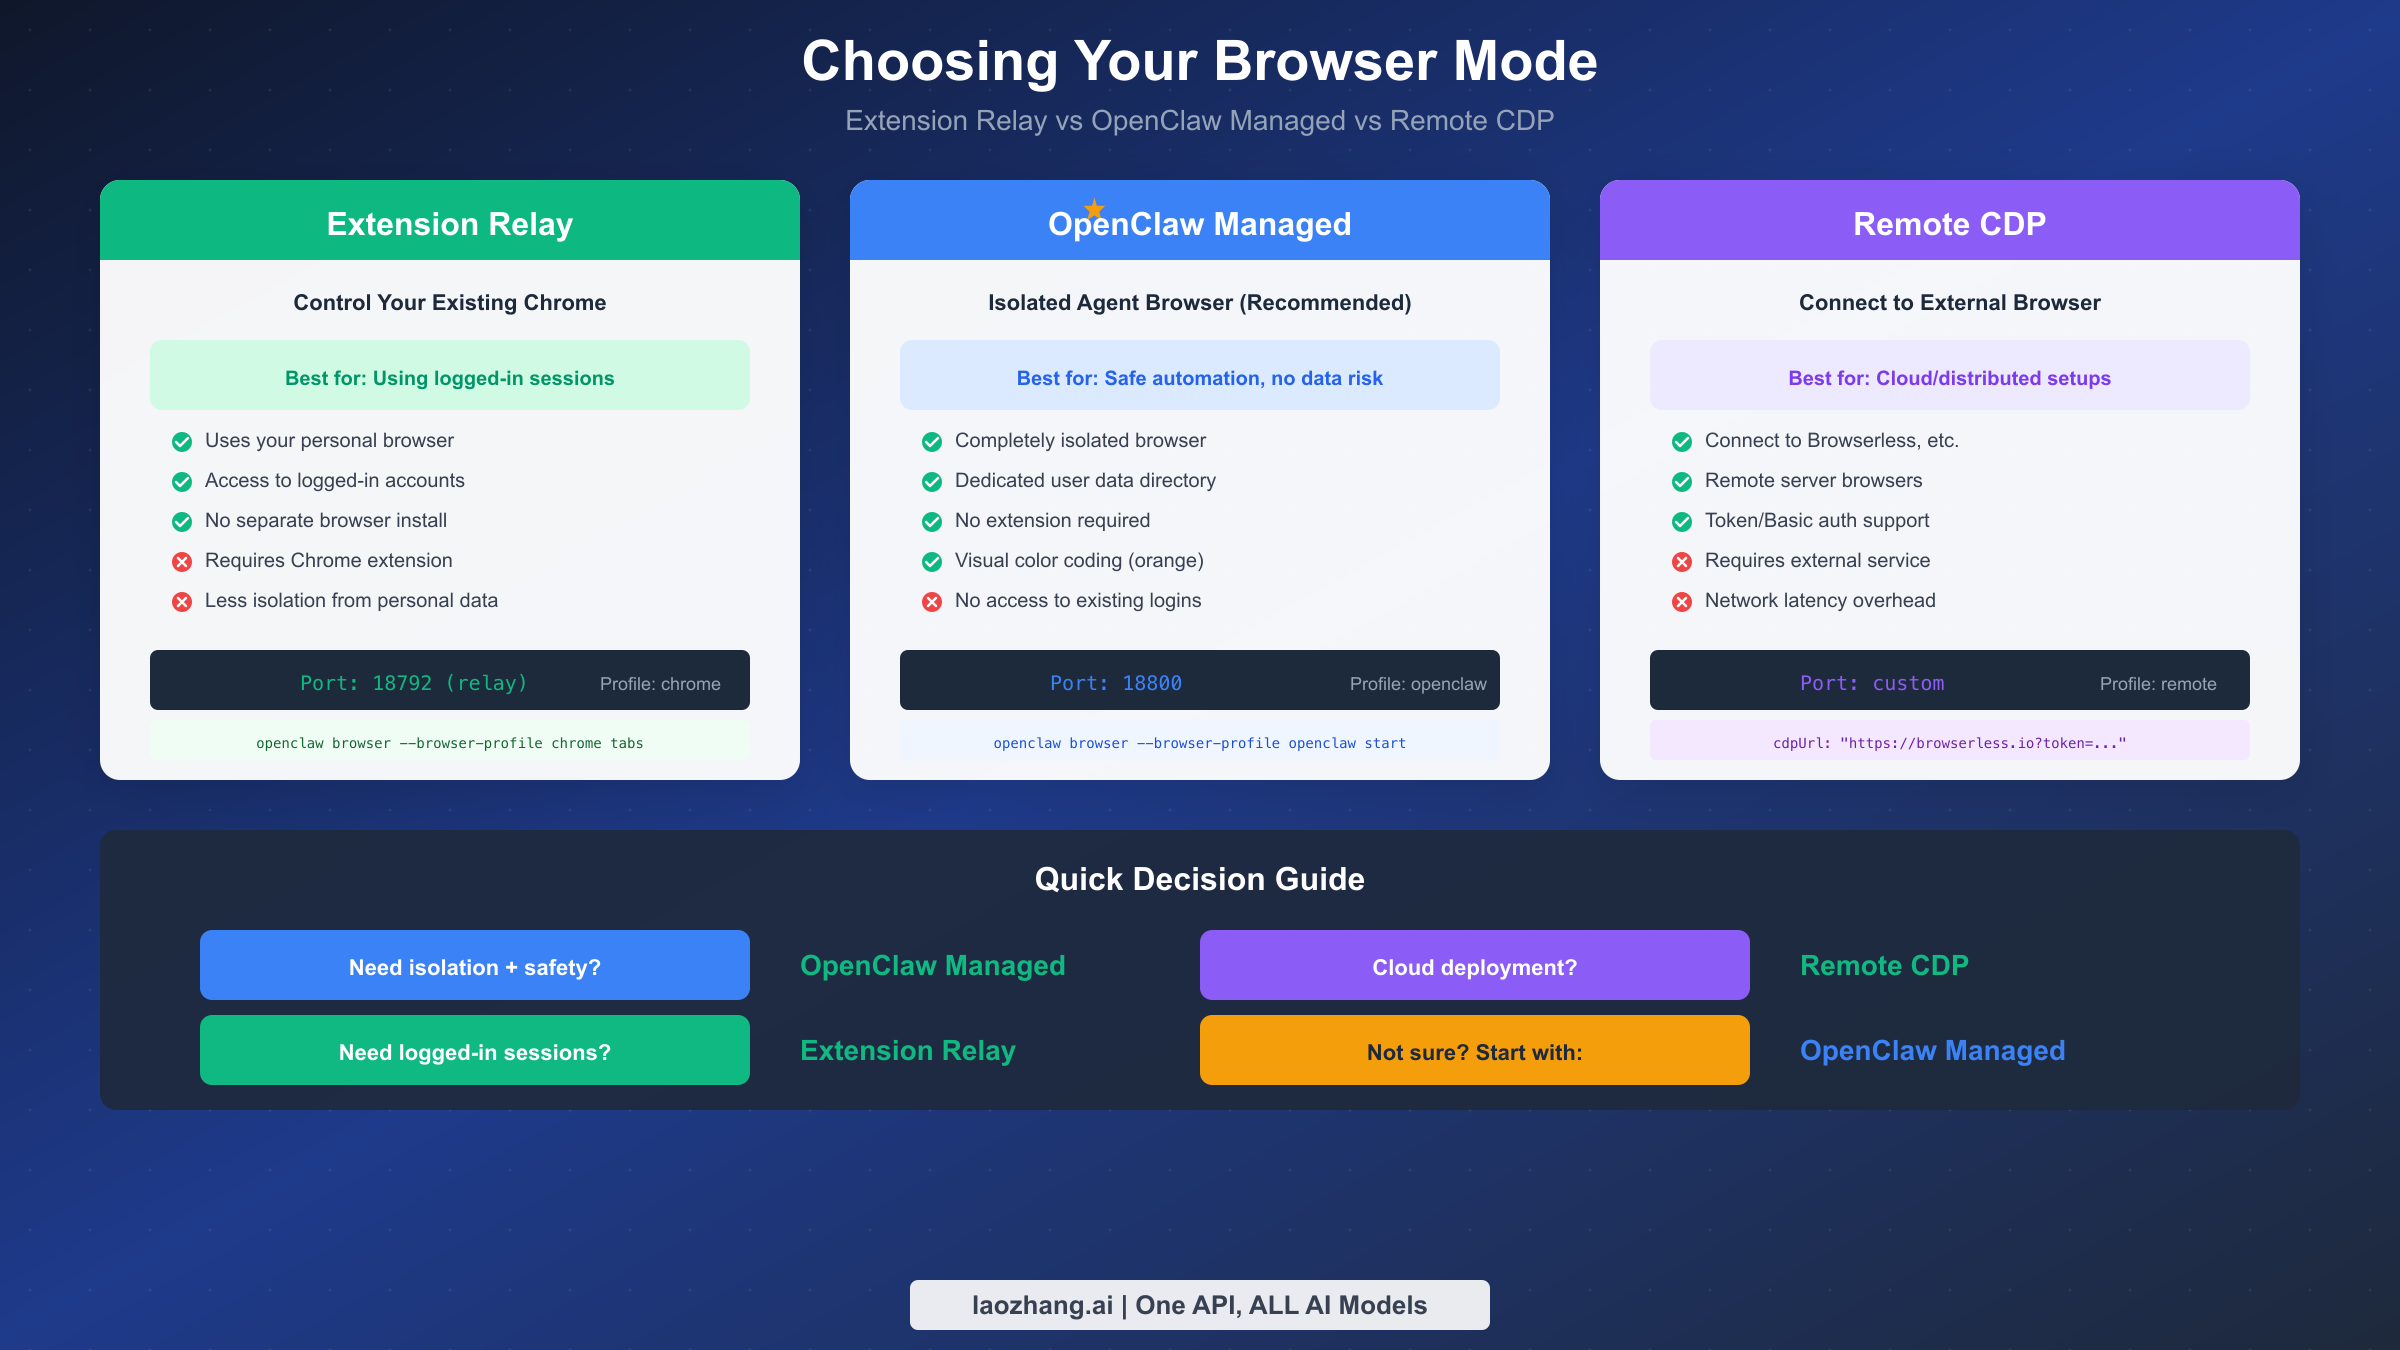
OpenClaw provides three distinct browser modes, each optimized for different use cases. The decision of which mode to use significantly impacts your automation workflow's security, isolation, and capabilities. Making the right choice upfront saves considerable reconfiguration later.
Extension Relay mode controls your existing Chrome browser through a local relay and Chrome extension. When you click the OpenClaw Browser Relay extension icon on a tab, it attaches to that tab and pipes CDP commands through the relay server. This mode excels when you need access to logged-in sessions—your Gmail, your corporate dashboard, your authenticated web applications. The extension uses chrome.debugger API to attach to tabs, giving the agent full control over page content and navigation while preserving your session cookies and authentication state.
However, Extension Relay comes with tradeoffs. Because it operates within your personal browser, there's less isolation between automation activities and your personal browsing. An agent could theoretically access other tabs or read cookies from unrelated sites. Additionally, some advanced CDP features require Playwright, and when using Extension Relay, ARIA snapshots and screenshots depend on having Playwright installed in your OpenClaw setup.
OpenClaw Managed mode launches a completely separate Chromium instance with its own user data directory. This browser appears with an orange accent color by default, making it visually distinct from your personal browser. The managed browser never touches your personal profile's cookies, history, or saved passwords. For most automation tasks—especially those involving sensitive operations or running in production environments—this isolation makes OpenClaw Managed the recommended default choice.
The managed browser operates on dedicated CDP ports starting from 18800. When you run openclaw browser --browser-profile openclaw start, OpenClaw launches this isolated instance and connects to it directly via CDP without requiring any extension. You can configure multiple managed profiles (like "work" or "test") each with their own CDP port and optional color tinting for visual identification.
Remote CDP mode connects to browsers running on other machines or hosted services. By setting browser.profiles.<name>.cdpUrl to a remote endpoint, you can control browsers on different servers or use cloud browser services like Browserless. Remote CDP URLs support authentication through query tokens (https://provider.example?token=<token>) or HTTP Basic auth (https://user:pass@provider.example ). This mode is essential for distributed deployments where the Gateway runs on one machine while browsers run elsewhere.
For most users starting with Browser Relay, the recommendation is straightforward: begin with OpenClaw Managed mode. The isolation it provides protects your personal data while you learn the automation APIs. Once you've established working workflows, you can selectively enable Extension Relay for specific tasks that require your logged-in sessions.
Configuration Deep Dive
Browser Relay configuration lives in ~/.openclaw/openclaw.json. A complete configuration example demonstrates the available options and their relationships:
json{
  "browser": {
    "enabled": true,
    "defaultProfile": "openclaw",
    "remoteCdpTimeoutMs": 1500,
    "remoteCdpHandshakeTimeoutMs": 3000,
    "headless": false,
    "noSandbox": false,
    "attachOnly": false,
    "executablePath": "/Applications/Brave Browser.app/Contents/MacOS/Brave Browser",
    "profiles": {
      "openclaw": { "cdpPort": 18800, "color": "#FF4500" },
      "work": { "cdpPort": 18801, "color": "#0066CC" },
      "remote": { "cdpUrl": "https://browserless.io?token=YOUR_TOKEN", "color": "#00AA00" }
    }
  }
}
The enabled flag controls whether browser tools are available at all. Setting this to false completely disables browser automation. The defaultProfile determines which profile is used when commands don't specify one explicitly—changing this to "openclaw" makes the managed browser the default instead of Extension Relay.
Profile configuration deserves careful attention. Each profile under profiles can specify either a cdpPort for local managed browsers or a cdpUrl for remote connections. The color property tints the browser window's frame, providing immediate visual feedback about which profile is active. This is particularly valuable when running multiple profiles simultaneously—you'll always know at a glance which browser belongs to which automation task.
The executablePath option overrides browser auto-detection. By default, OpenClaw searches for browsers in this priority order: Chrome, Brave, Edge, Chromium, Chrome Canary. On macOS, it checks /Applications and ~/Applications. On Linux, it looks for google-chrome, brave, microsoft-edge, and chromium in standard paths. If your browser is installed in a non-standard location or you prefer a specific browser, set the executable path explicitly.
For Docker deployments, avoid using npx playwright due to npm override conflicts. Instead, use the bundled CLI:
bashdocker compose run --rm openclaw-cli \
  node /app/node_modules/playwright-core/cli.js install chromium
To persist browser downloads across container restarts, set the PLAYWRIGHT_BROWSERS_PATH environment variable and ensure the path is mounted as a volume.
CLI configuration commands provide a quick way to adjust settings without editing JSON files directly:
bashopenclaw config set browser.defaultProfile "openclaw"
openclaw config set browser.executablePath "/usr/bin/google-chrome"
For integration with AI providers, platforms like laozhang.ai offer unified API access to multiple AI models, simplifying the agent configuration when your browser automation workflows require AI decision-making capabilities.
Essential CLI Commands
The openclaw browser command family provides comprehensive control over browser automation. All commands accept --browser-profile <name> to target specific profiles and --json for machine-readable output suitable for scripting. Understanding these commands thoroughly transforms your ability to build reliable automation workflows.
Lifecycle management handles browser startup and shutdown. These commands control the managed browser instance and monitor its health status:
bashopenclaw browser status                    # Check if browser is running
openclaw browser start                     # Launch browser instance
openclaw browser stop                      # Gracefully close browser
openclaw browser restart                   # Stop and restart browser
The status command provides essential debugging information. When things aren't working as expected, status reveals whether the browser is actually running, which profile is active, and the current CDP connection state. A healthy status output looks like this:
Browser Status: Running
Profile: openclaw
CDP Port: 18800
Tabs: 3 open
Memory: 245 MB
Uptime: 2h 15m
Tab operations manage browser tabs directly. Modern web automation often requires multiple tabs working in parallel, and these commands provide fine-grained control:
bashopenclaw browser tabs                      # List all open tabs
openclaw browser tab                       # Show current tab info
openclaw browser tab new                   # Open new tab
openclaw browser tab select 2              # Switch to tab index 2
openclaw browser tab close 2               # Close tab index 2
openclaw browser open https://example.com  # Open URL in new tab
openclaw browser focus abcd1234            # Focus tab by targetId
openclaw browser close abcd1234            # Close tab by targetId
The tabs command output includes crucial information for multi-tab workflows: tab index, URL, title, and target ID. When working with multiple tabs programmatically, the target ID provides a stable identifier that persists across tab operations, unlike the index which can shift when tabs are opened or closed.
Inspection commands capture page state, forming the foundation for reliable element targeting. These commands reveal what the browser sees, enabling you to understand and interact with page content:
bashopenclaw browser screenshot                # Capture visible viewport
openclaw browser screenshot --full-page    # Capture entire scrollable page
openclaw browser screenshot --ref e12      # Capture specific element
openclaw browser snapshot                  # Get element tree with refs
openclaw browser snapshot --interactive    # Flat list of interactive elements
openclaw browser snapshot --efficient      # Compact mode for large pages
openclaw browser snapshot --verbose        # Full accessibility tree
openclaw browser console --level error     # Show console messages
openclaw browser console --level debug     # Show all console output
openclaw browser errors --clear            # Show and clear error log
openclaw browser requests --filter api     # Show network requests
openclaw browser requests --method POST    # Filter by HTTP method
The snapshot command deserves special attention because it generates the element references used by action commands. With --interactive mode, the output shows only actionable elements in a flat list, making it easy to identify the right ref for your target. The --efficient mode reduces output size for pages with thousands of elements, while --verbose provides the complete accessibility tree for debugging complex element hierarchies.
Action commands interact with page elements. These commands translate high-level intentions into precise CDP operations:
bashopenclaw browser navigate https://example.com   # Navigate to URL
openclaw browser click e12                      # Click element by ref
openclaw browser click e12 --double             # Double-click
openclaw browser click e12 --right              # Right-click for context menu
openclaw browser type e15 "hello" --submit      # Type and submit
openclaw browser type e15 "hello" --delay 50    # Type with delay (ms)
openclaw browser press Enter                    # Press keyboard key
openclaw browser press Control+a                # Key combinations
openclaw browser hover e20                      # Hover over element
openclaw browser drag e10 e11                   # Drag element to target
openclaw browser select e9 "Option A"           # Select dropdown option
openclaw browser upload e8 /path/to/file.pdf   # Upload file
openclaw browser scrollintoview e25             # Scroll element into view
openclaw browser highlight e25                  # Visual highlight for debugging
The --delay flag on the type command simulates human-like typing speeds, which helps bypass bot detection on some sites. For file uploads, the upload command handles the file chooser dialog automatically, simplifying what would otherwise be a complex interaction sequence.
State management commands help maintain browser state across automation sessions. Cookie handling is particularly important for workflows that need to preserve authentication:
bashopenclaw browser cookies                        # List all cookies
openclaw browser cookies --domain example.com   # Filter by domain
openclaw browser cookies set "session=abc123; domain=.example.com; path=/"
openclaw browser cookies clear                  # Clear all cookies
openclaw browser cookies clear --domain example.com  # Clear specific domain
openclaw browser storage get "key"              # Read localStorage item
openclaw browser storage set "key" "value"      # Write localStorage item
openclaw browser storage clear                  # Clear localStorage
Cookie manipulation enables powerful workflows like session persistence, authentication token management, and testing scenarios with different user states. The storage commands provide similar capabilities for localStorage, which many modern applications use for client-side state.
The refs system uses a role-based format like e12 that resolves via Playwright's getByRole() internally. This approach provides more stable targeting than CSS selectors for dynamic pages. However, refs are not stable across navigations—always take a fresh snapshot after page changes or significant DOM updates.
Advanced Browser Automation Workflows
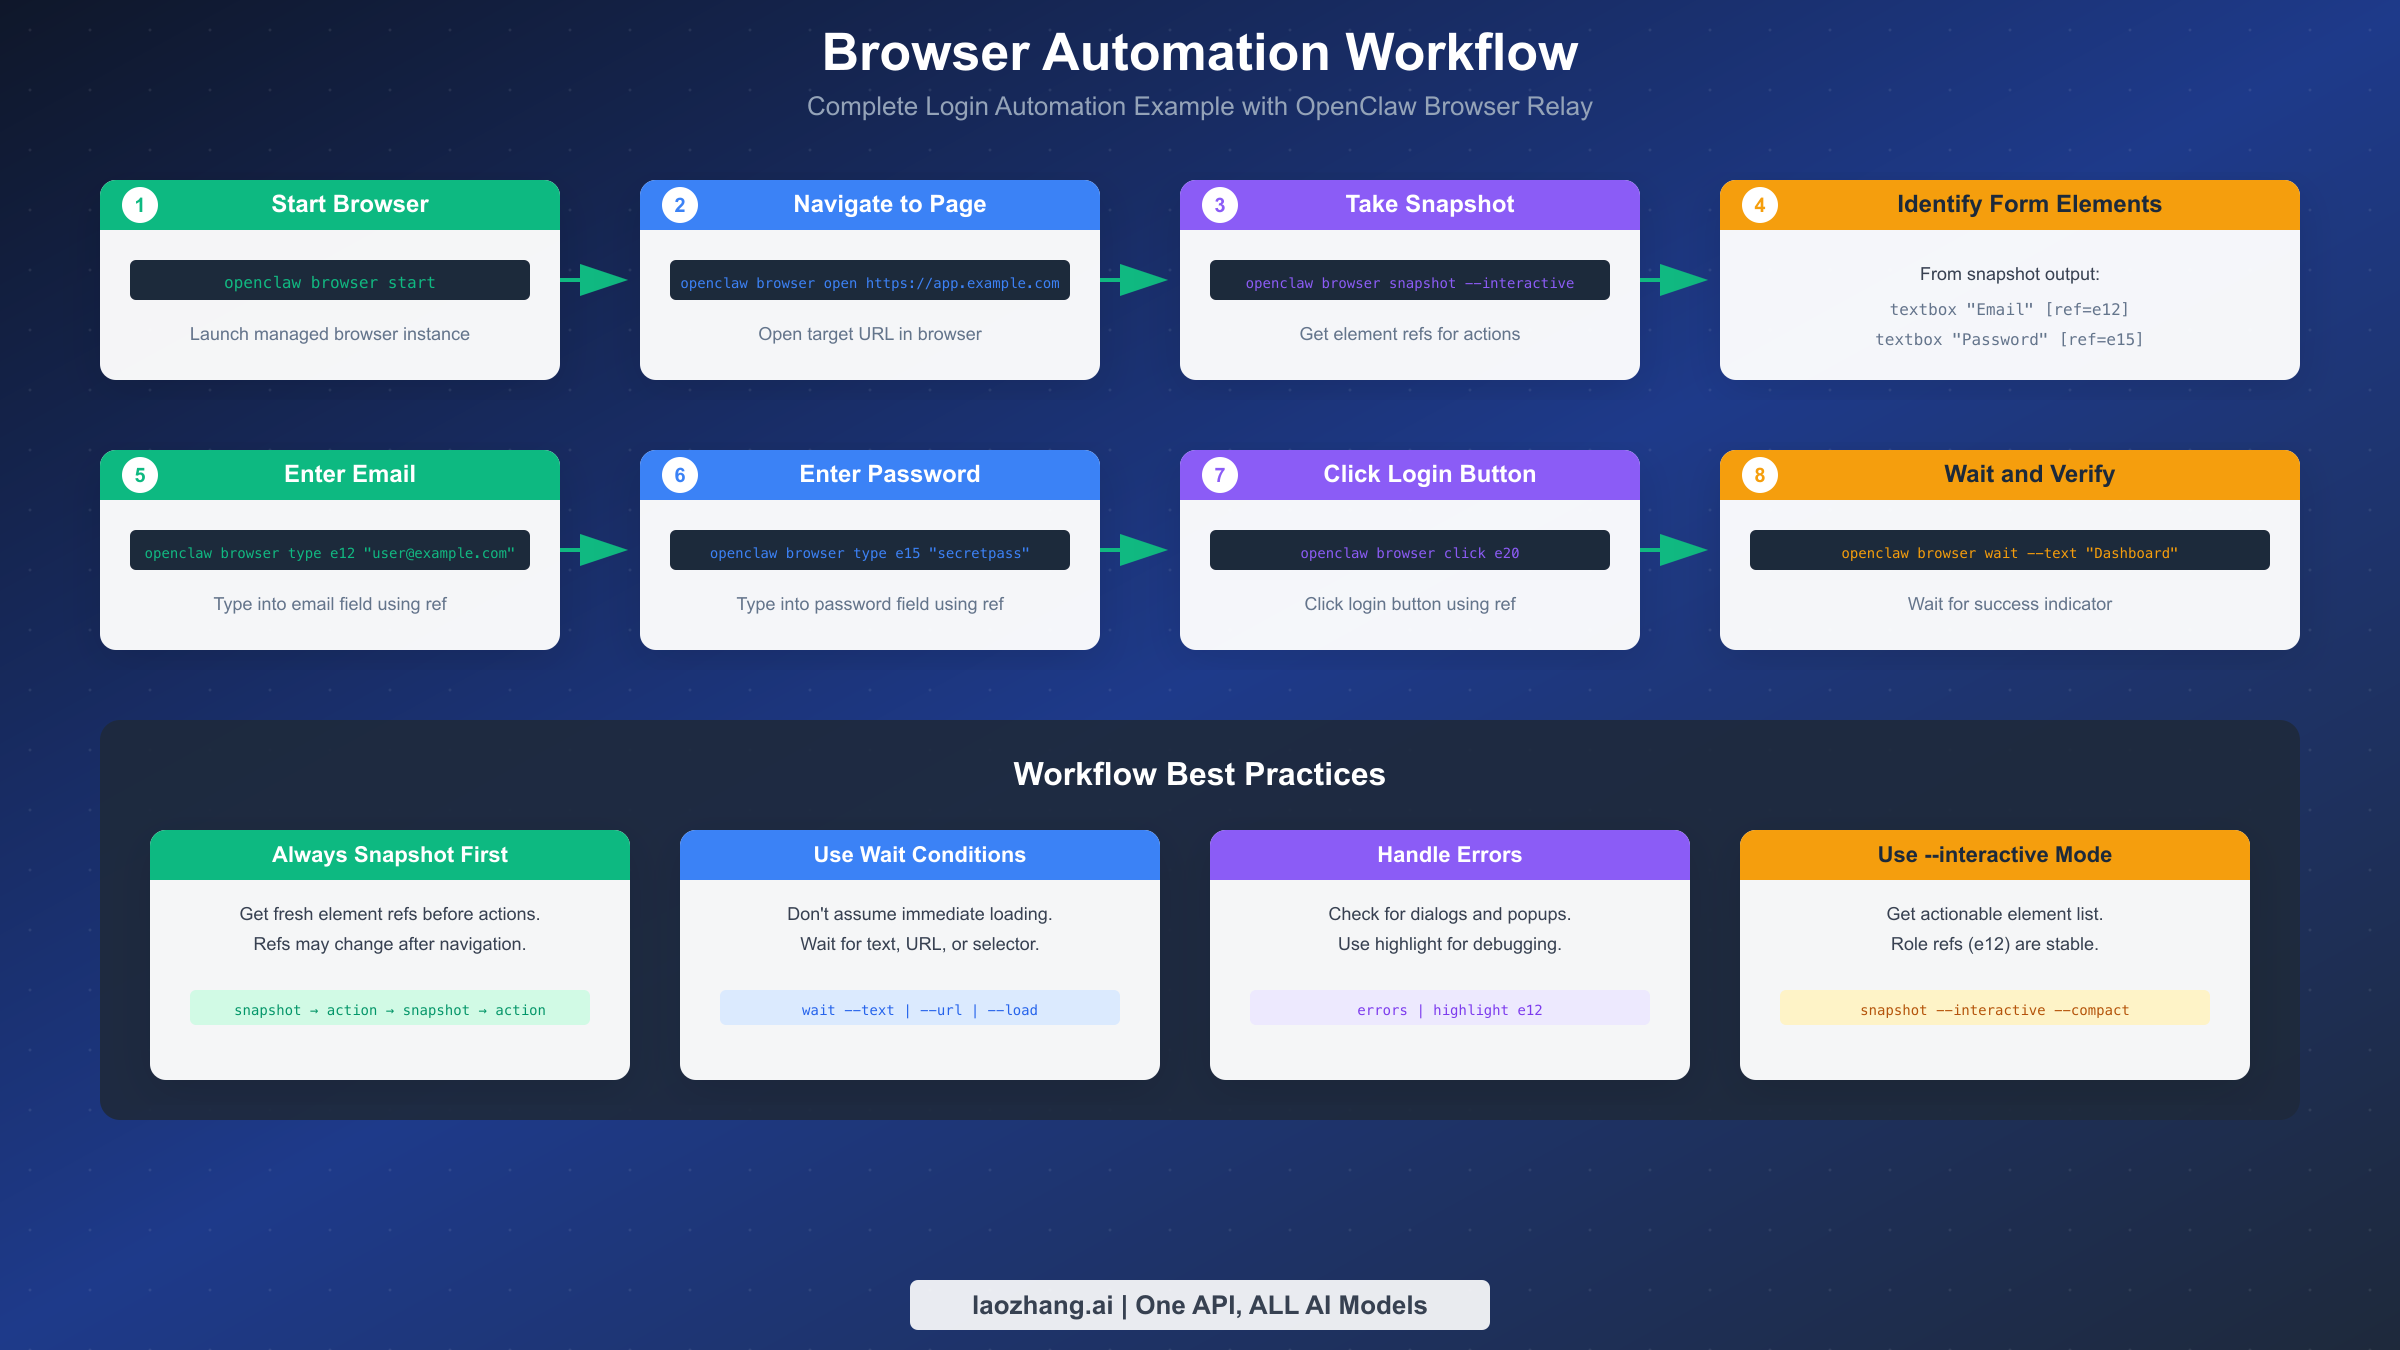
Real-world browser automation involves sequencing multiple commands into coherent workflows. A complete login automation demonstrates the typical pattern: start browser, navigate to the target site, take a snapshot to identify form elements, enter credentials, click submit, and verify successful login. Each step builds on the previous one, with error handling at critical junctures. Understanding these patterns enables you to build robust automation that handles real-world complexity.
The login workflow begins with browser initialization and navigation:
bashopenclaw browser --browser-profile openclaw start
openclaw browser open https://app.example.com/login
openclaw browser wait --load networkidle
The wait --load networkidle command pauses execution until network activity settles, ensuring the page has fully loaded before we try to interact with it. This prevents common timing issues where elements haven't rendered yet. The networkidle condition specifically waits for 500ms of no network requests, which works well for most single-page applications that load data asynchronously.
Next, take an interactive snapshot to identify form elements:
bashopenclaw browser snapshot --interactive --compact
The output shows elements like:
textbox "Email" [ref=e12]
textbox "Password" [ref=e15]
button "Sign In" [ref=e20]
With element refs identified, fill the form and submit:
bashopenclaw browser type e12 "user@example.com"
openclaw browser type e15 "secretpassword"
openclaw browser click e20
Finally, verify login success by waiting for an expected element:
bashopenclaw browser wait --text "Dashboard" --timeout-ms 10000
Data extraction workflows require careful handling of dynamic content and pagination. A comprehensive scraping workflow demonstrates production-ready patterns:
bashopenclaw browser open https://example.com/products # Initialize output file echo "[]" > products.json # Loop through pages page=1 while true; do echo "Processing page $page..." # Wait for content to load openclaw browser wait --load networkidle --timeout-ms 10000 # Extract data from current page openclaw browser snapshot --interactive > page_data.txt # Use JavaScript evaluation for structured data extraction openclaw browser evaluate 'JSON.stringify( Array.from(document.querySelectorAll(".product-card")).map(p => ({ name: p.querySelector(".title")?.innerText, price: p.querySelector(".price")?.innerText, url: p.querySelector("a")?.href })) )' > page_products.json # Merge with existing data (using jq for JSON processing) jq -s '.[0] + .[1]' products.json page_products.json > temp.json mv temp.json products.json # Check for next page button if grep -q 'button "Next"' page_data.txt; then ref=$(grep 'button "Next"' page_data.txt | grep -o 'e[0-9]*') openclaw browser click $ref page=$((page + 1)) sleep 1 # Respectful delay between pages else echo "Reached last page" break fi done echo "Extracted $(jq length products.json) products"
Cookie-based session management enables workflows that persist authentication across automation runs. This is particularly valuable for long-running automations or scheduled tasks:
bash# Initial authentication
openclaw browser --browser-profile openclaw start
openclaw browser open https://app.example.com/login

# Perform login (snapshot, type, click as shown above)
# ...

# After successful login, export session cookies
openclaw browser cookies --domain example.com --json > session_cookies.json

# Later, restore session without re-authenticating
openclaw browser cookies clear --domain example.com
cat session_cookies.json | while read cookie; do
  openclaw browser cookies set "$cookie"
done
openclaw browser navigate https://app.example.com/dashboard
# Now logged in without going through login flow
Multi-tab workflows enable parallel processing and cross-tab data transfer. This pattern is useful for comparison shopping, data aggregation, or workflows that need to cross-reference information:
bash# Open multiple tabs for parallel data gathering
openclaw browser open https://site1.com/data
openclaw browser open https://site2.com/data
openclaw browser open https://site3.com/data

# List tabs to see indices
openclaw browser tabs
# Output:
# 0: https://site1.com/data - "Site 1 Data"
# 1: https://site2.com/data - "Site 2 Data"
# 2: https://site3.com/data - "Site 3 Data"

# Extract data from each tab
for i in 0 1 2; do
  openclaw browser tab select $i
  openclaw browser wait --load networkidle
  openclaw browser snapshot --interactive > "tab_${i}_data.txt"
done

# Process all tabs' data
# ...

# Clean up - close extra tabs
openclaw browser tab close 2
openclaw browser tab close 1
Form automation with file uploads handles complex form interactions including file selection dialogs:
bash# Navigate to form
openclaw browser open https://app.example.com/upload

# Take snapshot to identify form fields
openclaw browser snapshot --interactive

# Fill text fields
openclaw browser type e10 "Document Title"
openclaw browser type e12 "This is the document description"

# Handle file upload
openclaw browser upload e15 /path/to/document.pdf

# Wait for upload processing
openclaw browser wait --text "Upload complete" --timeout-ms 30000

# Submit form
openclaw browser click e20
Conditional workflows with error recovery implement robust automation that handles unexpected states:
bash#!/bin/bash

attempt=1
max_attempts=3

while [ $attempt -le $max_attempts ]; do
  echo "Attempt $attempt of $max_attempts"

  # Navigate and wait
  openclaw browser navigate https://app.example.com
  openclaw browser wait --load networkidle --timeout-ms 15000

  # Take snapshot
  openclaw browser snapshot --interactive > snapshot.txt

  # Check for different states
  if grep -q 'button "Login"' snapshot.txt; then
    echo "Session expired, re-authenticating..."
    # Trigger login workflow
    # ...
    attempt=$((attempt + 1))
    continue
  elif grep -q 'text "Maintenance"' snapshot.txt; then
    echo "Site under maintenance, waiting 5 minutes..."
    sleep 300
    attempt=$((attempt + 1))
    continue
  elif grep -q 'button "Continue"' snapshot.txt; then
    echo "Ready to proceed"
    break
  fi

  attempt=$((attempt + 1))
done

if [ $attempt -gt $max_attempts ]; then
  echo "Failed after $max_attempts attempts"
  exit 1
fi
For AI-powered automation, Browser Relay integrates with AI APIs to enable intelligent decision-making during workflows. Services like laozhang.ai provide unified access to multiple AI models, allowing your automation to analyze page content and make context-aware decisions about which actions to take next. The combination of Browser Relay's precise browser control and AI's reasoning capabilities opens possibilities for truly adaptive automation that responds intelligently to unexpected page states.
Troubleshooting Common Issues
Browser automation inevitably encounters failures. Systematic troubleshooting identifies root causes quickly and prevents repeated frustration. The most common issues fall into categories: connection problems, element interaction failures, timing issues, and resource constraints. Building a mental model of common failure patterns accelerates debugging and helps you write more robust automation from the start.
"Browser disabled" or "not available" errors indicate configuration problems. Verify that browser tools are enabled:
bashopenclaw config get browser.enabled
If disabled, enable and restart the Gateway:
bashopenclaw config set browser.enabled true
openclaw gateway restart
This error can also appear if the OpenClaw Gateway isn't running at all. Check the Gateway status and start it if needed:
bashopenclaw gateway status
openclaw gateway start
"Tab not found" errors occur when the Extension Relay can't locate an attached tab. This happens when multiple tabs share the same URL, when the extension has detached, or when the tab was closed since the last command. Re-attach by clicking the extension icon on the target tab. The badge should show "ON" when successfully attached. If the problem persists, try detaching and reattaching:
bash# In Extension Relay mode, use the browser extension UI to:
# 1. Click extension icon on current tab to detach
# 2. Navigate to desired tab
# 3. Click extension icon to reattach
# 4. Verify with status command
openclaw browser --browser-profile chrome tab
"Playwright is not available" appears when trying to use features that require Playwright (navigate, act, AI snapshot, PDF generation). Install the full Playwright package:
bashnpm install playwright
npx playwright install chromium
For Docker deployments, use the bundled CLI to avoid npm override conflicts:
bashdocker compose run --rm openclaw-cli \
  node /app/node_modules/playwright-core/cli.js install chromium
Verify installation by checking Playwright availability:
bashopenclaw browser --browser-profile openclaw snapshot --verbose 2>&1 | head -20
Element interaction failures manifest in several specific error types. Understanding each helps target the right fix:
-
"not visible": Element exists but is hidden via CSS (display:none, visibility:hidden) or positioned offscreen. Solution: scroll into view or wait for visibility.
-
"strict mode violation": Multiple elements match the ref. This typically happens after page updates change the element structure. Solution: take a fresh snapshot and use the new ref.
-
"covered by another element": A modal, overlay, or other element is blocking interaction. Solution: dismiss the covering element first, or use force click.
-
"detached from DOM": Element was removed from the page between snapshot and action. Solution: re-snapshot and re-identify the element.
The debugging workflow for element issues:
bashopenclaw browser snapshot --interactive  # Get fresh refs
openclaw browser highlight e12           # Visualize what Playwright targets
openclaw browser scrollintoview e12      # Scroll element into view
openclaw browser click e12               # Retry click
If highlighting shows the wrong element, the ref has changed. Always re-snapshot after any navigation or significant page change. For persistent issues, use the verbose snapshot to understand the full element hierarchy:
bashopenclaw browser snapshot --verbose > debug_snapshot.txt
grep -A5 "e12" debug_snapshot.txt
Network and timing issues cause intermittent failures that are challenging to reproduce. The wait command supports multiple conditions that can be combined for robust synchronization:
bashopenclaw browser wait --text "Success"              # Wait for text
openclaw browser wait --url "**/dashboard"          # Wait for URL match
openclaw browser wait --load networkidle            # Wait for network quiet
openclaw browser wait --load domcontentloaded       # Wait for DOM ready
openclaw browser wait "#main-content"               # Wait for selector
openclaw browser wait --fn "window.ready===true"    # Wait for JS condition
Combine conditions for robust waits that handle multiple scenarios:
bashopenclaw browser wait "#main" --url "**/dash" --load networkidle --timeout-ms 15000
For single-page applications that update content without navigation, the networkidle condition may not trigger. In these cases, combine text or selector waits:
bash# Wait for specific content to appear after SPA navigation
openclaw browser click e15  # Trigger navigation
openclaw browser wait --text "New Page Content" --timeout-ms 10000
Port conflicts occur when another process is using the required ports. Diagnose with:
bashlsof -i :18789  # Check Gateway port
lsof -i :18800  # Check managed browser CDP port
If ports are occupied, either stop the conflicting process or configure OpenClaw to use different ports:
bashopenclaw config set gateway.port 19789
# All derived ports will shift accordingly
Memory and resource issues appear in long-running automation or when handling many tabs. Monitor browser resource usage:
bashopenclaw browser status # Shows memory usage
For memory-intensive workflows, periodically close unused tabs and restart the browser:
bash# Close all tabs except current
openclaw browser tabs --json | jq -r '.[1:] | .[].index' | while read i; do
  openclaw browser tab close $i
done

# For severe memory issues, full browser restart
openclaw browser stop
sleep 2
openclaw browser start
Trace recording provides deep debugging capabilities for complex issues. The trace captures a timeline of all browser activity including screenshots, network requests, and console output:
bashopenclaw browser trace start
# ... reproduce the issue ...
openclaw browser trace stop
The trace output file can be viewed in Playwright's trace viewer, providing a frame-by-frame replay of what happened. This is invaluable for debugging race conditions and timing-dependent failures.
Extension-specific issues in Chrome Relay mode have their own debugging approaches:
bash# Check extension status
# Look for "ON" badge on the extension icon

# Verify extension permissions
# Go to chrome://extensions and check that "Browser Relay" has required permissions

# Clear extension state
# Click extension icon to detach, then close and reopen tab
If the extension consistently fails to attach, check for conflicts with other debugging extensions or developer tools. Only one debugger can attach to a tab at a time.
Security Best Practices
Browser automation inherently involves sensitive operations—accessing authenticated sessions, manipulating form data, and potentially exposing credentials. Implementing proper security measures protects both your data and the systems you're automating.
Network isolation forms the first defense layer. Browser Relay binds to loopback addresses by default, preventing remote access. Never expose ports 18789-18899 to the public internet. For distributed deployments, use VPN solutions like Tailscale to create private networks between components. If the Gateway must be accessible remotely, ensure it runs behind proper authentication.
Credential management requires careful handling. Avoid hardcoding tokens and passwords in configuration files or scripts. Use environment variables:
bashexport BROWSERLESS_TOKEN="your-secret-token"
Then reference in configuration:
json{
  "browser": {
    "profiles": {
      "cloud": { "cdpUrl": "https://browserless.io?token=${BROWSERLESS_TOKEN}" }
    }
  }
}
For production systems, integrate with secrets managers like HashiCorp Vault or AWS Secrets Manager.
Profile isolation separates concerns. Use the openclaw managed profile for automation tasks, keeping your personal chrome profile for Extension Relay only when specifically needed. This prevents automation activities from interfering with personal browsing and limits credential exposure.
JavaScript evaluation risks deserve attention. Commands like browser act kind=evaluate and wait --fn execute arbitrary JavaScript in page context. A malicious prompt could inject code that exfiltrates data. If you don't need evaluation capabilities, disable them:
bashopenclaw config set browser.evaluateEnabled false
Audit logging helps track automation activities. Monitor browser commands and their outcomes. For compliance-sensitive environments, implement logging that captures who triggered automation, what actions occurred, and any errors encountered.
The managed browser profile stores session data that may include authentication tokens. Treat the profile directory (~/.openclaw/browser-profiles/openclaw/) as sensitive. When cleaning up, properly delete profile directories rather than just stopping the browser—use the profile management commands which move data to Trash safely.
For teams deploying Browser Relay at scale, establish clear policies about which sites can be automated, implement approval workflows for accessing production systems, and regularly audit automation scripts for security issues.
Conclusion
OpenClaw Browser Relay transforms how AI agents interact with the web, providing a secure, well-architected bridge between natural language commands and browser automation. The CDP foundation ensures performance comparable to professional automation tools, while the profile-based architecture offers the flexibility to match your specific security and isolation requirements.
Starting with Browser Relay involves a clear progression: begin with the OpenClaw Managed profile to learn the APIs safely, graduate to Extension Relay when you need logged-in session access, and implement Remote CDP for production cloud deployments. The CLI commands follow consistent patterns—snapshot for state, action for interaction, wait for synchronization—that become intuitive with practice.
The key to successful browser automation lies in understanding the underlying architecture. When something fails, knowing that messages flow from Gateway through Control Service to CDP Relay helps you diagnose where the breakdown occurred. When choosing between modes, understanding their isolation characteristics guides you to the right decision.
Browser Relay continues to evolve with the broader OpenClaw ecosystem. Future developments in areas like MCP integration (see the Claude MCP guide for protocol details) will further expand what's possible when AI agents control browsers. The fundamentals covered in this guide—CDP architecture, mode selection, workflow patterns, and security practices—provide the foundation for building increasingly sophisticated web automation systems.
Whether you're automating routine data entry, building AI-powered research assistants, or creating complex multi-step web workflows, Browser Relay provides the tools to make it happen. Start with a simple snapshot and click, then progressively add complexity as your understanding deepens.