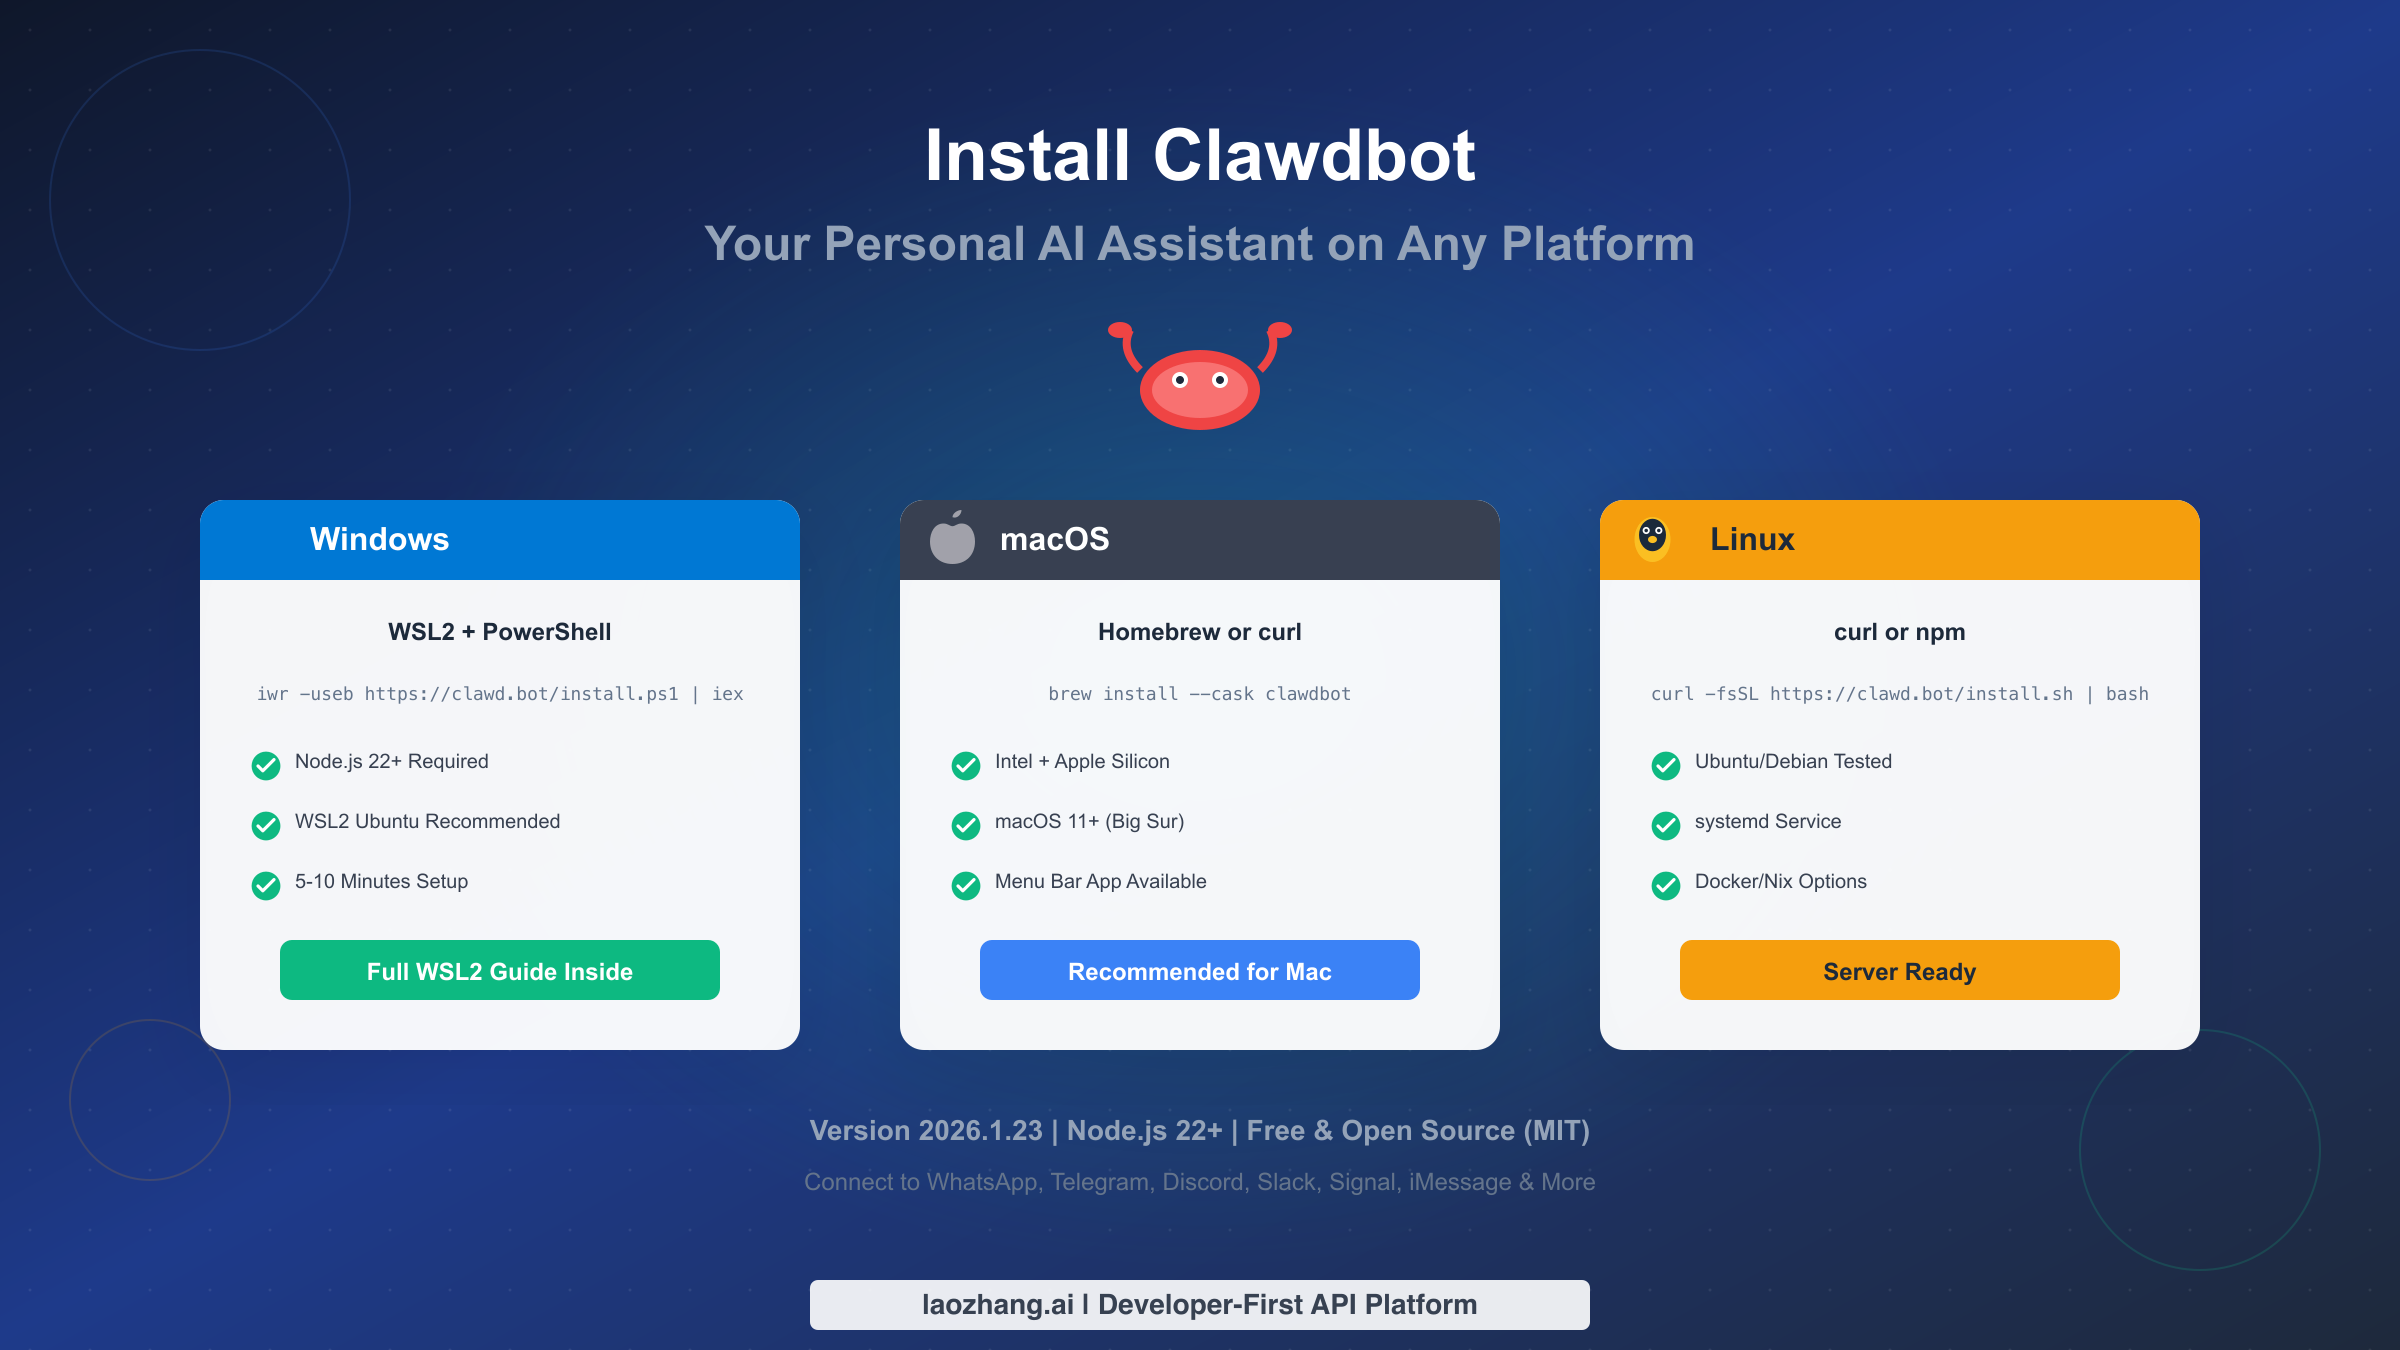
Installing Clawdbot on Windows, Mac, or Linux takes about 5-10 minutes and requires Node.js version 22 or higher. Windows users need WSL2 (Windows Subsystem for Linux) for the best experience. The quickest method is using the one-liner installer: curl -fsSL https://clawd.bot/install.sh | bash for Mac/Linux, or iwr -useb https://clawd.bot/install.ps1 | iex in PowerShell for Windows. After installation, run clawdbot onboard to configure your AI model and messaging channels. Clawdbot is free and open-source under the MIT license, with optional API costs for AI providers like Anthropic (approximately $0.003 per 1K tokens).
What You'll Need Before Installing Clawdbot
Before diving into the installation process, ensuring you have the right prerequisites will save you time and frustration. Clawdbot is designed to be lightweight and accessible, but it does have specific requirements that vary slightly by platform. Understanding these requirements upfront helps you choose the best installation method for your situation and avoid common roadblocks that trip up many first-time users.
The core requirement across all platforms is Node.js version 22 or higher. This is a strict requirement because Clawdbot uses modern JavaScript features that aren't available in older Node.js versions. If you're not sure which version you have, open a terminal and run node --version. If you see anything below v22.0.0, you'll need to upgrade before proceeding. The installation scripts can handle this for you in most cases, but knowing your starting point helps you understand what the installer is doing.
Hardware requirements are modest but worth noting. For basic chat functionality, Clawdbot runs comfortably on machines with 2GB of RAM. However, if you plan to use browser automation skills where Clawdbot controls a headless Chrome instance, you should have at least 4GB of RAM available. Storage requirements are minimal at around 500MB for the full installation including dependencies. These specifications make Clawdbot viable on older hardware, budget laptops, or small VPS instances.
Understanding the cost structure helps you plan appropriately. The Clawdbot software itself is completely free under the MIT license. However, you'll need an API key from an AI provider to power the intelligence. The recommended provider is Anthropic (Claude), though OpenAI is also supported. Anthropic's API costs approximately $0.003 per 1K input tokens and $0.015 per 1K output tokens for Claude Sonnet. For typical personal use with moderate daily conversations, expect costs between $5-20 per month. If you're building applications that need API access, services like laozhang.ai offer competitive pricing for developers who need reliable API access at scale. You can optionally run Clawdbot on a VPS for 24/7 availability, with providers like Hetzner offering suitable instances starting around $5 per month.
| Requirement | Specification | Notes |
|---|---|---|
| Node.js | v22.0.0 or higher | Strict requirement |
| RAM | 2GB minimum | 4GB for browser automation |
| Storage | ~500MB | For full installation |
| OS | Windows 10/11, macOS 11+, Linux | Windows requires WSL2 |
| API Key | Anthropic (recommended) or OpenAI | Required for AI functionality |
Choose Your Installation Method
Selecting the right installation method depends on your operating system, technical comfort level, and how much control you want over the process. Each approach has distinct advantages, and understanding these differences helps you make an informed choice rather than simply following the first tutorial you find.
The comparison table below breaks down your options across the dimensions that matter most: ease of use, time investment, and flexibility. Notice that while all methods lead to the same working installation, they differ significantly in how they handle updates, uninstallation, and system integration.
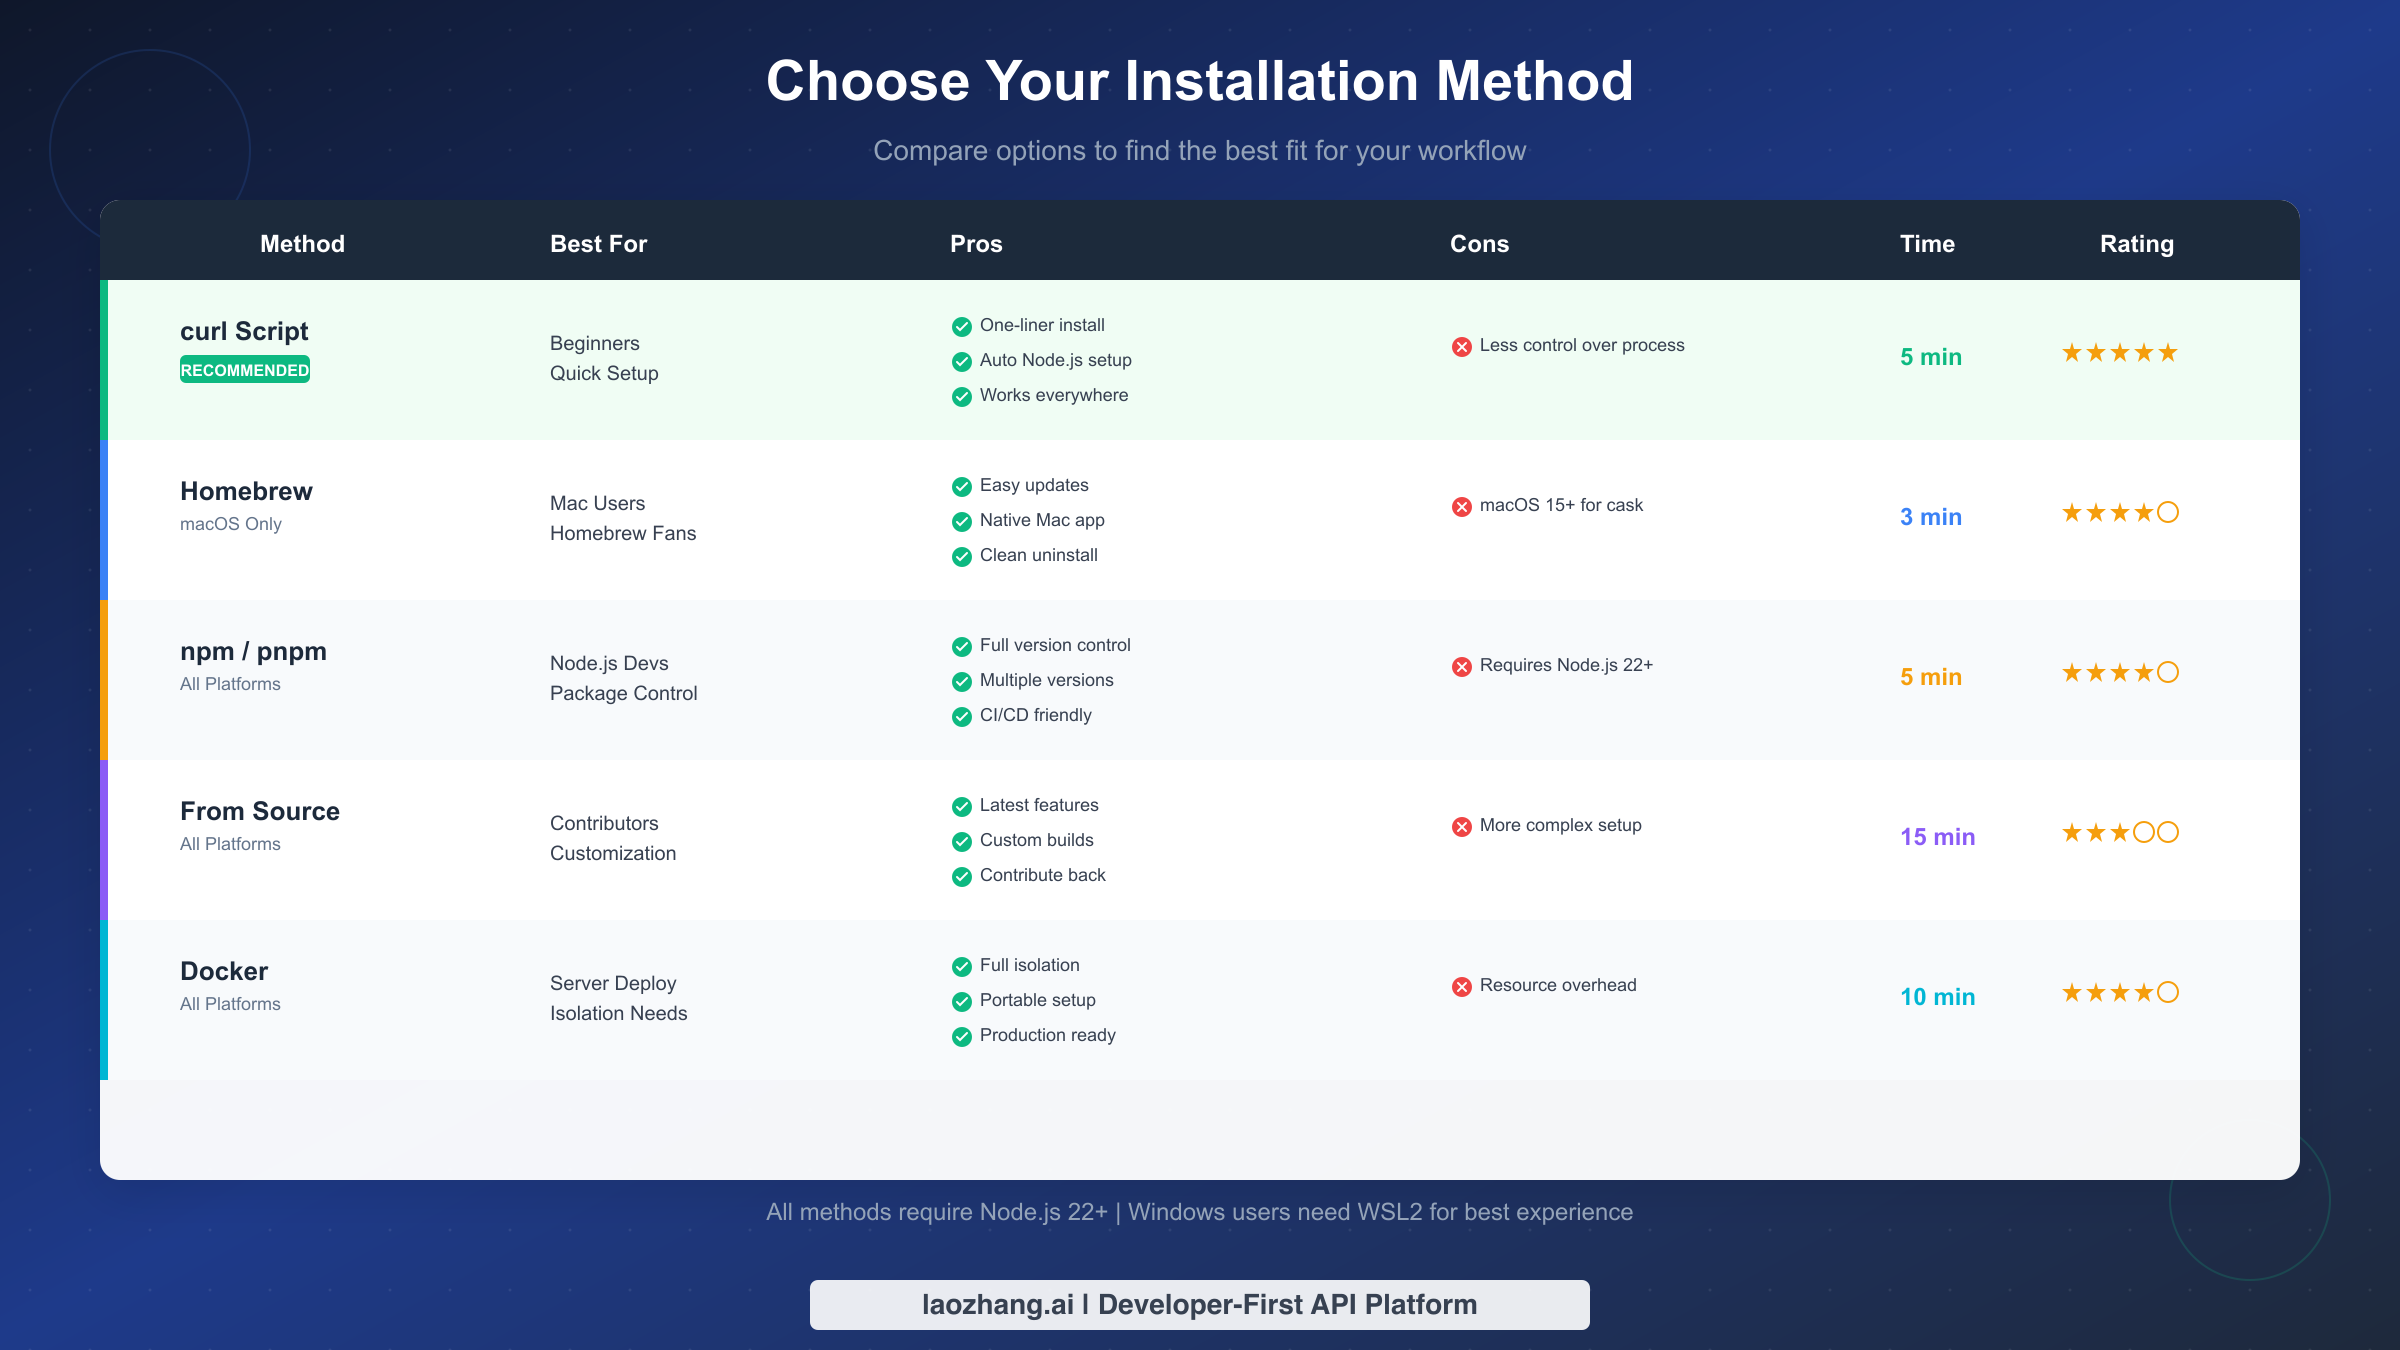
The curl/wget script is the recommended starting point for most users. This one-liner approach handles everything automatically, including Node.js installation if needed. It works identically across macOS and Linux, and there's a PowerShell equivalent for Windows users. The script detects your system configuration and makes appropriate choices without requiring input. The trade-off is that you have less visibility into what's being installed and where. For users who want to get started quickly without thinking about package managers or version control, this is the path of least resistance.
Homebrew provides the cleanest experience for Mac users who already use it. The brew install --cask clawdbot command installs a native macOS application with proper system integration, including a menu bar icon and automatic updates. This method requires macOS 15 or later for the cask version. The advantage here is seamless integration with the Mac ecosystem and trivially easy uninstallation through brew uninstall --cask clawdbot. If you're already a Homebrew user, this method feels natural and keeps your system tidy.
npm or pnpm installation appeals to Node.js developers who want package manager control. Running npm install -g clawdbot@latest gives you explicit version management and the ability to maintain multiple versions if needed. This approach requires that you already have Node.js 22+ installed, so it adds a prerequisite step for some users. The benefit is transparency and integration with your existing development workflow. You can easily check the installed version, upgrade to specific releases, and integrate Clawdbot into CI/CD pipelines if building automations.
Building from source suits contributors and power users who need maximum flexibility. This involves cloning the GitHub repository, running pnpm install, and building the project locally. The process takes longer (around 15 minutes including dependency installation) but gives you access to the latest features before they're released and the ability to modify the code. If you plan to contribute to Clawdbot or need custom functionality, this is your path.
Installing Clawdbot on Windows (Complete WSL2 Guide)
Windows installation deserves special attention because it requires an additional component that many users haven't encountered: the Windows Subsystem for Linux, specifically version 2 (WSL2). While this might seem like an extra hurdle, WSL2 actually provides a better Clawdbot experience than native Windows support would, giving you access to the full Linux ecosystem of tools and avoiding the compatibility quirks that plague Node.js applications on Windows.
The good news is that enabling WSL2 has become straightforward in recent Windows versions. Microsoft has streamlined the process to a single command for most users. If you're on Windows 10 version 2004 or later, or any version of Windows 11, you can enable WSL2 with minimal effort. The entire Windows setup process takes about 10 minutes, with most of that time spent waiting for downloads and installations to complete.
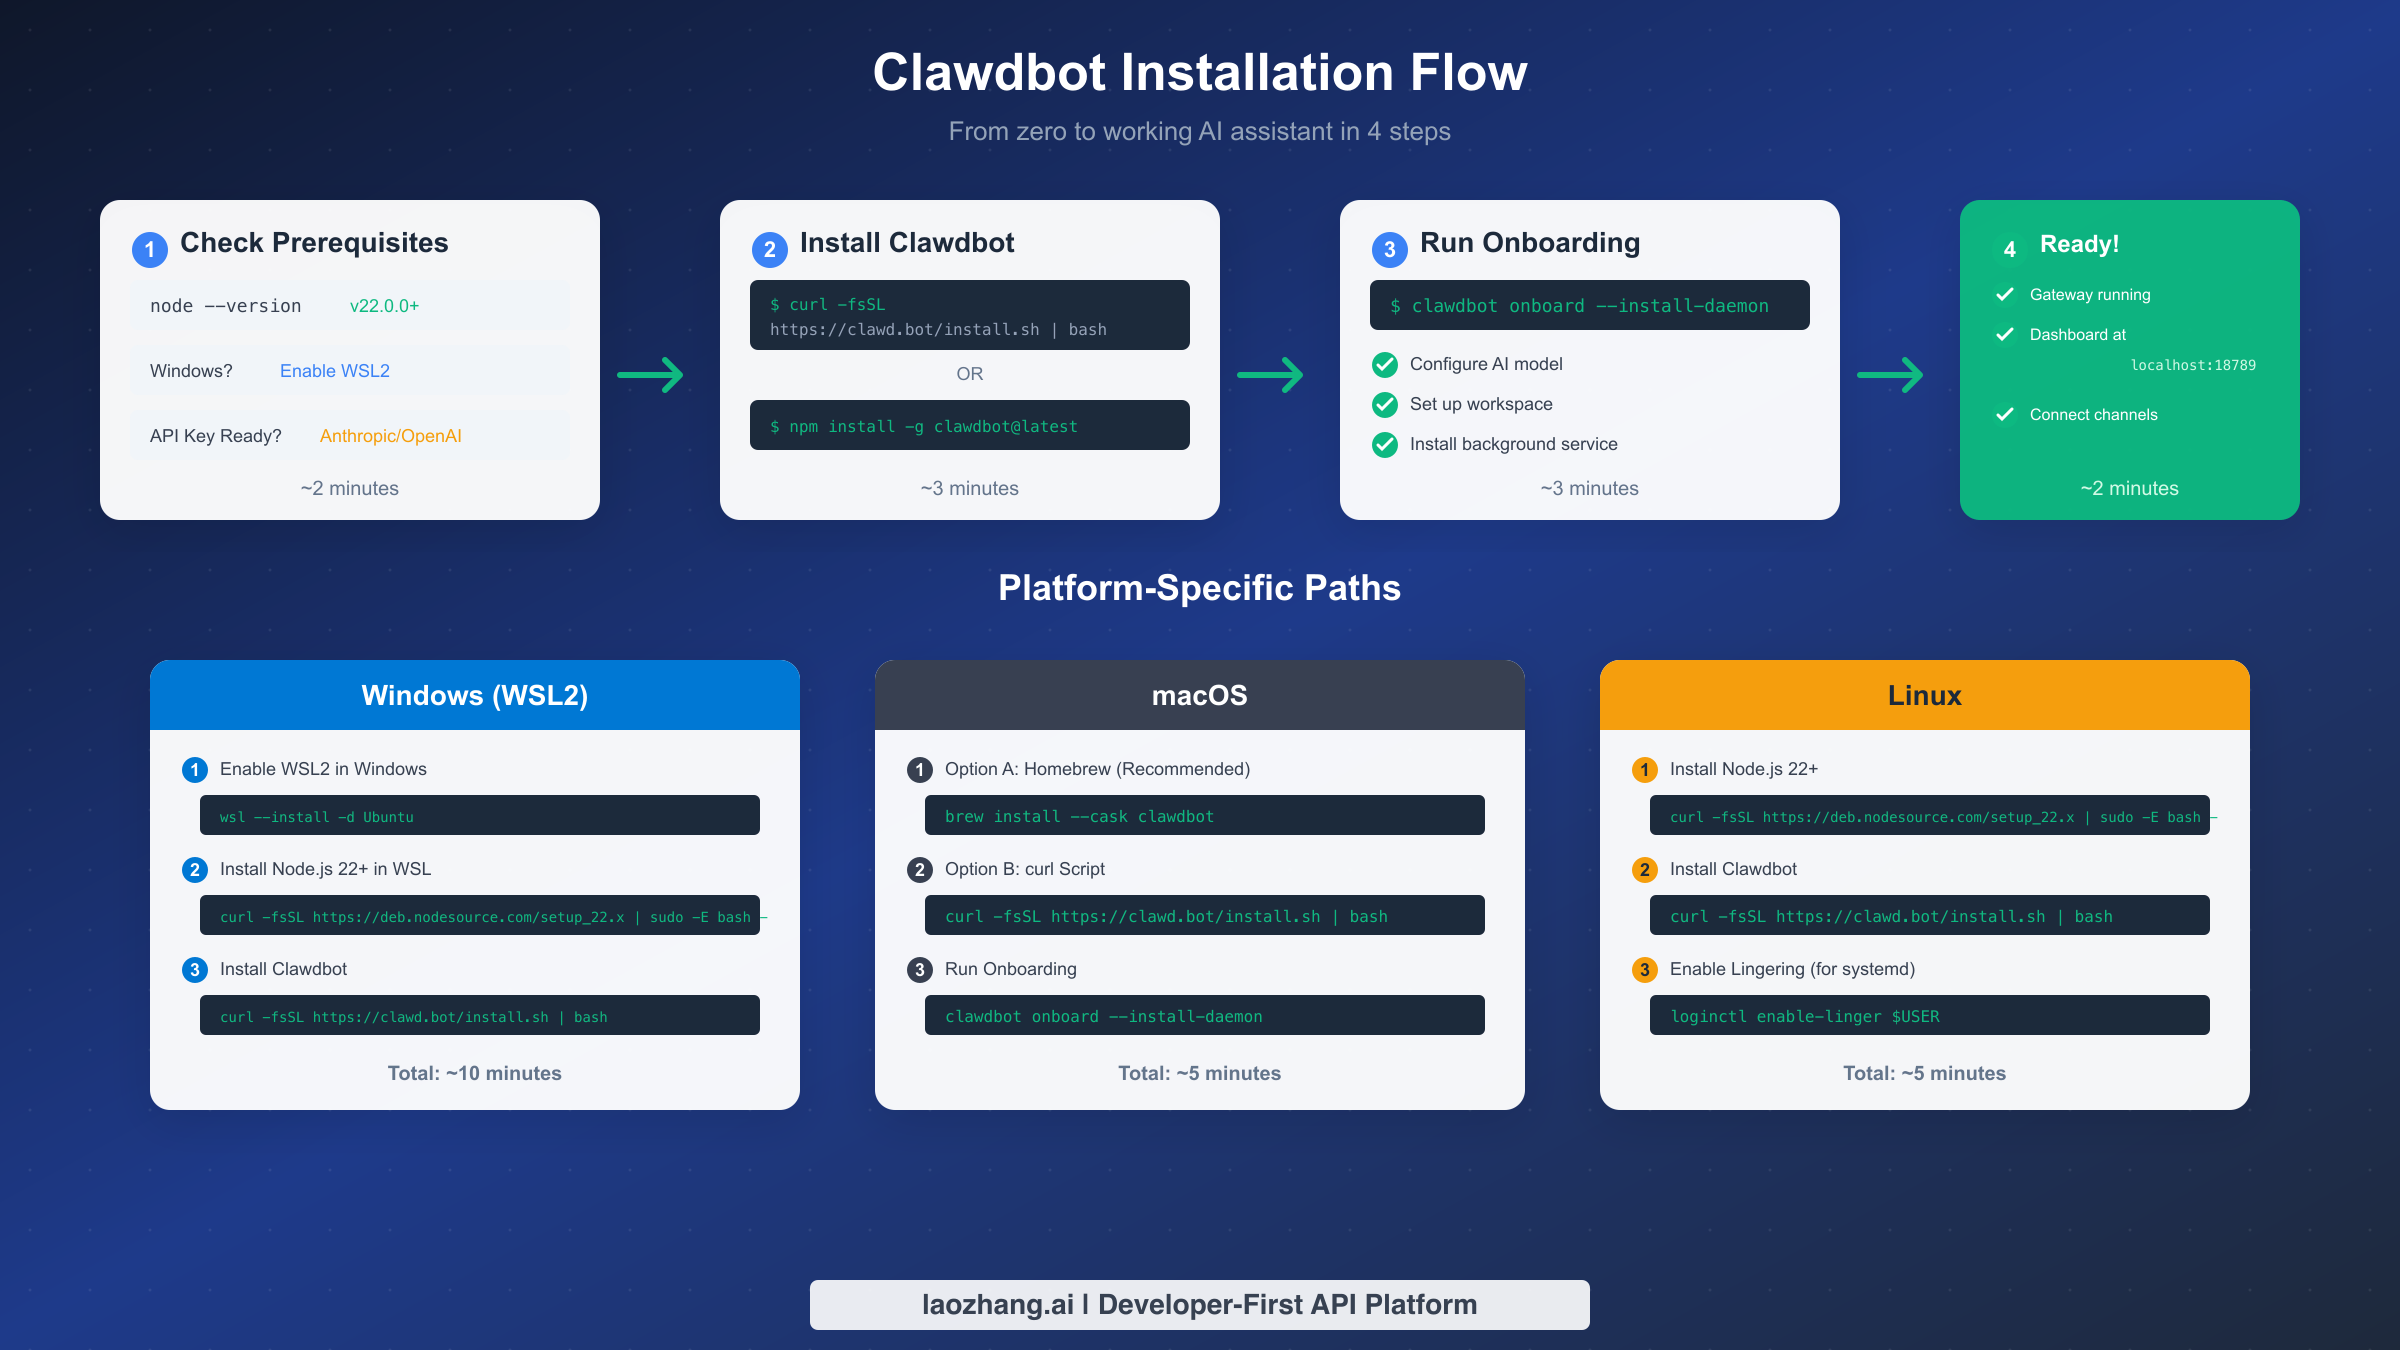
Start by enabling WSL2 on your Windows system. Open PowerShell as Administrator (right-click the Start button and select "Windows Terminal (Admin)" or "PowerShell (Admin)") and run the following command:
powershellwsl --install -d Ubuntu
This single command enables the WSL2 feature, downloads the Ubuntu distribution, and sets everything up. Your computer will need to restart to complete the installation. After restarting, Ubuntu will launch automatically and prompt you to create a username and password. Choose credentials you'll remember since you'll use them for sudo commands later.
Verify that WSL2 is properly configured before proceeding. After the restart and initial setup, open a new PowerShell window and run:
powershellwsl --list --verbose
You should see Ubuntu listed with VERSION 2. If it shows VERSION 1, you'll need to convert it with wsl --set-version Ubuntu 2. This conversion can take a few minutes but only needs to happen once.
Now switch to your Ubuntu environment and install Node.js. Open the Ubuntu terminal (you can find it in the Start menu as "Ubuntu") and run these commands:
bashcurl -fsSL https://deb.nodesource.com/setup_22.x | sudo -E bash -
sudo apt-get install -y nodejs
node --version
The last command should output v22.x.x or higher. If it shows an older version, the NodeSource setup didn't complete correctly. Try running sudo apt-get update followed by sudo apt-get install -y nodejs again.
Finally, install Clawdbot using the standard Linux installation script:
bashcurl -fsSL https://clawd.bot/install.sh | bash
The installer will detect that you're running in WSL2 and configure everything appropriately. It sets up a systemd user service that starts the Gateway automatically when Ubuntu launches. After installation completes, run clawdbot onboard --install-daemon to configure your AI model and connect your first messaging channel.
A note on accessing the Clawdbot dashboard from Windows: The Gateway runs inside WSL2 and binds to localhost by default. You can access the dashboard from your Windows browser at http://localhost:18789 because Windows automatically forwards localhost traffic to WSL2. If this doesn't work, check that the Gateway is running with clawdbot status and that no Windows firewall rules are blocking port 18789.
Installing Clawdbot on macOS
macOS provides the smoothest Clawdbot installation experience among all platforms, with multiple equally good options depending on your preferences. The tight integration between Apple Silicon/Intel support and the available installation methods means you're unlikely to encounter significant roadblocks. Most Mac users can go from nothing to a working Clawdbot in under five minutes.
Homebrew is the recommended method for most Mac users. If you don't have Homebrew installed, get it first by running /bin/bash -c "$(curl -fsSL https://raw.githubusercontent.com/Homebrew/install/HEAD/install.sh )" in Terminal. Once Homebrew is ready, installing Clawdbot is a single command:
bashbrew install --cask clawdbot
This installs the native macOS application, which includes a menu bar icon for quick access, proper system integration with Spotlight search, and automatic updates through Homebrew's update mechanism. The cask version requires macOS 15 (Sequoia) or later. For older macOS versions, use the curl method described below instead.
The curl script method works on any macOS version 11 (Big Sur) or later. This approach installs the CLI version rather than the native app, but provides identical functionality:
bashcurl -fsSL https://clawd.bot/install.sh | bash
The script automatically detects your Mac's architecture (Intel or Apple Silicon) and downloads the appropriate binaries. It also checks for Node.js and installs or upgrades it if necessary using Homebrew or direct download. After the script completes, it prompts you to run the onboarding wizard.
Complete the setup with the onboarding wizard regardless of which method you used:
bashclawdbot onboard --install-daemon
The wizard walks you through configuring your AI model (enter your Anthropic or OpenAI API key), setting up your workspace directory (default is ~/clawd), and optionally connecting your first messaging channel. The --install-daemon flag creates a launchd service that keeps the Gateway running in the background and starts it automatically when you log in.
macOS-specific features worth exploring after installation include Voice Wake mode (say "Hey Clawd" to activate), the menu bar quick access panel, and Canvas for visual interactions. These features integrate with macOS system capabilities like Continuity and Handoff, letting you start a conversation on your Mac and continue it on your iPhone if you have the iOS node installed.
Installing Clawdbot on Linux
Linux installation is straightforward and well-tested across major distributions. The Clawdbot team primarily develops on Linux, so you're getting a first-class experience. Ubuntu and Debian-based distributions have the most testing, but the installation works on Fedora, Arch, and other distros with minor adjustments for package managers.
The universal installation script handles most Linux systems automatically:
bashcurl -fsSL https://clawd.bot/install.sh | bash
This script checks for Node.js 22+, installing it via your distribution's package manager if needed. On Ubuntu/Debian, it uses the NodeSource repository to get the latest Node.js. On other distributions, it attempts to use the system package manager or falls back to downloading Node.js directly. The script also creates systemd user service files for running the Gateway in the background.
If you prefer manual installation or the script doesn't work for your distribution, follow these steps:
bashcurl -fsSL https://deb.nodesource.com/setup_22.x | sudo -E bash - sudo apt-get install -y nodejs # 2. Install Clawdbot globally npm install -g clawdbot@latest # 3. Run onboarding clawdbot onboard --install-daemon
Understanding the systemd service configuration helps with troubleshooting. Clawdbot installs a user-level systemd service (not system-level), which means it runs under your user account with your permissions. The service file typically goes in ~/.config/systemd/user/clawdbot-gateway.service. One critical detail: by default, systemd stops user services when you log out. For server installations where you want Clawdbot running 24/7, you need to enable lingering:
bashloginctl enable-linger $USER
This tells systemd to keep your user services running even when you're not logged in. Without this setting, your Gateway will stop when your SSH session ends, which is rarely what you want for a server installation.
Docker installation is available for users who prefer containerization. This approach provides complete isolation and easy deployment across different environments:
bashdocker pull clawdbot/clawdbot:latest
docker run -d --name clawdbot -p 18789:18789 -v ~/clawd:/app/data clawdbot/clawdbot
The Docker method is particularly useful for server deployments where you want consistent behavior across different Linux distributions or need to run multiple Clawdbot instances. The trade-off is slightly more complex configuration and an additional layer between Clawdbot and your system.
Verify Your Installation Works
Verification isn't just about confirming installation completed. It's about building confidence that every component is functioning correctly before you start using Clawdbot for real work. A systematic verification catches issues early when they're easy to diagnose and fix, rather than later when you're trying to figure out why a message wasn't sent or why a command didn't execute.
Start with the basic health check commands:
bash# Check Clawdbot is installed and accessible
clawdbot --version
# Expected output: clawdbot 2026.1.x

# Check Gateway status
clawdbot status
# Expected output: Gateway running at http://127.0.0.1:18789

# Run the doctor command for comprehensive diagnostics
clawdbot doctor
The clawdbot doctor command is particularly valuable. It examines your configuration, checks for common misconfigurations, warns about risky DM policies, and verifies that required dependencies are present. Any warnings or errors it reports deserve attention before you continue.
Verify the Gateway dashboard is accessible by opening http://localhost:18789 (or http://127.0.0.1:18789 ) in your web browser. You should see the Clawdbot Control UI with information about your workspace, connected channels, and active sessions. If the page doesn't load, the Gateway isn't running. Start it manually with clawdbot gateway and watch the output for error messages.
Check that your API key is configured correctly:
bashclawdbot sessions list
# Should show at least one default session

clawdbot chat "Hello, can you confirm you're working?"
# Should receive a response from the AI model
If the chat command fails with an authentication error, your API key isn't configured correctly. Re-run clawdbot onboard to reconfigure it, or manually edit ~/.clawdbot/credentials/ to fix the key.
Complete verification checklist:
-
clawdbot --versionreturns 2026.1.x -
clawdbot statusshows Gateway running - Dashboard accessible at localhost:18789
-
clawdbot doctorreports no errors - Test chat message receives AI response
- Daemon starts automatically after reboot (test with
systemctl --user status clawdbot-gatewayon Linux)
Troubleshooting Common Installation Issues
Even with well-designed installers, issues arise. The troubleshooting patterns below address the problems that most commonly block new users, organized by symptom so you can quickly find relevant solutions.
"Command not found: clawdbot" after installation typically means your PATH doesn't include the npm global bin directory. The installer usually adds this automatically, but the change only takes effect in new terminal sessions. First, try opening a new terminal window. If the command still isn't found, add npm's global bin to your PATH manually:
bash# Find npm's global bin directory
npm config get prefix
# Usually /usr/local or ~/.npm-global

# Add to PATH in your shell config (.bashrc, .zshrc, etc.)
export PATH="$(npm config get prefix)/bin:$PATH"

# Reload your shell config
source ~/.bashrc  # or ~/.zshrc for zsh
"Error: EACCES permission denied" during installation happens when npm tries to write to a directory your user doesn't own. This commonly occurs with system-level npm installations. The cleanest fix is to configure npm to use a user-owned directory:
bashmkdir ~/.npm-global
npm config set prefix '~/.npm-global'
export PATH=~/.npm-global/bin:$PATH
# Add the export line to your shell config file
Gateway fails to start with "Address already in use" means something else is using port 18789. Check what's using the port with lsof -i :18789 (macOS/Linux) or netstat -ano | findstr :18789 (Windows). Either stop the conflicting process or configure Clawdbot to use a different port by editing ~/.clawdbot/clawdbot.json and setting gateway.port to an available port.
"Error 4014: Disallowed intents" when connecting Discord means your Discord bot lacks required Gateway Intents. Go to the Discord Developer Portal, select your application, navigate to Bot settings, and enable the "MESSAGE CONTENT INTENT" and "SERVER MEMBERS INTENT" toggles. These are required for Clawdbot to receive and process messages.
Out of memory errors during installation occur on systems with limited RAM (1GB or less). The npm install process can be memory-intensive. Try adding swap space or setting a memory limit for Node:
bashexport NODE_OPTIONS="--max-old-space-size=2048"
npm install -g clawdbot@latest
"Bun is not recommended" warning appears if you're running Clawdbot with the Bun runtime. While Bun works for basic operations, it has known compatibility issues with WhatsApp and Telegram channels. If you're using those channels, switch to Node.js for the Gateway process.
Next Steps: Connect Your First Messaging Platform
With Clawdbot installed and verified, you're ready to connect it to the messaging platforms you actually use. This transforms Clawdbot from a local terminal tool into the AI assistant that meets you wherever you are, whether that's WhatsApp on your phone, Discord on your desktop, or Telegram on either.
WhatsApp is often the first choice for personal use because it connects to your existing account and requires no additional setup on the messaging side. Run clawdbot channels login whatsapp and scan the QR code with your phone's WhatsApp app. The connection uses the WhatsApp Web protocol, so your phone needs to stay online initially, though the connection becomes more persistent after the first sync. Important: only connect WhatsApp if you understand that Clawdbot will have access to your messages. Use a secondary account if you have privacy concerns.
Telegram requires creating a bot through @BotFather, but this takes only a minute and gives you more control than WhatsApp. The bot approach means Clawdbot only sees messages sent directly to the bot, not your entire message history. Run clawdbot channels add telegram, enter the bot token from BotFather, and you're connected.
Discord integration connects to servers where you've added your bot. This is ideal for team use or communities. Create a Discord application at discord.com/developers, add a bot to it, and invite the bot to your server with appropriate permissions. Then clawdbot channels add discord and provide the bot token.
Exploring Clawdbot's capabilities after setup reveals features that might not be obvious from the installation process. The clawdbot skills command lists available automations. The /status command in any connected chat shows current configuration. The /think deep command enables extended reasoning for complex questions. Consider exploring the official documentation for advanced configurations like multi-agent routing, custom skills development, and remote access through Tailscale.
Frequently Asked Questions
Is Clawdbot free to use? The Clawdbot software is completely free and open-source under the MIT license. You'll need an API key from Anthropic or OpenAI to power the AI, which has usage-based costs (approximately $5-20 per month for typical personal use).
Can Clawdbot run without an internet connection? The Gateway and basic infrastructure work offline, but AI responses require connectivity to your chosen AI provider. Local model support (like Ollama) is being developed but not yet production-ready.
How secure is Clawdbot? Clawdbot runs on your own hardware with your own API keys, so data doesn't pass through third-party servers. The pairing system prevents unauthorized access to your channels. That said, you're granting the AI access to your messages and potentially your file system, so understand the security implications before connecting sensitive accounts.
What happens if I uninstall Clawdbot?
On macOS with Homebrew: brew uninstall --cask clawdbot. On other systems: npm uninstall -g clawdbot. Your workspace data in ~/clawd (or wherever you configured it) remains intact and can be reused if you reinstall later.