Clawdbot skills transform your personal AI assistant from a simple chatbot into a powerful automation system capable of managing your emails, controlling smart devices, executing terminal commands, and integrating with virtually any API or service. With over 565 community skills already available on ClawdHub, the ecosystem is thriving—and creating your own skill is surprisingly straightforward once you understand the fundamentals.
This guide walks you through the complete skill creation process, from writing your first SKILL.md file to publishing on ClawdHub. Whether you want to automate personal workflows, integrate with external services, or share your creations with the community, you'll find everything you need right here.
TL;DR
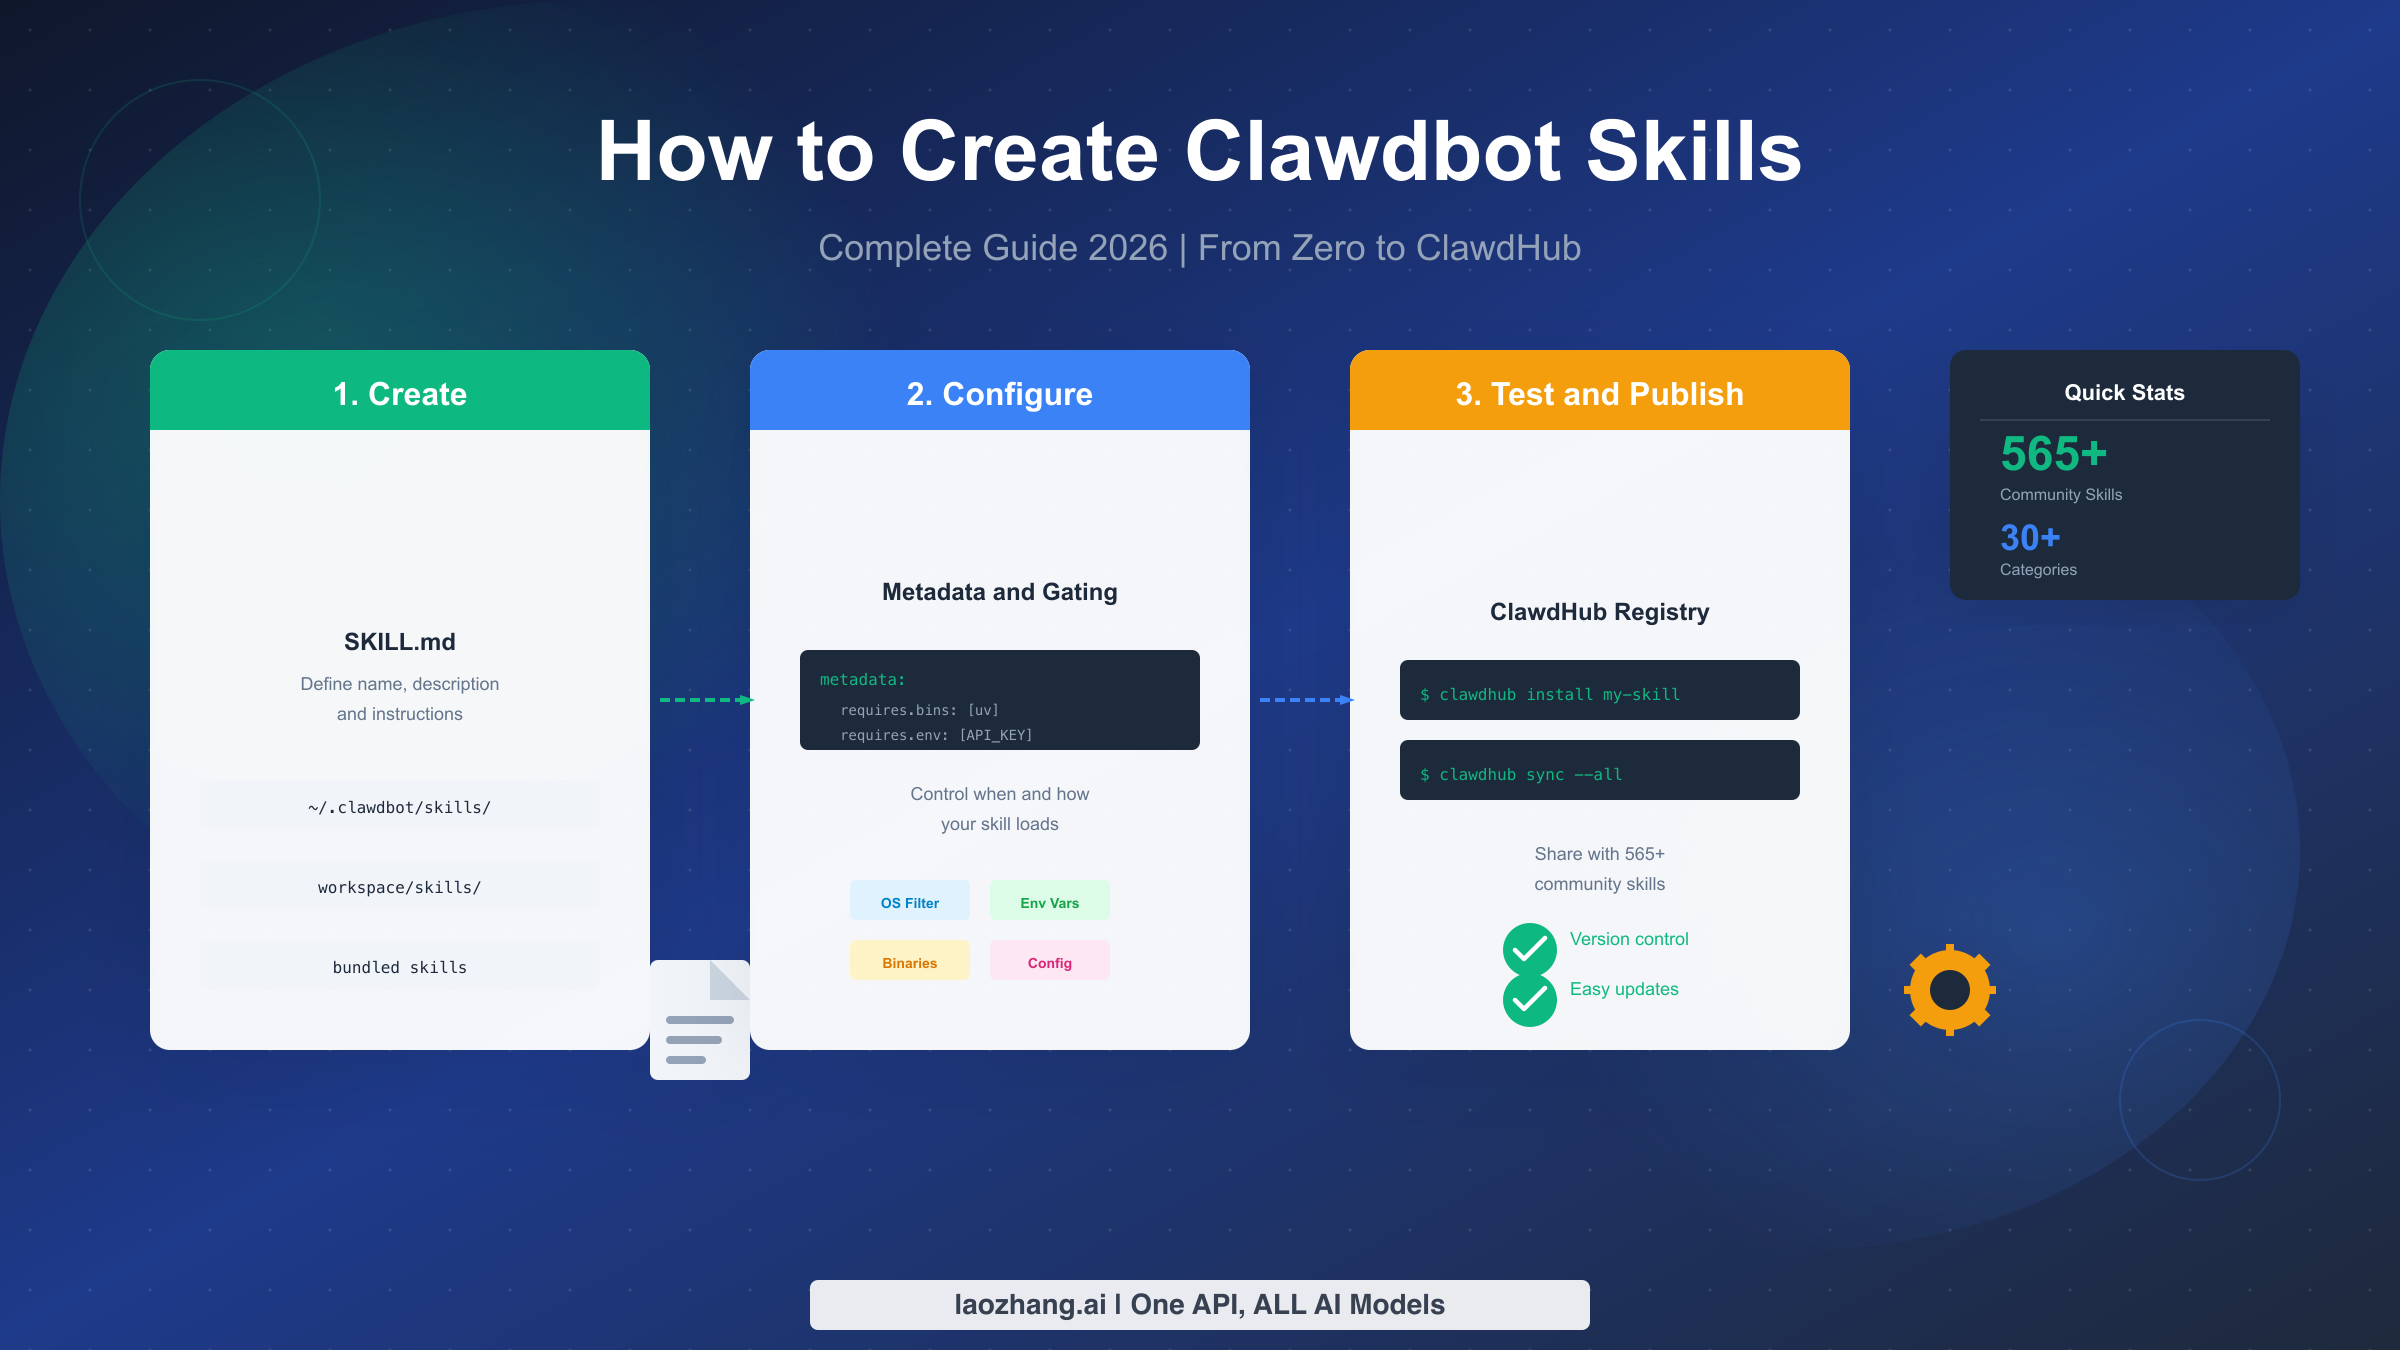
Creating a Clawdbot skill requires just three steps: (1) create a directory in ~/.clawdbot/skills/your-skill-name, (2) add a SKILL.md file with name and description in YAML frontmatter, and (3) write instructions in markdown below the frontmatter. Skills load automatically when Clawdbot starts, and you can publish to ClawdHub with a single clawdhub sync command. The entire process takes about 5 minutes for a basic skill, with no coding required for simple integrations.
What Are Clawdbot Skills?
Clawdbot is an open-source, self-hosted personal AI assistant that runs locally on your devices. Created by Peter Steinberger (founder of PSPDFKit), it has taken the developer community by storm since its release, with over 8,900 Discord members and active contributors making it one of the fastest-growing AI assistant projects. The core philosophy is simple: it's "Claude with hands"—an AI that doesn't just chat but actually executes tasks across your digital life.
Skills are the extension mechanism that makes Clawdbot truly powerful. Each skill is essentially a markdown file that teaches Clawdbot how to interact with a specific tool, service, or workflow. Think of skills as specialized training modules: a Docker skill teaches Clawdbot how to manage containers, a GitHub skill enables repository interactions, and a calendar skill lets it manage your schedule. The beauty lies in the simplicity—skills are just text files following the AgentSkills standard, meaning the same skill can work across multiple AI assistants including Claude Code, Cursor, and other compatible tools.
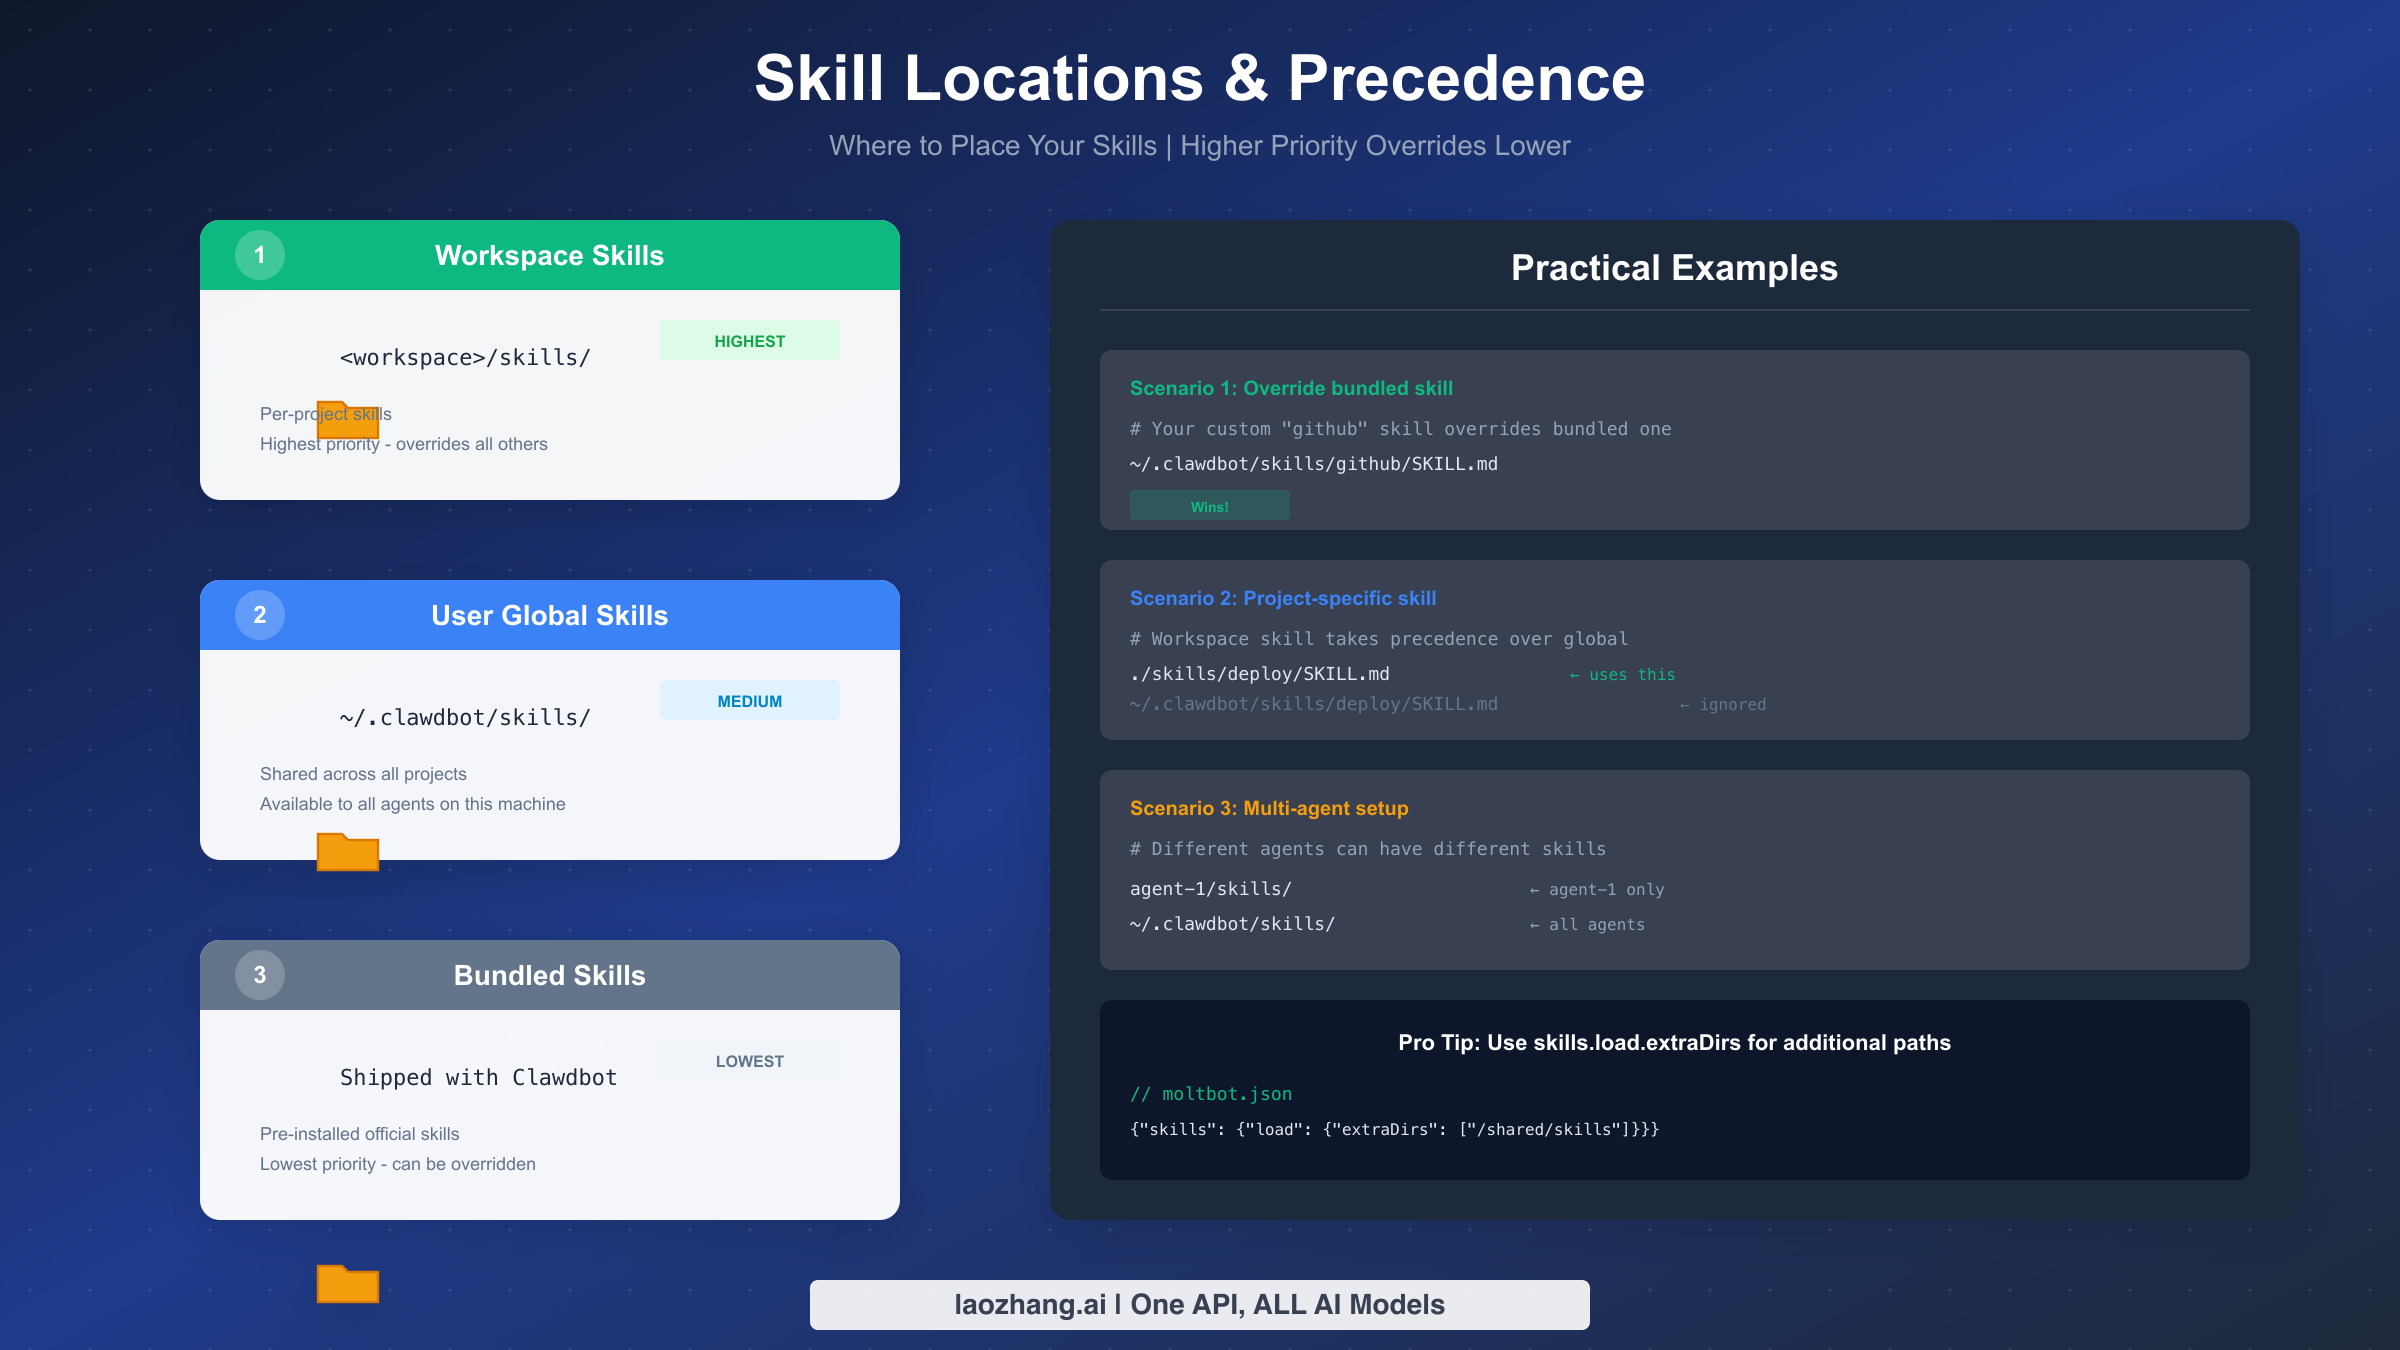
The skill system follows a clear hierarchy. Bundled skills ship with Clawdbot and handle common tasks. User global skills live in ~/.clawdbot/skills/ and apply across all your projects. Workspace skills exist within specific project directories and take highest precedence, allowing project-specific customizations. This layered approach means you can override any bundled behavior with your own implementations while keeping your customizations organized and portable.
What makes the Clawdbot skill ecosystem particularly compelling is ClawdHub, the public registry where developers share their creations. With 565+ skills across 30+ categories covering everything from marketing automation to smart home control, you can extend Clawdbot's capabilities in minutes simply by installing community skills. And when you create something useful, publishing back to ClawdHub lets others benefit from your work.
Your First Skill in 5 Minutes
Let's create a working skill right now. This hands-on approach will teach you the fundamentals faster than any theoretical explanation. We'll build a simple "weather" skill that uses the exec tool to fetch weather data.
Step 1: Create the skill directory
Open your terminal and run:
bashmkdir -p ~/.clawdbot/skills/weather
This creates a directory for your skill in the user global location, making it available across all your projects. You could alternatively use a workspace location (./skills/weather) for project-specific skills, but the global location is perfect for general-purpose utilities.
Step 2: Create the SKILL.md file
Create a new file at ~/.clawdbot/skills/weather/SKILL.md with the following content:
markdown---
name: weather
description: Get current weather information for any city using wttr.in
---

You are a weather assistant that helps users check current weather conditions.

When a user asks about weather:
1. Use the exec tool to run: curl -s "wttr.in/{city}?format=3"
2. Replace {city} with the requested location (use underscores for spaces)
3. Present the results in a friendly, readable format

## Examples

<strong>User asks</strong>: "What's the weather in San Francisco?"
<strong>Action</strong>: exec("curl -s 'wttr.in/San_Francisco?format=3'")
<strong>Response</strong>: Parse the output and tell the user the current conditions

<strong>User asks</strong>: "Weather in Tokyo"
<strong>Action</strong>: exec("curl -s 'wttr.in/Tokyo?format=3'")

## Notes
- wttr.in is a free weather service that requires no API key
- The format=3 option returns a concise one-line summary
- For detailed forecasts, omit the format parameter
Step 3: Verify the skill loads
Restart Clawdbot or run:
bashclawdbot skills list
You should see your new "weather" skill in the list. Now test it by asking Clawdbot: "What's the weather in New York?" The skill will automatically activate based on the description matching your intent.
That's it—you've created a working Clawdbot skill. The entire process took under 5 minutes, and you now have a reusable weather assistant. Let's dive deeper into the SKILL.md structure to understand how to build more sophisticated skills.
Understanding the SKILL.md File
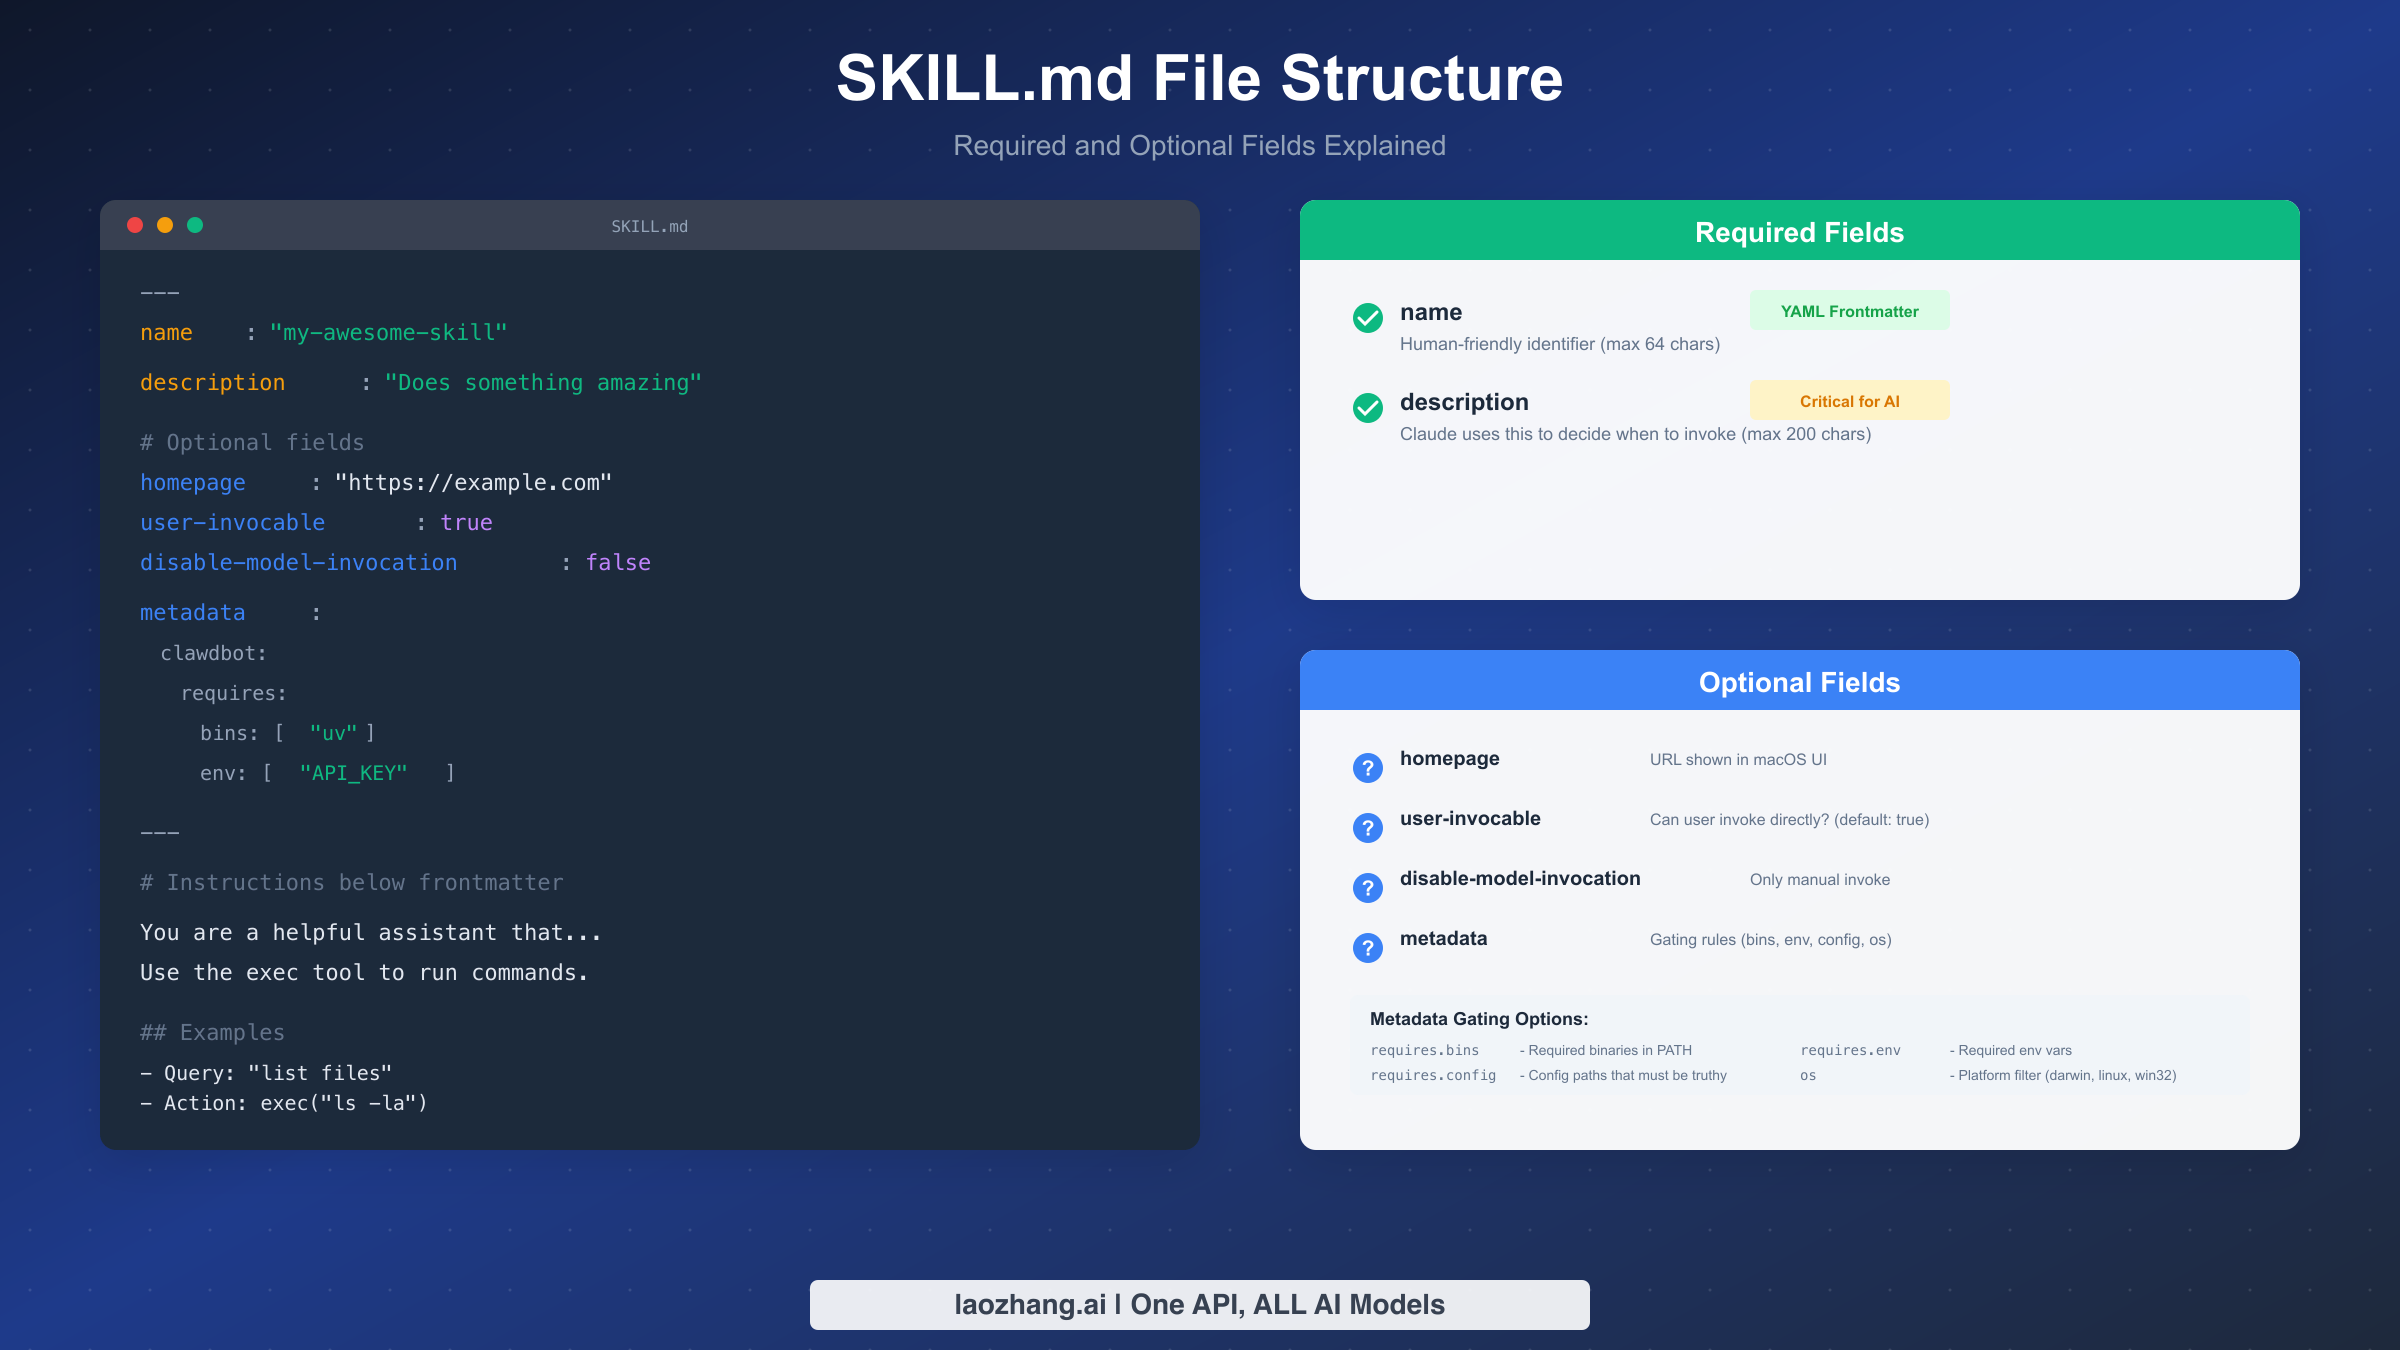
The SKILL.md file is the heart of every Clawdbot skill. It consists of two parts: YAML frontmatter containing metadata, and markdown content providing instructions. Understanding each component gives you full control over how your skill behaves.
Required Fields
Every SKILL.md must include these two fields in the YAML frontmatter:
| Field | Description | Limit |
|---|---|---|
name | Human-friendly identifier for your skill | 64 characters |
description | Explains when Clawdbot should invoke this skill | 200 characters |
The description field is particularly critical because Clawdbot uses it to determine when to activate your skill. A well-written description ensures your skill triggers at the right moments. For example, "Docker container management including starting, stopping, viewing logs, and cleanup" is more effective than simply "Docker helper" because it explicitly mentions the actions Clawdbot should associate with this skill.
Optional Metadata Fields
Beyond the basics, several optional fields let you fine-tune skill behavior:
The homepage field specifies a URL displayed in the macOS UI, useful for linking to documentation or project pages. The user-invocable field (default: true) controls whether users can manually trigger the skill. Setting disable-model-invocation to true prevents Clawdbot from automatically invoking the skill based on context—useful for skills with side effects like deployment or messaging where you want explicit user control.
The most powerful optional section is metadata, which contains gating rules that control when your skill loads. The gating system supports several requirement types that ensure your skill only appears when its dependencies are available.
Gating with metadata.clawdbot.requires
Gating prevents skills from loading when their requirements aren't met:
yamlmetadata:
  clawdbot:
    requires:
      bins: ["docker", "kubectl"]  # Required binaries in PATH
      env: ["DOCKER_HOST"]          # Required environment variables
      config: ["containers.enabled"] # Config paths that must be truthy
    os: darwin                       # Platform filter (darwin, linux, win32)
The requires.bins array lists executables that must exist in PATH. If you create a Docker skill, gating on bins: ["docker"] ensures the skill only appears on systems with Docker installed. The requires.env array works similarly for environment variables—perfect for skills requiring API keys. The requires.config option checks Clawdbot's configuration for specific settings.
The os field restricts your skill to specific platforms. A macOS-only skill controlling Apple Notes would use os: darwin, while a Linux service management skill might specify os: linux.
The Instruction Body
Below the YAML frontmatter, markdown content provides detailed instructions. This is where you teach Clawdbot how to use your skill effectively. Structure your instructions clearly with sections for different operations, include examples showing expected inputs and actions, and provide any necessary context about the tools or APIs involved.
A well-structured instruction section typically includes an overview paragraph, specific action guidelines, concrete examples, and important notes or warnings. The more specific your instructions, the more reliably Clawdbot will execute the intended actions.
Real-World Skill Examples
Abstract concepts become concrete through examples. Let's examine three progressively complex skills that demonstrate different patterns and capabilities.
Example 1: Simple CLI Integration
This Linear task management skill shows basic tool integration:
markdown---
name: linear-tasks
description: Create, update, and query Linear issues and projects using the linear CLI
metadata:
  clawdbot:
    requires:
      bins: ["linear"]
      env: ["LINEAR_API_KEY"]
---

You help manage Linear tasks and projects.

## Creating Issues
Use: linear issue create --title "Title" --description "Details" --team "TEAM"

## Listing Issues
Use: linear issue list --assignee @me --state "In Progress"

## Updating Status
Use: linear issue update ISSUE-123 --state "Done"

## Best Practices
- Always confirm before creating new issues
- Include relevant context in descriptions
- Use appropriate team identifiers
This skill gates on both the linear CLI tool and the LINEAR_API_KEY environment variable, ensuring it only loads when the Linear integration is properly configured. The instructions are action-oriented with specific command templates.
Example 2: API-Based Skill with Dynamic Tools
For more sophisticated integrations, skills can define custom tools. If you're building skills that call AI APIs, services like laozhang.ai provide affordable access to models like Claude and GPT-4, making it easy to create AI-powered skill extensions without managing multiple API keys.
Here's a web search skill pattern:
markdown---
name: web-search
description: Search the web and retrieve current information using Exa neural search
metadata:
  clawdbot:
    requires:
      env: ["EXA_API_KEY"]
    primaryEnv: EXA_API_KEY
---

You perform intelligent web searches to find current, relevant information.

## Search Types

**General Search**
When users need current information on any topic, use the search endpoint
with relevant keywords and context.

**Code Search**
For programming questions, use the code search mode to find relevant
repositories, documentation, and Stack Overflow answers.

## Response Format
1. Summarize the most relevant findings
2. Include source URLs for verification
3. Note the publication dates for time-sensitive topics

## Limitations
- Results reflect publicly indexed content
- Some paywalled content may not be accessible
- Always cite sources when presenting information
Example 3: Multi-File Skill with Resources
Complex skills can include supporting files. The skill directory structure might look like:
~/.clawdbot/skills/report-generator/
├── SKILL.md
├── templates/
│   ├── weekly-report.md
│   └── sprint-summary.md
└── resources/
    └── style-guide.md
The SKILL.md would reference these resources:
markdown---
name: report-generator
description: Generate formatted reports using predefined templates for weekly updates and sprint summaries
---

You generate professional reports using the templates in ./templates/.

## Available Templates

### Weekly Report
Use `templates/weekly-report.md` for standard weekly status updates.
Fill in the placeholder sections with relevant information.

### Sprint Summary
Use `templates/sprint-summary.md` for end-of-sprint documentation.
Include completed items, blockers, and next sprint goals.

## Style Guidelines
Follow the conventions in `resources/style-guide.md` for consistency:
- Use bullet points for action items
- Include dates in ISO format (YYYY-MM-DD)
- Keep summaries under 200 words

## Workflow
1. Ask which report type the user needs
2. Gather required information through conversation
3. Generate the report using the appropriate template
4. Offer to save or copy the result
These examples demonstrate the flexibility of the skill system. From simple CLI wrappers to complex multi-file integrations, the same SKILL.md structure scales to handle virtually any use case.
Advanced Skill Features
Once you've mastered the basics, advanced features unlock powerful capabilities for specialized workflows and enterprise environments.
Install Hooks
Skills can specify installation instructions that appear when requirements aren't met. The metadata.clawdbot.install array defines installation options:
yamlmetadata:
  clawdbot:
    requires:
      bins: ["uv"]
    install:
      - id: brew
        kind: homebrew
        formula: astral-sh/tap/uv
        bins: ["uv"]
        label: "Install uv via Homebrew"
      - id: pip
        kind: pip
        package: uv
        bins: ["uv"]
        label: "Install uv via pip"
When a user tries to invoke a skill with missing dependencies, Clawdbot presents these installation options, streamlining the setup process.
Subagent Execution
Skills can specify that they should run in dedicated subagent processes, useful for long-running tasks or operations requiring isolation:
yamlmetadata:
  clawdbot:
    subagent: true
    subagentConfig:
      timeout: 300000  # 5 minutes
      maxTokens: 8192
Dynamic Tool Injection
Advanced skills can dynamically add tools based on context. The command-dispatch and command-tool fields enable direct tool dispatch:
yaml---
name: quick-deploy
description: Deploy the current project with one command
command-dispatch: tool
command-tool: exec
---
This pattern is useful for skills that should immediately execute a specific action rather than engaging in conversation.
Token Cost Optimization
Each loaded skill consumes tokens from your context window. The formula is approximately:
195 + Σ(97 + name_length + description_length + location_length)
For typical skills, this averages around 24 tokens per skill. When building large skill collections, keep descriptions concise without sacrificing clarity. Disable or unload skills you're not actively using to preserve context for conversations.
Config Overrides
The moltbot.json configuration file allows per-skill customization:
json{
  "skills": {
    "entries": {
      "my-skill": {
        "enabled": true,
        "apiKey": "sk-...",
        "env": { "CUSTOM_VAR": "value" },
        "config": { "customField": "value" }
      }
    }
  }
}
This separation keeps sensitive values out of SKILL.md files while allowing skill-specific configuration.
Troubleshooting Common Issues
Even well-crafted skills sometimes fail to load or behave unexpectedly. Understanding common issues and their solutions will save you debugging time.
Skill Not Loading
When your skill doesn't appear in clawdbot skills list, check these items systematically:
First, verify the file structure. The SKILL.md filename must be exactly SKILL.md (all caps, .md extension). The file must be directly inside the skill directory, not nested in subdirectories. Confirm the skill directory is in a valid location (~/.clawdbot/skills/, ./skills/, or bundled).
Second, validate the YAML frontmatter. YAML is sensitive to indentation—use exactly two spaces, not tabs. Ensure the frontmatter opens and closes with triple dashes (---). Check that required fields (name, description) are present and properly quoted if they contain special characters.
Third, review gating requirements. If your skill uses requires.bins, verify those binaries exist in PATH by running which binary-name. For requires.env, confirm the environment variables are set in your shell profile. Remember that sandboxed agents need binaries installed inside the container as well.
Skill Loads but Doesn't Invoke
If the skill appears in the list but Clawdbot never activates it, the description likely doesn't match user intent. Review your description—does it clearly describe when the skill should activate? Try making it more specific with action words. Test with explicit invocation: some users configure disable-model-invocation: true and forget they need to manually trigger.
Metadata Validation Errors
Invalid metadata prevents skill loading. Common mistakes include JSON syntax errors in the metadata field, mismatched brackets or quotes, and invalid field names. Validate your YAML with an online tool like yamllint.com before troubleshooting further.
Environment Variable Issues
Skills requiring environment variables often fail silently when those variables aren't set. Add debugging by temporarily removing the requires.env gating and adding instructions to check the variable:
markdownBefore proceeding, verify the API key is available:
exec("echo $MY_API_KEY | head -c 10")
Once confirmed, re-enable the gating.
Platform-Specific Problems
Skills restricted by os field will silently skip on unsupported platforms. If you're developing cross-platform skills, test on each target operating system. For Windows users, remember that Clawdbot requires WSL2—native Windows is not supported.
Publishing to ClawdHub
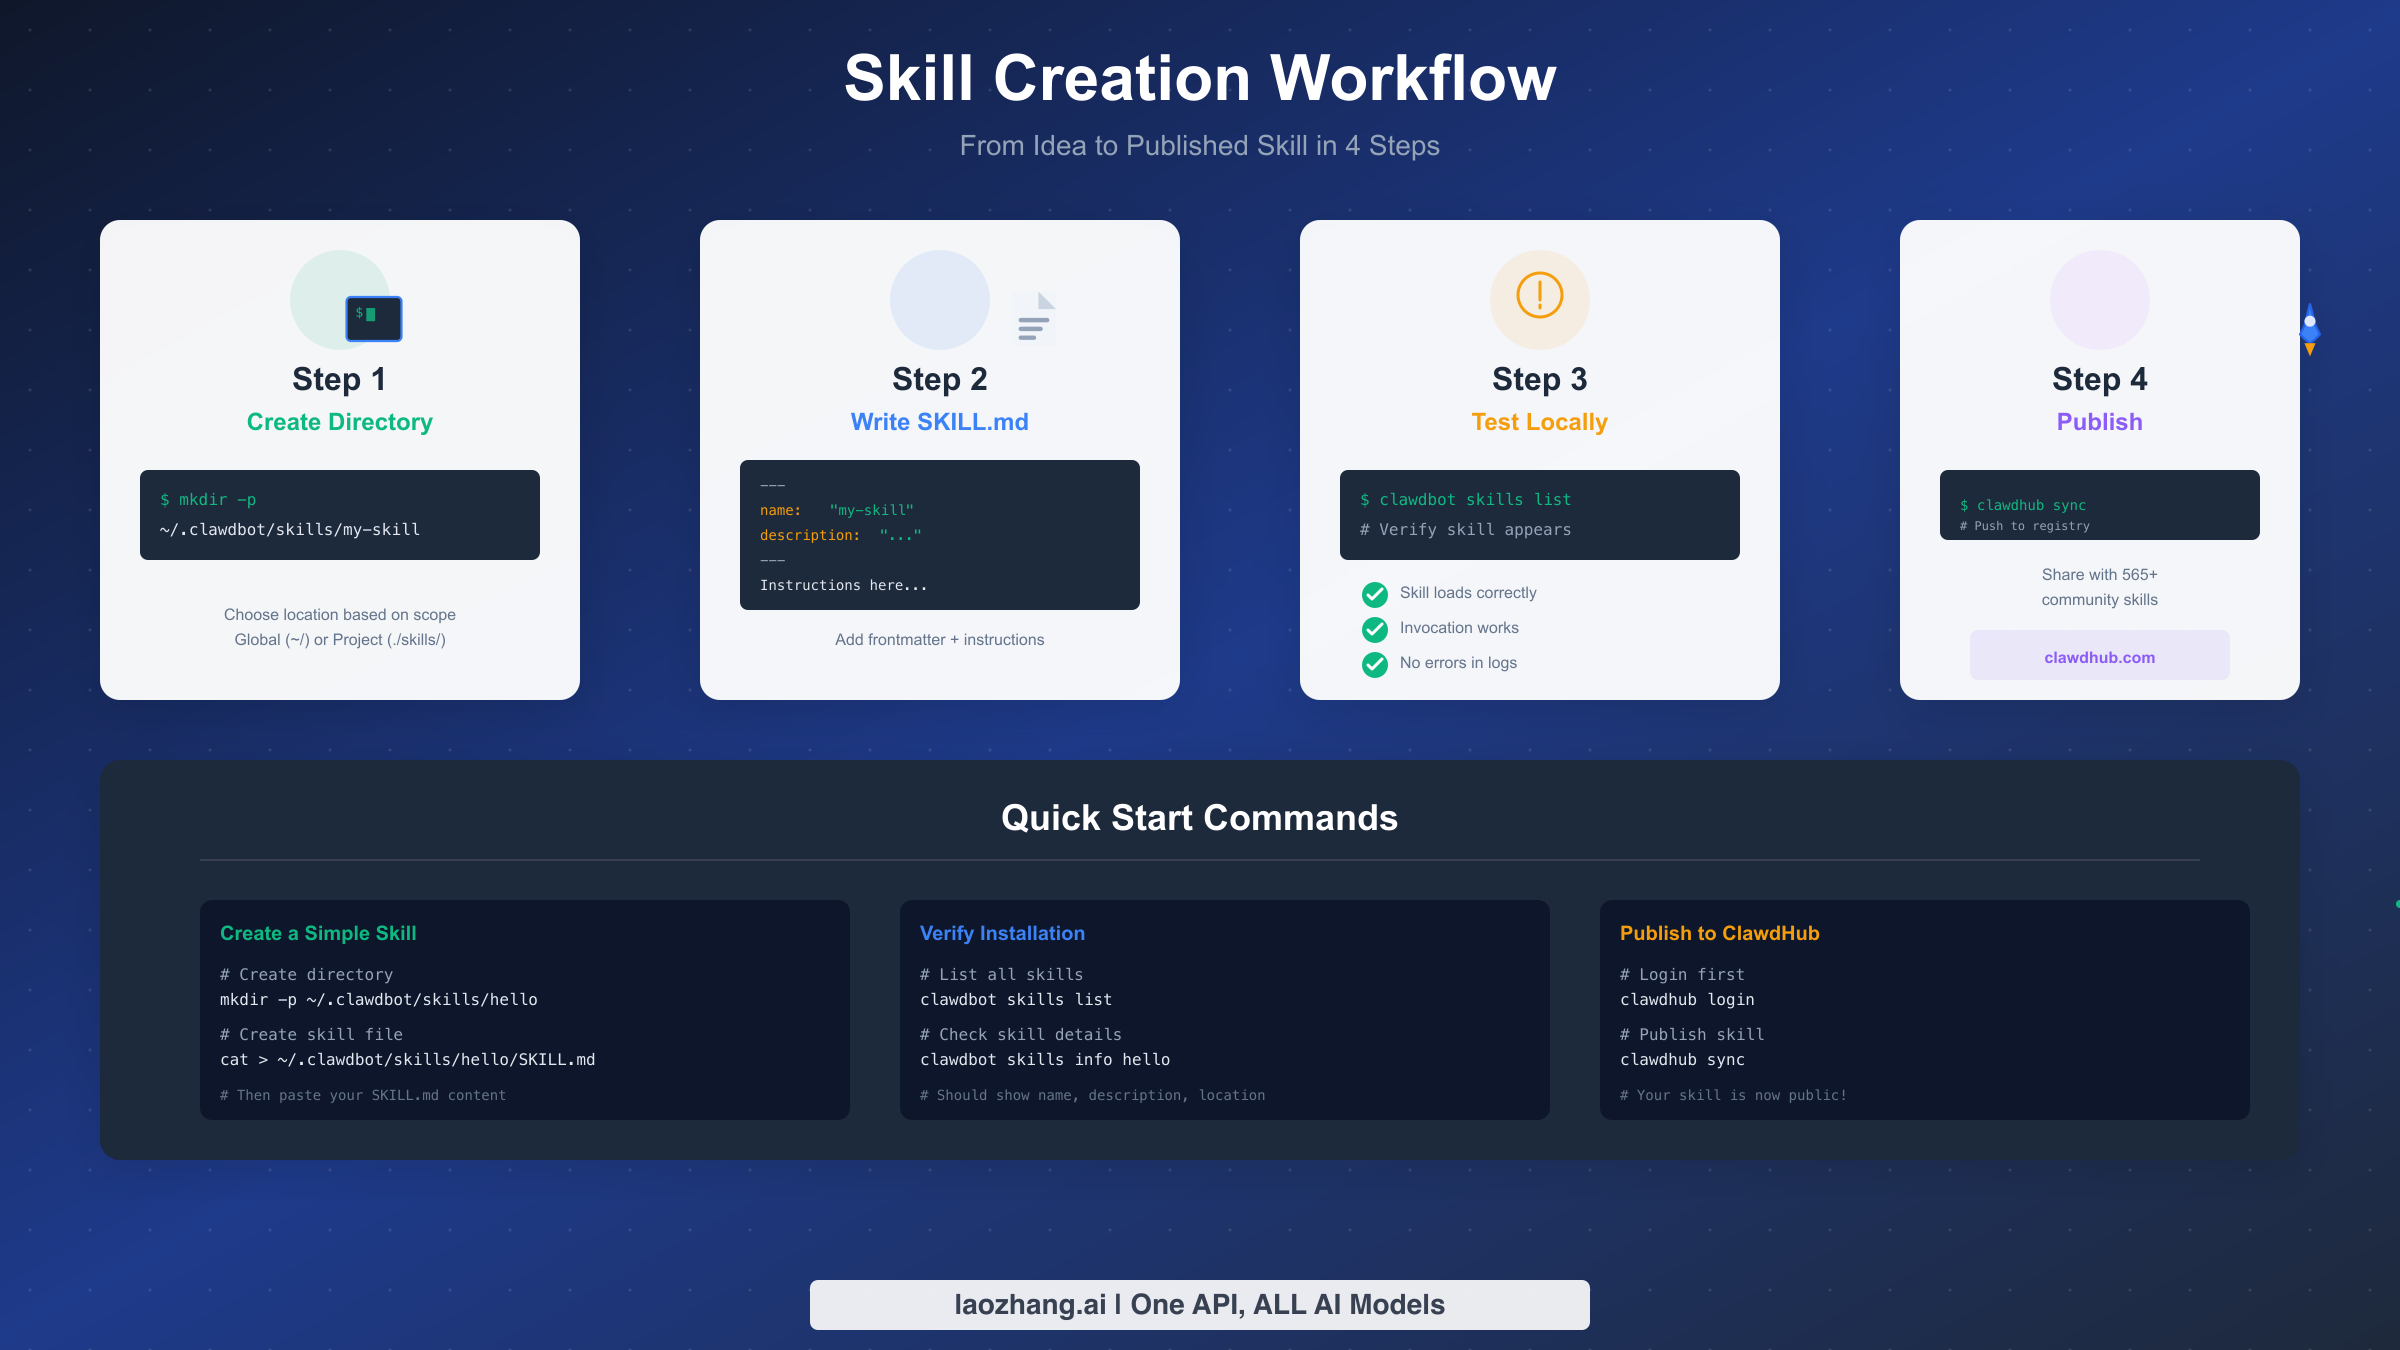
ClawdHub is the public registry where the community shares Clawdbot skills. Publishing your skill makes it discoverable and installable by anyone running clawdhub install your-skill-name.
Preparing for Publication
Before publishing, ensure your skill meets quality standards. The description should clearly explain the skill's purpose and when it activates. Include practical examples in the instruction body. Test thoroughly on your own system. Add appropriate gating so the skill only loads when dependencies are available. Consider adding a homepage field linking to documentation or a GitHub repository.
Publishing Workflow
First, authenticate with ClawdHub:
bashclawdhub login
This opens a browser for authentication. Once logged in, navigate to your skill directory and run:
bashclawdhub sync
The command validates your SKILL.md, uploads it to the registry, and creates a versioned entry. You'll receive a confirmation with the public URL where others can find your skill.
Versioning and Updates
ClawdHub supports semantic versioning with a latest tag always pointing to the most recent release. To update an existing skill:
- Make your changes locally
- Test thoroughly
- Run
clawdhub syncagain - The new version uploads with changelog tracking
Users who installed your skill can update with clawdhub update your-skill-name or clawdhub update --all for bulk updates.
Community Contribution
Published skills may also appear in curated lists like the awesome-clawdbot-skills repository, which catalogs 565+ skills across 30+ categories. After publishing to ClawdHub, consider submitting your skill to these community resources for additional visibility. The documentation at docs.laozhang.ai provides examples of integrating AI capabilities into custom skills if you're building more sophisticated AI-powered integrations.
Security Best Practices
Skills run with the same permissions as Clawdbot itself, meaning they can access files, execute commands, and interact with network services. This power demands responsible development practices.
API Key Handling
Never hardcode API keys in SKILL.md files. Instead, use the requires.env gating to ensure environment variables are set, then reference those variables in your instructions. For skills requiring multiple credentials, consider using the moltbot.json config file with the apiKey field, which injects credentials securely at runtime.
Third-Party Skill Safety
Treat community skills as you would any third-party code: with healthy skepticism. Before installing skills from ClawdHub, review the SKILL.md contents to understand what actions it can perform. Pay particular attention to skills using exec extensively or requiring broad permissions. When possible, prefer skills from known developers or those with significant community adoption.
Sandboxing Considerations
For maximum security, run Clawdbot in a sandboxed environment. The agents.defaults.sandbox.docker.setupCommand configuration option lets you specify a setup script for containerized execution. Skills running in sandboxes need their binary dependencies installed inside the container—the host-level requires.bins check happens at load time, but execution occurs in the sandbox.
Limiting Skill Permissions
For skills with potentially dangerous operations (deployments, data deletion, messaging), use disable-model-invocation: true to prevent automatic triggering. This ensures the user must explicitly invoke the skill, adding a safety layer for consequential actions.
Auditing Active Skills
Regularly review your loaded skills with clawdbot skills list. Remove or disable skills you no longer use to reduce your attack surface and context window consumption. For enterprise environments, consider maintaining a curated list of approved skills rather than allowing unrestricted ClawdHub installations.
Conclusion and Next Steps
You now have comprehensive knowledge for creating Clawdbot skills at any complexity level. From the minimal two-field SKILL.md to sophisticated multi-file skills with install hooks and dynamic tooling, the patterns covered here handle virtually any integration scenario.
The Clawdbot ecosystem continues expanding rapidly. The 565+ skills already available on ClawdHub demonstrate the community's creativity, and your contributions can help others automate their workflows. Whether you're building personal utilities or publishing broadly useful integrations, the skill system's simplicity makes development accessible while its depth supports enterprise-grade solutions.
For continued learning, explore the official Clawdbot documentation for the latest feature additions, browse awesome-clawdbot-skills for inspiration, and join the active Discord community where developers share techniques and troubleshoot together.
The best way to master skill development is through practice. Start with a personal workflow you want to automate, build the skill, test it thoroughly, and consider sharing it with the community. Each skill you create deepens your understanding and contributes to the growing ecosystem that makes Clawdbot increasingly powerful for everyone.
FAQ
How long does it take to create a Clawdbot skill?
A basic skill takes about 5 minutes to create—just a directory and a SKILL.md file with name, description, and instructions. More complex skills with gating, install hooks, and supporting files might take 30-60 minutes for initial development plus testing time.
Do I need programming experience to create skills?
No coding is required for most skills. Skills are markdown files containing instructions that teach Clawdbot how to use existing tools and commands. However, understanding command-line interfaces and the tools you're integrating will help you write more effective instructions.
Can I use the same skill across different AI assistants?
Yes, Clawdbot skills follow the AgentSkills standard, which is supported by multiple AI coding assistants including Claude Code, Cursor, Gemini CLI, and others. A well-written skill often works across these platforms with minimal or no modifications.
How do I update a skill I've already published to ClawdHub?
Simply make your changes locally, test them, and run clawdhub sync again from your skill directory. ClawdHub automatically versions your updates and users can pull the new version with clawdhub update.
What's the difference between global and workspace skills?
Global skills (in ~/.clawdbot/skills/) are available across all projects on your machine. Workspace skills (in ./skills/ within a project) only load for that specific project and take precedence over global skills with the same name, allowing project-specific customizations.