Clawdbot (now OpenClaw) can be installed anywhere - you don't need a Mac Mini. Run it on any machine with 2GB RAM and Node.js 22+ using the one-click installer: curl -fsSL https://clawd.bot/install.sh | bash. For containerized deployment, use Docker Compose with --restart unless-stopped for 24/7 operation. VPS options start at EUR 3.49/month on Hetzner. This guide covers installation, Docker setup, platform-specific deployment (Windows WSL2, Linux, macOS, Raspberry Pi), and troubleshooting common errors like Discord's 4014.
Why You Don't Need a Mac Mini for Clawdbot
One of the most persistent myths about Clawdbot is that you need a Mac Mini or expensive hardware to run it. This misconception likely originated from early adopters who happened to use Macs for development, but it's completely unfounded. Clawdbot is a Node.js application that runs beautifully on virtually any modern hardware, from a $3.49/month VPS to a Raspberry Pi sitting in your closet.
The truth is that Clawdbot's resource requirements are remarkably modest. At its core, it's a message relay and AI API bridge - not a resource-intensive application. The minimum requirements are just 1GB of RAM and a single vCPU core, which means even the cheapest cloud instances can run it without breaking a sweat. For most users running a personal AI assistant across a few channels, these minimum specs work perfectly fine.
What really matters for Clawdbot isn't expensive hardware - it's reliable uptime. A $1000 Mac Mini sitting on your desk will actually perform worse than a $5/month VPS if your home internet goes down, your laptop sleeps, or someone accidentally unplugs your machine. The "run it anywhere" philosophy of Clawdbot is one of its greatest strengths, and understanding this frees you from unnecessary hardware purchases.
Let's compare the real costs of running Clawdbot across different platforms. Hetzner offers cloud instances starting at EUR 3.49/month with 4GB RAM and 2 vCPUs - more than enough for Clawdbot with room to spare. DigitalOcean Droplets start at $6/month for 1GB RAM configurations. AWS Free Tier gives you 12 months of t2.micro instances at zero cost. Even Railway's usage-based pricing typically runs $5-20/month for Clawdbot workloads. Compare this to a Mac Mini's $599+ starting price, and the economics become crystal clear.
The hardware myth persists partly because early documentation focused on macOS-specific instructions. But Clawdbot has always been cross-platform, and today's installation options make it easier than ever to run on Linux, Windows (via WSL2), and various cloud platforms. If you've been holding off on trying Clawdbot because you thought you needed expensive hardware, consider this myth thoroughly busted.
Prerequisites and System Requirements
Before diving into installation, let's ensure your system meets Clawdbot's requirements. Understanding these specifications upfront will save you troubleshooting time later and help you choose the right deployment strategy for your needs.
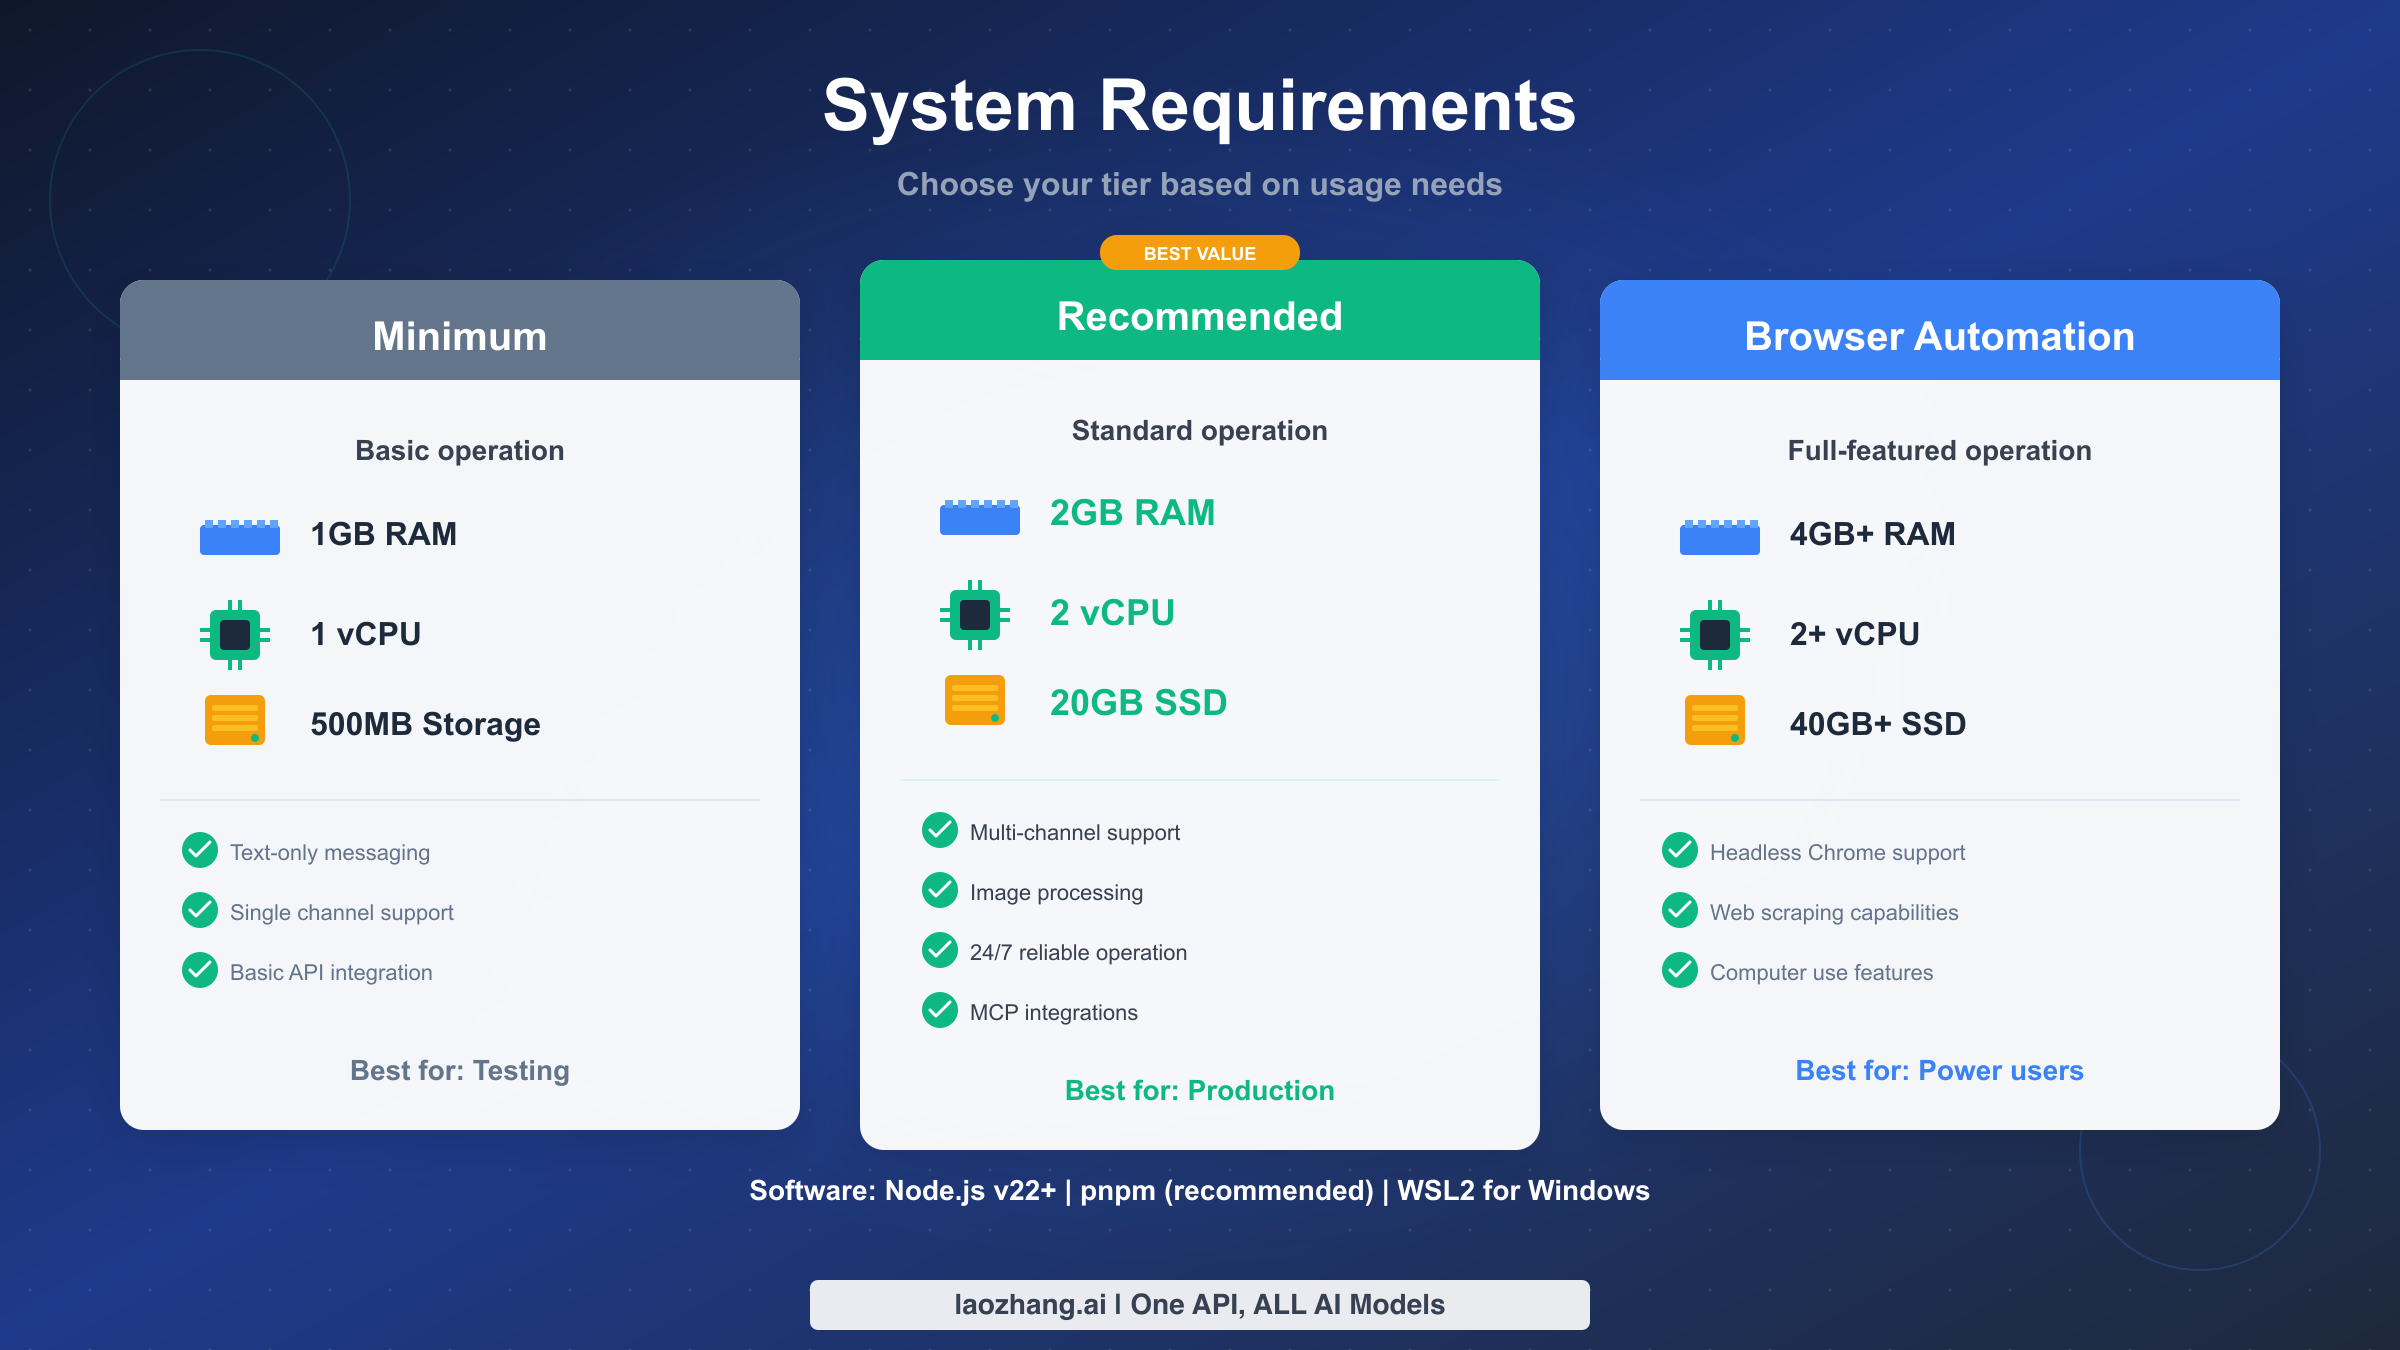
Clawdbot's hardware requirements fall into three tiers based on your intended usage. The minimum tier requires just 1GB RAM, 1 vCPU, and 500MB of storage - sufficient for text-only messaging on a single channel. Most users should target the recommended tier: 2GB RAM, 2 vCPUs, and 20GB SSD storage. This configuration handles multi-channel support, image processing, and 24/7 reliable operation without any performance concerns. The browser automation tier requires 4GB+ RAM, 2+ vCPUs, and 40GB+ SSD storage to support headless Chrome for web scraping and computer use features.
On the software side, Node.js v22 or higher is absolutely required - older versions will not work. The installation process will check your Node version automatically, but it's worth verifying beforehand with node --version. If you're below v22, you'll need to upgrade using your preferred Node version manager (nvm, fnm, or volta are all excellent choices). The recommended package manager is pnpm, which Clawdbot uses internally for its workspace structure, though npm works as well.
Platform support is comprehensive but comes with one critical caveat for Windows users: native Windows is not supported. You must use Windows Subsystem for Linux 2 (WSL2) with a Linux distribution like Ubuntu. This isn't a limitation of Clawdbot specifically, but rather reflects the Unix-centric nature of many Node.js ecosystem tools. The good news is that WSL2 performance is excellent, and the setup process is straightforward.
For Linux users, virtually any modern distribution works: Ubuntu, Debian, Fedora, CentOS, Arch, and others all run Clawdbot without issues. macOS users on both Intel and Apple Silicon are fully supported. Raspberry Pi users should ensure they're running a 64-bit OS (Raspberry Pi OS 64-bit or Ubuntu Server) on at least a Pi 4 with 2GB RAM or higher for the best experience.
Network requirements are minimal but important to understand. Clawdbot uses port 18789 for its Gateway WebSocket connections and port 18791 for browser control interface. If you're running behind a firewall or on a VPS, you'll need to ensure these ports are accessible. The Gateway port is essential for client connections, while the browser control port is only needed if you're using browser automation features.
One-Click Installation with Setup Wizard
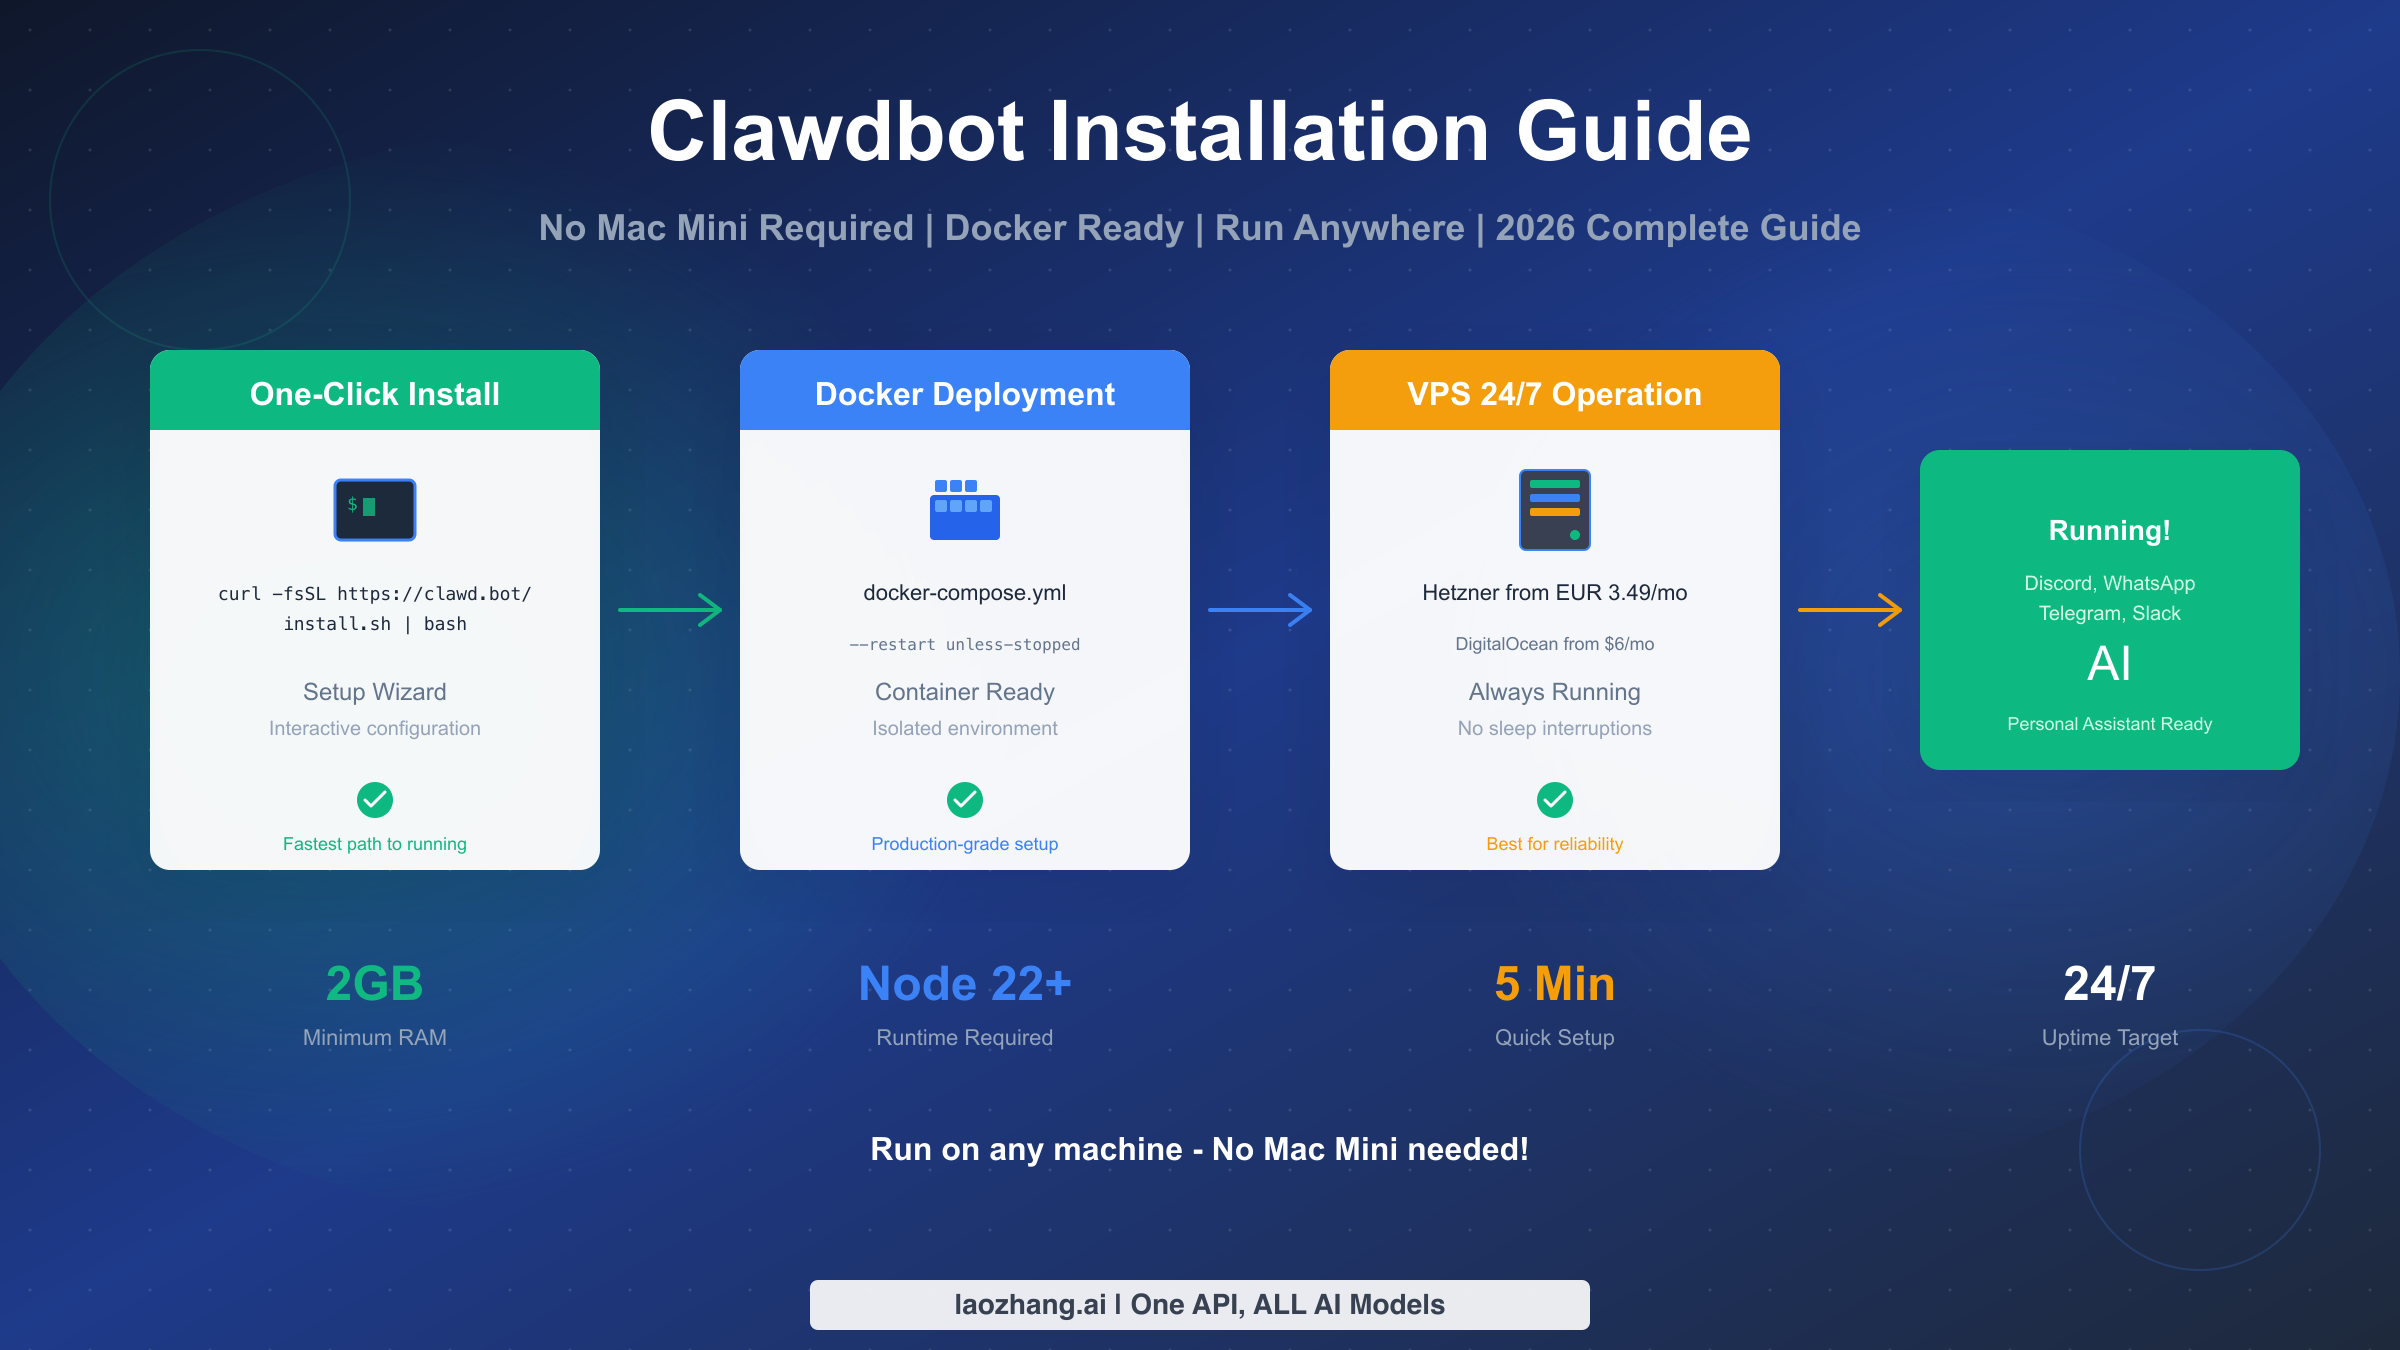
The fastest path to running Clawdbot is the official one-click installation script. This method handles all dependencies, downloads the latest version, and walks you through initial configuration with an interactive wizard. For most users, this is the recommended approach.
Open your terminal (or WSL2 terminal on Windows) and run the following command:
bashcurl -fsSL https://clawd.bot/install.sh | bash
This script performs several important tasks automatically. First, it verifies that your Node.js version meets the minimum requirement of v22+. Then it downloads the latest stable release of Clawdbot and extracts it to the appropriate directory. Finally, it installs all necessary dependencies using pnpm, creating a ready-to-run installation.
After the installation completes, you'll be guided through the Setup Wizard - an interactive configuration process that establishes your initial settings. The wizard covers several key areas that are essential for getting Clawdbot operational.
The first wizard section involves API configuration. You'll need to provide your Claude API key for Anthropic's AI capabilities. If you don't have one yet, check out our Claude API key configuration guide for step-by-step instructions. The wizard will validate your key before proceeding to ensure everything is correctly configured.
Channel setup comes next, where you'll configure your first messaging platform. Discord is the most common choice and requires creating a bot application in the Discord Developer Portal. You'll need your bot token and must enable the Message Content Intent - failing to enable this intent is the #1 cause of the dreaded Error 4014. The wizard provides clear prompts for each piece of information needed.
For users wanting to connect multiple channels, the wizard supports configuration for WhatsApp (via Baileys), Telegram, Slack, Signal, and even iMessage (on macOS only). Each channel has its own authentication flow, and the wizard guides you through the specific requirements for each platform you choose to enable.
Once the wizard completes, you can start Clawdbot with a simple command:
bashclawdbot start
The first run may take a moment as Clawdbot initializes its connections and verifies your channel configurations. You should see log output indicating successful connections to your configured channels. At this point, you can send a test message to your bot to verify everything is working correctly.
However, there's one critical limitation with this basic setup: when you close your terminal or your computer sleeps, Clawdbot stops running. This is where deployment strategies become important, and we'll cover those in detail in the platform-specific sections below. For testing and development, the basic installation is perfect, but for 24/7 operation, you'll need to implement one of the persistence solutions covered later in this guide.
Docker Deployment Guide
Docker provides an excellent deployment option for Clawdbot, offering isolation, easy updates, and built-in restart policies. For users comfortable with containers, this is often the preferred approach - especially on VPS deployments where you want reliable, hands-off operation.
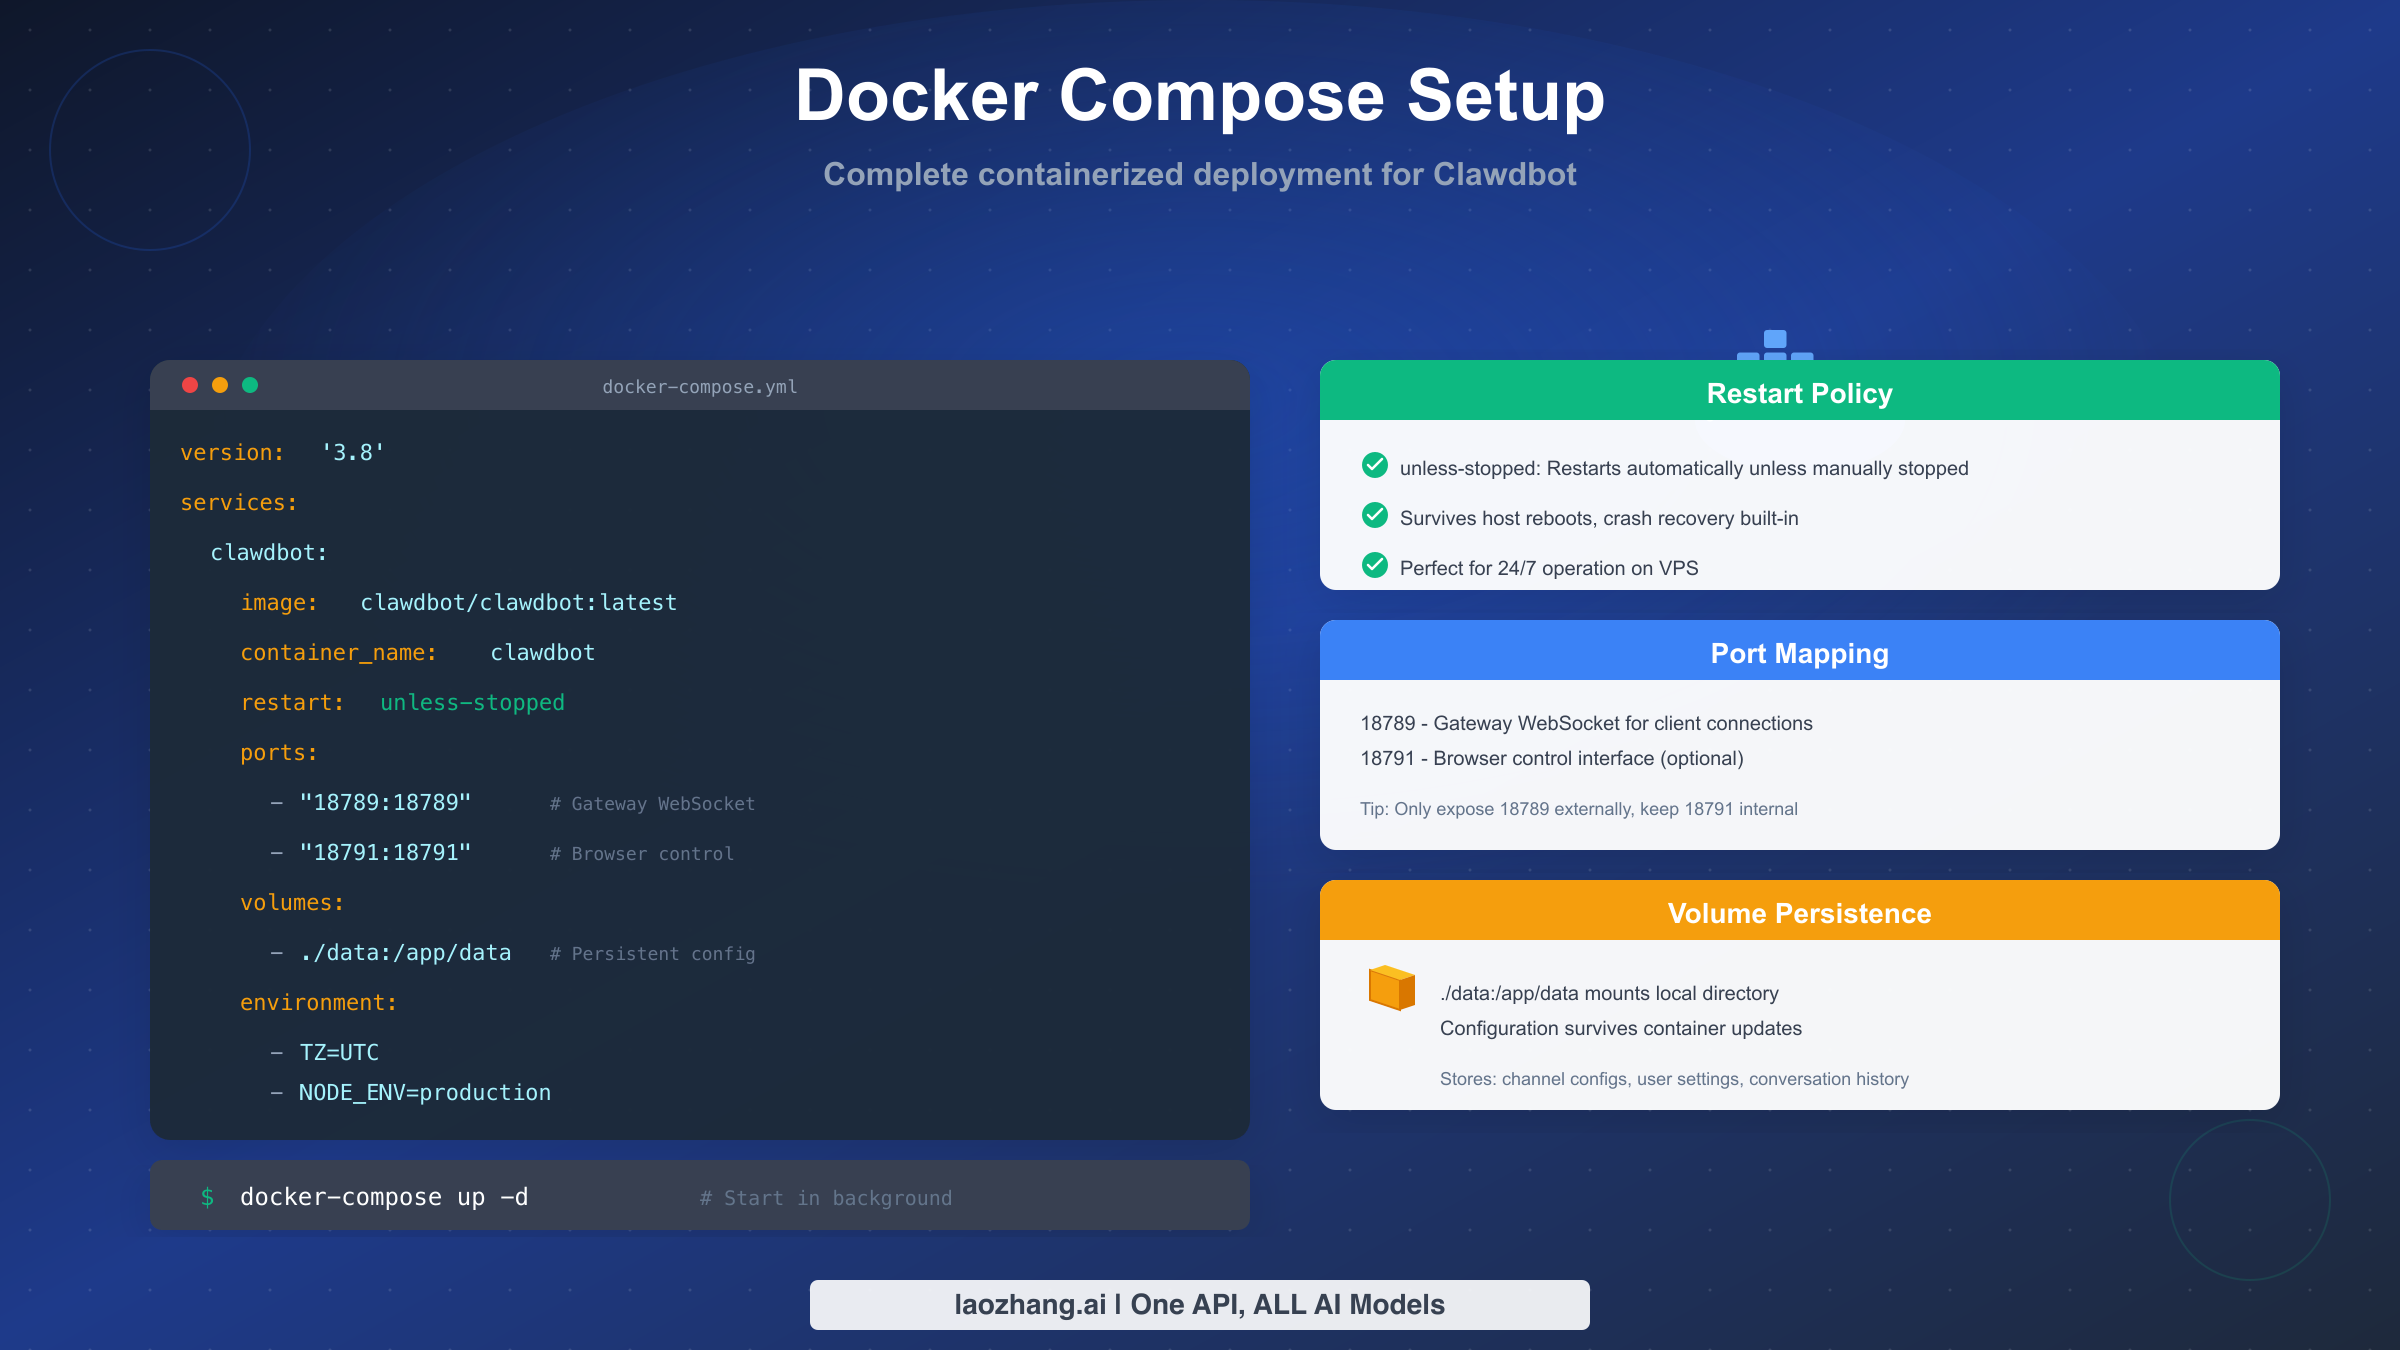
Let's create a complete Docker Compose configuration that handles everything you need for production deployment. Create a file named docker-compose.yml in your preferred directory:
yamlversion: '3.8'

services:
  clawdbot:
    image: clawdbot/clawdbot:latest
    container_name: clawdbot
    restart: unless-stopped
    ports:
      - "18789:18789"  # Gateway WebSocket
      - "18791:18791"  # Browser control (optional)
    volumes:
      - ./data:/app/data
    environment:
      - TZ=UTC
      - NODE_ENV=production
Let's examine each section of this configuration to understand what it does and why. The restart: unless-stopped policy is perhaps the most important setting for 24/7 operation. This tells Docker to automatically restart the container if it crashes, if Docker itself restarts, or if the host system reboots - but not if you manually stop it with docker-compose down. This behavior is ideal for production deployments where you want automatic recovery from failures while retaining control over intentional stops.
The port mappings expose two key services. Port 18789 is the Gateway WebSocket that clients connect to - this is essential for Clawdbot to function. Port 18791 is the browser control interface, which is only needed if you're using browser automation features. For security, you might consider only exposing port 18789 externally and keeping 18791 internal if you don't need browser automation, or if you're accessing it through a reverse proxy.
Volume mounting with ./data:/app/data is crucial for persistence. This mounts a local data directory into the container, ensuring that your configuration, channel settings, and conversation history survive container updates and rebuilds. Without this volume mount, you would lose all settings every time you update Clawdbot - not ideal for a production deployment.
Environment variables provide additional configuration. Setting TZ=UTC ensures consistent timestamp handling across different host systems. NODE_ENV=production tells Node.js to optimize for production workloads, which can improve performance and reduce memory usage.
To start your containerized Clawdbot, run:
bashdocker-compose up -d
The -d flag runs the container in detached mode, freeing your terminal. You can check the logs with docker-compose logs -f clawdbot to monitor the startup process and verify successful channel connections.
For initial setup within the Docker container, you may need to run the setup wizard interactively:
bashdocker-compose exec clawdbot clawdbot setup
This launches the same interactive wizard described in the one-click installation section, but runs it within the container context. Your configuration will be saved to the mounted volume, persisting across container restarts.
Updating Clawdbot in Docker is straightforward. Pull the latest image and recreate the container:
bashdocker-compose pull
docker-compose up -d
Because your configuration lives in the mounted volume, updates preserve all your settings. This is one of Docker's major advantages for production deployments - clean, predictable updates without configuration loss.
Platform-Specific Deployment and Persistence
While installation gets Clawdbot running, true deployment means ensuring it stays running - surviving terminal closures, system sleeps, reboots, and crashes. Each operating system has its own preferred method for background service management, and understanding these options is key to reliable 24/7 operation.
Windows with WSL2 presents unique considerations because you're essentially running Linux inside Windows. The most reliable persistence method combines Windows Task Scheduler with a WSL startup script. First, create a script in your WSL home directory:
bash#!/bin/bash

cd /home/yourusername/clawdbot
/usr/bin/node /home/yourusername/clawdbot/src/index.js
Make it executable with chmod +x ~/start-clawdbot.sh. Then create a Windows scheduled task that runs at system startup:
wsl -d Ubuntu -u root /home/yourusername/start-clawdbot.sh
This approach ensures Clawdbot starts automatically when Windows boots, even before you log in. The key limitation to understand is that WSL2 itself must remain running - if Windows completely shuts down (not just sleep), the scheduled task will restart everything on the next boot.
Linux with systemd provides the most robust persistence solution, which is why it's the preferred choice for VPS deployments. Create a systemd service unit file:
ini[Unit]
Description=Clawdbot AI Assistant
After=network.target

[Service]
Type=simple
User=clawdbot
WorkingDirectory=/opt/clawdbot
ExecStart=/usr/bin/node /opt/clawdbot/src/index.js
Restart=always
RestartSec=10
StandardOutput=journal
StandardError=journal

[Install]
WantedBy=multi-user.target
Save this to /etc/systemd/system/clawdbot.service, then enable and start it:
bashsudo systemctl daemon-reload
sudo systemctl enable clawdbot
sudo systemctl start clawdbot
The Restart=always directive ensures automatic recovery from crashes, while After=network.target ensures network connectivity is available before Clawdbot starts. This is the gold standard for Linux server deployments.
macOS with LaunchAgent provides persistence at the user level - Clawdbot starts when you log in and runs in the background. Create a plist file at ~/Library/LaunchAgents/com.clawdbot.plist:
xml<?xml version="1.0" encoding="UTF-8"?>
<!DOCTYPE plist PUBLIC "-//Apple//DTD PLIST 1.0//EN" "http://www.apple.com/DTDs/PropertyList-1.0.dtd">
<plist version="1.0">
<dict>
    <key>Label</key>
    <string>com.clawdbot</string>
    <key>ProgramArguments</key>
    <array>
        <string>/usr/local/bin/node</string>
        <string>/Users/yourusername/clawdbot/src/index.js</string>
    </array>
    <key>WorkingDirectory</key>
    <string>/Users/yourusername/clawdbot</string>
    <key>KeepAlive</key>
    <true/>
    <key>RunAtLoad</key>
    <true/>
    <key>StandardOutPath</key>
    <string>/tmp/clawdbot.log</string>
    <key>StandardErrorPath</key>
    <string>/tmp/clawdbot.error.log</string>
</dict>
</plist>
Load the agent with launchctl load ~/Library/LaunchAgents/com.clawdbot.plist. The critical limitation on macOS is sleep: when your Mac sleeps, network connections drop, and Clawdbot effectively pauses. For true 24/7 operation on macOS, you'll need to disable sleep in Energy Saver preferences - or consider a VPS instead.
Raspberry Pi users benefit from using the same systemd approach as Linux servers. The Pi 4 with at least 2GB RAM makes an excellent always-on home server for Clawdbot. Key considerations include using a quality power supply (power issues cause most Pi instability), a good SD card (or better, USB SSD boot for reliability), and ensuring adequate cooling for 24/7 operation. The ARM64 architecture is fully supported, though some npm packages may require native compilation during installation.
VPS remains the recommended solution for 24/7 operation for most users. The combination of systemd reliability, guaranteed uptime, and extremely low cost (starting at EUR 3.49/month on Hetzner) makes it the pragmatic choice. You avoid all the complexity of keeping local hardware running continuously, and your Clawdbot instance remains accessible even when you're away from home.
For API access flexibility when self-hosting, platforms like laozhang.ai provide unified API access to multiple AI models through a single endpoint, which can simplify your Clawdbot configuration and provide fallback options if one provider experiences issues.
Common Issues and Troubleshooting
Even with careful setup, you may encounter issues during Clawdbot installation or operation. This section covers the most common problems and their solutions, helping you get back to a working state quickly.
Error 4014: Discord Message Content Intent Not Enabled is by far the most common error users encounter. Discord requires explicit opt-in to receive message content for privacy reasons. To fix this, visit the Discord Developer Portal, select your bot application, navigate to the Bot section, and enable the "Message Content Intent" toggle under Privileged Gateway Intents. After enabling, restart Clawdbot. Note that bots in 100+ servers require verification to use this intent.
Error 1008: Unauthorized indicates a token mismatch between your client and gateway configuration. Double-check that your gateway.auth.token setting matches exactly what you've configured. This error commonly occurs after copying configurations between environments or when tokens contain whitespace that gets mishandled. Regenerate your tokens if needed and ensure clean copying without extra characters.
Port Already in Use appears when another process is occupying port 18789 or 18791. On Linux/macOS, identify the conflicting process with lsof -i :18789. You can either stop the conflicting process or configure Clawdbot to use different ports by modifying the gateway configuration. Docker users should check that no host service is using the same ports.
Memory Issues During npm Install can occur on low-memory systems (1GB RAM) when installing dependencies. The solution is to add swap space temporarily:
bashsudo fallocate -l 2G /swapfile
sudo chmod 600 /swapfile
sudo mkswap /swapfile
sudo swapon /swapfile
npm install
sudo swapoff /swapfile
This provides temporary virtual memory for the intensive compilation steps, after which you can remove the swapfile.
Node.js Version Too Old manifests as various cryptic errors about unsupported syntax or missing features. Verify your version with node --version - it must be v22 or higher. Use nvm to install the correct version: nvm install 22 && nvm use 22. On systems with multiple Node versions, ensure your service files or Docker configurations point to the correct binary.
Connection Drops After Some Time usually indicate network timeout issues, particularly on residential internet connections. First, verify your network stability. For VPS deployments, check that your cloud provider isn't implementing aggressive idle connection timeouts. The built-in heartbeat mechanism should prevent most timeout issues, but extremely restrictive networks may still cause problems.
WhatsApp QR Code Won't Scan means the session data may be corrupted. Delete the baileys_auth_info directory and restart Clawdbot to generate a fresh QR code. Ensure you're scanning with the main WhatsApp app, not WhatsApp Business, and that your phone has a stable internet connection during the linking process.
Permission Denied Errors on Linux often relate to file ownership after running commands with different users. Ensure consistent ownership of the Clawdbot directory: sudo chown -R clawdbot:clawdbot /opt/clawdbot. When using systemd, verify the service runs as the user who owns the files.
For additional troubleshooting resources, consult the official OpenClaw documentation at docs.openclaw.ai, which maintains updated solutions for emerging issues. The community Discord server also provides peer support for complex problems.
Conclusion and Next Steps
You now have comprehensive knowledge to deploy Clawdbot on any platform - from the initial myth-busting about hardware requirements through complete deployment configurations for every major operating system. The key takeaways bear repeating: you don't need expensive hardware, VPS deployment offers the best reliability-to-cost ratio, and proper persistence configuration is essential for 24/7 operation.
For most users, the recommended path is clear. Start with the one-click installer on your local machine to verify everything works and configure your channels through the setup wizard. Once you're satisfied with the configuration, migrate to a VPS using Docker Compose with the configuration we provided. This approach gives you the best of both worlds: easy local testing and reliable production deployment.
If you're choosing between deployment methods, consider your priorities. Docker on a VPS offers the cleanest update path and best isolation. Native systemd installation on Linux provides slightly better performance with less overhead. Local deployment on macOS or Windows makes sense for development and testing but isn't recommended for production use due to sleep and reliability concerns.
For extending Clawdbot's capabilities, explore MCP integration for extended capabilities, which allows Clawdbot to interact with external tools and services. You might also want to set up multiple channels to reach users across different platforms, or configure custom personas for different use cases.
The Clawdbot/OpenClaw ecosystem continues to evolve rapidly. Stay updated by watching the GitHub repository for releases, joining the community Discord for announcements, and periodically checking your deployment for available updates. With the foundation you've built through this guide, you're well-prepared to maintain a reliable, always-available AI assistant that serves your needs around the clock.