
Are you struggling to connect Claude Code with your development tools and data sources? The Model Context Protocol (MCP) changes everything. This comprehensive guide shows you exactly how to set up, configure, and optimize MCP plugins for Claude Code, turning your AI assistant into a powerhouse that seamlessly integrates with your entire development ecosystem.
Claude Code MCP enables seamless integration between AI assistants and your development environment through standardized protocols
What is MCP and Why It Matters for Claude Code
The Model Context Protocol (MCP) is Anthropic's open standard that revolutionizes how AI assistants interact with external systems. Launched in late 2024, MCP provides a unified way for Claude Code to connect with databases, APIs, development tools, and file systems - all through a standardized protocol.
Key Benefits of MCP Integration
- Unified Context Access: Claude Code can dynamically discover and use tools without manual integration
- Real-time Data Access: Direct connection to live databases, APIs, and file systems
- Enhanced Security: Keep your data within your infrastructure while leveraging AI capabilities
- Reduced Development Time: Build against a standard protocol instead of maintaining separate connectors
- Team Collaboration: Share MCP configurations across your development team
MCP Architecture Overview
The MCP ecosystem consists of three main components:
- MCP Hosts: Applications like Claude Desktop that consume MCP services
- MCP Clients: Built into hosts to communicate with servers
- MCP Servers: Provide resources, tools, and prompts to clients
Quick Start: Setting Up Your First MCP Plugin
Prerequisites
Before diving in, ensure you have:
- Claude Desktop app installed (Windows or macOS)
- Node.js 18+ or Python 3.10+
- Basic understanding of JSON configuration
- Access to Claude Code (any plan tier)
Step 1: Configure Claude Desktop
The configuration file location varies by operating system:
macOS:
bash~/Library/Application Support/Claude/claude_desktop_config.json
Windows:
bash%APPDATA%\Claude\claude_desktop_config.json
Step 2: Basic Configuration
Create or edit the configuration file:
json{
  "mcpServers": {
    "filesystem": {
      "command": "npx",
      "args": ["-y", "@modelcontextprotocol/server-filesystem", "/path/to/allowed/directory"]
    },
    "github": {
      "command": "npx",
      "args": ["-y", "@modelcontextprotocol/server-github"],
      "env": {
        "GITHUB_PERSONAL_ACCESS_TOKEN": "your-token-here"
      }
    }
  }
}
Step 3: Restart Claude Desktop
After saving the configuration, completely quit and restart Claude Desktop. The MCP icon will appear in the interface if at least one server is properly configured.
Advanced Configuration Techniques
Direct Config File Editing (The Better Way)
While the official CLI wizard forces perfect entry on the first try, experienced developers prefer direct file editing:
json{
  "mcpServers": {
    "custom-server": {
      "command": "node",
      "args": ["./path/to/your/server.js"],
      "env": {
        "API_KEY": "your-api-key",
        "DATABASE_URL": "postgresql://localhost/mydb",
        "LOG_LEVEL": "debug"
      },
      "cwd": "/path/to/working/directory"
    }
  }
}
Pro Tips:
- Keep backups of working configurations
- Use environment variables for sensitive data
- Test configurations incrementally
- Share configs via Git for team consistency
Multiple Server Configuration
json{
  "mcpServers": {
    "database": {
      "command": "python",
      "args": ["./mcp-servers/database_server.py"],
      "env": {
        "DB_CONNECTION": "postgresql://user:pass@localhost/db"
      }
    },
    "slack": {
      "command": "npx",
      "args": ["-y", "@modelcontextprotocol/server-slack"],
      "env": {
        "SLACK_BOT_TOKEN": "xoxb-your-token",
        "SLACK_TEAM_ID": "T1234567890"
      }
    },
    "jira": {
      "command": "node",
      "args": ["./custom-servers/jira-mcp.js"],
      "env": {
        "JIRA_URL": "https://company.atlassian.net",
        "JIRA_EMAIL": "dev@company.com",
        "JIRA_API_TOKEN": "your-api-token"
      }
    }
  }
}
Building Custom MCP Servers
Basic Server Structure (Node.js)
javascriptimport { Server } from '@modelcontextprotocol/sdk/server/index.js';
import { StdioServerTransport } from '@modelcontextprotocol/sdk/server/stdio.js';

const server = new Server({
  name: 'custom-tool-server',
  version: '1.0.0',
}, {
  capabilities: {
    tools: {},
    resources: {},
    prompts: {}
  }
});

// Define tools
server.setRequestHandler('tools/list', async () => {
  return {
    tools: [{
      name: 'query_database',
      description: 'Execute SQL queries on the connected database',
      inputSchema: {
        type: 'object',
        properties: {
          query: { type: 'string', description: 'SQL query to execute' }
        },
        required: ['query']
      }
    }]
  };
});

// Handle tool calls
server.setRequestHandler('tools/call', async (request) => {
  if (request.params.name === 'query_database') {
    const { query } = request.params.arguments;
    // Execute query and return results
    const results = await executeQuery(query);
    return { content: [{ type: 'text', text: JSON.stringify(results) }] };
  }
});

// Start server
const transport = new StdioServerTransport();
await server.connect(transport);
Python Server Example
pythonfrom mcp.server.models import InitializationOptions
from mcp.server import NotificationOptions, Server
from mcp.server.stdio import stdio_server
import asyncio
import json

server = Server("custom-python-server")

@server.list_tools()
async def handle_list_tools():
    return [
        {
            "name": "analyze_code",
            "description": "Analyze Python code for issues",
            "inputSchema": {
                "type": "object",
                "properties": {
                    "code": {"type": "string", "description": "Python code to analyze"}
                },
                "required": ["code"]
            }
        }
    ]

@server.call_tool()
async def handle_call_tool(name: str, arguments: dict):
    if name == "analyze_code":
        code = arguments.get("code")
        # Perform analysis
        results = analyze_python_code(code)
        return {"type": "text", "text": json.dumps(results)}

async def main():
    async with stdio_server() as (read_stream, write_stream):
        await server.run(
            read_stream,
            write_stream,
            InitializationOptions(
                server_name="custom-python-server",
                server_version="1.0.0"
            )
        )

if __name__ == "__main__":
    asyncio.run(main())
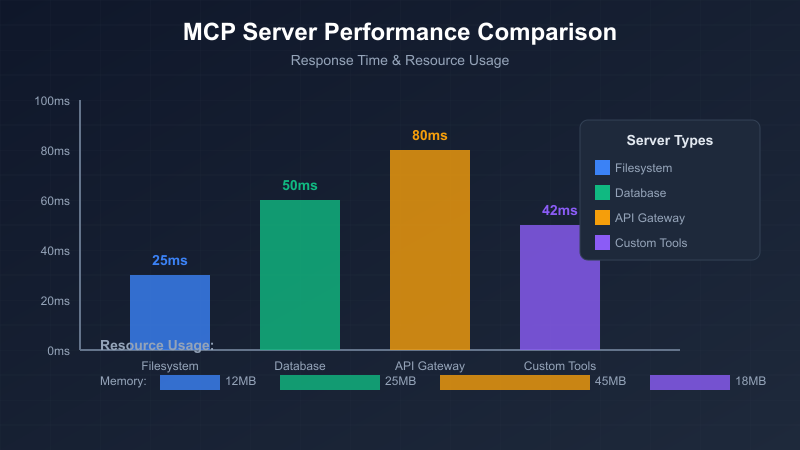
Performance Optimization and Best Practices
1. Resource Management
javascript// Implement caching for frequently accessed data
const cache = new Map();
const CACHE_TTL = 5 * 60 * 1000; // 5 minutes

server.setRequestHandler('resources/read', async (request) => {
  const uri = request.params.uri;
  const cached = cache.get(uri);

  if (cached && Date.now() - cached.timestamp < CACHE_TTL) {
    return cached.data;
  }

  const data = await fetchResource(uri);
  cache.set(uri, { data, timestamp: Date.now() });
  return data;
});
2. Error Handling
javascriptserver.setRequestHandler('tools/call', async (request) => {
  try {
    const result = await processToolCall(request);
    return { content: [{ type: 'text', text: result }] };
  } catch (error) {
    return {
      content: [{
        type: 'text',
        text: `Error: ${error.message}\n\nPlease check your input and try again.`
      }],
      isError: true
    };
  }
});
3. Security Considerations
- Input Validation: Always validate and sanitize user inputs
- Rate Limiting: Implement request throttling for resource-intensive operations
- Authentication: Use secure token management for API access
- Sandboxing: Run untrusted code in isolated environments
Production Deployment Strategies
Team Environment Setup
- Centralized Configuration Management
bash# Store shared configs in Git
git add .claude/mcp-configs/
git commit -m "Add team MCP server configurations"
- Environment-Specific Settings
json{
  "mcpServers": {
    "api-gateway": {
      "command": "node",
      "args": ["./servers/api-gateway.js"],
      "env": {
        "API_ENDPOINT": "${API_ENDPOINT:-https://api.dev.company.com}",
        "API_KEY": "${API_KEY}"
      }
    }
  }
}
- Automated Deployment
yaml# .github/workflows/deploy-mcp-servers.yml
name: Deploy MCP Servers
on:
  push:
    branches: [main]
    paths:
      - 'mcp-servers/**'

jobs:
  deploy:
    runs-on: ubuntu-latest
    steps:
      - uses: actions/checkout@v3
      - name: Deploy to production
        run: |
          npm run build:mcp-servers
          npm run deploy:mcp-servers
Monitoring and Debugging
Enable debug logging for troubleshooting:
json{
  "mcpServers": {
    "debug-server": {
      "command": "node",
      "args": ["--inspect", "./server.js"],
      "env": {
        "DEBUG": "mcp:*",
        "LOG_LEVEL": "verbose"
      }
    }
  }
}
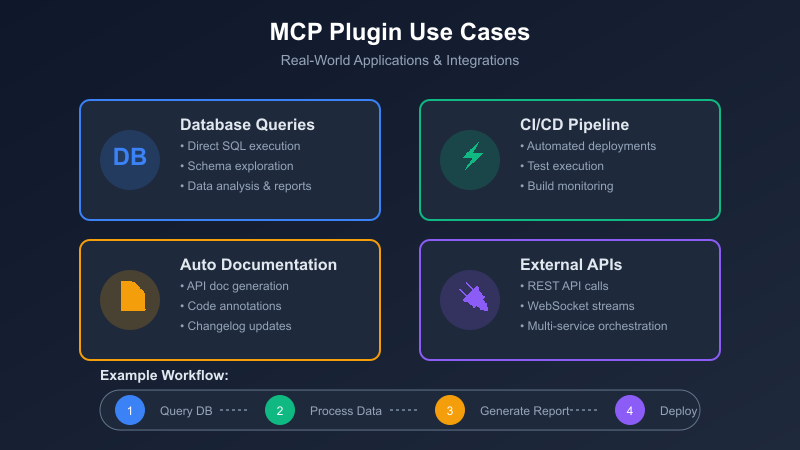
Real-World Use Cases and Examples
1. Database Integration
Connect Claude Code directly to your PostgreSQL database:
javascriptconst pgServer = new MCPServer({
  name: 'postgres-mcp',
  tools: [{
    name: 'query_customers',
    execute: async ({ filter }) => {
      const query = `SELECT * FROM customers WHERE status = \$1`;
      const results = await db.query(query, [filter.status]);
      return formatResults(results);
    }
  }]
});
2. CI/CD Integration
Automate deployment workflows:
javascriptserver.addTool('deploy_to_staging', {
  description: 'Deploy current branch to staging environment',
  execute: async ({ branch }) => {
    const deployment = await githubActions.createDeployment({
      ref: branch,
      environment: 'staging',
      auto_merge: false
    });
    return `Deployment ${deployment.id} initiated`;
  }
});
3. Documentation Generation
Auto-generate API documentation:
javascriptserver.addTool('generate_api_docs', {
  description: 'Generate OpenAPI documentation from code',
  execute: async ({ sourcePath }) => {
    const docs = await generateOpenAPISpec(sourcePath);
    await fs.writeFile('./docs/api.json', JSON.stringify(docs));
    return 'API documentation generated successfully';
  }
});

Troubleshooting Common Issues
Server Not Appearing in Claude
- Check Configuration Path: Ensure the config file is in the correct location
- Validate JSON: Use a JSON validator to check for syntax errors
- Verify Permissions: Ensure Claude has read access to the config file
- Check Logs: Look for error messages in Claude's debug console
Connection Timeouts
json{
  "mcpServers": {
    "slow-server": {
      "command": "node",
      "args": ["./server.js"],
      "timeout": 30000,  // Increase timeout to 30 seconds
      "retry": {
        "attempts": 3,
        "delay": 1000
      }
    }
  }
}
Version Mismatches
Ensure compatibility between:
- Node.js/Python runtime versions
- MCP SDK versions
- Claude Desktop version
- Server implementation
“💡 Cost Optimization Tip: If you're building complex MCP integrations that require multiple API calls, consider using LaoZhang-AI API gateway service. It provides unified access to Claude, ChatGPT, and other models at lower costs, perfect for MCP servers that need AI capabilities with free trial for new users.
Advanced MCP Patterns
1. Chained Operations
javascriptserver.addTool('full_deployment_pipeline', {
  description: 'Run complete deployment pipeline',
  execute: async ({ environment }) => {
    const steps = [
      () => runTests(),
      () => buildApplication(),
      () => deployToEnvironment(environment),
      () => runHealthChecks(),
      () => notifyTeam()
    ];

    for (const step of steps) {
      const result = await step();
      if (!result.success) {
        return `Pipeline failed at: ${result.step}`;
      }
    }

    return 'Deployment completed successfully';
  }
});
2. Streaming Responses
javascriptserver.setRequestHandler('tools/call', async function* (request) {
  if (request.params.name === 'stream_logs') {
    const logStream = createLogStream(request.params.arguments.service);

    for await (const line of logStream) {
      yield {
        content: [{ type: 'text', text: line }],
        isPartial: true
      };
    }
  }
});
3. Multi-Model Integration
javascriptconst multiModelServer = new MCPServer({
  name: 'multi-model-mcp',
  tools: [{
    name: 'analyze_with_best_model',
    execute: async ({ task, data }) => {
      const modelSelector = new ModelSelector();
      const bestModel = modelSelector.selectForTask(task);

      // Route to appropriate model via API
      const result = await callModel(bestModel, data);
      return result;
    }
  }]
});
Future-Proofing Your MCP Implementation
Upcoming Features
- WebSocket Support: Real-time bidirectional communication
- Enhanced Security: OAuth2 integration and fine-grained permissions
- Cloud MCP Servers: Hosted MCP services for team collaboration
- Visual Configuration: GUI-based server setup and management
Best Practices for Longevity
- Version Your Servers: Use semantic versioning for your MCP implementations
- Document Everything: Maintain comprehensive documentation for custom servers
- Test Thoroughly: Implement automated testing for MCP servers
- Monitor Performance: Track usage metrics and optimize accordingly
Conclusion
The Model Context Protocol transforms Claude Code from a powerful AI assistant into an integrated development environment powerhouse. By following this guide, you've learned how to set up, configure, and optimize MCP plugins for your specific needs.
Start with the basic filesystem and GitHub integrations, then gradually build custom servers tailored to your workflow. Remember to leverage the community resources and keep your implementations secure and performant.
The future of AI-assisted development lies in seamless integration between AI models and your existing tools - MCP makes this future a reality today.
Next Steps
- Install Claude Desktop and configure your first MCP server
- Explore the official MCP server repository for pre-built integrations
- Join the Claude MCP Community for support and updates
- Build a custom server for your most common development tasks
- Share your MCP configurations with your team
Happy coding with Claude Code MCP!